Version control, metadata search, and navigation
This tutorial will walk you through configuring Microsoft Azure DevOps to enable source control on your models. It will also help you learn about other productivity features in the development tools, including the ability to create and organize TODO task, search metadata and source code, navigate between related model elements, and create a project from a model.
Configure your Azure DevOps organization and project
In this section, you'll create a new project in Azure DevOps. This project will host the source code of your model. You'll use the Fleet Management model as an example. If you don't have an Azure DevOps organization, you'll create one.
Sign up to Azure DevOps, create an account, and create a new project
Go to https://www.visualstudio.com/ to sign up for Azure DevOps. Click Sign up. If you already have an account in Azure DevOps, go to the Create an Azure DevOps team project section later in this article.
Sign in with your Microsoft account.
Note
You can also use an organizational account (Microsoft 365 domain).
Create an Azure DevOps organization, and select a URL for your account. You'll use this URL to connect from your development computer when you configure source control in Visual Studio. The following image shows an example of the account URL.

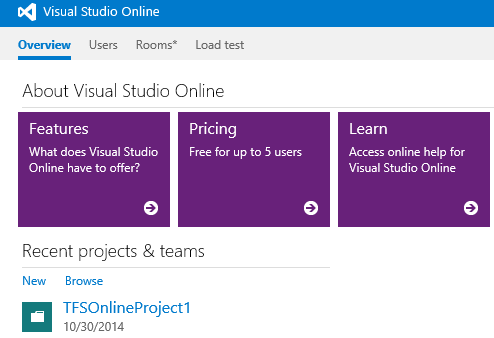
When the account is created, you're directed to your account main page where you're prompted to create your first project.
Create a demo Fleet Management project.
Note
This tutorial assumes that you're using Team Foundation Version Control (TFVC), which is the default option for finance and operations apps. For information about how to use Git for X++ development, see X++ in Git.

Create an Azure DevOps team project
If you already have an Azure DevOps organization, go to your account in Microsoft Edge. This article uses .visualstudio.com as the example URL for illustration purposes.
Under Recent projects & teams, click New to create a new project.
In the Project name field, enter Fleet Management, enter a Description, and then click Create project.
Create the recommended folder structure in your team project
If you've migrated your code from a previous version by using the automated code upgrade tool in Microsoft Dynamics Lifecycle Services, the following folder structure is automatically created in your Azure DevOps team project.
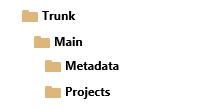
The Metadata folder contains your source XML files organized by packages and models, and the Projects folder contains Visual Studio projects. If you aren't migrating code and are starting from scratch, create a similar folder structure on the server in your team project before you start development.
Configure Visual Studio to connect to your team project
Open Visual Studio. If you're signed in to the machine as an administrator, you must open Visual Studio as an administrator.
Click Tools > Options > Source Control > Plug-in Selection.
In the Current source control plug-in field, select Visual Studio Team Foundation Server.
Select Team > Connect to Team Foundation Server.
In Team Explorer, click Select Team Projects.
In the Select a Team Foundation Server drop-down list, select the Azure DevOps organization that hosts the Fleet Management project, or click Servers if it isn't in the menu.
- When the Add/Remove Team Foundation Server dialog opens, click Add.
- Enter the URL of your Azure DevOps organization.
- Click OK.
- If prompted, enter your Microsoft Account username and password.
Select the Fleet Management check box under Team projects, and then click Connect.

Map your Azure DevOps project to your local model store and projects folder
Your model store root folder contains source files of all packages and models that are part of your application. During deployment, you'll probably use source files from more than one model across more than one package. We recommend that you map your model store root folder to the Azure DevOps team project metadata folder.
In Visual studio Team Explorer, connect to the team project as described earlier in this document.
Open Source Control Explorer from Team Explorer.
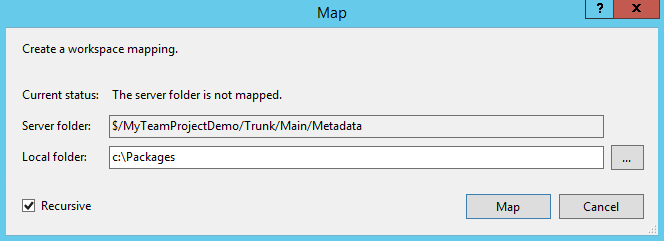
Map the Metadata folder of your team project to the root folder of the model store on your local drive (Typically K:\AOSService\PackagesLocalDirectory), an example is shown in the image below.
Note
Your model store may be located under I:\AosService\PackagesLocalDirectory or another drive, depending on your machine configuration.
Click Map, and on the next dialog, click No.
Similarly, map the /Trunk/Main/Projects server folder to the local projects folder that will hold your Visual Studio solution and project files.
Scenario 1: Open the fleet management solution and add it to Azure DevOps source control
This section describes the steps needed to add a solution to Azure DevOps source control. This scenario is relevant when you've started development on a new model and you're adding it to source control for the first time. For code migration scenarios, or when you're synchronizing new models that have been created by another developer, see scenario 2.
Open the FleetManagement solution
Note
This project is only an example. You can open any project/solution to learn about the process of adding a solution to source control.
- On the File menu, point to Open, and then click Project/Solution.
- Browse to the desktop and open the FleetManagement folder.
- Select the solution file named FleetManagement. The file type is listed as Microsoft Visual Studio Solution. If the solution file isn't on your computer, create it by following the steps in End-to-end scenario for the Fleet Management sample application.
- Click Open. Loading the solution may take some time.
Add the FleetManagement solution to source control
In Solution Explorer, right-click the Fleet Management solution, and select Add Solution to Source Control.
On the next dialog, select Team Foundation Version Control, and then click Next.
In the Team Project Location, select Projects, as shown in this image.
Note
If you've already mapped the server Projects folder to a local folder that contains the FleetManagement solution, skip steps 2 and 3.
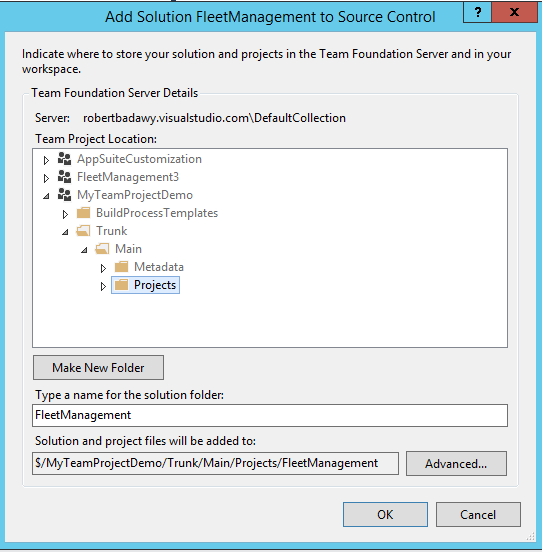
Click OK.
Go to Team Explorer > Pending changes, and then click Check-in to check-in your solution and its model element to the Azure DevOps source control.
Add the model descriptor file to source control
All Visual Studio projects belong to models. Models are source code distribution and deployment units that are typically larger in scope than a Visual Studio project. In the previous section, you added element files of the fleet management solution to source control. Because this was the first time that you added elements of the Fleet Management models to source control, you'll also need to check-in the model descriptor file.
In Visual Studio, in Team Explorer, open Source Control Explorer.
Right-click the metadata folder (for example, \Trunk\Main\Metadata) and click Add Items to Folder....
Select your model descriptor file. The model descriptor file is the XML file manifest of your model. It's located in the Descriptor folder of the package that the model belongs to. The following image shows an example of where the model descriptor file of the Fleet Management model exists (c:\packages\FleetManagement\Descriptor\FleetManagement.xml).
Note
Your model store may be located under K:\AosService\PackagesLocalDirectory or c:\AosService\PackagesLocalDirectory or another drive, depending on your machine configuration.

Click Finish.
Note
Because your solution contained elements from two models, you'll need to add an additional model descriptor file to source control: K:\AOSService\PackagesLocalDirectory\FleetManagementExtension\Descriptor\FleetManagementExtension.xml
Check-in your pending items. Your item is now ready for development of the fleet management application using a state-of-the-art, cloud-based source control system, and many other application lifecycle features of Azure DevOps.
Experiment with source control
In this section, you'll make minor changes to the FMRental table and compare your changes with the latest version in your source code repository.
In Solution Explorer, select Fleet Management Migrated > Data model > Tables > FMRental.
Double-click FMRental to open the designer.
Right-click the Fields node, and then click New > Integer.

Right-click Methods, and add a new method.
In the X++ code editor, enter a comment in the new method.
Enter a comment in any existing method.
Save the FMRental.
In Team Explorer, right-click FMRental.xml, and select Compare with Latest Version.

Browse through the differences in the comparison (Diff) window.
In Solution Explorer, right-click on the FMRental table, and select Source control > Undo > Pending Changes to revert your changes.

Confirm the undo on the next dialog and close the diff window.
Scenario 2: Synchronize models from source control
In this section, you'll synchronize existing models and model elements from your Azure DevOps project. Synchronization is relevant in the following cases: 1) You've migrated your code from a previous version via Lifecycle Services, or 2) another developer has checked in a new model or new model elements, and you want to synchronize them to your development environment.
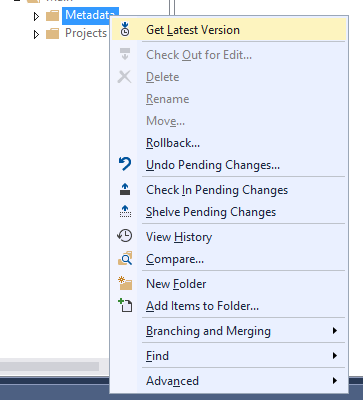
In Source Control Explorer, right-click on Metadata and select Get Latest Version. Getting the latest version will synchronize your local packages folder with the latest code.
Alternatively, you can use the Advanced menu to synchronize specific build version or change sets.
Once synchronization is complete, and if the synchronization leads to synchronizing new models to your environment, you need to refresh your metadata from Visual Studio.
Go to Dynamics 365 > Model Management > Refresh models.
Organize TODO tasks in a project
This section describes how you can create a Visual Studio project out of tasks (TODO comments) embedded in your X++ code.
In Solution Explorer, select Fleet Management Migrated > Code > Classes > FMDataHelper, and then double-click FMDataHelper. The X++ code editor opens.
Enter a TODO comment (//TODO: my comment) inside any method.

Open other Fleet Management classes or tables and add more TODO comments.
Rebuild the FleetManagement Migrated project.
Select View > Task List, to open the Visual Studio Task List window.

Select Comments from the drop-down list.

Select all TODO items, right-click, and select Add to new project.

Adding the items will open the New project dialog and enable you to create a new project that contains all of your TODOs.
You can save this project as a working project to manage your TODO list.
When you're finished, undo all of your pending changes in Team Explorer.

Click File > Close Solution, to close the FleetManagement solution.
Use metadata search and navigation tools to find elements and create projects
This section demonstrates how you can perform metadata-based searches throughout your application.
Use the Metadata search window
Click Dynamics 365 > Metadata search.
In the Metadata search window, in the Search field, enter the following text to find all of the table insert methods in the Application Suite model that contain a cross-company query.
type:table,method name:insert code:"crosscompany" model:"Application Suite".Wait for the search to complete. It may take a while.
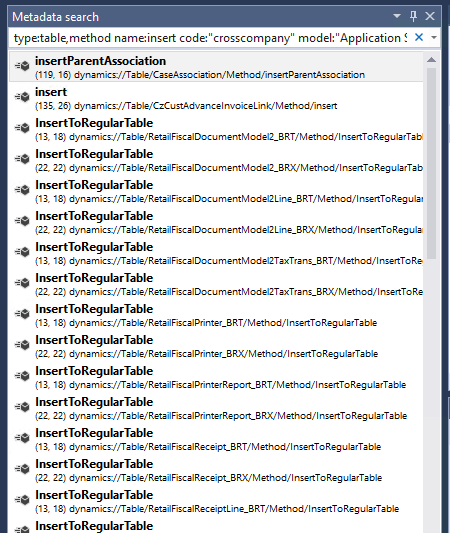
Double-click a result in the list. The code editor will open and place the cursor at the line that matches your search criteria.
Select several elements in the results list by holding down the Ctrl key for multiple selections, right-click, and then select Add to new project. Adding the elements will let you create a new solution and project containing the selected elements.
Try other search examples
You don't need to wait for the search to complete before you interact with search results. You can double-click results at any time to view the metadata or source code that matches your search criteria. The following are some suggested search examples:
Find vertical tab controls defined in view mode and autowidth mode in the model Application Suite.
type:form,formtabcontrol property:arrangeMethod=Vertical,ViewEditMode=view,WidthMode=Auto model:"Application Suite"Find all grid controls in forms that aren't editable and with the property heightmode = column.
type:form,formgridcontrol:allowedit=no,heightmode=columnFind all SimpleListDetail forms in the Application Suite model.
type:formdesign property:style=simplelistdetail model:"Application Suite"Find all tables that have an index field name that contains the keyword xpNum.
type:table,tableindexfield anem: xpNum*Use the search bar drop-down menu to access previous searches.

Navigate to related elements
This section highlights a feature that enables you to move from one element to a related element without having to find the related elements in Application Explorer or Solution Explorer.
Open Application Explorer, and switch the view to Model View.

Under the Fleet Management model, click User Interface > Menu items > Display Menu Items > FMCustomer.

Right-click FMCustomer, and then select Open designer.
In the FMCustomer menu item designer, right-click the root node, and then select Go to Form FMCustomer.

The FMCustomer form designer will open.
In the designer of the FMCustomer form, expand Data sources, right-click FMCustomer, and then select Go to Table FMCustomer

The FMCustomer table designer will open.
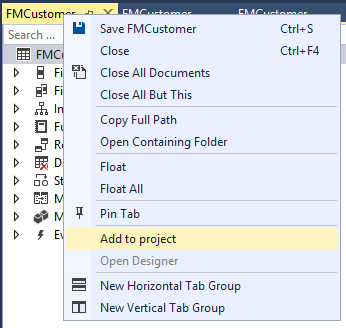
Using the same methodology, you can navigate to the EDT element that a table field references. Tip: Press F9 instead of opening the context menu. F9 will open the designer of the referenced element. Tip: You can add an element to the current project by right-clicking on the document tab and selecting Add to project.
Use Application Explorer to create a project from a model
You can use Application Explorer to search for all or some elements of a model and create a project out of the search results.
Make sure the option to organize a project by element type is on. Go to Dynamics 365 > Options > Projects.
Go to Application Explorer and search for elements in the desired model. For example, enter model:"fleet management" and click Enter.

When the search is complete, right-click the AOT root node and select Add search results to new project.

Specify your project properties in the new project dialog and click OK to create the project.
Tip
To create a project from search results, you can add any type, name, or other filters to your search as long as all results are in the same model. For example: model:"Fleet Management" type:Table name:^FM will return all tables in the Fleet Management model with a name starting with the letters FM.
Commenti e suggerimenti
Presto disponibile: nel corso del 2024 verranno dismessi i problemi di GitHub come meccanismo di feedback per il contenuto e verranno sostituiti con un nuovo sistema di feedback. Per altre informazioni, vedere: https://aka.ms/ContentUserFeedback.
Invia e visualizza il feedback per