Azure Active Directory B2C 内のユーザー インターフェイスをカスタマイズする
"開始する前に"、[ポリシーの種類の選択] セレクターを使用して、設定するポリシーの種類を選択します。 Azure Active Directory B2C には、ユーザーがアプリケーションを操作する方法を定義する 2 つの方法 (定義済みのユーザー フローを使用する、または完全に構成可能なカスタム ポリシーを使用する) があります。 この記事で必要な手順は、方法ごとに異なります。
Azure Active Directory B2C (Azure AD B2C) に表示されるユーザー インターフェイスを顧客に合わせてブランド化したりカスタマイズすることは、アプリケーション内でシームレスなユーザー エクスペリエンスを提供するのに役立ちます。 そのような操作性には、サインアップ、サインイン、プロファイル編集、パスワード リセットが含まれます。 この記事では、ページ テンプレートを使用した Azure AD B2C ページと、会社のブランドをカスタマイズします。
ヒント
ページ テンプレート、バナー ロゴ、背景画像、背景色以外のユーザー フロー ページのその他の側面をカスタマイズするには、「HTML テンプレートを使用して UI をカスタマイズする」方法をご覧ください。
前提条件
- ユーザー フローを作成して、ユーザーがアプリケーションにサインアップおよびサインインできるようにします。
- Web アプリケーションを登録します。
- 「Active Directory B2C でのカスタム ポリシーの概要」にある手順を完了します。
- Web アプリケーションを登録します。
概要
Azure AD B2C にはいくつかの組み込みテンプレートが用意されています。これらを使用すると、ユーザー エクスペリエンスのページにプロフェッショナルな外観を提供できます。 これらのページ テンプレートは、会社のブランド機能を使用して、独自のカスタマイズの開始点としても使用できます。
注意
クラシック テンプレートでサポートされているブラウザーには、Internet Explorer、Microsoft Edge、Google Chrome、Mozilla Firefox、Safari の現在および以前のバージョンが含まれます。 Ocean Blue テンプレートと Slate Gray テンプレートでは、Internet Explorer 11 や 10 などの古いブラウザー バージョンのサポートが制限される場合があります。サポートするブラウザーでアプリケーションをテストすることをお勧めします。
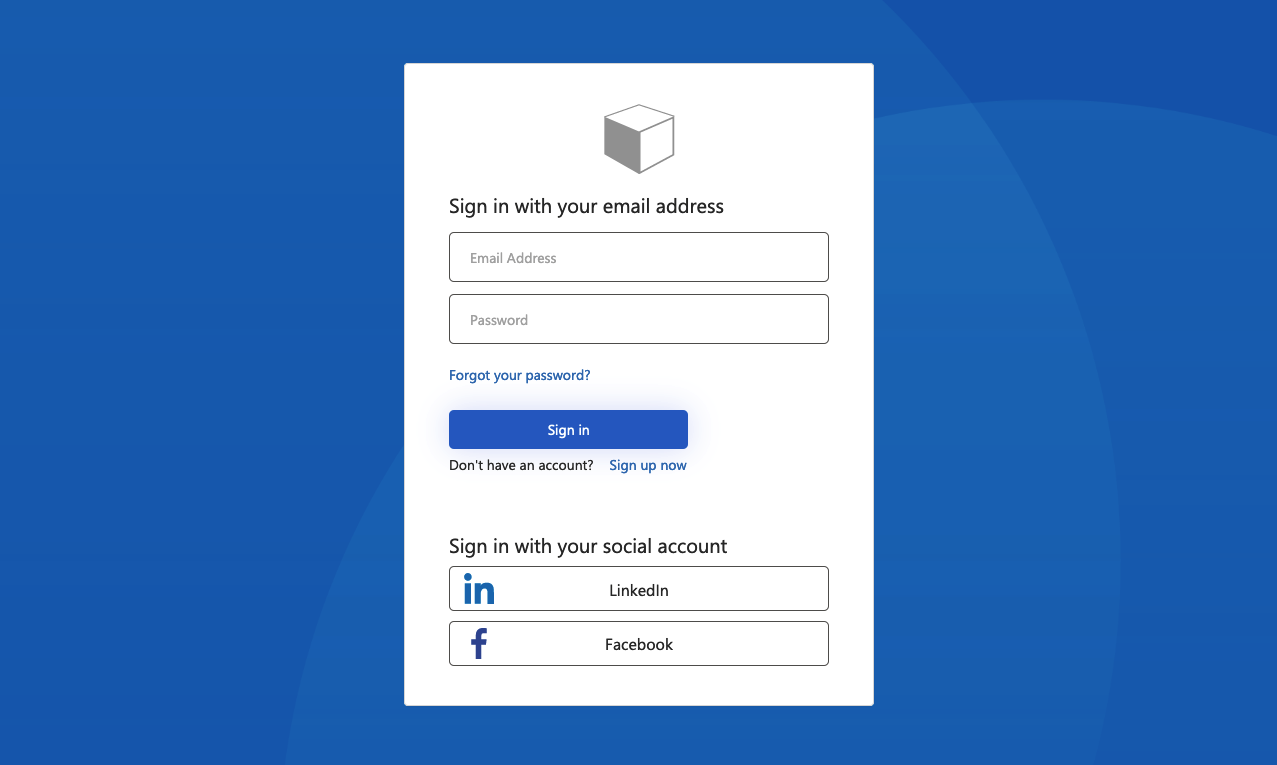
オーシャン ブルー
サインアップとサインインのページに表示される、オーシャン ブルー テンプレートの例:
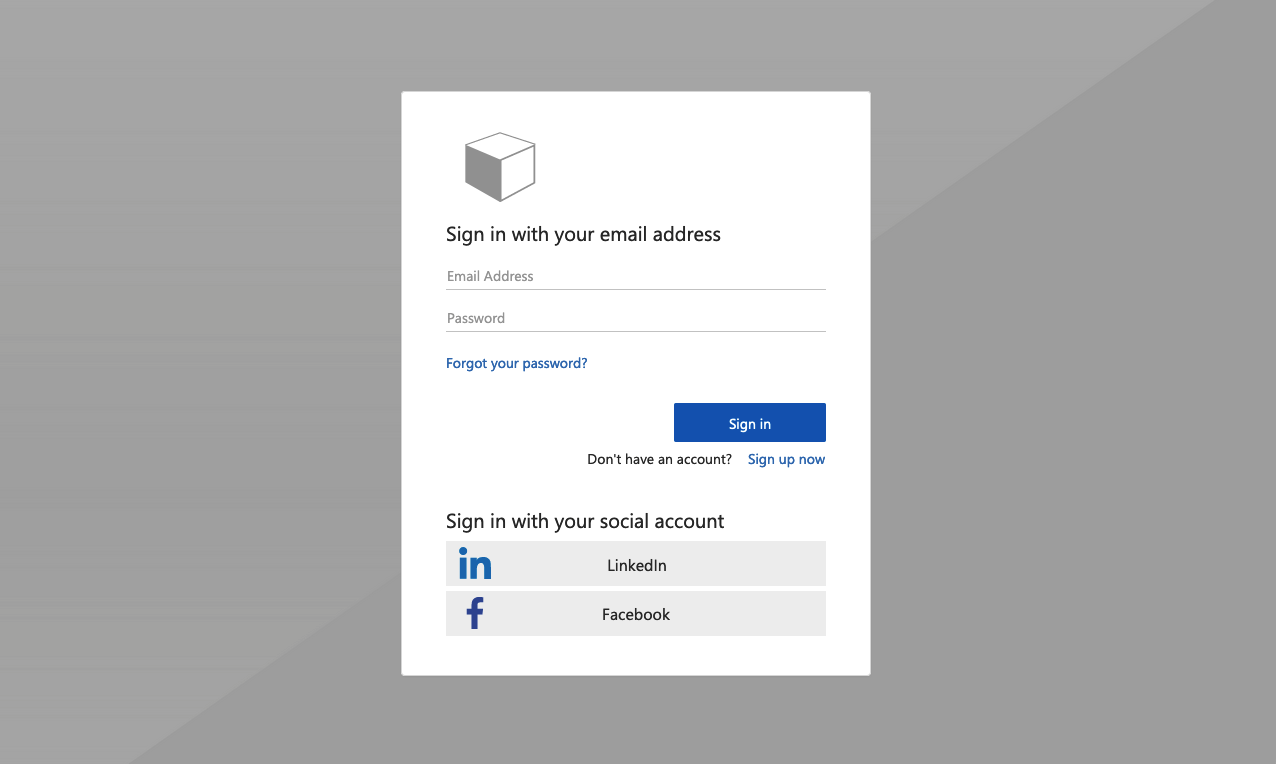
スレート グレー
サインアップ サインイン ページ上に表示される、スレート グレー テンプレートの例:
クラシック
サインアップ サインイン ページ上に表示される、クラシック テンプレートの例:
会社のブランド
Microsoft Entra ID の [会社のブランド] を使用して、バナー ロゴ、背景画像、背景色で Azure AD B2C ページをカスタマイズできます。 会社のブランドには、サインアップ、サインイン、プロファイル編集、パスワード リセットが含まれます。
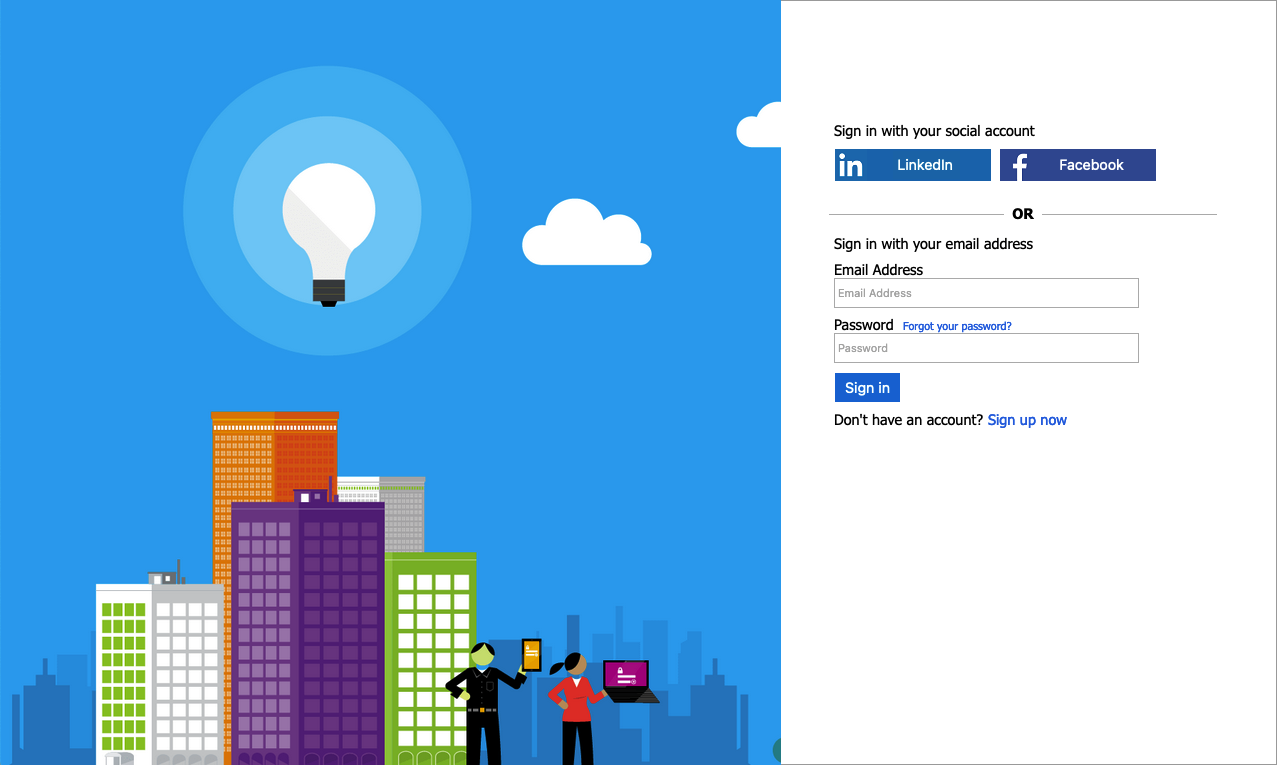
次の例に、オーシャン ブルー テンプレートを使用し、カスタム ロゴと背景画像を備えたサインアップとサインインのページを示します。
ページ テンプレートを選択する
- Azure portal にサインインします。
- 複数のテナントにアクセスできる場合、上部のメニューの [設定] アイコンを選択し、[ディレクトリとサブスクリプション] メニューからお使いの Azure AD B2C テナントに切り替えます。
- Azure portal で、 [Azure AD B2C] を検索して選択します。
- [ユーザー フロー] を選択します。
- カスタマイズするユーザー フローを選択します。
- 左側のメニューの [カスタマイズ] で、 [ページ レイアウト] を選択し、 [テンプレート] を選択します。
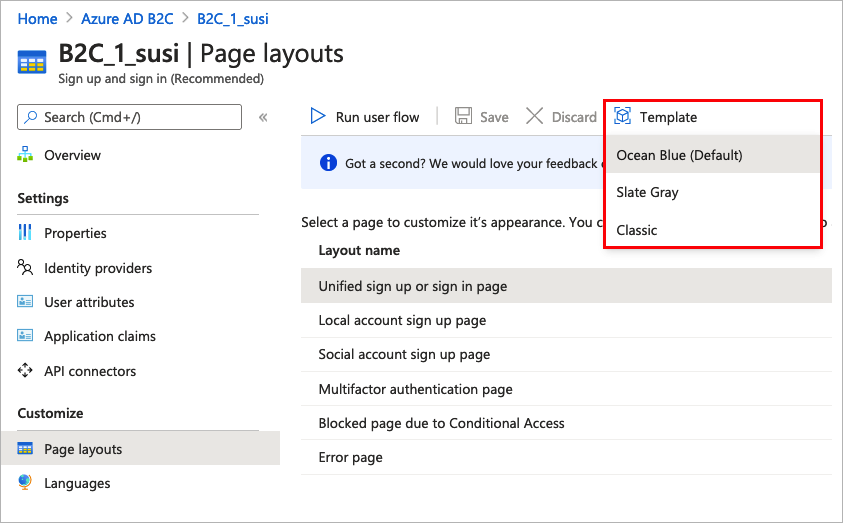
テンプレートを選択すると、選択したテンプレートがユーザー フロー内のすべてのページに適用されます。 各ページの URI は、 [カスタム ページ URI] フィールドに表示されます。
ページ テンプレートを選択するには、コンテンツ定義の LoadUri 要素を設定します。 次の例は、コンテンツ定義識別子と、対応する LoadUri を示しています。
オーシャン ブルー:
<ContentDefinitions>
  <ContentDefinition Id="api.error">
    <LoadUri>~/tenant/templates/AzureBlue/exception.cshtml</LoadUri>
  </ContentDefinition>
  <ContentDefinition Id="api.idpselections">
    <LoadUri>~/tenant/templates/AzureBlue/idpSelector.cshtml</LoadUri>
  </ContentDefinition>
  <ContentDefinition Id="api.idpselections.signup">
    <LoadUri>~/tenant/templates/AzureBlue/idpSelector.cshtml</LoadUri>
  </ContentDefinition>
  <ContentDefinition Id="api.signuporsignin">
    <LoadUri>~/tenant/templates/AzureBlue/unified.cshtml</LoadUri>
  </ContentDefinition>
  <ContentDefinition Id="api.selfasserted">
    <LoadUri>~/tenant/templates/AzureBlue/selfAsserted.cshtml</LoadUri>
  </ContentDefinition>
  <ContentDefinition Id="api.selfasserted.profileupdate">
    <LoadUri>~/tenant/templates/AzureBlue/selfAsserted.cshtml</LoadUri>
  </ContentDefinition>
  <ContentDefinition Id="api.localaccountsignup">
    <LoadUri>~/tenant/templates/AzureBlue/selfAsserted.cshtml</LoadUri>
  </ContentDefinition>
  <ContentDefinition Id="api.localaccountpasswordreset">
    <LoadUri>~/tenant/templates/AzureBlue/selfAsserted.cshtml</LoadUri>
  </ContentDefinition>
  <ContentDefinition Id="api.phonefactor">
    <LoadUri>~/tenant/templates/AzureBlue/multifactor-1.0.0.cshtml</LoadUri>
  </ContentDefinition>
</ContentDefinitions>
スレート グレー:
<ContentDefinitions>
  <ContentDefinition Id="api.error">
    <LoadUri>~/tenant/templates/MSA/exception.cshtml</LoadUri>
  </ContentDefinition>
  <ContentDefinition Id="api.idpselections">
    <LoadUri>~/tenant/templates/MSA/idpSelector.cshtml</LoadUri>
  </ContentDefinition>
  <ContentDefinition Id="api.idpselections.signup">
    <LoadUri>~/tenant/templates/MSA/idpSelector.cshtml</LoadUri>
  </ContentDefinition>
  <ContentDefinition Id="api.signuporsignin">
    <LoadUri>~/tenant/templates/MSA/unified.cshtml</LoadUri>
  </ContentDefinition>
  <ContentDefinition Id="api.selfasserted">
    <LoadUri>~/tenant/templates/MSA/selfAsserted.cshtml</LoadUri>
  </ContentDefinition>
  <ContentDefinition Id="api.selfasserted.profileupdate">
    <LoadUri>~/tenant/templates/MSA/selfAsserted.cshtml</LoadUri>
  </ContentDefinition>
  <ContentDefinition Id="api.localaccountsignup">
    <LoadUri>~/tenant/templates/MSA/selfAsserted.cshtml</LoadUri>
  </ContentDefinition>
  <ContentDefinition Id="api.localaccountpasswordreset">
    <LoadUri>~/tenant/templates/MSA/selfAsserted.cshtml</LoadUri>
  </ContentDefinition>
  <ContentDefinition Id="api.phonefactor">
    <LoadUri>~/tenant/templates/MSA/multifactor-1.0.0.cshtml</LoadUri>
  </ContentDefinition>
</ContentDefinitions>
クラシック:
<ContentDefinitions>
  <ContentDefinition Id="api.error">
    <LoadUri>~/tenant/default/exception.cshtml</LoadUri>
  </ContentDefinition>
  <ContentDefinition Id="api.idpselections">
    <LoadUri>~/tenant/default/idpSelector.cshtml</LoadUri>
  </ContentDefinition>
  <ContentDefinition Id="api.idpselections.signup">
    <LoadUri>~/tenant/default/idpSelector.cshtml</LoadUri>
  </ContentDefinition>
  <ContentDefinition Id="api.signuporsignin">
    <LoadUri>~/tenant/default/unified.cshtml</LoadUri>
  </ContentDefinition>
  <ContentDefinition Id="api.selfasserted">
    <LoadUri>~/tenant/default/selfAsserted.cshtml</LoadUri>
  </ContentDefinition>
  <ContentDefinition Id="api.selfasserted.profileupdate">
    <LoadUri>~/tenant/default/selfAsserted.cshtml</LoadUri>
  </ContentDefinition>
  <ContentDefinition Id="api.localaccountsignup">
    <LoadUri>~/tenant/default/selfAsserted.cshtml</LoadUri>
  </ContentDefinition>
  <ContentDefinition Id="api.localaccountpasswordreset">
    <LoadUri>~/tenant/default/selfAsserted.cshtml</LoadUri>
  </ContentDefinition>
  <ContentDefinition Id="api.phonefactor">
    <LoadUri>~/tenant/default/multifactor-1.0.0.cshtml</LoadUri>
  </ContentDefinition>
</ContentDefinitions>
会社のブランドの構成
ユーザー フロー ページをカスタマイズするには、まず Microsoft Entra ID で会社のブランドを構成し、次に Azure AD B2C のユーザー フローでこれを有効にします。
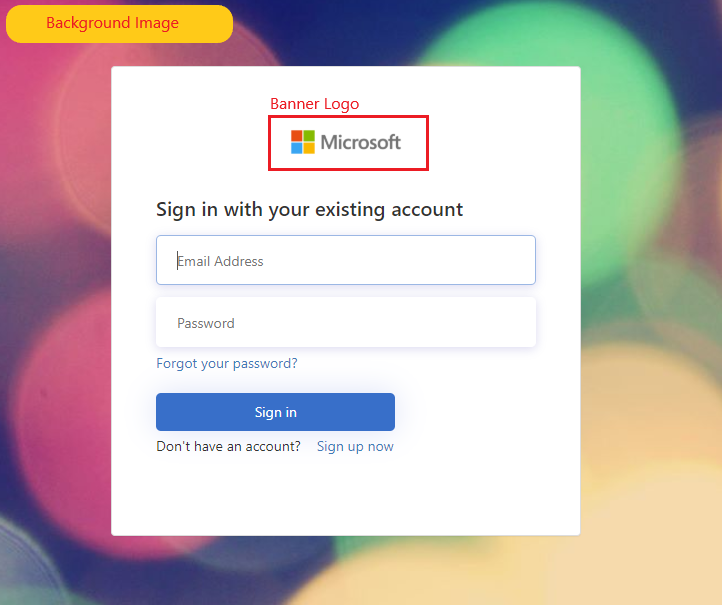
まず、 [会社のブランド] でバナー ロゴ、背景画像、および背景色を設定します。
- Azure portal にサインインします。
- 複数のテナントにアクセスできる場合、上部のメニューの [設定] アイコンを選択し、[ディレクトリとサブスクリプション] メニューからお使いの Azure AD B2C テナントに切り替えます。
- Azure portal で、 [Azure AD B2C] を検索して選択します。
- [管理] から [会社のブランド] を選択します。
- 「組織の Microsoft Entra のサインイン ページにブランドを追加する」の手順に従います。
Azure AD B2C で会社のブランドを構成する際は、次の点に注意してください。
- 現在、Azure AD B2C の会社のブランドは、背景画像、バナー ロゴ、背景色のカスタマイズに制限されています。 [詳細設定] などの会社のブランド ペイン内にあるその他のプロパティはサポートされていません。
- ユーザー フロー ページでは、背景画像が読み込まれる前に背景色が表示されます。 よりスムーズな読み込みエクスペリエンスのため、背景画像の色とほぼ同じ背景色を選択することをお勧めします。
- バナー ロゴは、ユーザーがサインアップ ユーザー フローを開始するときに、ユーザーに送信された確認メールに表示されます。
ユーザー フロー ページでの会社のブランド化の有効化
会社のブランドを構成したら、それをユーザー フローで有効にします。
- Azure portal の左側のメニューで、 [Azure AD B2C] を選択します。
- [ポリシー] で [ユーザー フロー (ポリシー)] を選択します。
- 会社のブランド化を有効にするユーザー フローを選択します。 会社のブランド化は、標準の "サインイン" および標準の "プロファイル編集" ユーザー フローの種類ではサポートされていません。
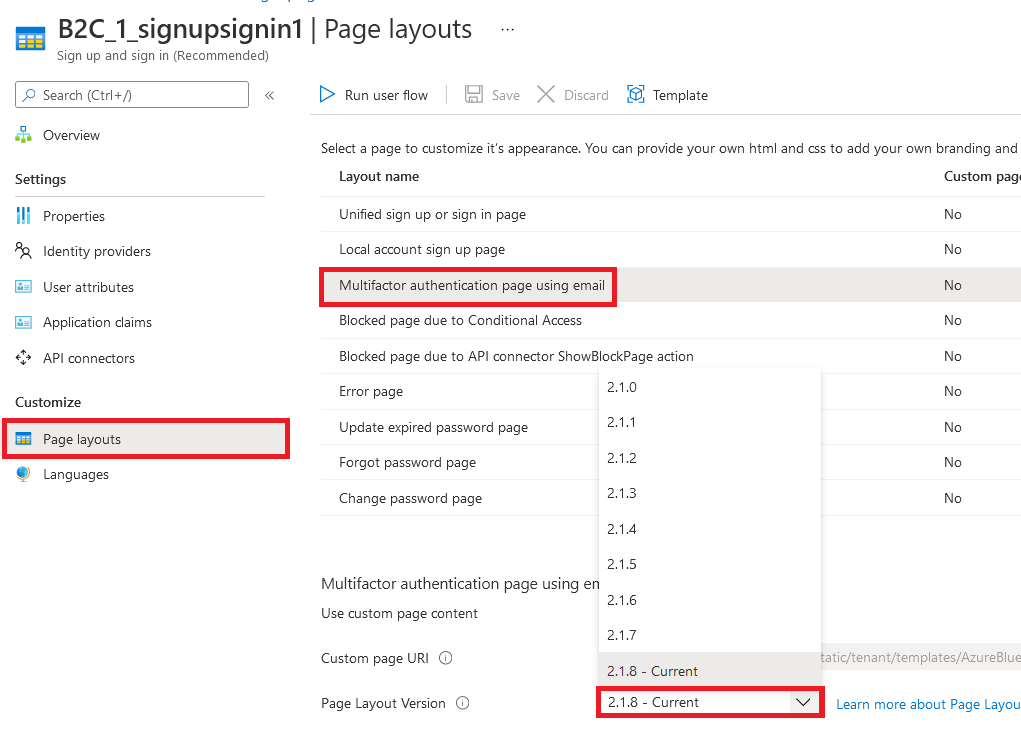
- [カスタマイズ] で、 [ページ レイアウト] を選択して、ブランド化するページを選択します。 たとえば、 [統合されたサインアップまたはサインイン ページ] を選択します。
- [ページ レイアウト バージョン (プレビュー)] では、バージョン 1.2.0 以上を選択します。
- [保存] を選択します。
ユーザー フローのすべてのページをブランド化する場合は、ユーザー フローのページ レイアウトごとにページ レイアウト バージョンを設定します。
カスタム ポリシー ページで会社のブランド化を有効にする
会社のブランドを構成したら、それをカスタム ポリシーで有効にします。 カスタム ポリシーのコンテンツ定義の "すべて" に対して、ページ contract バージョンを使用してページ レイアウト バージョンを構成します。 値の形式には、次のように contract という語が含まれている必要があります: urn:com:microsoft:aad:b2c:elements:contract:page-name:version。 古い DataUri 値を使用するカスタム ポリシーでページ レイアウトを指定するには、次の操作を行います。 詳細については、ページ バージョンでページ レイアウトに移行する方法について説明します。
次の例は、コンテンツ定義と、それに対応するページ コントラクト、およびオーシャン ブルー ページ テンプレートを示しています。
<ContentDefinitions>
  <ContentDefinition Id="api.error">
    <LoadUri>~/tenant/templates/AzureBlue/exception.cshtml</LoadUri>
    <DataUri>urn:com:microsoft:aad:b2c:elements:contract:globalexception:1.2.0</DataUri>
  </ContentDefinition>
  <ContentDefinition Id="api.idpselections">
    <LoadUri>~/tenant/templates/AzureBlue/idpSelector.cshtml</LoadUri>
    <DataUri>urn:com:microsoft:aad:b2c:elements:contract:providerselection:1.2.0</DataUri>
  </ContentDefinition>
  <ContentDefinition Id="api.idpselections.signup">
    <LoadUri>~/tenant/templates/AzureBlue/idpSelector.cshtml</LoadUri>
    <DataUri>urn:com:microsoft:aad:b2c:elements:contract:providerselection:1.2.0</DataUri>
  </ContentDefinition>
  <ContentDefinition Id="api.signuporsignin">
    <LoadUri>~/tenant/templates/AzureBlue/unified.cshtml</LoadUri>
    <DataUri>urn:com:microsoft:aad:b2c:elements:contract:unifiedssp:1.2.0</DataUri>
  </ContentDefinition>
  <ContentDefinition Id="api.selfasserted">
    <LoadUri>~/tenant/templates/AzureBlue/selfAsserted.cshtml</LoadUri>
    <DataUri>urn:com:microsoft:aad:b2c:elements:contract:selfasserted:1.2.0</DataUri>
  </ContentDefinition>
  <ContentDefinition Id="api.selfasserted.profileupdate">
     <LoadUri>~/tenant/templates/AzureBlue/selfAsserted.cshtml</LoadUri>
    <DataUri>urn:com:microsoft:aad:b2c:elements:contract:selfasserted:1.2.0</DataUri>
  </ContentDefinition>
  <ContentDefinition Id="api.localaccountsignup">
     <LoadUri>~/tenant/templates/AzureBlue/selfAsserted.cshtml</LoadUri>
    <DataUri>urn:com:microsoft:aad:b2c:elements:contract:selfasserted:1.2.0</DataUri>
  </ContentDefinition>
  <ContentDefinition Id="api.localaccountpasswordreset">
     <LoadUri>~/tenant/templates/AzureBlue/selfAsserted.cshtml</LoadUri>
    <DataUri>urn:com:microsoft:aad:b2c:elements:contract:selfasserted:1.2.0</DataUri>
  </ContentDefinition>
  <ContentDefinition Id="api.phonefactor">
    <LoadUri>~/tenant/templates/AzureBlue/multifactor-1.0.0.cshtml</LoadUri>
    <DataUri>urn:com:microsoft:aad:b2c:elements:contract:multifactor:1.2.0</DataUri>
  </ContentDefinition>
</ContentDefinitions>
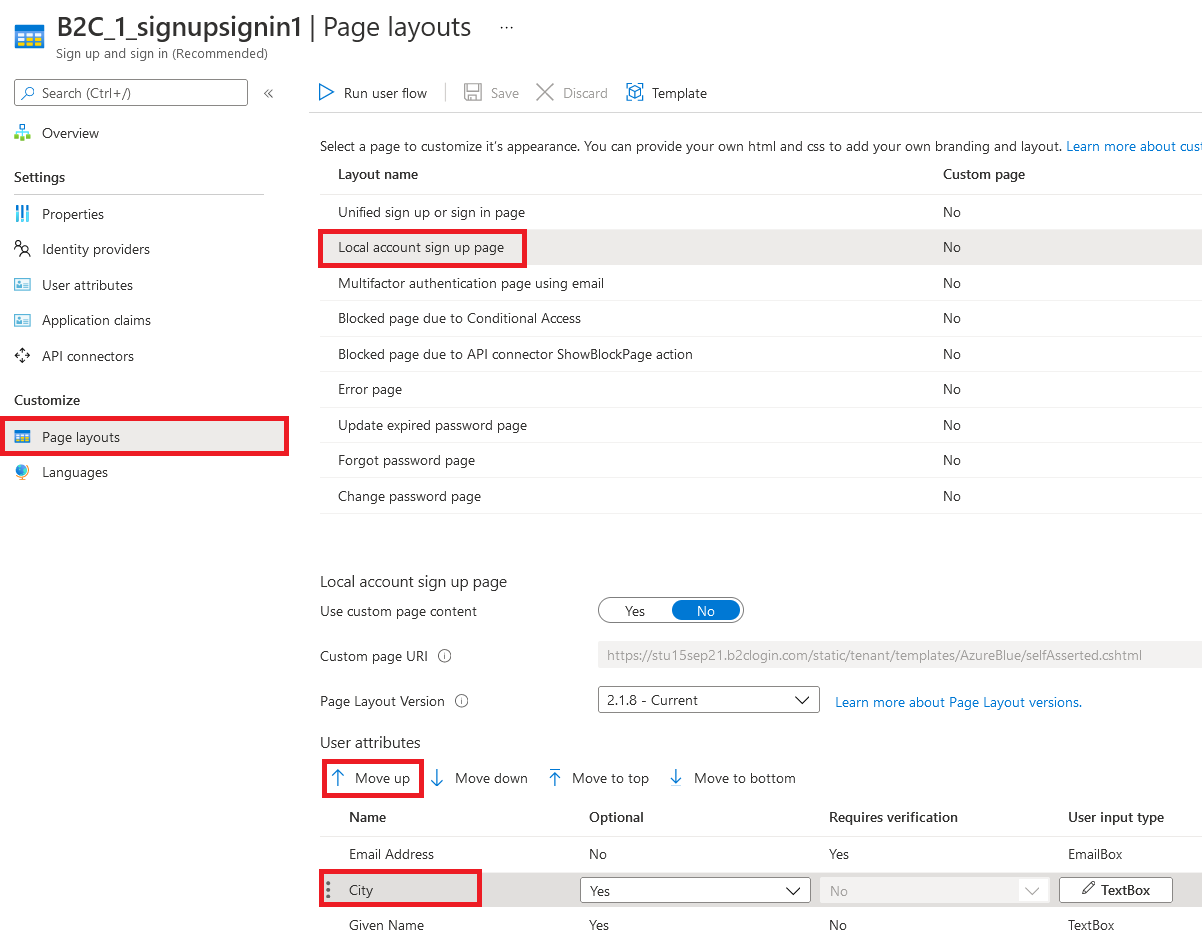
サインアップ フォームの入力フィールドを再配置する
ローカル アカウント フォームのサインアップ ページの入力フィールドを再配置するには、次の手順に従います。
- Azure portal にサインインします。
- 複数のテナントにアクセスできる場合、上部のメニューの [設定] アイコンを選択し、[ディレクトリとサブスクリプション] メニューからお使いの Azure AD B2C テナントに切り替えます。
- Azure portal で、 [Azure AD B2C] を検索して選択します。
- 左側のメニューで [ユーザー フロー] を選択します。
- 入力フィールドを再配置するユーザー フロー (ローカル アカウントのみ) を選択します。
- 左側のメニューで、 [ページ レイアウト] を選択します。
- テーブルで、 [ローカル アカウント サインアップ ページ] の行を選択します。
- [ユーザー属性] で、再配置する入力フィールドを選択し、(上または下へ) ドラッグしてドロップするか、[上へ移動] コントロールまたは [下へ移動] コントロールを使用して目的の順序にします。
- ページの最上部で [保存] を選択します。
次のステップ
Azure Active Directory B2C でのアプリケーションのユーザー インターフェイスのカスタマイズに関する記事を参照して、アプリケーションのユーザー インターフェイスをカスタマイズする方法の詳細を確認します。