チュートリアル: 認証コード フローを使用して Angular シングルページ アプリケーション (SPA) からユーザーをサインインさせて Microsoft Graph API を呼び出す
このチュートリアルでは、ユーザーのサインインを行い、PKCE による承認コード フローを使用して Microsoft Graph API を呼び出す Angular シングルページ アプリケーション (SPA) を構築します。 構築する SPA では、Angular v2 用の Microsoft Authentication Library (MSAL) を使用します。
このチュートリアルの内容:
- Microsoft Entra 管理センターでアプリケーションを登録します
npmで Angular プロジェクトを作成する- ユーザーのサインインとサインアウトをサポートするコードを追加する
- Microsoft Graph API を呼び出すコードを追加する
- アプリケーションをテストする
MSAL Angular v2 は、暗黙的な許可のフローではなくブラウザーでの承認コード フローをサポートすることで、MSAL Angular v1 よりも強化されています。 MSAL Angular v2 では、暗黙的フローはサポートされていません。
前提条件
- ローカル Web サーバーを実行するための Node.js。
- プロジェクト ファイルを編集するためのエディター (Visual Studio Code など)。
このサンプル アプリのしくみ
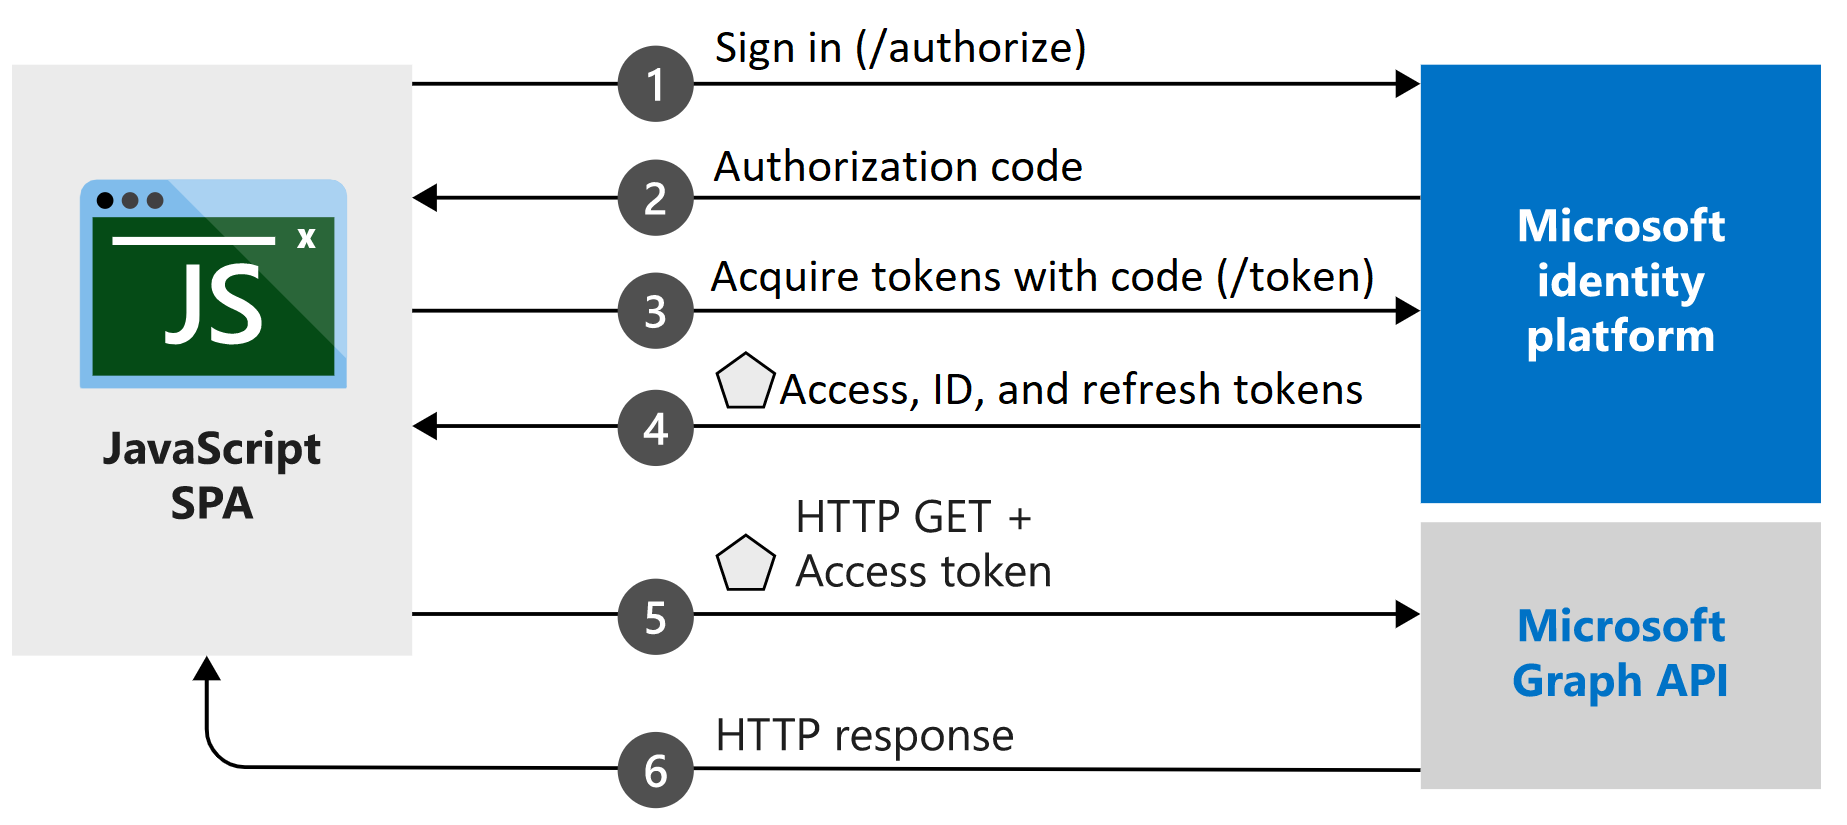
このチュートリアルで作成したサンプル アプリケーションを使用すると、Angular SPA で、Microsoft ID プラットフォームによって発行されたトークンを受け取る Microsoft Graph API や Web API に対してクエリを実行することができます。 Angular v2 用の Microsoft Authentication Library (MSAL)、MSAL.js v2 ライブラリのラッパーを使用します。 MSAL Angular では、Angular (9 以降) のアプリケーションで Microsoft Entra ID を使用してエンタープライズ ユーザーを認証できるほか、Microsoft アカウントを持つユーザーとソーシャル ID (Facebook、Google、LinkedIn など) を認証することができます。 また、アプリケーションは、このライブラリを通じて、Microsoft クラウド サービスや Microsoft Graph にアクセスすることができます。
このシナリオでは、ユーザーのサインイン後に、アクセス トークンが要求され、Authorization ヘッダーを介して HTTP 要求に追加されます。 トークンの取得と更新は、MSAL によって処理されます。
ライブラリ
このチュートリアルでは、次のライブラリを使用します。
| ライブラリ | 説明 |
|---|---|
| MSAL Angular | JavaScript Angular Wrapper 用の Microsoft Authentication Library |
| MSAL ブラウザー | JavaScript v2 ブラウザー パッケージ用の Microsoft Authentication Library |
すべての MSAL.js ライブラリのソース コードは、GitHub の microsoft-authentication-library-for-js リポジトリにあります。
完成したコード サンプルを入手する
代わりに、このチュートリアルの完成したサンプル プロジェクトをダウンロードしますか? ms-identity-javascript-angular-spa を複製します
git clone https://github.com/Azure-Samples/ms-identity-javascript-angular-spa.git
チュートリアルを続行してアプリケーションを自分でビルドする場合は、次のセクション「アプリケーションとレコードの識別子を登録する」に進みます。
アプリケーションとレコードの識別子を登録する
ヒント
この記事の手順は、開始するポータルによって若干異なる場合があります。
登録を完了するには、アプリケーションに名前を指定し、サポートされているアカウントの種類を指定して、リダイレクト URI を追加します。 登録すると、アプリケーションの [概要] ペインに、アプリケーションのソース コードに必要な識別子が表示されます。
- アプリケーション開発者以上として Microsoft Entra 管理センターにサインインします。
- 複数のテナントにアクセスできる場合は、上部のメニューの [設定] アイコン
 を使い、[ディレクトリとサブスクリプション] メニューからアプリケーションを登録するテナントに切り替えます。
 - [ID]>[アプリケーション]>[アプリの登録] を参照します。
- [新規登録] を選択します。
- アプリケーションの名前 (Angular-SPA-auth-code など) を入力します。
- [サポートされているアカウントの種類] で、 [この組織のディレクトリ内のアカウントのみ] を選択します。 さまざまなアカウントの種類の詳細については、[選択に関するヘルプ] オプションを選択します。
- [リダイレクト URI (省略可能)] で、ドロップダウン メニューを使用して [シングルページ アプリケーション (SPA)] を選択し、テキスト ボックスに「
http://localhost:4200」と入力します。 - [登録] を選択します。
- 登録が完了すると、アプリケーションの [概要] ペインが表示されます。 アプリケーションのソース コードで使用するディレクトリ (テナント) ID とアプリケーション (クライアント) ID を記録します。
プロジェクトを作成する
Visual Studio Code を開き、[ファイル]>[フォルダーを開く...] の順に選択します。プロジェクトを作成する場所に移動して選択します。
[ターミナル]>[新しいターミナル] を選択して、新しいターミナルを開きます。
- ターミナルの種類を切り替える必要がある場合があります。 ターミナルの + アイコンの横にある下矢印を選択し、[コマンド プロンプト] を選択します。
次のコマンドを実行して、
msal-angular-tutorialという名前の新しい Angular プロジェクトを作成し、Angular Material コンポーネント ライブラリ、MSAL ブラウザー、MSAL Angular をインストールし、home コンポーネントと profile コンポーネントを生成します。npm install -g @angular/cli ng new msal-angular-tutorial --routing=true --style=css --strict=false cd msal-angular-tutorial npm install @angular/material @angular/cdk npm install @azure/msal-browser @azure/msal-angular ng generate component home ng generate component profile
アプリケーションを構成してベース UI を編集する
src/app/app.module.ts を開きます。
MsalModuleとMsalInterceptorを、isIE定数と共にimportsに追加する必要があります。 また、material モジュールも追加します。 ファイルの内容全体を次のスニペットに置き換えます。import { BrowserModule } from "@angular/platform-browser"; import { BrowserAnimationsModule } from "@angular/platform-browser/animations"; import { NgModule } from "@angular/core"; import { MatButtonModule } from "@angular/material/button"; import { MatToolbarModule } from "@angular/material/toolbar"; import { MatListModule } from "@angular/material/list"; import { AppRoutingModule } from "./app-routing.module"; import { AppComponent } from "./app.component"; import { HomeComponent } from "./home/home.component"; import { ProfileComponent } from "./profile/profile.component"; import { MsalModule, MsalRedirectComponent } from "@azure/msal-angular"; import { PublicClientApplication } from "@azure/msal-browser"; const isIE = window.navigator.userAgent.indexOf("MSIE ") > -1 || window.navigator.userAgent.indexOf("Trident/") > -1; @NgModule({ declarations: [AppComponent, HomeComponent, ProfileComponent], imports: [ BrowserModule, BrowserAnimationsModule, AppRoutingModule, MatButtonModule, MatToolbarModule, MatListModule, MsalModule.forRoot( new PublicClientApplication({ auth: { clientId: "Enter_the_Application_Id_here", // Application (client) ID from the app registration authority: "Enter_the_Cloud_Instance_Id_Here/Enter_the_Tenant_Info_Here", // The Azure cloud instance and the app's sign-in audience (tenant ID, common, organizations, or consumers) redirectUri: "Enter_the_Redirect_Uri_Here", // This is your redirect URI }, cache: { cacheLocation: "localStorage", storeAuthStateInCookie: isIE, // Set to true for Internet Explorer 11 }, }), null, null ), ], providers: [], bootstrap: [AppComponent, MsalRedirectComponent], }) export class AppModule {}次の値を Microsoft Entra 管理センターから取得した値に置き換えます。 使用できる構成オプションの詳細については、クライアント アプリケーションの初期化に関する記事を参照してください。
clientId- クライアントとも呼ばれる、アプリケーションの識別子。Enter_the_Application_Id_Hereを、登録したアプリケーションの概要ページから先ほど記録したアプリケーション (クライアント) ID の値に置き換えます。authority- これは 2 つの部分で構成されます。- "インスタンス" はクラウド プロバイダーのエンドポイントです。 メイン (グローバル) Azure クラウドの場合は、「
https://login.microsoftonline.com」と入力します。 各国のクラウドの利用可能なさまざまなエンドポイントで確認します。 - "テナント ID" は、アプリケーションが登録されているテナントの識別子です。
_Enter_the_Tenant_Info_Hereを、登録したアプリケーションの概要ページから先ほど記録したディレクトリ (テナント) ID の値に置き換えます。
- "インスタンス" はクラウド プロバイダーのエンドポイントです。 メイン (グローバル) Azure クラウドの場合は、「
redirectUri- アプリが正しく承認され、認証コードまたはアクセス トークンが付与されると、承認サーバーがユーザーを送り出す場所。Enter_the_Redirect_Uri_Hereをhttp://localhost:4200で置き換え
src/app/app-routing.module.ts を開き、home および profile のコンポーネントへのルートを追加します。 ファイルの内容全体を次のスニペットに置き換えます。
import { NgModule } from "@angular/core";
import { Routes, RouterModule } from "@angular/router";
import { BrowserUtils } from "@azure/msal-browser";
import { HomeComponent } from "./home/home.component";
import { ProfileComponent } from "./profile/profile.component";

const routes: Routes = [
  {
    path: "profile",
    component: ProfileComponent,
  },
  {
    path: "",
    component: HomeComponent,
  },
];

const isIframe = window !== window.parent && !window.opener;

@NgModule({
  imports: [
    RouterModule.forRoot(routes, {
      // Don't perform initial navigation in iframes or popups
      initialNavigation:
        !BrowserUtils.isInIframe() && !BrowserUtils.isInPopup()
          ? "enabledNonBlocking"
          : "disabled", // Set to enabledBlocking to use Angular Universal
    }),
  ],
  exports: [RouterModule],
})
export class AppRoutingModule {}
src/app/app.component.html を開き、既存のコードを次のものに置き換えます。
<mat-toolbar color="primary">
  <a class="title" href="/">{{ title }}</a>

  <div class="toolbar-spacer"></div>

  <a mat-button [routerLink]="['profile']">Profile</a>

  <button mat-raised-button *ngIf="!loginDisplay" (click)="login()">Login</button>

</mat-toolbar>
<div class="container">
  <!--This is to avoid reload during acquireTokenSilent() because of hidden iframe -->
  <router-outlet *ngIf="!isIframe"></router-outlet>
</div>
src/style.css を開いて CSS を定義します。
@import "~@angular/material/prebuilt-themes/deeppurple-amber.css";

html,
body {
  height: 100%;
}
body {
  margin: 0;
  font-family: Roboto, "Helvetica Neue", sans-serif;
}
.container {
  margin: 1%;
}
src/app/app.component.css を開き、CSS スタイルをアプリケーションに追加します。
.toolbar-spacer {
  flex: 1 1 auto;
}

a.title {
  color: white;
}
ポップアップを使用したサインイン
src/app/app.component.ts を開き、ポップアップ ウィンドウを使用してユーザーをサインインさせるように、ファイルの内容を次のように置き換えます。
import { MsalService } from '@azure/msal-angular';
import { Component, OnInit } from '@angular/core';

@Component({
  selector: 'app-root',
  templateUrl: './app.component.html',
  styleUrls: ['./app.component.css']
})
export class AppComponent implements OnInit {
  title = 'msal-angular-tutorial';
  isIframe = false;
  loginDisplay = false;

  constructor(private authService: MsalService) { }

  ngOnInit() {
    this.isIframe = window !== window.parent && !window.opener;
  }

  login() {
    this.authService.loginPopup()
      .subscribe({
        next: (result) => {
          console.log(result);
          this.setLoginDisplay();
        },
        error: (error) => console.log(error)
      });
  }

  setLoginDisplay() {
    this.loginDisplay = this.authService.instance.getAllAccounts().length > 0;
  }
}
リダイレクトを使用したサインイン
MsalRedirectComponentをブートストラップするように src/app/app.module.ts を更新します。 これは、リダイレクトを処理する専用の redirect コンポーネントです。MsalModuleインポートとAppComponentブートストラップを次のように変更します。... import { MsalModule, MsalRedirectComponent } from '@azure/msal-angular'; // Updated import ... bootstrap: [AppComponent, MsalRedirectComponent] // MsalRedirectComponent bootstrapped here ...src/index.html を開き、ファイルの内容全体を、
<app-redirect>セレクターを追加した次のスニペットに置き換えます。<!doctype html> <html lang="en"> <head> <meta charset="utf-8"> <title>msal-angular-tutorial</title> <base href="/"> <meta name="viewport" content="width=device-width, initial-scale=1"> <link rel="icon" type="image/x-icon" href="favicon.ico"> </head> <body> <app-root></app-root> <app-redirect></app-redirect> </body> </html>src/app/app.component.ts を開き、フルフレーム リダイレクトを使用してユーザーをサインインさせるように、コードを次のように置き換えます。
import { MsalService } from '@azure/msal-angular';
import { Component, OnInit } from '@angular/core';

@Component({
  selector: 'app-root',
  templateUrl: './app.component.html',
  styleUrls: ['./app.component.css']
})
export class AppComponent implements OnInit {
  title = 'msal-angular-tutorial';
  isIframe = false;
  loginDisplay = false;

  constructor(private authService: MsalService) { }

  ngOnInit() {
    this.isIframe = window !== window.parent && !window.opener;
  }

  login() {
    this.authService.loginRedirect();
  }

  setLoginDisplay() {
    this.loginDisplay = this.authService.instance.getAllAccounts().length > 0;
  }
}
src/app/home/home.component.ts に移動し、ファイルの内容全体を、
LOGIN_SUCCESSイベントをサブスクライブする次のスニペットに置き換えます。import { Component, OnInit } from '@angular/core'; import { MsalBroadcastService, MsalService } from '@azure/msal-angular'; import { EventMessage, EventType, InteractionStatus } from '@azure/msal-browser'; import { filter } from 'rxjs/operators'; @Component({ selector: 'app-home', templateUrl: './home.component.html', styleUrls: ['./home.component.css'] }) export class HomeComponent implements OnInit { constructor(private authService: MsalService, private msalBroadcastService: MsalBroadcastService) { } ngOnInit(): void { this.msalBroadcastService.msalSubject$ .pipe( filter((msg: EventMessage) => msg.eventType === EventType.LOGIN_SUCCESS), ) .subscribe((result: EventMessage) => { console.log(result); }); } }
条件付きの表示
認証済みのユーザーにのみ特定のユーザー インターフェイス (UI) を表示するには、ユーザーがサインイン済みでやり取りが完了していることをコンポーネントが認識できるように、MsalBroadcastService をサブスクライブする必要があります。
やり取りが完了していてアカウントがサインインしているかどうかを UI の表示前にチェックするように、
MsalBroadcastServiceを src/app/app.component.ts に追加して監視可能なinProgress$をサブスクライブします。 コードは次のようになっているはずです。import { Component, OnInit, OnDestroy } from '@angular/core'; import { MsalService, MsalBroadcastService } from '@azure/msal-angular'; import { InteractionStatus } from '@azure/msal-browser'; import { Subject } from 'rxjs'; import { filter, takeUntil } from 'rxjs/operators'; @Component({ selector: 'app-root', templateUrl: './app.component.html', styleUrls: ['./app.component.css'] }) export class AppComponent implements OnInit, OnDestroy { title = 'msal-angular-tutorial'; isIframe = false; loginDisplay = false; private readonly _destroying$ = new Subject<void>(); constructor(private broadcastService: MsalBroadcastService, private authService: MsalService) { } ngOnInit() { this.isIframe = window !== window.parent && !window.opener; this.broadcastService.inProgress$ .pipe( filter((status: InteractionStatus) => status === InteractionStatus.None), takeUntil(this._destroying$) ) .subscribe(() => { this.setLoginDisplay(); }) } login() { this.authService.loginRedirect(); } setLoginDisplay() { this.loginDisplay = this.authService.instance.getAllAccounts().length > 0; } ngOnDestroy(): void { this._destroying$.next(undefined); this._destroying$.complete(); } }やり取りが完了しているかどうかを UI の更新前にもチェックするように、src/app/home/home.component.ts のコードを更新します。 コードは次のようになっているはずです。
import { Component, OnInit } from '@angular/core';
import { MsalBroadcastService, MsalService } from '@azure/msal-angular';
import { EventMessage, EventType, InteractionStatus } from '@azure/msal-browser';
import { filter } from 'rxjs/operators';

@Component({
  selector: 'app-home',
  templateUrl: './home.component.html',
  styleUrls: ['./home.component.css']
})
export class HomeComponent implements OnInit {
  loginDisplay = false;

  constructor(private authService: MsalService, private msalBroadcastService: MsalBroadcastService) { }

  ngOnInit(): void {
    this.msalBroadcastService.msalSubject$
      .pipe(
        filter((msg: EventMessage) => msg.eventType === EventType.LOGIN_SUCCESS),
      )
      .subscribe((result: EventMessage) => {
        console.log(result);
      });

    this.msalBroadcastService.inProgress$
      .pipe(
        filter((status: InteractionStatus) => status === InteractionStatus.None)
      )
      .subscribe(() => {
        this.setLoginDisplay();
      })
  }

  setLoginDisplay() {
    this.loginDisplay = this.authService.instance.getAllAccounts().length > 0;
  }
}
src/app/home/home.component.html のコードを次の条件付きの表示に置き換えます。
<div *ngIf="!loginDisplay">
    <p>Please sign-in to see your profile information.</p>
</div>

<div *ngIf="loginDisplay">
    <p>Login successful!</p>
    <p>Request your profile information by clicking Profile above.</p>
</div>
Angular Guard を実装する
MsalGuard クラスは、ルートを保護し、保護されたルートにアクセスする前に認証を要求するために使用できます。 次の手順では、MsalGuard を Profile ルートに追加します。 Profile ルートを保護すると、ユーザーは Login ボタンを使用してサインインしていなくても、Profile ルートにアクセスまたは Profile ボタンを選択しようとした際に、Profile ページの表示前にポップアップまたはリダイレクトを介した認証を行うように MsalGuard から求められます。
MsalGuard はユーザー エクスペリエンスを改善できる便利なクラスですが、セキュリティという点では信頼すべきでありません。 攻撃者がクライアント側の保護を回避する可能性があるので、ユーザーによってアクセスされるべきでないデータをサーバーが返すことのないようにする必要があります。
MsalGuardクラスをアプリケーションのプロバイダーとして src/app/app.module.ts に追加し、MsalGuardの構成を追加します。 後からトークンを取得するために必要なスコープは、authRequestで指定できます。Guard のやり取りの種類はRedirectまたはPopupに設定できます。 コードは次のようになります。import { BrowserModule } from "@angular/platform-browser"; import { BrowserAnimationsModule } from "@angular/platform-browser/animations"; import { NgModule } from "@angular/core"; import { MatButtonModule } from "@angular/material/button"; import { MatToolbarModule } from "@angular/material/toolbar"; import { MatListModule } from "@angular/material/list"; import { AppRoutingModule } from "./app-routing.module"; import { AppComponent } from "./app.component"; import { HomeComponent } from "./home/home.component"; import { ProfileComponent } from "./profile/profile.component"; import { MsalModule, MsalRedirectComponent, MsalGuard, } from "@azure/msal-angular"; // MsalGuard added to imports import { PublicClientApplication, InteractionType, } from "@azure/msal-browser"; // InteractionType added to imports const isIE = window.navigator.userAgent.indexOf("MSIE ") > -1 || window.navigator.userAgent.indexOf("Trident/") > -1; @NgModule({ declarations: [AppComponent, HomeComponent, ProfileComponent], imports: [ BrowserModule, BrowserAnimationsModule, AppRoutingModule, MatButtonModule, MatToolbarModule, MatListModule, MsalModule.forRoot( new PublicClientApplication({ auth: { clientId: "Enter_the_Application_Id_here", authority: "Enter_the_Cloud_Instance_Id_Here/Enter_the_Tenant_Info_Here", redirectUri: "Enter_the_Redirect_Uri_Here", }, cache: { cacheLocation: "localStorage", storeAuthStateInCookie: isIE, }, }), { interactionType: InteractionType.Redirect, // MSAL Guard Configuration authRequest: { scopes: ["user.read"], }, }, null ), ], providers: [ MsalGuard, // MsalGuard added as provider here ], bootstrap: [AppComponent, MsalRedirectComponent], }) export class AppModule {}src/app/app-routing.module.ts で保護したいルートで
MsalGuardを設定します。import { NgModule } from "@angular/core"; import { Routes, RouterModule } from "@angular/router"; import { BrowserUtils } from "@azure/msal-browser"; import { HomeComponent } from "./home/home.component"; import { ProfileComponent } from "./profile/profile.component"; import { MsalGuard } from "@azure/msal-angular"; const routes: Routes = [ { path: "profile", component: ProfileComponent, canActivate: [MsalGuard], }, { path: "", component: HomeComponent, }, ]; const isIframe = window !== window.parent && !window.opener; @NgModule({ imports: [ RouterModule.forRoot(routes, { // Don't perform initial navigation in iframes or popups initialNavigation: !BrowserUtils.isInIframe() && !BrowserUtils.isInPopup() ? "enabledNonBlocking" : "disabled", // Set to enabledBlocking to use Angular Universal }), ], exports: [RouterModule], }) export class AppRoutingModule {}保護構成で設定された
authRequestが考慮されるように、src/app/app.component.ts でログイン呼び出しを調整します。 これでコードは次のようになります。import { Component, OnInit, OnDestroy, Inject } from '@angular/core'; import { MsalService, MsalBroadcastService, MSAL_GUARD_CONFIG, MsalGuardConfiguration } from '@azure/msal-angular'; import { InteractionStatus, RedirectRequest } from '@azure/msal-browser'; import { Subject } from 'rxjs'; import { filter, takeUntil } from 'rxjs/operators'; @Component({ selector: 'app-root', templateUrl: './app.component.html', styleUrls: ['./app.component.css'] }) export class AppComponent implements OnInit, OnDestroy { title = 'msal-angular-tutorial'; isIframe = false; loginDisplay = false; private readonly _destroying$ = new Subject<void>(); constructor(@Inject(MSAL_GUARD_CONFIG) private msalGuardConfig: MsalGuardConfiguration, private broadcastService: MsalBroadcastService, private authService: MsalService) { } ngOnInit() { this.isIframe = window !== window.parent && !window.opener; this.broadcastService.inProgress$ .pipe( filter((status: InteractionStatus) => status === InteractionStatus.None), takeUntil(this._destroying$) ) .subscribe(() => { this.setLoginDisplay(); }) } login() { if (this.msalGuardConfig.authRequest){ this.authService.loginRedirect({...this.msalGuardConfig.authRequest} as RedirectRequest); } else { this.authService.loginRedirect(); } } setLoginDisplay() { this.loginDisplay = this.authService.instance.getAllAccounts().length > 0; } ngOnDestroy(): void { this._destroying$.next(undefined); this._destroying$.complete(); } }
トークンを取得する
Angular Interceptor
MSAL Angular には Interceptor クラスが用意されています。これは、既知の保護されたリソースに対して Angular の http クライアントを使用する送信要求のためにトークンを自動的に取得します。
src/app/app.module.ts で
Interceptorクラスをプロバイダーとして (その構成と一緒に) アプリケーションに追加します。 これでコードは次のようになります。import { BrowserModule } from "@angular/platform-browser"; import { BrowserAnimationsModule } from "@angular/platform-browser/animations"; import { NgModule } from "@angular/core"; import { HTTP_INTERCEPTORS, HttpClientModule } from "@angular/common/http"; // Import import { MatButtonModule } from "@angular/material/button"; import { MatToolbarModule } from "@angular/material/toolbar"; import { MatListModule } from "@angular/material/list"; import { AppRoutingModule } from "./app-routing.module"; import { AppComponent } from "./app.component"; import { HomeComponent } from "./home/home.component"; import { ProfileComponent } from "./profile/profile.component"; import { MsalModule, MsalRedirectComponent, MsalGuard, MsalInterceptor, } from "@azure/msal-angular"; // Import MsalInterceptor import { InteractionType, PublicClientApplication, } from "@azure/msal-browser"; const isIE = window.navigator.userAgent.indexOf("MSIE ") > -1 || window.navigator.userAgent.indexOf("Trident/") > -1; @NgModule({ declarations: [AppComponent, HomeComponent, ProfileComponent], imports: [ BrowserModule, BrowserAnimationsModule, AppRoutingModule, MatButtonModule, MatToolbarModule, MatListModule, HttpClientModule, MsalModule.forRoot( new PublicClientApplication({ auth: { clientId: "Enter_the_Application_Id_Here", authority: "Enter_the_Cloud_Instance_Id_Here/Enter_the_Tenant_Info_Here", redirectUri: "Enter_the_Redirect_Uri_Here", }, cache: { cacheLocation: "localStorage", storeAuthStateInCookie: isIE, }, }), { interactionType: InteractionType.Redirect, authRequest: { scopes: ["user.read"], }, }, { interactionType: InteractionType.Redirect, // MSAL Interceptor Configuration protectedResourceMap: new Map([ ["Enter_the_Graph_Endpoint_Here/v1.0/me", ["user.read"]], ]), } ), ], providers: [ { provide: HTTP_INTERCEPTORS, useClass: MsalInterceptor, multi: true, }, MsalGuard, ], bootstrap: [AppComponent, MsalRedirectComponent], }) export class AppModule {}保護されるリソースは
protectedResourceMapとして指定されます。protectedResourceMapコレクションに指定する URL は、大文字と小文字が区別されます。 リソースごとに、アクセス トークンで返されるように要求されているスコープを追加します。次に例を示します。
- Microsoft Graph の場合
["user.read"] - カスタム Web API の場合
["<Application ID URL>/scope"](つまり、api://<Application ID>/access_as_user)
次の説明のとおりに
protectedResourceMapの値を変更します。Enter_the_Graph_Endpoint_Hereは、アプリケーションが通信する必要がある、Microsoft Graph API のインスタンスです。 グローバル Microsoft Graph API エンドポイントの場合、この文字列をhttps://graph.microsoft.comに置き換えます。 各国のクラウドのデプロイにおけるエンドポイントの場合は、Microsoft Graph のドキュメントで「各国のクラウドでのデプロイ」を参照してください。
- Microsoft Graph の場合
ユーザーのプロファイルを HTTP 要求で取得するように src/app/profile/profile.component.ts のコードを置き換え、
GRAPH_ENDPOINTを Microsoft Graph エンドポイントに置き換えます。import { Component, OnInit } from '@angular/core'; import { HttpClient } from '@angular/common/http'; const GRAPH_ENDPOINT = 'Enter_the_Graph_Endpoint_Here/v1.0/me'; type ProfileType = { givenName?: string, surname?: string, userPrincipalName?: string, id?: string }; @Component({ selector: 'app-profile', templateUrl: './profile.component.html', styleUrls: ['./profile.component.css'] }) export class ProfileComponent implements OnInit { profile!: ProfileType; constructor( private http: HttpClient ) { } ngOnInit() { this.getProfile(); } getProfile() { this.http.get(GRAPH_ENDPOINT) .subscribe(profile => { this.profile = profile; }); } }プロファイル情報を表示するように、src/app/profile/profile.component.html で UI を置き換えます。
<div>
    <p><strong>First Name: </strong> {{profile?.givenName}}</p>
    <p><strong>Last Name: </strong> {{profile?.surname}}</p>
    <p><strong>Email: </strong> {{profile?.userPrincipalName}}</p>
    <p><strong>Id: </strong> {{profile?.id}}</p>
</div>
サインアウト
条件に従って
Logoutボタンを表示するように、src/app/app.component.html のコードを更新します。<mat-toolbar color="primary"> <a class="title" href="/">{{ title }}</a> <div class="toolbar-spacer"></div> <a mat-button [routerLink]="['profile']">Profile</a> <button mat-raised-button *ngIf="!loginDisplay" (click)="login()">Login</button> <button mat-raised-button *ngIf="loginDisplay" (click)="logout()">Logout</button> </mat-toolbar> <div class="container"> <!--This is to avoid reload during acquireTokenSilent() because of hidden iframe --> <router-outlet *ngIf="!isIframe"></router-outlet> </div>
リダイレクトを使用したサインアウト
リダイレクトを使用してユーザーをサインアウトさせるように、src/app/app.component.ts のコードを更新します。
import { Component, OnInit, OnDestroy, Inject } from '@angular/core';
import { MsalService, MsalBroadcastService, MSAL_GUARD_CONFIG, MsalGuardConfiguration } from '@azure/msal-angular';
import { InteractionStatus, RedirectRequest } from '@azure/msal-browser';
import { Subject } from 'rxjs';
import { filter, takeUntil } from 'rxjs/operators';

@Component({
  selector: 'app-root',
  templateUrl: './app.component.html',
  styleUrls: ['./app.component.css']
})
export class AppComponent implements OnInit, OnDestroy {
  title = 'msal-angular-tutorial';
  isIframe = false;
  loginDisplay = false;
  private readonly _destroying$ = new Subject<void>();

  constructor(@Inject(MSAL_GUARD_CONFIG) private msalGuardConfig: MsalGuardConfiguration, private broadcastService: MsalBroadcastService, private authService: MsalService) { }

  ngOnInit() {
    this.isIframe = window !== window.parent && !window.opener;

    this.broadcastService.inProgress$
    .pipe(
      filter((status: InteractionStatus) => status === InteractionStatus.None),
      takeUntil(this._destroying$)
    )
    .subscribe(() => {
      this.setLoginDisplay();
    })
  }

  login() {
    if (this.msalGuardConfig.authRequest){
      this.authService.loginRedirect({...this.msalGuardConfig.authRequest} as RedirectRequest);
    } else {
      this.authService.loginRedirect();
    }
  }

  logout() { // Add log out function here
    this.authService.logoutRedirect({
      postLogoutRedirectUri: 'http://localhost:4200'
    });
  }

  setLoginDisplay() {
    this.loginDisplay = this.authService.instance.getAllAccounts().length > 0;
  }

  ngOnDestroy(): void {
    this._destroying$.next(undefined);
    this._destroying$.complete();
  }
}
ポップアップを使用したサインアウト
ポップアウトを使用してユーザーをサインアウトさせるように、src/app/app.component.ts のコードを更新します。
import { Component, OnInit, OnDestroy, Inject } from '@angular/core';
import { MsalService, MsalBroadcastService, MSAL_GUARD_CONFIG, MsalGuardConfiguration } from '@azure/msal-angular';
import { InteractionStatus, PopupRequest } from '@azure/msal-browser';
import { Subject } from 'rxjs';
import { filter, takeUntil } from 'rxjs/operators';

@Component({
  selector: 'app-root',
  templateUrl: './app.component.html',
  styleUrls: ['./app.component.css']
})
export class AppComponent implements OnInit, OnDestroy {
  title = 'msal-angular-tutorial';
  isIframe = false;
  loginDisplay = false;
  private readonly _destroying$ = new Subject<void>();

  constructor(@Inject(MSAL_GUARD_CONFIG) private msalGuardConfig: MsalGuardConfiguration, private broadcastService: MsalBroadcastService, private authService: MsalService) { }

  ngOnInit() {
    this.isIframe = window !== window.parent && !window.opener;

    this.broadcastService.inProgress$
    .pipe(
      filter((status: InteractionStatus) => status === InteractionStatus.None),
      takeUntil(this._destroying$)
    )
    .subscribe(() => {
      this.setLoginDisplay();
    })
  }

  login() {
    if (this.msalGuardConfig.authRequest){
      this.authService.loginPopup({...this.msalGuardConfig.authRequest} as PopupRequest)
        .subscribe({
          next: (result) => {
            console.log(result);
            this.setLoginDisplay();
          },
          error: (error) => console.log(error)
        });
    } else {
      this.authService.loginPopup()
        .subscribe({
          next: (result) => {
            console.log(result);
            this.setLoginDisplay();
          },
          error: (error) => console.log(error)
        });
    }
  }

  logout() { // Add log out function here
    this.authService.logoutPopup({
      mainWindowRedirectUri: "/"
    });
  }

  setLoginDisplay() {
    this.loginDisplay = this.authService.instance.getAllAccounts().length > 0;
  }

  ngOnDestroy(): void {
    this._destroying$.next(undefined);
    this._destroying$.complete();
  }
}
コードのテスト
アプリケーション フォルダーからコマンドライン プロンプトで次のコマンドを実行して、Web サーバーを起動してポートをリッスンします。
npm install
npm start
ブラウザーで、「
http://localhost:4200」と入力すると、次のようなページが表示されます。
[承諾] を選択して、アプリにプロファイルへのアクセス許可を付与します。 これは初めてサインインを開始するときに行われます。
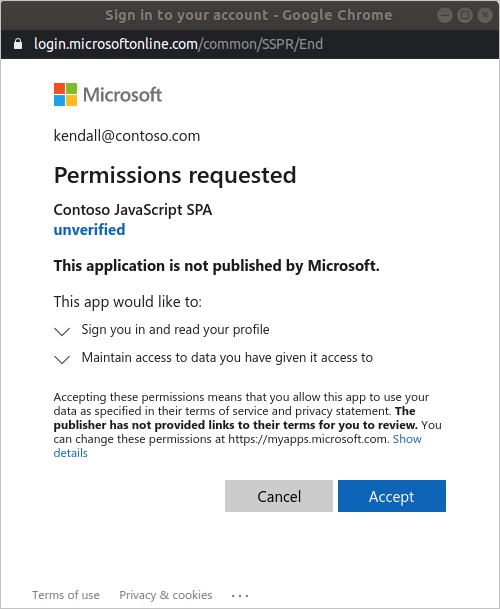
要求されたアクセス許可に同意すると、Web アプリケーションによってログイン ページが正常に表示されます。

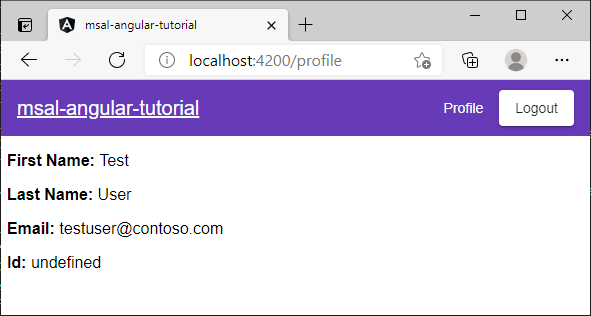
[Profile] を選択して、Microsoft Graph API への呼び出しからの応答で返されるユーザー プロファイル情報を表示します。
スコープと委任されたアクセス許可を追加する
Microsoft Graph API には、ユーザーのプロファイルを読み取るための User.Read スコープが必要です。 User.Read スコープは、すべてのアプリ登録に自動的に追加されます。 Microsoft Graph の他の API や、バックエンド サーバーのカスタム API には、他のスコープが必要な場合があります。 たとえば、Microsoft Graph API では、ユーザーのメールを一覧表示するために Mail.Read スコープが必要です。
スコープを追加すると、追加したスコープに対して追加の同意を求めるメッセージがユーザーに表示される場合があります。
注意
スコープの数を増やすと、ユーザーは追加の同意を求められることがあります。
ヘルプとサポート
サポートが必要な場合、問題をレポートする場合、またはサポート オプションについて知りたい場合は、開発者向けのヘルプとサポートに関するページを参照してください。
次のステップ
- 次の複数パートのチュートリアル シリーズで、ユーザーをサインインさせる React シングルページ アプリケーション (SPA) をビルドして詳細を学習します。