クイックスタート: Azure Machine Learning の利用を開始する
適用対象:  Python SDK azure-ai-ml v2 (現行)
このチュートリアルでは、Azure Machine Learning service の最もよく使用される機能の一部について概説します。 その中で、モデルを作成、登録、デプロイします。 このチュートリアルは、Azure Machine Learning の主要な概念とその最も一般的な使用方法を理解するのに役立ちます。
スケーラブルなコンピューティング リソースでトレーニング ジョブを実行し、それをデプロイし、最後にデプロイをテストする方法について説明します。
データ準備を処理し、モデルのトレーニングと登録を行うトレーニング スクリプトを作成します。 モデルをトレーニングしたら、"エンドポイント" として "デプロイ" し、そのエンドポイントを "推論" のために呼び出します。
これを実行する手順は次のとおりです。
- Azure Machine Learning ワークスペースへのハンドルを設定する
- トレーニング スクリプトを作成する
- スケーラブルなコンピューティング リソースであるコンピューティング クラスターを作成する
- 適切なジョブ環境で構成されたコンピューティング クラスターでトレーニング スクリプトを実行するコマンド ジョブを作成して実行する
- トレーニング スクリプトの出力を表示する
- 新しくトレーニングされたモデルをエンドポイントとしてデプロイする
- 推論のために Azure Machine Learning エンドポイントを呼び出す
このビデオでこのクイックスタートの手順の概要をご覧ください。
前提条件
-
Azure Machine Learning を使用するには、まずワークスペースが必要です。 まだない場合は、作業を開始するために必要なリソースの作成を完了し、ワークスペースを作成してその使用方法の詳細を確認してください。
-
スタジオにサインインして、ワークスペースを選択します (まだ開いていない場合)。
-
ワークスペースでノートブックを開くか作成します。
- コードをコピーしてセルに貼り付ける場合は、新しいノートブックを作成します。
- または、スタジオの [サンプル] セクションから tutorials/get-started-notebooks/quickstart.ipynb を開きます。 次に、[複製] を選択してノートブックを [ファイル] に追加します。 (サンプルの検索場所を確認してください)。
カーネルを設定する
コンピューティング インスタンスがまだない場合は、開いているノートブックの最上部のバーで作成します。

コンピューティング インスタンスが停止している場合は、[コンピューティングの開始] を選択して、実行されるまで待ちます。

右上にあるカーネルが
Python 3.10 - SDK v2であることを確認します。 そうでない場合は、ドロップダウンを使用してこのカーネルを選択します。
認証が必要であることを示すバナーが表示された場合は、[認証] を選択します。


重要
このチュートリアルの残りの部分には、チュートリアル ノートブックのセルが含まれています。 それらを新しいノートブックにコピー/貼り付けするか、複製した場合はここでそのノートブックに切り替えます。
ワークスペースへのハンドルを作成する
コードについて詳しく説明する前に、ワークスペースを参照する方法が必要です。 ワークスペースは、Azure Machine Learning の最上位のリソースで、Azure Machine Learning を使用するときに作成するすべての成果物を操作するための一元的な場所を提供します。
ワークスペースへのハンドル用に ml_client を作成します。 次に、ml_client を使用してリソースとジョブを管理します。
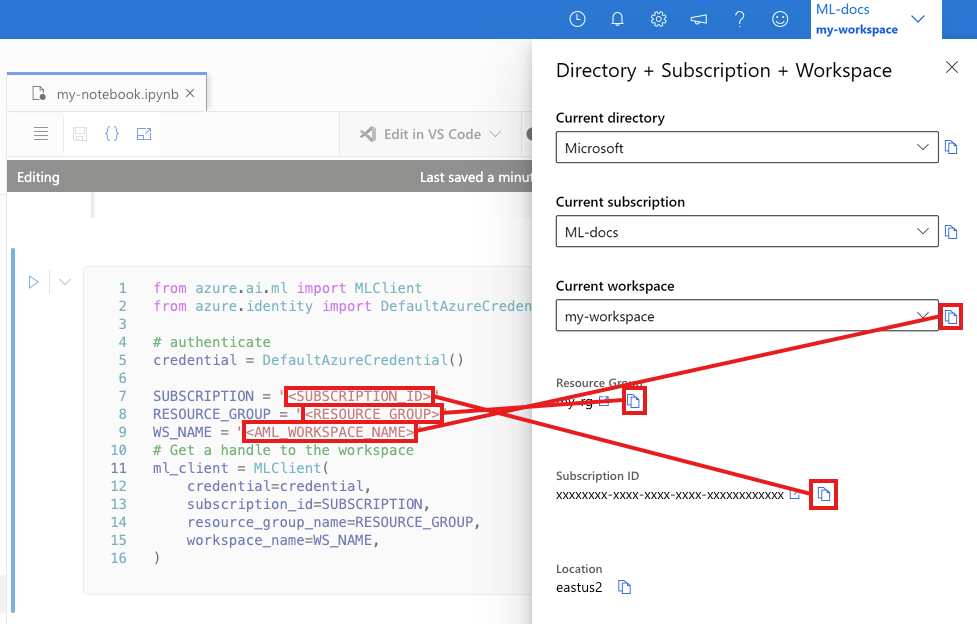
次のセルに、サブスクリプション ID、リソース グループ名、ワークスペース名を入力します。 これらの値を見つけるには:
- 右上隅の Azure Machine Learning スタジオ ツール バーで、ワークスペース名を選びます。
- ワークスペース、リソース グループ、サブスクリプション ID の値をコードにコピーします。
- 1 つの値をコピーし、領域を閉じて貼り付けてから、戻って次のものを処理する必要があります。
from azure.ai.ml import MLClient
from azure.identity import DefaultAzureCredential

# authenticate
credential = DefaultAzureCredential()

SUBSCRIPTION="<SUBSCRIPTION_ID>"
RESOURCE_GROUP="<RESOURCE_GROUP>"
WS_NAME="<AML_WORKSPACE_NAME>"
# Get a handle to the workspace
ml_client = MLClient(
    credential=credential,
    subscription_id=SUBSCRIPTION,
    resource_group_name=RESOURCE_GROUP,
    workspace_name=WS_NAME,
)
注意
MLClient を作成しても、ワークスペースには接続されません。 クライアントの初期化は遅延型なので、初めて呼び出す必要が生じるまで待機します (これは、次のコード セルで行われます)。
# Verify that the handle works correctly.
# If you ge an error here, modify your SUBSCRIPTION, RESOURCE_GROUP, and WS_NAME in the previous cell.
ws = ml_client.workspaces.get(WS_NAME)
print(ws.location,":", ws.resource_group)
トレーニング スクリプトを作成する
まず、トレーニング スクリプト main.py Python ファイルを作成します。
最初にスクリプトのソース フォルダーを作成します。
import os

train_src_dir = "./src"
os.makedirs(train_src_dir, exist_ok=True)
このスクリプトを使用して、データの前処理を行い、それをテストとトレーニングのデータに分割します。 次に、このデータを使用してツリー ベースのモデルをトレーニングし、出力モデルを返します。
MLFlow は、パイプラインの実行中にパラメーターとメトリックをログに記録するために使われます。
次のセルでは、IPython マジックを使用して、作成したディレクトリにトレーニング スクリプトを書き込みます。
%%writefile {train_src_dir}/main.py
import os
import argparse
import pandas as pd
import mlflow
import mlflow.sklearn
from sklearn.ensemble import GradientBoostingClassifier
from sklearn.metrics import classification_report
from sklearn.model_selection import train_test_split

def main():
    """Main function of the script."""

    # input and output arguments
    parser = argparse.ArgumentParser()
    parser.add_argument("--data", type=str, help="path to input data")
    parser.add_argument("--test_train_ratio", type=float, required=False, default=0.25)
    parser.add_argument("--n_estimators", required=False, default=100, type=int)
    parser.add_argument("--learning_rate", required=False, default=0.1, type=float)
    parser.add_argument("--registered_model_name", type=str, help="model name")
    args = parser.parse_args()

    # Start Logging
    mlflow.start_run()

    # enable autologging
    mlflow.sklearn.autolog()

    ###################
    #<prepare the data>
    ###################
    print(" ".join(f"{k}={v}" for k, v in vars(args).items()))

    print("input data:", args.data)

    credit_df = pd.read_csv(args.data, header=1, index_col=0)

    mlflow.log_metric("num_samples", credit_df.shape[0])
    mlflow.log_metric("num_features", credit_df.shape[1] - 1)

    train_df, test_df = train_test_split(
        credit_df,
        test_size=args.test_train_ratio,
    )
    ####################
    #</prepare the data>
    ####################

    ##################
    #<train the model>
    ##################
    # Extracting the label column
    y_train = train_df.pop("default payment next month")

    # convert the dataframe values to array
    X_train = train_df.values

    # Extracting the label column
    y_test = test_df.pop("default payment next month")

    # convert the dataframe values to array
    X_test = test_df.values

    print(f"Training with data of shape {X_train.shape}")

    clf = GradientBoostingClassifier(
        n_estimators=args.n_estimators, learning_rate=args.learning_rate
    )
    clf.fit(X_train, y_train)

    y_pred = clf.predict(X_test)

    print(classification_report(y_test, y_pred))
    ###################
    #</train the model>
    ###################

    ##########################
    #<save and register model>
    ##########################
    # Registering the model to the workspace
    print("Registering the model via MLFlow")
    mlflow.sklearn.log_model(
        sk_model=clf,
        registered_model_name=args.registered_model_name,
        artifact_path=args.registered_model_name,
    )

    # Saving the model to a file
    mlflow.sklearn.save_model(
        sk_model=clf,
        path=os.path.join(args.registered_model_name, "trained_model"),
    )
    ###########################
    #</save and register model>
    ###########################

    # Stop Logging
    mlflow.end_run()

if __name__ == "__main__":
    main()
このスクリプトでわかるように、モデルのトレーニングが完了すると、モデル ファイルが保存され、ワークスペースに登録されます。 これで、登録したモデルを推論エンドポイントで使用できるようになりました。
[ファイル] で新しいフォルダーとスクリプトを表示するために、[更新] を選択する必要がある場合があります。
コマンドを構成する
目的のタスクを実行できるスクリプトと、そのスクリプトを実行するコンピューティング クラスターを用意したら、コマンド ライン アクションを実行できる汎用コマンドを使用します。 このコマンドライン アクションを使って、直接システム コマンドを呼び出すことや、スクリプトを実行することができます。
ここでは、入力データ、分割率、学習率、登録されたモデル名を指定する入力変数を作成します。 このコマンド スクリプトで以下を行います。
- トレーニング スクリプトに必要なソフトウェア ライブラリとランタイム ライブラリを定義する "環境" を使用します。 Azure Machine Learning には、キュレーションまたは既製の環境が多数用意されていて、一般的なトレーニングと推論のシナリオに役立ちます。 ここでは、それらの環境のいずれかを使用します。 「チュートリアル: Azure Machine Learning でモデルをトレーニングする」で、カスタム環境を作成する方法について説明します。
- コマンド ライン アクション自体を構成します。この場合は
python main.pyです。 入出力には、コマンドで${{ ... }}表記を使ってアクセスできます。 - このサンプルでは、インターネット上のファイルからデータにアクセスします。
- コンピューティング リソースが指定されていないため、スクリプトは、自動的に作成されるサーバーレス コンピューティング クラスターで実行されます。
from azure.ai.ml import command
from azure.ai.ml import Input

registered_model_name = "credit_defaults_model"

job = command(
    inputs=dict(
        data=Input(
            type="uri_file",
            path="https://azuremlexamples.blob.core.windows.net/datasets/credit_card/default_of_credit_card_clients.csv",
        ),
        test_train_ratio=0.2,
        learning_rate=0.25,
        registered_model_name=registered_model_name,
    ),
    code="./src/",  # location of source code
    command="python main.py --data ${{inputs.data}} --test_train_ratio ${{inputs.test_train_ratio}} --learning_rate ${{inputs.learning_rate}} --registered_model_name ${{inputs.registered_model_name}}",
    environment="AzureML-sklearn-1.0-ubuntu20.04-py38-cpu@latest",
    display_name="credit_default_prediction",
)
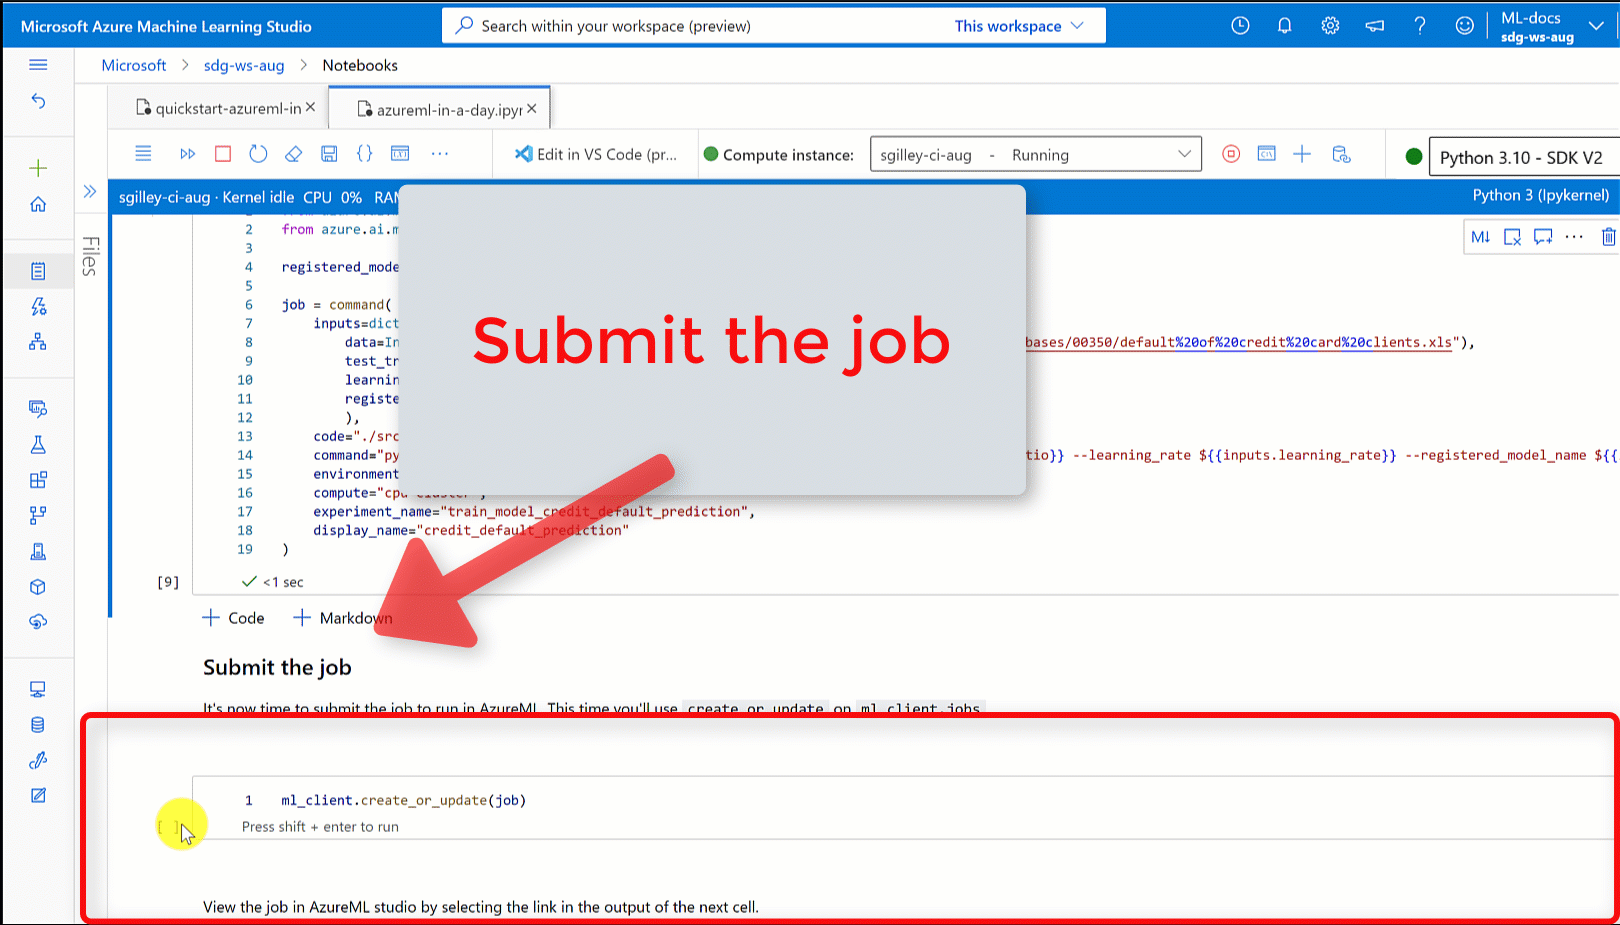
ジョブを送信する
次に、Azure Machine Learning で実行するジョブを送信します。 今回は ml_client に対して create_or_update を使います。
ml_client.create_or_update(job)
ジョブの出力を表示してジョブの完了を待機する
前のセルの出力内のリンクを選択して、Azure Machine Learning スタジオでジョブを表示します。
このジョブの出力は、Azure Machine Learning スタジオではこのようになります。 メトリック、出力などのさまざまな詳細のタブを調べます。完了すると、ジョブで、トレーニングの結果としてモデルがワークスペースに登録されます。
重要
ジョブの状態が完了になるまで待ってから、このノートブックに戻って続行します。 ジョブの実行には 2 から 3 分かかります。 コンピューティング クラスターが 0 ノードにスケールダウンされ、カスタム環境がまだ構築中である場合は、さらに長く (最大 10 分) かかることがあります。
モデルをオンライン エンドポイントとしてデプロイする
次に、機械学習モデルを Web サービス (online endpoint) として Azure クラウドにデプロイします。
機械学習サービスをデプロイするには、登録したモデルを使用します。
新しいオンライン エンドポイントを作成する
登録されたモデルを用意できたので、次はオンライン エンドポイントを作成します。 エンドポイント名は、Azure リージョン全体で一意である必要があります。 このチュートリアルでは、UUID を使って一意の名前を作成します。
import uuid

# Creating a unique name for the endpoint
online_endpoint_name = "credit-endpoint-" + str(uuid.uuid4())[:8]
エンドポイントを作成します。
# Expect the endpoint creation to take a few minutes
from azure.ai.ml.entities import (
    ManagedOnlineEndpoint,
    ManagedOnlineDeployment,
    Model,
    Environment,
)

# create an online endpoint
endpoint = ManagedOnlineEndpoint(
    name=online_endpoint_name,
    description="this is an online endpoint",
    auth_mode="key",
    tags={
        "training_dataset": "credit_defaults",
        "model_type": "sklearn.GradientBoostingClassifier",
    },
)

endpoint = ml_client.online_endpoints.begin_create_or_update(endpoint).result()

print(f"Endpoint {endpoint.name} provisioning state: {endpoint.provisioning_state}")
Note
エンドポイントの作成には数分かかります。
エンドポイントが作成されたら、次のように取得できます。
endpoint = ml_client.online_endpoints.get(name=online_endpoint_name)

print(
    f'Endpoint "{endpoint.name}" with provisioning state "{endpoint.provisioning_state}" is retrieved'
)
モデルをエンドポイントにデプロイする
エンドポイントを作成したら、エントリ スクリプトを使ってモデルをデプロイします。 各エンドポイントに複数のデプロイを設定できます。 これらのデプロイへの直接トラフィックは、ルールを使用して指定できます。 ここでは、受信トラフィックの 100% を処理する 1 つのデプロイを作成します。 ここではデプロイの色名 (たとえば blue、green、red のデプロイ) を選択しましたが、これは任意です。
Azure Machine Learning スタジオの [モデル] ページで、登録したモデルの最新バージョンを確認できます。 また、次のコードで、使う最新のバージョン番号を取得することもできます。
# Let's pick the latest version of the model
latest_model_version = max(
    [int(m.version) for m in ml_client.models.list(name=registered_model_name)]
)
print(f'Latest model is version "{latest_model_version}" ')
最新バージョンのモデルをデプロイします。
# picking the model to deploy. Here we use the latest version of our registered model
model = ml_client.models.get(name=registered_model_name, version=latest_model_version)

# Expect this deployment to take approximately 6 to 8 minutes.
# create an online deployment.
# if you run into an out of quota error, change the instance_type to a comparable VM that is available.
# Learn more on https://azure.microsoft.com/pricing/details/machine-learning/.
blue_deployment = ManagedOnlineDeployment(
    name="blue",
    endpoint_name=online_endpoint_name,
    model=model,
    instance_type="Standard_DS3_v2",
    instance_count=1,
)

blue_deployment = ml_client.begin_create_or_update(blue_deployment).result()
注意
このデプロイには約 6 分から 8 分かかります。
デプロイが完了したら、テストの準備は完了です。
サンプル クエリでのテスト
モデルがエンドポイントにデプロイされた後、それを使用して推論を実行できます。
スコア スクリプトの run メソッドで想定される設計に従って、サンプル要求ファイルを作成します。
deploy_dir = "./deploy"
os.makedirs(deploy_dir, exist_ok=True)
%%writefile {deploy_dir}/sample-request.json
{
  "input_data": {
    "columns": [0,1,2,3,4,5,6,7,8,9,10,11,12,13,14,15,16,17,18,19,20,21,22],
    "index": [0, 1],
    "data": [
            [20000,2,2,1,24,2,2,-1,-1,-2,-2,3913,3102,689,0,0,0,0,689,0,0,0,0],
            [10, 9, 8, 7, 6, 5, 4, 3, 2, 1, 10, 9, 8, 7, 6, 5, 4, 3, 2, 1, 10, 9, 8]
        ]
  }
}
# test the blue deployment with some sample data
ml_client.online_endpoints.invoke(
    endpoint_name=online_endpoint_name,
    request_file="./deploy/sample-request.json",
    deployment_name="blue",
)
リソースをクリーンアップする
エンドポイントを使う予定がない場合は、削除してリソースの使用を停止します。 他のデプロイがエンドポイントを使っていないことを確認してから削除してください。
注意
完全に削除されるまで約 20 分かかります。
ml_client.online_endpoints.begin_delete(name=online_endpoint_name)
コンピューティング インスタンスを停止する
コンピューティング インスタンスをすぐに使用しない場合は、停止してください。
- スタジオの左側のナビゲーション領域で、[コンピューティング] を選択します。
- 上部のタブで、 [コンピューティング インスタンス] を選択します
- 一覧からコンピューティング インスタンスを選択します。
- 上部のツールバーで、 [停止] を選択します。
すべてのリソースの削除
重要
作成したリソースは、Azure Machine Learning に関連したその他のチュートリアルおよびハウツー記事の前提条件として使用できます。
作成したどのリソースも今後使用する予定がない場合は、課金が発生しないように削除します。
Azure Portal で、左端にある [リソース グループ] を選択します。
一覧から、作成したリソース グループを選択します。
[リソース グループの削除] を選択します。
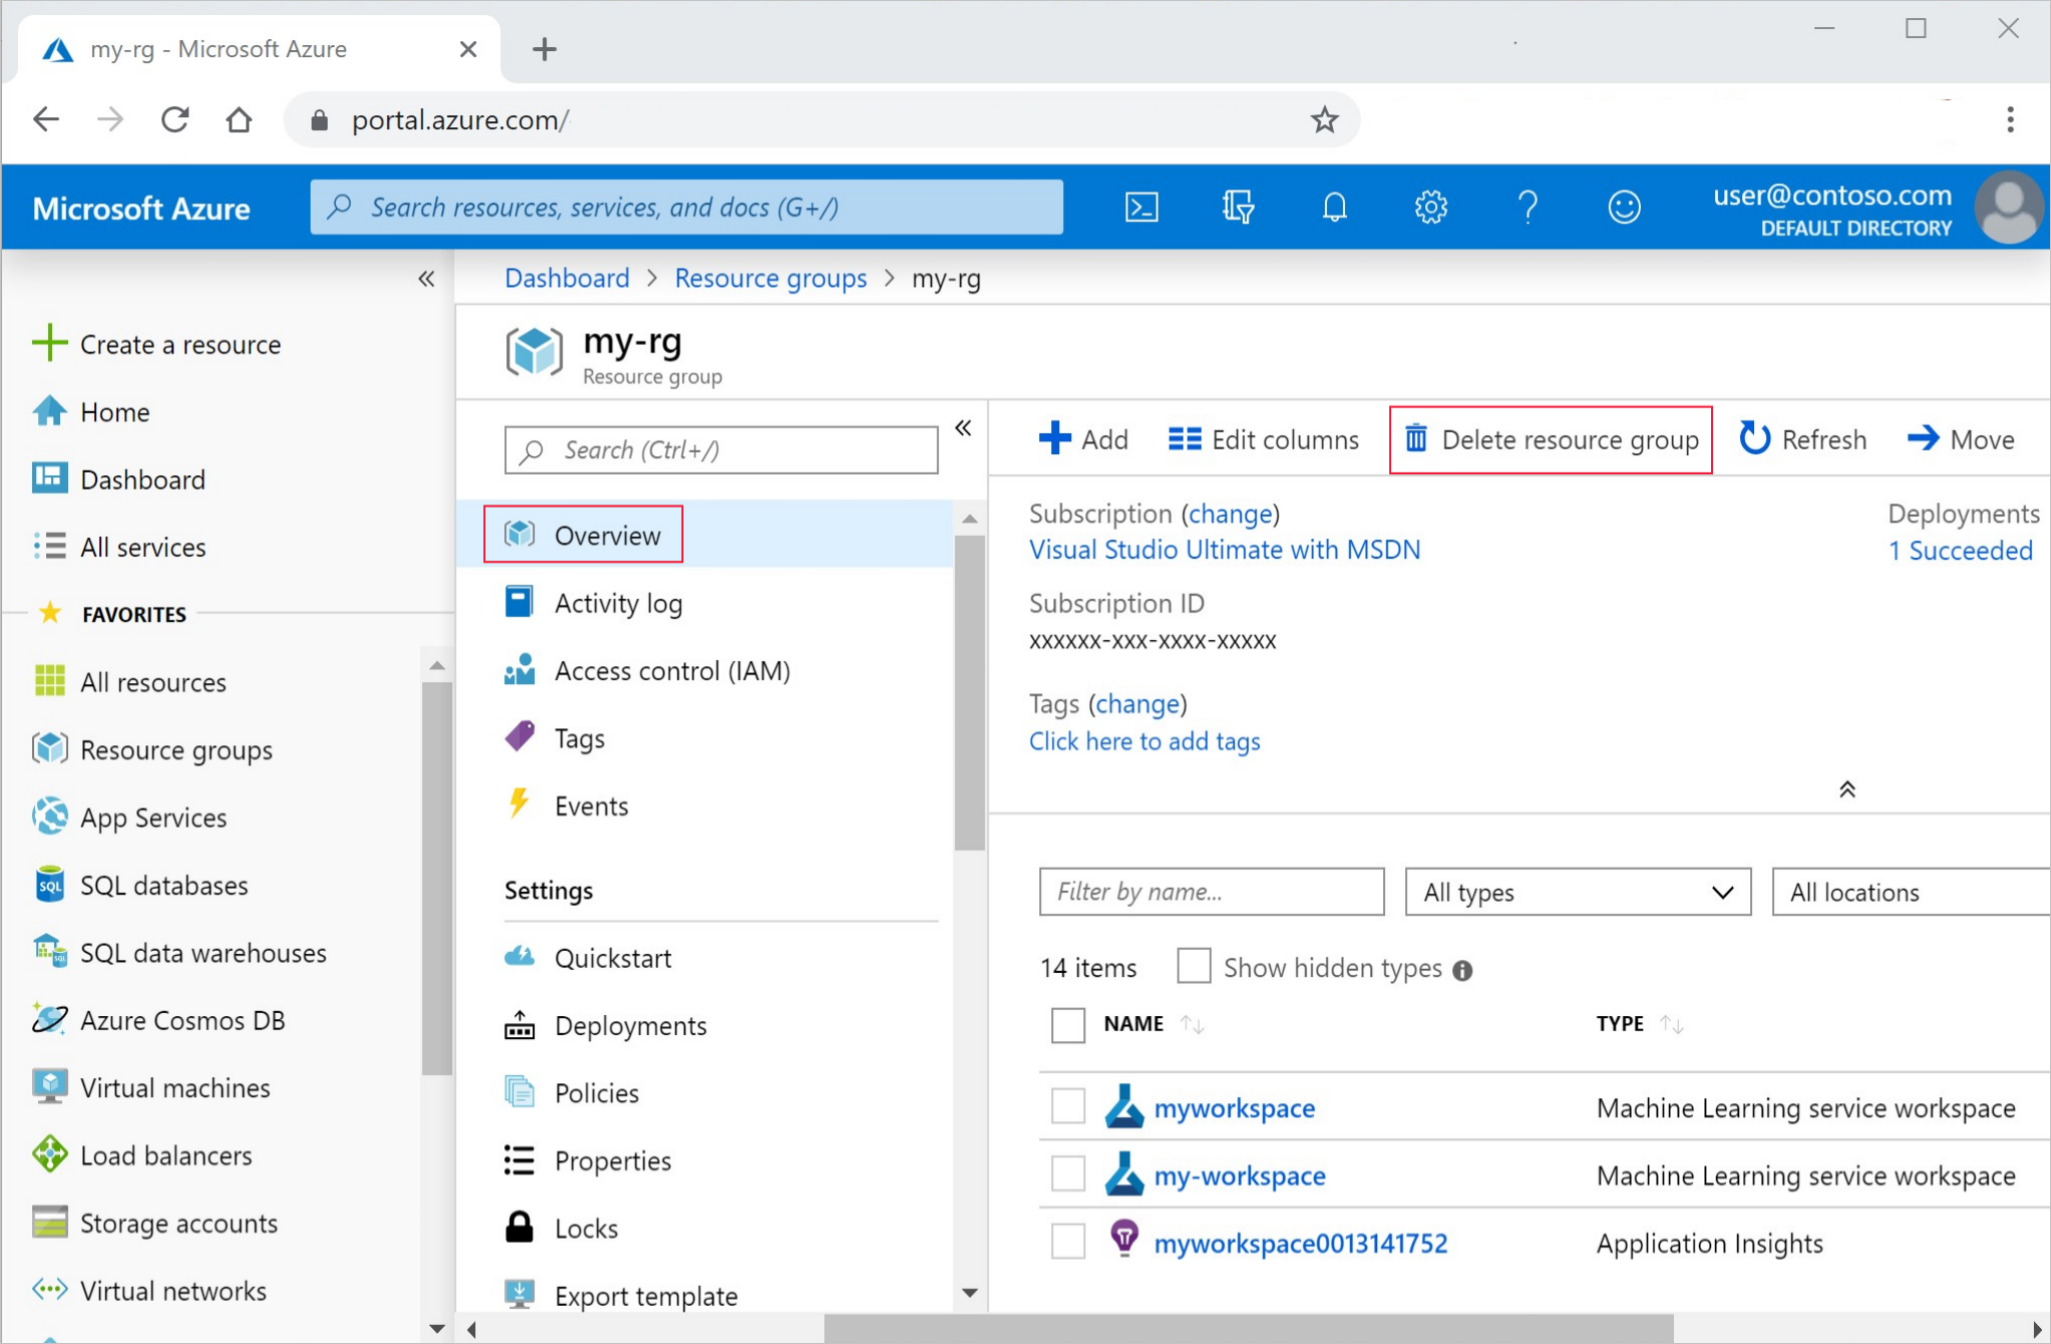
リソース グループ名を入力します。 次に、 [削除] を選択します。
次のステップ
モデルのトレーニングとデプロイに何が関係するのか理解したので、次のチュートリアルでプロセスについて詳しく学習してください。
| チュートリアル | 説明 |
|---|---|
| Azure Machine Learning でデータをアップロードし、データにアクセスし、データを探索する | クラウドに大きなデータを保存し、ノートブックとスクリプトからそのデータを取得します |
| クラウド ワークステーションでのモデル開発 | 機械学習モデルのプロトタイプ作成と開発を開始します |
| Azure Machine Learning でモデルをトレーニングする | モデルのトレーニングについて詳しく説明します |
| モデルをオンライン エンドポイントとしてデプロイする | モデルのデプロイについて詳しく説明します |
| 実稼働の機械学習パイプラインを作成する | 完全な機械学習タスクを複数ステップのワークフローに分割します。 |