ASP.NET Web API での HTTP メッセージ ハンドラー
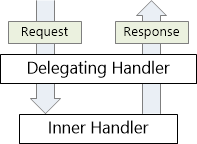
メッセージ ハンドラーは、HTTP 要求を受け取り、HTTP 応答を返すクラスです。 メッセージ ハンドラーは、抽象クラス HttpMessageHandler から派生します。
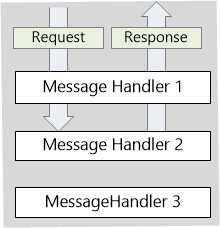
通常、一連のメッセージ ハンドラーは連鎖しています。 最初のハンドラーは HTTP 要求を受け取り、何らかの処理を行って、次のハンドラーにその要求を渡します。 ある時点で応答が作成され、連鎖をさかのぼります。 このパターンは、デリゲート ハンドラーと呼ばれます。
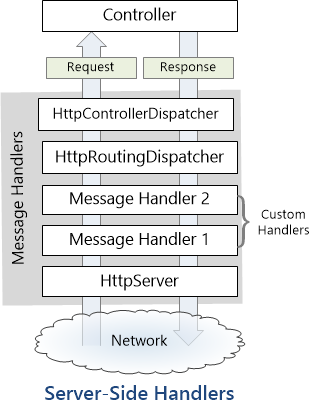
サーバー側メッセージ ハンドラー
Web API パイプラインのサーバー側では、いくつかの組み込みメッセージ ハンドラーが使われます。
- HttpServer は、ホストから要求を取得します。
- HttpRoutingDispatcher は、ルートに基づいて要求をディスパッチします。
- HttpControllerDispatcher は、Web API コントローラーに要求を送信します。
カスタム ハンドラーをパイプラインに追加できます。 メッセージ ハンドラーは、(コントローラーのアクションではなく) HTTP メッセージのレベルで影響する横断的な問題に適しています。 たとえば、メッセージ ハンドラーでは次のことを行う場合があります。
- 要求ヘッダーを読み取ったり変更したりする。
- 応答ヘッダーを応答に追加する。
- コントローラーに到達する前に要求を検証する。
次の図は、パイプラインに挿入された 2 つのカスタム ハンドラーを示したものです。
Note
クライアント側では、HttpClient もメッセージ ハンドラーを使います。 詳しくは、HttpClient のメッセージ ハンドラーに関する記事をご覧ください。
カスタム メッセージ ハンドラー
カスタム メッセージ ハンドラーを記述するには、System.Net.Http.DelegatingHandler から派生し、SendAsync メソッドをオーバーライドします。 このメソッドのシグネチャは次のとおりです。
Task<HttpResponseMessage> SendAsync(
    HttpRequestMessage request, CancellationToken cancellationToken);
このメソッドは、HttpRequestMessage を入力として受け取り、HttpResponseMessage を非同期的に返します。 一般的な実装では、次の処理が行われます。
- 要求メッセージを処理します。
base.SendAsyncを呼び出して、内部ハンドラーに要求を送信します。- 内部ハンドラーは応答メッセージを返します。 (この手順は非同期です。)
- 応答を処理し、呼び出し元に返します。
簡単な例を次に示します。
public class MessageHandler1 : DelegatingHandler
{
    protected async override Task<HttpResponseMessage> SendAsync(
        HttpRequestMessage request, CancellationToken cancellationToken)
    {
        Debug.WriteLine("Process request");
        // Call the inner handler.
        var response = await base.SendAsync(request, cancellationToken);
        Debug.WriteLine("Process response");
        return response;
    }
}
Note
base.SendAsync の呼び出しは非同期です。 この呼び出しの後でハンドラーが何らかの処理を行う場合は、次に示すように、await キーワードを使います。
デリゲート ハンドラーは、内部ハンドラーをスキップして、応答を直接作成することもできます。
public class MessageHandler2 : DelegatingHandler
{
    protected override Task<HttpResponseMessage> SendAsync(
        HttpRequestMessage request, CancellationToken cancellationToken)
    {
        // Create the response.
        var response = new HttpResponseMessage(HttpStatusCode.OK)
        {
            Content = new StringContent("Hello!")
        };

        // Note: TaskCompletionSource creates a task that does not contain a delegate.
        var tsc = new TaskCompletionSource<HttpResponseMessage>();
        tsc.SetResult(response);   // Also sets the task state to "RanToCompletion"
        return tsc.Task;
    }
}
デリゲート ハンドラーが base.SendAsync を呼び出さずに応答を作成する場合、要求はパイプラインの残りの部分をスキップします。 これは、要求を検証するハンドラーの場合に役に立つことがあります (エラー応答の作成)。
パイプラインへのハンドラーの追加
サーバー側でメッセージ ハンドラーを追加するには、HttpConfiguration.MessageHandlers コレクションにハンドラーを追加します。 "ASP.NET MVC 4 Web アプリケーション" テンプレートを使ってプロジェクトを作成した場合は、WebApiConfig クラス内でこれを行うことができます。
public static class WebApiConfig
{
    public static void Register(HttpConfiguration config)
    {
        config.MessageHandlers.Add(new MessageHandler1());
        config.MessageHandlers.Add(new MessageHandler2());

        // Other code not shown...
    }
}
メッセージ ハンドラーは、MessageHandlers コレクション内と同じ順序で呼び出されます。 これらは入れ子になっているため、応答メッセージは他の方向に移動します。 つまり、最後のハンドラーが最初に応答メッセージを取得します。
内部ハンドラーを設定する必要はないことに注意してください。Web API フレームワークは、メッセージ ハンドラーを自動的に接続します。
セルフホスティングの場合は、HttpSelfHostConfiguration クラスのインスタンスを作成して、ハンドラーを MessageHandlers コレクションに追加します。
var config = new HttpSelfHostConfiguration("http://localhost");
config.MessageHandlers.Add(new MessageHandler1());
config.MessageHandlers.Add(new MessageHandler2());
次に、カスタム メッセージ ハンドラーの例をいくつか見てみましょう。
例: X-HTTP-Method-Override
X-HTTP-Method-Override は、標準ではない HTTP ヘッダーです。 それは、PUT や DELETE など、特定の HTTP 要求の種類を送信できないクライアント向けに設計されています。 代わりに、クライアントは POST 要求を送信し、X-HTTP-Method-Override ヘッダーを目的のメソッドに設定します。 次に例を示します。
X-HTTP-Method-Override: PUT
次に示すのは、X-HTTP-Method-Override のサポートを追加するメッセージ ハンドラーです。
public class MethodOverrideHandler : DelegatingHandler
{
    readonly string[] _methods = { "DELETE", "HEAD", "PUT" };
    const string _header = "X-HTTP-Method-Override";

    protected override Task<HttpResponseMessage> SendAsync(
        HttpRequestMessage request, CancellationToken cancellationToken)
    {
        // Check for HTTP POST with the X-HTTP-Method-Override header.
        if (request.Method == HttpMethod.Post && request.Headers.Contains(_header))
        {
            // Check if the header value is in our methods list.
            var method = request.Headers.GetValues(_header).FirstOrDefault();
            if (_methods.Contains(method, StringComparer.InvariantCultureIgnoreCase))
            {
                // Change the request method.
                request.Method = new HttpMethod(method);
            }
        }
        return base.SendAsync(request, cancellationToken);
    }
}
SendAsync メソッドで、ハンドラーは要求メッセージが POST 要求かどうか、および X-HTTP-Method-Override ヘッダーが含まれているかどうかを調べます。 そうである場合は、ヘッダーの値を検証してから、要求メソッドを変更します。 最後に、ハンドラーは base.SendAsync を呼び出して、メッセージを次のハンドラーに渡します。
要求が HttpControllerDispatcher クラスに到達すると、HttpControllerDispatcher は更新された要求メソッドに基づいて要求をルーティングします。
例: カスタム応答ヘッダーの追加
次に示すのは、すべての応答メッセージにカスタム ヘッダーを追加するメッセージ ハンドラーです。
// .Net 4.5
public class CustomHeaderHandler : DelegatingHandler
{
    async protected override Task<HttpResponseMessage> SendAsync(
            HttpRequestMessage request, CancellationToken cancellationToken)
    {
        HttpResponseMessage response = await base.SendAsync(request, cancellationToken);
        response.Headers.Add("X-Custom-Header", "This is my custom header.");
        return response;
    }
}
最初に、ハンドラーは base.SendAsync を呼び出して、内部メッセージ ハンドラーに要求を渡します。 内部ハンドラーは応答メッセージを返しますが、Task<T> オブジェクトを使って非同期にそれを行います。 応答メッセージは、base.SendAsync が非同期に完了するまで使用できません。
この例では、await キーワードを使って、SendAsync の完了後に非同期的に作業を実行します。 .NET Framework 4.0 が対象の場合は、Task<T>.ContinueWith メソッドを使います。
public class CustomHeaderHandler : DelegatingHandler
{
    protected override Task<HttpResponseMessage> SendAsync(
        HttpRequestMessage request, CancellationToken cancellationToken)
    {
        return base.SendAsync(request, cancellationToken).ContinueWith(
            (task) =>
            {
                HttpResponseMessage response = task.Result;
                response.Headers.Add("X-Custom-Header", "This is my custom header.");
                return response;
            }
        );
    }
}
例: API キーの確認
一部の Web サービスでは、クライアントで要求に API キーを含める必要があります。 次に示すのは、メッセージ ハンドラーが要求で有効な API キーを調べる方法の例です。
public class ApiKeyHandler : DelegatingHandler
{
    public string Key { get; set; }

    public ApiKeyHandler(string key)
    {
        this.Key = key;
    }

    protected override Task<HttpResponseMessage> SendAsync(
        HttpRequestMessage request, CancellationToken cancellationToken)
    {
        if (!ValidateKey(request))
        {
            var response = new HttpResponseMessage(HttpStatusCode.Forbidden);
            var tsc = new TaskCompletionSource<HttpResponseMessage>();
            tsc.SetResult(response);
            return tsc.Task;
        }
        return base.SendAsync(request, cancellationToken);
    }

    private bool ValidateKey(HttpRequestMessage message)
    {
        var query = message.RequestUri.ParseQueryString();
        string key = query["key"];
        return (key == Key);
    }
}
このハンドラーは、URI クエリ文字列で API キーを調べます。 (この例の場合、キーは静的な文字列であると想定しています。実際の実装では、おそらくさらに複雑な検証を使います。)クエリ文字列にキーが含まれている場合、ハンドラーは要求を内部ハンドラーに渡します。
要求に有効なキーがない場合、ハンドラーは状態 "403 禁止" を含む応答メッセージを作成します。 この場合、ハンドラーは base.SendAsync を呼び出さないため、内部ハンドラーは要求を受け取らず、コントローラーも受け取りません。 そのため、コントローラーは、すべての受信した要求が有効な API キーを持っているものと想定できます。
Note
API キーが特定のコントローラー アクションのみに適用される場合は、メッセージ ハンドラーではなくアクション フィルターの使用を検討します。 アクション フィルターは、URI ルーティングが実行された後で実行されます。
ルートごとのメッセージ ハンドラー
HttpConfiguration.MessageHandlers コレクション内のハンドラーはグローバルに適用されます。
または、ルートを定義するときに、特定のルートにメッセージ ハンドラーを追加できます。
public static class WebApiConfig
{
    public static void Register(HttpConfiguration config)
    {
        config.Routes.MapHttpRoute(
            name: "Route1",
            routeTemplate: "api/{controller}/{id}",
            defaults: new { id = RouteParameter.Optional }
        );

        config.Routes.MapHttpRoute(
            name: "Route2",
            routeTemplate: "api2/{controller}/{id}",
            defaults: new { id = RouteParameter.Optional },
            constraints: null,
            handler: new MessageHandler2()  // per-route message handler
        );

        config.MessageHandlers.Add(new MessageHandler1());  // global message handler
    }
}
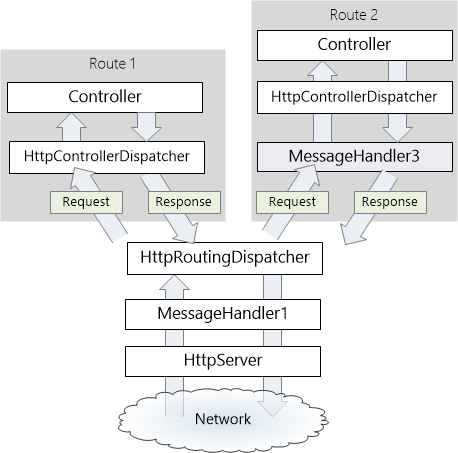
この例では、要求 URI が "Route2" と一致する場合、要求は MessageHandler2 にディスパッチされます。 次の図は、これら 2 つのルートのパイプラインを示したものです。

既定の HttpControllerDispatcher が MessageHandler2 に置き換えられていることに注意してください。 この例では、MessageHandler2 が応答を作成し、"Route2" と一致する要求はコントローラーに届きません。 これにより、Web API コントローラー メカニズム全体を独自のカスタム エンドポイントに置き換えることができます。
または、ルートごとのメッセージ ハンドラーで HttpControllerDispatcher にデリゲートし、そこでコントローラーにディスパッチすることもできます。
次のコードでは、このルートを構成する方法を示します。
// List of delegating handlers.
DelegatingHandler[] handlers = new DelegatingHandler[] {
    new MessageHandler3()
};

// Create a message handler chain with an end-point.
var routeHandlers = HttpClientFactory.CreatePipeline(
    new HttpControllerDispatcher(config), handlers);

config.Routes.MapHttpRoute(
    name: "Route2",
    routeTemplate: "api2/{controller}/{id}",
    defaults: new { id = RouteParameter.Optional },
    constraints: null,
    handler: routeHandlers
);
フィードバック
以下は間もなく提供いたします。2024 年を通じて、コンテンツのフィードバック メカニズムとして GitHub の issue を段階的に廃止し、新しいフィードバック システムに置き換えます。 詳細については、「https://aka.ms/ContentUserFeedback」を参照してください。
フィードバックの送信と表示