// Create the Bot Framework Authentication to be used with the Bot Adapter.
services.AddSingleton<BotFrameworkAuthentication, ConfigurationBotFrameworkAuthentication>();

// Create the Bot Adapter with error handling enabled.
Bots\WelcomeUserBot.cs
// Initializes a new instance of the "WelcomeUserBot" class.
public WelcomeUserBot(UserState userState)
{
    _userState = userState;
}
// Create HTTP server
const server = restify.createServer();
server.use(restify.plugins.bodyParser());

server.listen(process.env.port || process.env.PORT || 3978, function() {
    console.log(`\n${ server.name } listening to ${ server.url }`);
    console.log('\nGet Bot Framework Emulator: https://aka.ms/botframework-emulator');
Spring コンテナーによってユーザー状態オブジェクトはスタートアップ時に作成され、依存関係がボット コンストラクターに挿入されます。
Application.java
@Bean
public Bot getBot(UserState userState) {
    return new WelcomeUserBot(userState);
}
WelcomeUserBot.java
private final UserState userState;

// Initializes a new instance of the "WelcomeUserBot" class.
@Autowired
public WelcomeUserBot(UserState withUserState) {
    userState = withUserState;
}
this.onMessage(async (context, next) => {
    // Read UserState. If the 'DidBotWelcomedUser' does not exist (first time ever for a user)
    // set the default to false.
    const didBotWelcomedUser = await this.welcomedUserProperty.get(context, false);
/**
 * Override the ActivityHandler.run() method to save state changes after the bot logic completes.
 */
async run(context) {
    await super.run(context);

    // Save state changes
    await this.userState.saveChanges(context);
}
// Get state data from UserState.
StatePropertyAccessor<WelcomeUserState> stateAccessor =
    userState.createProperty("WelcomeUserState");
CompletableFuture<WelcomeUserState> stateFuture =
    stateAccessor.get(turnContext, WelcomeUserState::new);
# Get the state properties from the turn context.
welcome_user_state = await self.user_state_accessor.get(
    turn_context, WelcomeUserState
)
async def on_turn(self, turn_context: TurnContext):
    await super().on_turn(turn_context)

    # save changes to WelcomeUserState after each turn
    await self._user_state.save_changes(turn_context)
public class WelcomeUserBot : ActivityHandler
{
    // Messages sent to the user.
    private const string WelcomeMessage = "This is a simple Welcome Bot sample. This bot will introduce you " +
                                            "to welcoming and greeting users. You can say 'intro' to see the " +
                                            "introduction card. If you are running this bot in the Bot Framework " +
                                            "Emulator, press the 'Start Over' button to simulate user joining " +
                                            "a bot or a channel";

    private const string InfoMessage = "You are seeing this message because the bot received at least one " +
                                        "'ConversationUpdate' event, indicating you (and possibly others) " +
                                        "joined the conversation. If you are using the emulator, pressing " +
                                        "the 'Start Over' button to trigger this event again. The specifics " +
                                        "of the 'ConversationUpdate' event depends on the channel. You can " +
                                        "read more information at: " +
                                        "https://aka.ms/about-botframework-welcome-user";

    private const string LocaleMessage = "You can use the activity's 'GetLocale()' method to welcome the user " +
                                         "using the locale received from the channel. " +
                                         "If you are using the Emulator, you can set this value in Settings.";
{
    foreach (var member in membersAdded)
    {
        if (member.Id != turnContext.Activity.Recipient.Id)
        {
            await turnContext.SendActivityAsync($"Hi there - {member.Name}. {WelcomeMessage}", cancellationToken: cancellationToken);
            await turnContext.SendActivityAsync(InfoMessage, cancellationToken: cancellationToken);
            await turnContext.SendActivityAsync($"{LocaleMessage} Current locale is '{turnContext.Activity.GetLocale()}'.", cancellationToken: cancellationToken);
            await turnContext.SendActivityAsync(PatternMessage, cancellationToken: cancellationToken);
        }
    }
}
// Sends welcome messages to conversation members when they join the conversation.
// Messages are only sent to conversation members who aren't the bot.
this.onMembersAdded(async (context, next) => {
// Iterate over all new members added to the conversation
for (const idx in context.activity.membersAdded) {
// Greet anyone that was not the target (recipient) of this message.
// Since the bot is the recipient for events from the channel,
// context.activity.membersAdded === context.activity.recipient.Id indicates the
// bot was added to the conversation, and the opposite indicates this is a user.
if (context.activity.membersAdded[idx].id !== context.activity.recipient.id) {
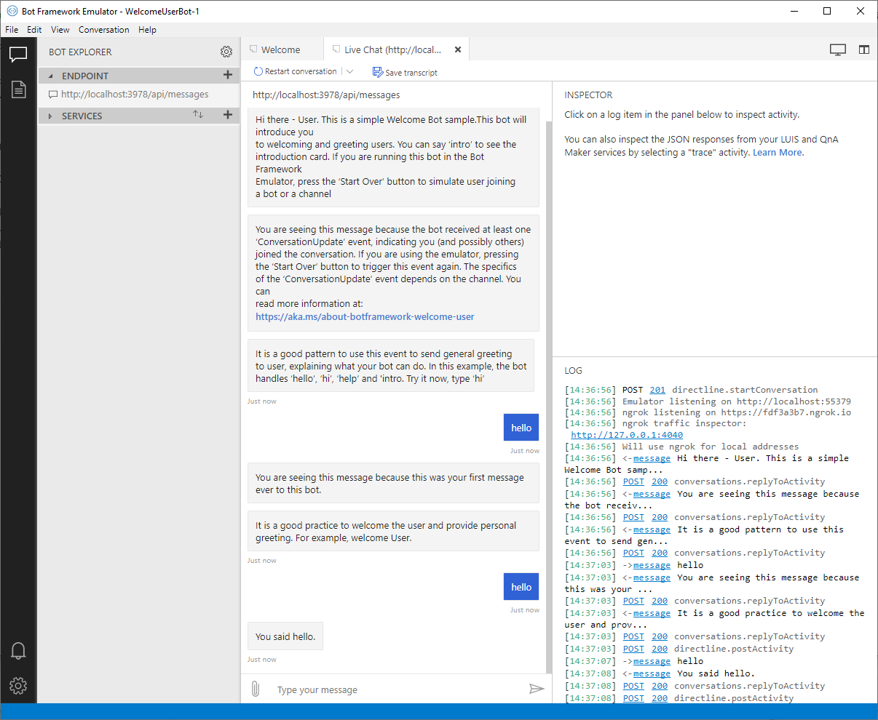
await context.sendActivity(`Welcome to the 'Welcome User' Bot. This bot will introduce you to welcoming and greeting users.`);
await context.sendActivity(`You are seeing this message because the bot received at least one 'ConversationUpdate' ` +
`event, indicating you (and possibly others) joined the conversation. If you are using the emulator, ` +
`pressing the 'Start Over' button to trigger this event again. The specifics of the 'ConversationUpdate' ` +
`event depends on the channel. You can read more information at https://aka.ms/about-botframework-welcome-user`);
await context.sendActivity(`You can use the activity's 'locale' property to welcome the user ` +
`using the locale received from the channel. ` +
`If you are using the Emulator, you can set this value in Settings. ` +
`Current locale is '${ context.activity.locale }'`);
await context.sendActivity(`It is a good pattern to use this event to send general greeting to user, explaining what your bot can do. ` +
`In this example, the bot handles 'hello', 'hi', 'help' and 'intro'. ` +
`Try it now, type 'hi'`);
}
}
// By calling next() you ensure that the next BotHandler is run.
await next();
});
public class WelcomeUserBot extends ActivityHandler {
    // Messages sent to the user.
    private static final String WELCOME_MESSAGE =
        "This is a simple Welcome Bot sample. This bot will introduce you "
            + "to welcoming and greeting users. You can say 'intro' to see the "
            + "introduction card. If you are running this bot in the Bot Framework "
            + "Emulator, press the 'Start Over' button to simulate user joining "
            + "a bot or a channel";

    private static final String INFO_MESSAGE =
        "You are seeing this message because the bot received at least one "
            + "'ConversationUpdate' event, indicating you (and possibly others) "
            + "joined the conversation. If you are using the emulator, pressing "
            + "the 'Start Over' button to trigger this event again. The specifics "
            + "of the 'ConversationUpdate' event depends on the channel. You can "
            + "read more information at: " + "https://aka.ms/about-botframework-welcome-user";

    private String localeMessage =
        "You can use the activity's GetLocale() method to welcome the user "
            + "using the locale received from the channel. "
            + "If you are using the Emulator, you can set this value in Settings.";

    private static final String PATTERN_MESSAGE =
        "It is a good pattern to use this event to send general greeting"
            + "to user, explaining what your bot can do. In this example, the bot "
            + "handles 'hello', 'hi', 'help' and 'intro'. Try it now, type 'hi'";
"""
Greet when users are added to the conversation.
Note that all channels do not send the conversation update activity.
If you find that this bot works in the emulator, but does not in
another channel the reason is most likely that the channel does not
send this activity.
"""
for member in members_added:
    if member.id != turn_context.activity.recipient.id:
        await turn_context.send_activity(
            f"Hi there { member.name }. " + self.WELCOME_MESSAGE
        )

        await turn_context.send_activity(self.INFO_MESSAGE)

        await turn_context.send_activity(
            f"{ self.LOCALE_MESSAGE } Current locale is { turn_context.activity.locale }."
        )

        await turn_context.send_activity(self.PATTERN_MESSAGE)
{
    var welcomeUserStateAccessor = _userState.CreateProperty<WelcomeUserState>(nameof(WelcomeUserState));
    var didBotWelcomeUser = await welcomeUserStateAccessor.GetAsync(turnContext, () => new WelcomeUserState(), cancellationToken);

    if (didBotWelcomeUser.DidBotWelcomeUser == false)
    {
        didBotWelcomeUser.DidBotWelcomeUser = true;

        // the channel should sends the user name in the 'From' object
        var userName = turnContext.Activity.From.Name;

        await turnContext.SendActivityAsync("You are seeing this message because this was your first message ever to this bot.", cancellationToken: cancellationToken);
        await turnContext.SendActivityAsync($"It is a good practice to welcome the user and provide personal greeting. For example, welcome {userName}.", cancellationToken: cancellationToken);
    }
    else
this.onMessage(async (context, next) => {
    // Read UserState. If the 'DidBotWelcomedUser' does not exist (first time ever for a user)
    // set the default to false.
    const didBotWelcomedUser = await this.welcomedUserProperty.get(context, false);

    // Your bot should proactively send a welcome message to a personal chat the first time
    // (and only the first time) a user initiates a personal chat with your bot.
    if (didBotWelcomedUser === false) {
        // The channel should send the user name in the 'From' object
        const userName = context.activity.from.name;
        await context.sendActivity('You are seeing this message because this was your first message ever sent to this bot.');
        await context.sendActivity(`It is a good practice to welcome the user and provide personal greeting. For example, welcome ${ userName }.`);

        // Set the flag indicating the bot handled the user's first message.
        await this.welcomedUserProperty.set(context, true);
    } else {
    }

    // By calling next() you ensure that the next BotHandler is run.
    await next();
});
@Override
protected CompletableFuture<Void> onMessageActivity(TurnContext turnContext) {
    // Get state data from UserState.
    StatePropertyAccessor<WelcomeUserState> stateAccessor =
        userState.createProperty("WelcomeUserState");
    CompletableFuture<WelcomeUserState> stateFuture =
        stateAccessor.get(turnContext, WelcomeUserState::new);

    return stateFuture.thenApply(thisUserState -> {
        if (!thisUserState.getDidBotWelcomeUser()) {
            thisUserState.setDidBotWelcomeUser(true);

            // the channel should send the user name in the 'from' object
            String userName = turnContext.getActivity().getFrom().getName();
            return turnContext
                .sendActivities(
                    MessageFactory.text(FIRST_WELCOME_ONE),
                    MessageFactory.text(String.format(FIRST_WELCOME_TWO, userName))
                );
// Save any state changes.
.thenApply(response -> userState.saveChanges(turnContext))
if not welcome_user_state.did_welcome_user:
    welcome_user_state.did_welcome_user = True

    await turn_context.send_activity(
        "You are seeing this message because this was your first message ever to this bot."
    )

    name = turn_context.activity.from_property.name
    await turn_context.send_activity(
        f"It is a good practice to welcome the user and provide personal greeting. For example: Welcome {name}"
    )
// This example uses an exact match on user's input utterance.
// Consider using LUIS or QnA for Natural Language Processing.
const text = context.activity.text.toLowerCase();
switch (text) {
case 'hello':
case 'hi':
    await context.sendActivity(`You said "${ context.activity.text }"`);
    break;
case 'intro':
case 'help':
    await this.sendIntroCard(context);
    break;
default:
    await context.sendActivity(`This is a simple Welcome Bot sample. You can say 'intro' to
                                    see the introduction card. If you are running this bot in the Bot
                                    Framework Emulator, press the 'Start Over' button to simulate user joining a bot or a channel`);
}
// This example hardcodes specific utterances.
// You should use LUIS or QnA for more advance language understanding.
String text = turnContext.getActivity().getText().toLowerCase();
switch (text) {
    case "hello":
    case "hi":
        return turnContext.sendActivities(MessageFactory.text("You said " + text));

    case "intro":
    case "help":
        return sendIntroCard(turnContext);

    default:
        return turnContext.sendActivity(WELCOME_MESSAGE);
}
ユーザーが intro または help を入力すると、ボットが __send_intro_card を呼び出して、概要アダプティブ カードがユーザーに示されます。
bots/welcome-user-bot.py
if text in ("hello", "hi"):
    await turn_context.send_activity(f"You said { text }")
elif text in ("intro", "help"):
    await self.__send_intro_card(turn_context)
else:
    await turn_context.send_activity(self.WELCOME_MESSAGE)
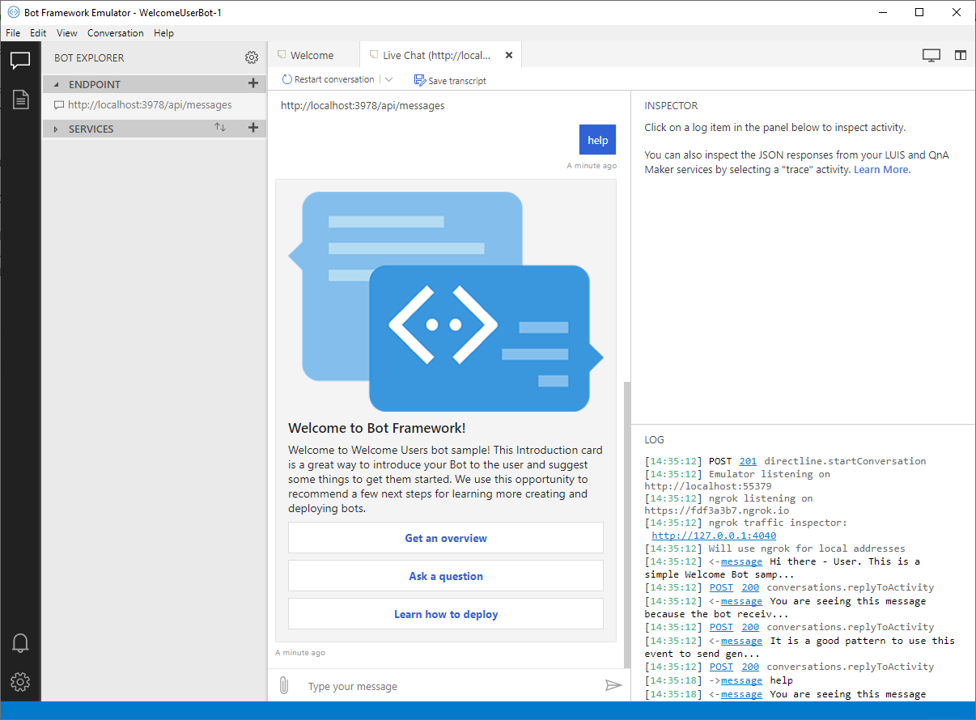
    {
        var card = new HeroCard
        {
            Title = "Welcome to Bot Framework!",
            Text = @"Welcome to Welcome Users bot sample! This Introduction card
                     is a great way to introduce your Bot to the user and suggest
                     some things to get them started. We use this opportunity to
                     recommend a few next steps for learning more creating and deploying bots.",
            Images = new List<CardImage>() { new CardImage("https://aka.ms/bf-welcome-card-image") },
            Buttons = new List<CardAction>()
            {
                new CardAction(ActionTypes.OpenUrl, "Get an overview", null, "Get an overview", "Get an overview", "https://docs.microsoft.com/en-us/azure/bot-service/?view=azure-bot-service-4.0"),
                new CardAction(ActionTypes.OpenUrl, "Ask a question", null, "Ask a question", "Ask a question", "https://stackoverflow.com/questions/tagged/botframework"),
                new CardAction(ActionTypes.OpenUrl, "Learn how to deploy", null, "Learn how to deploy", "Learn how to deploy", "https://docs.microsoft.com/en-us/azure/bot-service/bot-builder-howto-deploy-azure?view=azure-bot-service-4.0"),
            }
        };

        var response = MessageFactory.Attachment(card.ToAttachment());
        await turnContext.SendActivityAsync(response, cancellationToken);
    }
}
bots/welcomeBot.js
async sendIntroCard(context) {
    const card = CardFactory.heroCard(
        'Welcome to Bot Framework!',
        'Welcome to Welcome Users bot sample! This Introduction card is a great way to introduce your Bot to the user and suggest some things to get them started. We use this opportunity to recommend a few next steps for learning more creating and deploying bots.',
        ['https://aka.ms/bf-welcome-card-image'],
        [
            {
                type: ActionTypes.OpenUrl,
                title: 'Get an overview',
                value: 'https://docs.microsoft.com/en-us/azure/bot-service/?view=azure-bot-service-4.0'
            },
            {
                type: ActionTypes.OpenUrl,
                title: 'Ask a question',
                value: 'https://stackoverflow.com/questions/tagged/botframework'
            },
            {
                type: ActionTypes.OpenUrl,
                title: 'Learn how to deploy',
                value: 'https://docs.microsoft.com/en-us/azure/bot-service/bot-builder-howto-deploy-azure?view=azure-bot-service-4.0'
            }
        ]
    );

    await context.sendActivity({ attachments: [card] });
}
WelcomeUserBot.java
private CompletableFuture<ResourceResponse> sendIntroCard(TurnContext turnContext) {
    HeroCard card = new HeroCard();
    card.setTitle("Welcome to Bot Framework!");
    card.setText(
        "Welcome to Welcome Users bot sample! This Introduction card "
            + "is a great way to introduce your Bot to the user and suggest "
            + "some things to get them started. We use this opportunity to "
            + "recommend a few next steps for learning more creating and deploying bots."
    );

    CardImage image = new CardImage();
    image.setUrl("https://aka.ms/bf-welcome-card-image");

    card.setImages(Collections.singletonList(image));

    CardAction overviewAction = new CardAction();
    overviewAction.setType(ActionTypes.OPEN_URL);
    overviewAction.setTitle("Get an overview");
    overviewAction.setText("Get an overview");
    overviewAction.setDisplayText("Get an overview");
    overviewAction.setValue(
        "https://docs.microsoft.com/en-us/azure/bot-service/?view=azure-bot-service-4.0"
    );

    CardAction questionAction = new CardAction();
    questionAction.setType(ActionTypes.OPEN_URL);
    questionAction.setTitle("Ask a question");
    questionAction.setText("Ask a question");
    questionAction.setDisplayText("Ask a question");
    questionAction.setValue("https://stackoverflow.com/questions/tagged/botframework");

    CardAction deployAction = new CardAction();
    deployAction.setType(ActionTypes.OPEN_URL);
    deployAction.setTitle("Learn how to deploy");
    deployAction.setText("Learn how to deploy");
    deployAction.setDisplayText("Learn how to deploy");
    deployAction.setValue(
        "https://docs.microsoft.com/en-us/azure/bot-service/bot-builder-howto-deploy-azure?view=azure-bot-service-4.0"
    );
    card.setButtons(Arrays.asList(overviewAction, questionAction, deployAction));

    Activity response = MessageFactory.attachment(card.toAttachment());
    return turnContext.sendActivity(response);
}
bots/welcome-user-bot.py
async def __send_intro_card(self, turn_context: TurnContext):
    card = HeroCard(
        title="Welcome to Bot Framework!",
        text="Welcome to Welcome Users bot sample! This Introduction card "
        "is a great way to introduce your Bot to the user and suggest "
        "some things to get them started. We use this opportunity to "
        "recommend a few next steps for learning more creating and deploying bots.",
        images=[CardImage(url="https://aka.ms/bf-welcome-card-image")],
        buttons=[
            CardAction(
                type=ActionTypes.open_url,
                title="Get an overview",
                text="Get an overview",
                display_text="Get an overview",
                value="https://docs.microsoft.com/en-us/azure/bot-service/?view=azure-bot-service-4.0",
            ),
            CardAction(
                type=ActionTypes.open_url,
                title="Ask a question",
                text="Ask a question",
                display_text="Ask a question",
                value="https://stackoverflow.com/questions/tagged/botframework",
            ),
            CardAction(
                type=ActionTypes.open_url,
                title="Learn how to deploy",
                text="Learn how to deploy",
                display_text="Learn how to deploy",
                value="https://docs.microsoft.com/en-us/azure/bot-service/bot-builder-howto-deploy-azure?view=azure-bot-service-4.0",
            ),
        ],
    )

    return await turn_context.send_activity(
        MessageFactory.attachment(CardFactory.hero_card(card))
    )