フォローアップ プロンプトを使用して、複数のターンを含む会話を作成します。
フォローアップ プロンプトとコンテキストを使用して、一連の質問についてボットの "複数ターン" と呼ばれる複数回のターンを管理します。
複数ターンの動作を確認するには、次のデモンストレーション ビデオをご覧ください。
Note
QnA Maker サービスは、2025 年 3 月 31 日に廃止される予定です。 Azure AI Language の一部として、質問応答機能の新しいバージョンが提供されました。 言語サービス内の質問応答機能については、質問応答に関する記事を参照してください。 QnA Maker の新しいリソースは、2022 年 10 月 1 日以降作成できません。 既存の QnA Maker のナレッジ ベースを質問応答に移行する方法については、移行ガイドを参照してください。
複数ターン会話とは
1 回のターンでは複数の質問に応答できません。 クライアント アプリケーション (チャット ボット) の会話を設計するにあたり、場合によっては、ユーザーが行う質問をフィルター処理または調整してから正しい応答を決定する必要があります。 質問のこのフローは、ユーザーにフォローアップ プロンプトを示すことで実現します。
ユーザーが質問したとき、QnA Maker は応答 "と" フォローアップ プロンプトがあれば返します。 この応答では、フォローアップ質問を選択肢として提示できます。
注意事項
複数ターンのプロンプトは、FAQ ドキュメントからは抽出されません。 複数ターンの抽出が必要な場合は、QnA のペアを FAQ として指定している疑問符を削除します。
チャット ボットとの複数ターン会話の例
複数ターンでは、次の図のように、チャット ボットがユーザーとの会話を管理して最終的な応答を決定します。

上の画像では、ユーザーが「My account」と入力して会話を開始しました。 ナレッジ ベースには、3 つのリンクされた質問と応答のペアがあります。 答えを絞り込むために、ユーザーはナレッジ ベース内の 3 つの選択肢のうちの 1 つを選択します。 質問 (#1) には 3 つのフォローアップ プロンプトがあり、チャット ボットで 3 つのオプション (#2) として提示されます。
ユーザーがオプション (#3) を選ぶと、調整のための次のオプション (#4) が表示されます。 このシーケンスは、正しい最終応答 (#6) をユーザーが決定するまで続きます (#5)。
ボットで複数ターンを使用する
KB を公開した後、[ボットの作成] ボタンを選択して、QnA Maker ボットを Azure AI Bot Service にデプロイできます。 ボットで有効にしたチャット クライアントにプロンプトが表示されます。
ドキュメントの構造から複数ターン会話を作成する
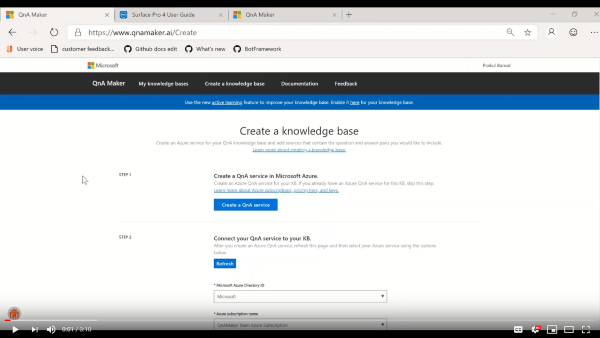
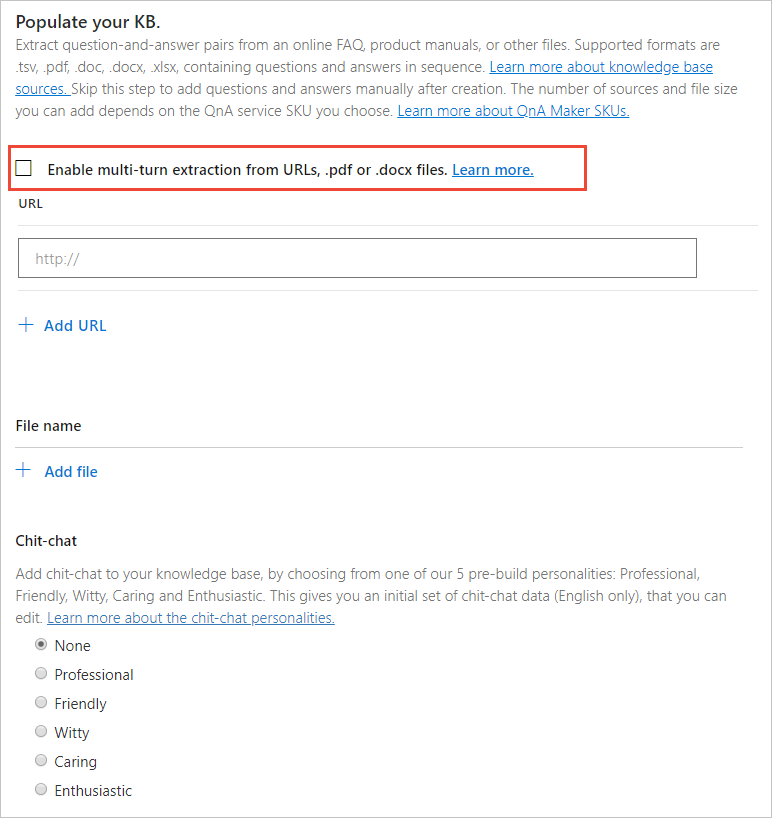
ナレッジ ベースを教えて作成するとき、 [Populate your KB](KB のポピュレート) セクションに [Enable multi-turn extraction from URLs, .pdf or .docx files](URL や.pdf または .docx ファイルからの複数ターン抽出を有効にする) チェック ボックスが表示されます。
このオプションを選択すると、QnA Maker でドキュメント構造内に存在する階層が抽出されます。 その階層はフォローアップ プロンプトに変換されて、階層のルートが親 QnA として機能します。 ドキュメントによっては、階層のルートにコンテンツが含まれておらず、回答として機能する場合があります。 代替の回答テキストとして使用される "既定の回答テキスト" を指定すると、このような階層を抽出できます。
複数ターン構造は、URL、PDF ファイル、または DOCX ファイルからのみ推論できます。 構造の例として、Microsoft Surface ユーザー マニュアル PDF ファイルの画像を表示します。

独自の複数ターンのドキュメントのビルド
複数ターンのドキュメントを作成する場合は、次のガイドラインに留意してください。
階層を示すには、見出しとサブ見出しを使用する。 例えば、h1 を使用して親 QnA を示し、h2 を使用してプロンプトとして受け取る必要がある QnA を示します。 後続の階層を示すには、小さい見出しサイズを使用する。 スタイル、色、その他のメカニズムを、ドキュメント内の構造を暗黙に示すために使用しないでください。QnA Maker では複数ターンのプロンプトが抽出されることはありません。
見出しの最初の文字は大文字にしなくてはなりません。
見出しの末尾に疑問符
?を付けないでください。サンプル ドキュメントを独自の複数ターンのドキュメントを作成する参考として使用できます。
複数ターンの KB へのファイルの追加
階層ドキュメントを追加すると、QnA Maker ではその構造からフォローアップ プロンプトを決定し、会話フローを作成します。
- QnA Maker で、[URL や .pdf または .docx ファイルからの複数ターン抽出を有効にする] を有効にして作成された既存のナレッジ ベースを選択します。
- [設定] ページにアクセスし、追加するファイルまたは URL を選択します。
- ナレッジ ベースを保存してトレーニングします。
注意事項
新規または空のナレッジ ベースのデータ ソースとしてエクスポートされた TSV または XLS の複数ターンのナレッジ ベース ファイルを使用することは、サポートされていません。 エクスポートされた複数ターン プロンプトをナレッジ ベースに追加するには、QnA Maker ポータルの [設定] ページから、そのファイルの種類をインポートする必要があります。
作成 API を使用して複数ターンのプロンプトを持つナレッジ ベースを作成する
QnA Maker 作成 API を使用して、複数ターンのプロンプトを持つナレッジ ケースを作成できます。 プロンプトは context プロパティの prompts 配列に追加されます。
コンテキストを使用して質問と応答を表示する
表示される質問と回答のペアを減らして、コンテキスト会話の質問と回答のペアのみにします。
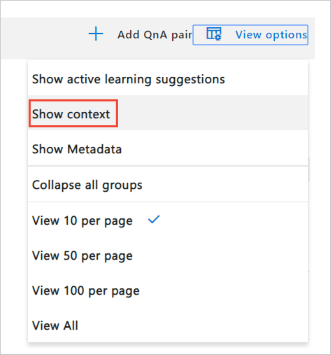
[オプションの表示] を選択し、 [コンテキストを表示] を選択します。 一覧には、フォローアップ プロンプトを含む質問と応答のペアが表示されます。
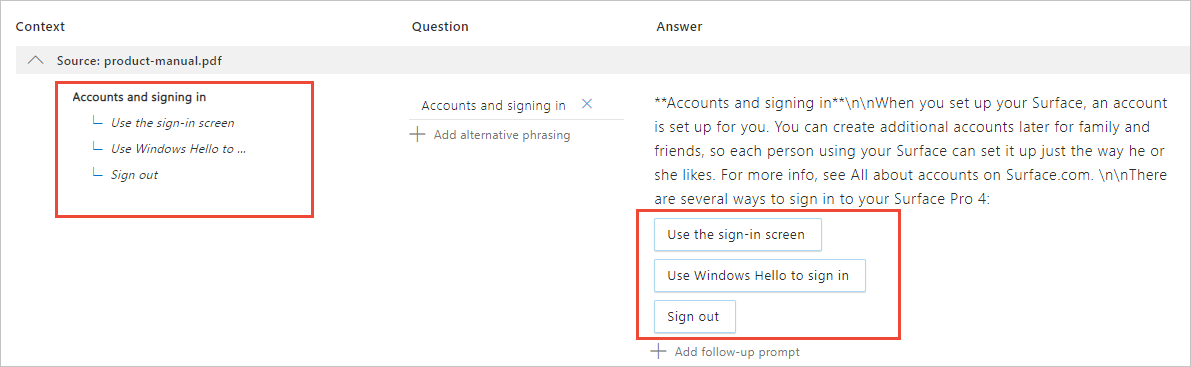
複数ターンのコンテキストが最初の列に表示されます。

上の画像では、 #1 が列内で太字テキストで表示され、現在の質問を示しています。 親の質問は、行の最上位の項目です。 それより下のすべての質問は、リンクされた質問と応答のペアです。 これらの項目は選択できるので、直ちに他のコンテキスト項目に移動できます。
既存の質問と応答のペアをフォローアップ プロンプトとして追加する
元の質問 My account には、Accounts and signing in (アカウントとサインイン) のようなフォローアップ プロンプトがあります。
現在リンクされていない既存の質問と応答のペアにフォローアップ プロンプトを追加します。 質問がどの質問と応答のペアにもリンクされていないので、現在のビュー設定を変更する必要があります。
既存の質問と応答のペアをフォローアップ プロンプトとしてリンクするには、質問と応答のペアの行を選択します。 Surface マニュアルの場合、Sign out を検索して一覧を減らします。
Signout の行の [応答] 列で、 [Add follow-up prompt](フォローアップ プロンプトの追加) を選択します。
[Follow-up prompt](フォローアップ プロンプト) ポップアップ ウィンドウのフィールドに、次の値を入力します。
フィールド 値 表示テキスト 「Turn off the device」(デバイスの電源を切る) と入力します。 これは、フォローアップ プロンプトに表示するカスタム テキストです。 Context-only (コンテキストのみ) このチェック ボックスをオンにします。 応答は、質問がコンテキストを指定する場合にのみ返されます。 Link to answer (応答へのリンク) 「Use the sign-in screen」(サインイン画面を使用する) と入力して、既存の質問と応答のペアを検索します。 1 つの一致が返されます。 この応答をフォローアップとして選択し、 [保存] を選択します。
![[フォローアップ プロンプト] ページ](../media/conversational-context/search-follow-up-prompt-for-existing-answer.png)
フォローアップ プロンプトを追加した後、上部のナビゲーションで [Save and train](保存してトレーニング) を選択します。
表示テキストを編集する
フォローアップ プロンプトを作成し、既存の質問と応答のペアを [Link to Answer](応答へのリンク) として入力したら、新しい [表示テキスト] を入力できます。 このテキストは、既存の質問を置き換えず、新しい代替質問を追加しません。 これらの値とは別になります。
表示テキストを編集するには、 [コンテキスト] フィールドで質問を検索し選択します。
その質問の行では、応答列でフォローアップ プロンプトを選択します。
編集する表示テキストを選択し、 [編集] を選択します。
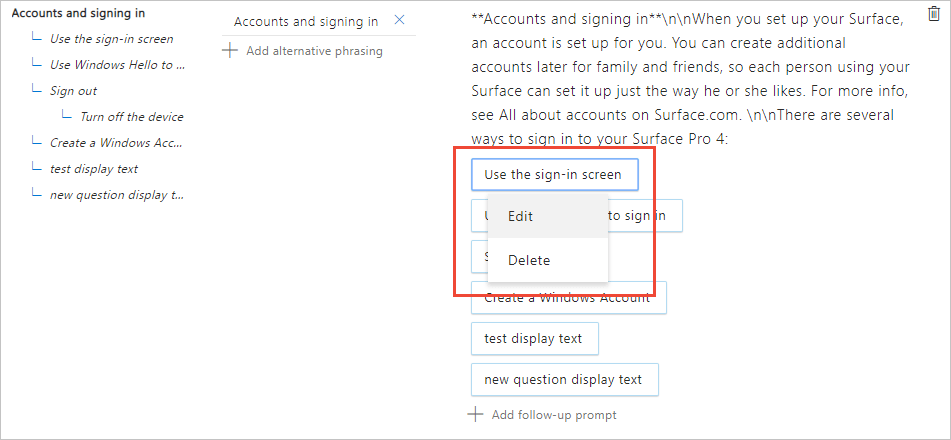
[Follow-up prompt](フォローアップ プロンプト) ポップアップ ウィンドウで、既存の表示テキストを変更します。
表示テキストの編集が完了したら、 [保存] を選択します。
上部のナビゲーション バーで、 [Save and train](保存してトレーニング) を選択します。
新しい質問と応答のペアをフォローアップ プロンプトとして追加する
新しい質問と応答のペアをナレッジ ベースに追加すると、各ペアがフォローアップ プロンプトとして既存の質問にリンクされるはずです。
ナレッジ ベースのツール バーで、「Accounts and signing in」(アカウントとサインイン) に対する既存の質問と応答のペアを検索して選択します。
この質問の [応答] 列で [Add follow-up prompt](フォローアップ プロンプトの追加) を選択します。
[Follow-up prompt (PREVIEW)](フォローアップ プロンプト (プレビュー)) で、次の値を入力して新しいフォローアップ プロンプトを作成します。
フィールド 値 表示テキスト 「Create a Windows Account.」(Windows アカウントを作成する。) フォローアップ プロンプトに表示するカスタム テキスト。 Context-only (コンテキストのみ) このチェック ボックスをオンにします。 この応答は、質問がコンテキストを指定する場合にのみ返されます。 Link to answer (応答へのリンク) 応答として次のテキストを入力します。
「Create a Windows account with a new or existing email account.」(新規または既存の電子メール アカウントを使用して Windows アカウントを作成します。)
データベースを保存してトレーニングすると、このテキストが変換されます。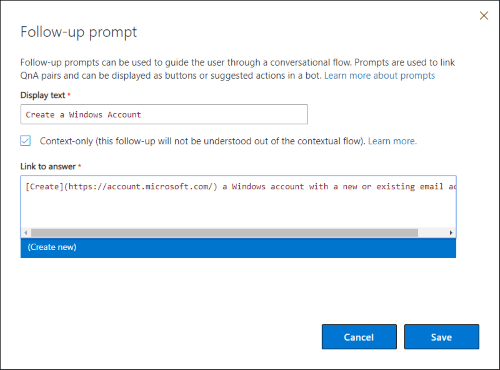
[新規作成] を選択してから、 [保存] を選択します。
このアクションによって、新しい質問と応答のペアが作成され、選択した質問がフォローアップ プロンプトとしてリンクされます。 両方の質問の [コンテキスト] 列は、フォローアップ プロンプトの関係を示します。
[オプションの表示] を選択し、[Show context (PREVIEW)](コンテキストを表示 (プレビュー)) を選択します。
新しい質問は、どのようにリンクされているかを示します。

親の質問は、その選択肢の 1 つとして新しい質問を表示します。
![スクリーンショットに、両方の質問の [コンテキスト] 列がフォローアップ プロンプトの関係を示していることが示されています。](../media/conversational-context/child-prompt-created.png)
フォローアップ プロンプトを追加した後、上部のナビゲーション バーで [Save and train](保存してトレーニング) を選択します。
![スクリーンショットに、両方の質問の [コンテキスト] 列がフォローアップ プロンプトの関係を示していることが示されています。](../media/conversational-context/child-prompt-created.png#lightbox)
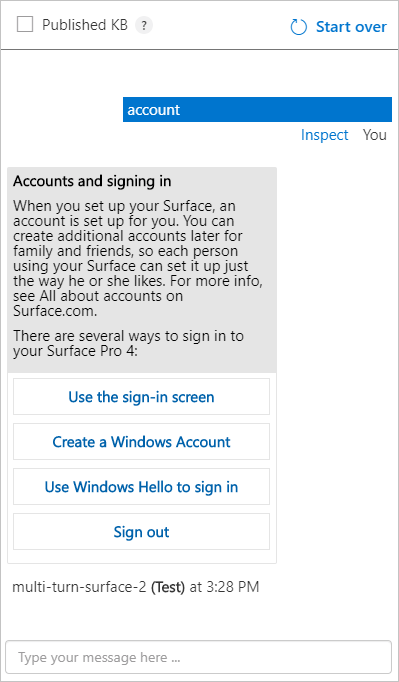
フォローアップ プロンプトのテスト中に複数ターンを表示にする
[テスト] ペインでフォローアップ プロンプトを含む質問をテストすると、応答にフォローアップ プロンプトが含まれます。
最初の応答とフォローアップ プロンプトを返す JSON 要求
空の context オブジェクトを使用して、ユーザーの質問に対する応答を要求し、フォローアップ プロンプトを含めます。
{
  "question": "accounts and signing in",
  "top": 10,
  "userId": "Default",
  "isTest": false,
  "context": {}
}
最初の応答とフォローアップ プロンプトを返す JSON 応答
前のセクションでは、「Accounts and signing in」(アカウントとサインイン) に対する応答とフォローアップ プロンプト (ある場合) を要求しました。 応答には、answers[0].context にあるプロンプト情報と、ユーザーに表示するテキストが含まれます。
{
    "answers": [
        {
            "questions": [
                "Accounts and signing in"
            ],
            "answer": "**Accounts and signing in**\n\nWhen you set up your Surface, an account is set up for you. You can create additional accounts later for family and friends, so each person using your Surface can set it up just the way he or she likes. For more info, see All about accounts on Surface.com. \n\nThere are several ways to sign in to your Surface Pro 4: ",
            "score": 100.0,
            "id": 15,
            "source": "product-manual.pdf",
            "metadata": [],
            "context": {
                "isContextOnly": true,
                "prompts": [
                    {
                        "displayOrder": 0,
                        "qnaId": 16,
                        "qna": null,
                        "displayText": "Use the sign-in screen"
                    }
                ]
            }
        },
        {
            "questions": [
                "Sign out"
            ],
            "answer": "**Sign out**\n\nHere's how to sign out: \n\n  Go to Start, and right-click your name. Then select Sign out. ",
            "score": 38.01,
            "id": 18,
            "source": "product-manual.pdf",
            "metadata": [],
            "context": {
                "isContextOnly": true,
                "prompts": [
                    {
                        "displayOrder": 0,
                        "qnaId": 16,
                        "qna": null,
                        "displayText": "Turn off the device"
                    }
                ]
            }
        },
        {
            "questions": [
                "Use the sign-in screen"
            ],
            "answer": "**Use the sign-in screen**\n\n1.  \n\nTurn on or wake your Surface by pressing the power button. \n\n2.  \n\nSwipe up on the screen or tap a key on the keyboard. \n\n3.  \n\nIf you see your account name and account picture, enter your password and select the right arrow or press Enter on your keyboard. \n\n4.  \n\nIf you see a different account name, select your own account from the list at the left. Then enter your password and select the right arrow or press Enter on your keyboard. ",
            "score": 27.53,
            "id": 16,
            "source": "product-manual.pdf",
            "metadata": [],
            "context": {
                "isContextOnly": true,
                "prompts": []
            }
        }
    ]
}
prompts 配列によって displayText プロパティのテキストと qnaId の値が提供されます。 これらの応答を会話フローで次に表示される選択肢として示し、選択された qnaId を次の要求で QnA Maker に送り返すことができます。
最初以外の応答とフォローアップ プロンプトを返す JSON 要求
前のコンテキストを context オブジェクトに含めます。
次の JSON 要求では、現在の質問は「Use Windows Hello to sign in」(Windows Hello を使ってサインインする) であり、前の質問は「accounts and signing in」(アカウントとサインイン) でした。
{
  "question": "Use Windows Hello to sign in",
  "top": 10,
  "userId": "Default",
  "isTest": false,
  "qnaId": 17,
  "context": {
    "previousQnAId": 15,
    "previousUserQuery": "accounts and signing in"
  }
}
最初以外の応答とフォローアップ プロンプトを返す JSON 応答
QnA Maker GenerateAnswer JSON 応答は、answersオブジェクトの最初の項目にある context プロパティのフォローアップ プロンプトを含みます。
{
    "answers": [
        {
            "questions": [
                "Use Windows Hello to sign in"
            ],
            "answer": "**Use Windows Hello to sign in**\n\nSince Surface Pro 4 has an infrared (IR) camera, you can set up Windows Hello to sign in just by looking at the screen. \n\nIf you have the Surface Pro 4 Type Cover with Fingerprint ID (sold separately), you can set up your Surface sign you in with a touch. \n\nFor more info, see What is Windows Hello? on Windows.com. ",
            "score": 100.0,
            "id": 17,
            "source": "product-manual.pdf",
            "metadata": [],
            "context": {
                "isContextOnly": true,
                "prompts": []
            }
        },
        {
            "questions": [
                "Meet Surface Pro 4"
            ],
            "answer": "**Meet Surface Pro 4**\n\nGet acquainted with the features built in to your Surface Pro 4. \n\nHere's a quick overview of Surface Pro 4 features: \n\n\n\n\n\n\n\nPower button \n\n\n\n\n\nPress the power button to turn your Surface Pro 4 on. You can also use the power button to put it to sleep and wake it when you're ready to start working again. \n\n\n\n\n\n\n\nTouchscreen \n\n\n\n\n\nUse the 12.3" display, with its 3:2 aspect ratio and 2736 x 1824 resolution, to watch HD movies, browse the web, and use your favorite apps. \n\nThe new Surface G5 touch processor provides up to twice the touch accuracy of Surface Pro 3 and lets you use your fingers to select items, zoom in, and move things around. For more info, see Surface touchscreen on Surface.com. \n\n\n\n\n\n\n\nSurface Pen \n\n\n\n\n\nEnjoy a natural writing experience with a pen that feels like an actual pen. Use Surface Pen to launch Cortana in Windows or open OneNote and quickly jot down notes or take screenshots. \n\nSee Using Surface Pen (Surface Pro 4 version) on Surface.com for more info. \n\n\n\n\n\n\n\nKickstand \n\n\n\n\n\nFlip out the kickstand and work or play comfortably at your desk, on the couch, or while giving a hands-free presentation. \n\n\n\n\n\n\n\nWi-Fi and Bluetooth® \n\n\n\n\n\nSurface Pro 4 supports standard Wi-Fi protocols (802.11a/b/g/n/ac) and Bluetooth 4.0. Connect to a wireless network and use Bluetooth devices like mice, printers, and headsets. \n\nFor more info, see Add a Bluetooth device and Connect Surface to a wireless network on Surface.com. \n\n\n\n\n\n\n\nCameras \n\n\n\n\n\nSurface Pro 4 has two cameras for taking photos and recording video: an 8-megapixel rear-facing camera with autofocus and a 5-megapixel, high-resolution, front-facing camera. Both cameras record video in 1080p, with a 16:9 aspect ratio. Privacy lights are located on the right side of both cameras. \n\nSurface Pro 4 also has an infrared (IR) face-detection camera so you can sign in to Windows without typing a password. For more info, see Windows Hello on Surface.com. \n\nFor more camera info, see Take photos and videos with Surface and Using autofocus on Surface 3, Surface Pro 4, and Surface Book on Surface.com. \n\n\n\n\n\n\n\nMicrophones \n\n\n\n\n\nSurface Pro 4 has both a front and a back microphone. Use the front microphone for calls and recordings. Its noise-canceling feature is optimized for use with Skype and Cortana. \n\n\n\n\n\n\n\nStereo speakers \n\n\n\n\n\nStereo front speakers provide an immersive music and movie playback experience. To learn more, see Surface sound, volume, and audio accessories on Surface.com. \n\n\n\n\n",
            "score": 21.92,
            "id": 3,
            "source": "product-manual.pdf",
            "metadata": [],
            "context": {
                "isContextOnly": true,
                "prompts": [
                    {
                        "displayOrder": 0,
                        "qnaId": 4,
                        "qna": null,
                        "displayText": "Ports and connectors"
                    }
                ]
            }
        },
        {
            "questions": [
                "Use the sign-in screen"
            ],
            "answer": "**Use the sign-in screen**\n\n1.  \n\nTurn on or wake your Surface by pressing the power button. \n\n2.  \n\nSwipe up on the screen or tap a key on the keyboard. \n\n3.  \n\nIf you see your account name and account picture, enter your password and select the right arrow or press Enter on your keyboard. \n\n4.  \n\nIf you see a different account name, select your own account from the list at the left. Then enter your password and select the right arrow or press Enter on your keyboard. ",
            "score": 19.04,
            "id": 16,
            "source": "product-manual.pdf",
            "metadata": [],
            "context": {
                "isContextOnly": true,
                "prompts": []
            }
        }
    ]
}
QnA Maker ID でナレッジ ベースをクエリする
カスタム アプリケーションを構築する場合は、最初の質問の応答で、フォローアップ プロンプトとそれに関連付けられているプロンプト qnaId が返されます。 ID が付与されたので、フォローアップ プロンプトの要求本文でこれを渡すことができます。 要求本文に qnaId とコンテキスト オブジェクト (これには以前の QnA Maker プロパティが含まれます) が含まれる場合、GenerateAnswer は、ランキング アルゴリズムを使用して質問テキストによる応答を見つけるのではなく、ID により正確な質問を返します。
更新 API では表示の順序がサポートされている
JSON 応答で返される表示テキストと表示の順序は、更新 API による編集でサポートされています。
更新 API を使用して複数ターンのプロンプトを追加または削除する
QnA Maker 更新 API を使用して、複数ターンのプロンプトを追加または削除できます。 プロンプトは context プロパティの promptsToAdd 配列と promptsToDelete 配列に追加されます。
バージョン管理用のナレッジ ベースのエクスポート
QnA Maker は、エクスポートされるファイルに複数ターンの会話ステップを含めることにより、バージョン管理をサポートしています。
次のステップ
- この対話サンプルのコンテキスト会話について、または複数ターン会話のための概念的ボット設計について詳しく学習します。