クイックスタート: Speech サービスと LUIS を使用して意図を認識する
重要
LUIS は 2025 年 10 月 1 日に廃止されます。 2023 年 4 月 1 日以降、新しい LUIS リソースを作成することはできません。 継続的な製品サポートと多言語機能のベネフィットを得るために、LUIS アプリケーションを会話言語理解に移行することをお勧めします。
会話言語理解 (CLU) は、Speech SDK バージョン 1.25 以降の C# と C++ で使用できます。 Speech SDK と CLU を使用して意図を認識するには、こちらのクイックスタートを参照してください。
リファレンス ドキュメント | パッケージ (NuGet) | GitHub のその他のサンプル
このクイックスタートでは、Speech SDK と Language Understanding (LUIS) サービスを使用して、マイクによってキャプチャされたオーディオ データから意図を認識します。 具体的には、Speech SDK を使用して音声をキャプチャし、LUIS のあらかじめ構築されたドメインを使用してホーム オートメーションに対する意図 (照明のオン/オフなど) を特定します。
前提条件
- Azure サブスクリプション - 無料アカウントを作成します
- Azure portal で言語リソースを作成します。 Free 価格レベル (
`F0` ) を使用してサービスを試用し、後から運用環境用の有料レベルにアップグレードすることができます。 今回、Speech リソースは必要ありません。 - Language リソース キーとエンドポイントを取得します。 言語リソースがデプロイされたら、[リソースに移動] を選択して、キーを表示および管理します。 Azure AI サービス リソースの詳細については、「リソースのキーを取得する」を参照してください。
意図認識用の LUIS アプリを作成する
意図認識を実行するには、LUIS プレビュー ポータルを使用して、LUIS アカウントとプロジェクトを作成する必要があります。 このクイックスタートでは、インテント認識が使用可能なリージョンに LUIS サブスクリプションが必要です。 音声サービスのサブスクリプションは不要です。
まず、LUIS プレビュー ポータルを使用して LUIS アカウントとアプリを作成する必要があります。 作成する LUIS アプリは、意図、エンティティ、および発話例を提供するホーム オートメーション用に事前構築済みのドメインを使用します。 完成すると、クラウド内で LUIS エンドポイントが実行されるようになります。これは、Speech SDK を使用して呼び出すことができます。
LUIS アプリを作成するには、次の手順に従います。
完了すると、次の 4 つが必要になります。
- 再発行 ([Speech priming](音声認識の準備) をオン)
- LUIS のプライマリ キー
- LUIS の場所
- LUIS のアプリ ID
この情報は、LUIS プレビュー ポータルの次の場所で確認できます。
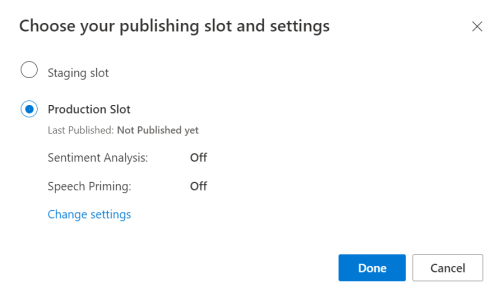
LUIS プレビュー ポータルから目的のアプリをアプリし、[Publish](発行) ボタンを選択します。
[Production](運用) スロットを選択します。
en-USを使用している場合は、 [change settings](設定の変更) を選択し、 [Speech priming](音声プライミング) オプションを [On](オン) の位置に切り替えます。 次に、[Publish](発行) ボタンを選択します。重要
[Speech priming](音声認識の準備) の使用を強くお勧めします。音声認識の精度が向上します。
LUIS プレビュー ポータルで、[管理] を選択し、次に [Azure リソース] を選択します。 このページでは、LUIS 予測リソースの LUIS キーと場所 ("リージョン" と呼ばれることもあります) を確認できます。
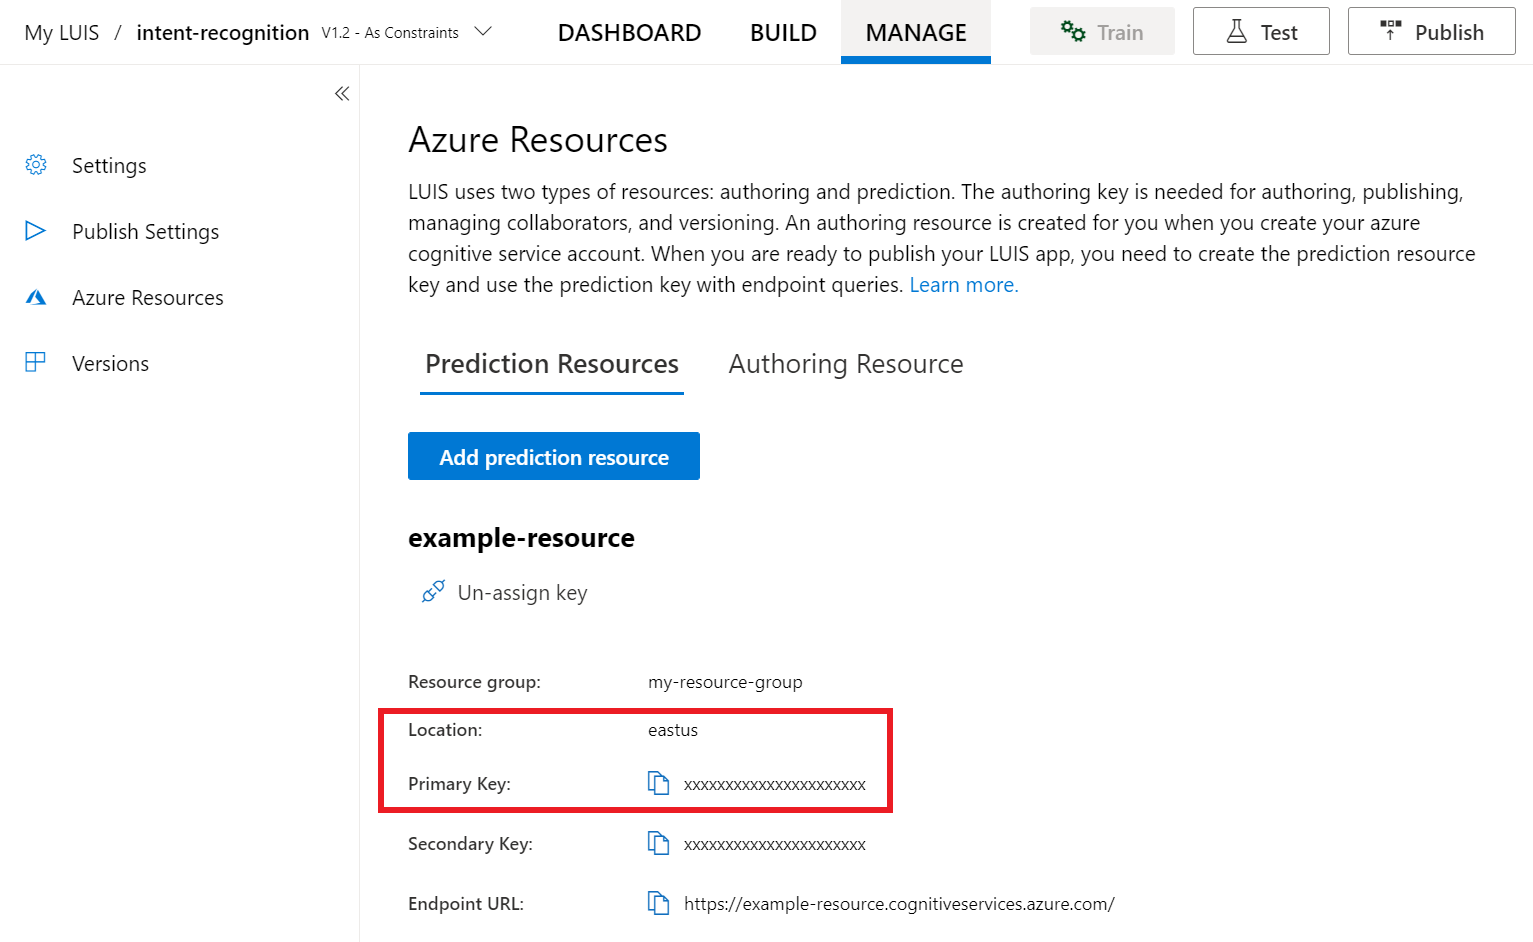
キーと場所を確認したら、アプリ ID が必要になります。 [設定] を選択します。 アプリ ID は、このページから入手できます。

Visual Studio でプロジェクトを開きます。
次に、Visual Studio でプロジェクトを開きます。
- Visual Studio 2019 を起動します。
- プロジェクトを読み込んで
Program.csを開きます。
定型コードを使用して開始する
このプロジェクトのスケルトンとして機能するコードを追加しましょう。 RecognizeIntentAsync() という非同期メソッドを作成済みであることを確認します。
using System;
using System.Threading.Tasks;
using Microsoft.CognitiveServices.Speech;
using Microsoft.CognitiveServices.Speech.Intent;

namespace helloworld
{
    class Program
    {
        public static async Task RecognizeIntentAsync()
        {
        }

        static async Task Main()
        {
            await RecognizeIntentAsync();
            Console.WriteLine("Please press <Return> to continue.");
            Console.ReadLine();
        }
    }
}
Speech 構成を作成する
IntentRecognizer オブジェクトを初期化する前に、LUIS 予測リソース用のキーとリージョンを使用する構成を作成する必要があります。
重要
スターター キーとオーサリング キーは機能しません。 前の手順で作成した予測キーと場所を使用する必要があります。 詳細については、「意図認識用の LUIS アプリを作成する」を参照してください。
このコードを RecognizeIntentAsync() メソッドに挿入します。 次の値を必ず更新してください。
"YourLanguageUnderstandingSubscriptionKey"を LUIS 予測キーで置き換えます。"YourLanguageUnderstandingServiceRegion"を LUIS の場所で置き換えます。 リージョンのリージョン識別子を使用してください。
ヒント
これらの値を見つける方法については、「意図認識用の LUIS アプリを作成する」を参照してください。
重要
終わったらコードからキーを削除し、公開しないよう注意してください。 運用環境では、Azure Key Vault などの資格情報を格納してアクセスする安全な方法を使用します。 詳しくは、Azure AI サービスのセキュリティに関する記事をご覧ください。
var config = SpeechConfig.FromSubscription(
    "YourLanguageUnderstandingSubscriptionKey",
    "YourLanguageUnderstandingServiceRegion");
このサンプルでは、FromSubscription() メソッドを使用して SpeechConfig をビルドします。 使用可能なメソッドの完全な一覧については、SpeechConfig クラスに関する記事を参照してください。
Azure Cognitive Service for SpeechSDK では、既定で認識される言語は en-us です。ソース言語の選択については、音声を認識する方法を参照してください。
IntentRecognizer を初期化する
ここで、IntentRecognizer を作成しましょう。 アンマネージド リソースが確実に正しく解放されるように、このオブジェクトは using ステートメント内に作成されます。 このコードを Speech 構成のすぐ下にある RecognizeIntentAsync() メソッドに挿入します。
// Creates an intent recognizer using microphone as audio input.
using (var recognizer = new IntentRecognizer(config))
{
}
LanguageUnderstandingModel と意図を追加する
LanguageUnderstandingModel と意図認識エンジンを関連付け、認識させる意図を追加する必要があります。 ホーム オートメーション用のあらかじめ構築されたドメインの意図を使用します。 前のセクションの using ステートメントに次のコードを挿入します。 "YourLanguageUnderstandingAppId" は必ずお客様の LUIS app ID で置き換えてください。
ヒント
この値を見つける方法については、「意図認識用の LUIS アプリを作成する」を参照してください。
// Creates a Language Understanding model using the app id, and adds specific intents from your model
var model = LanguageUnderstandingModel.FromAppId("YourLanguageUnderstandingAppId");
recognizer.AddIntent(model, "YourLanguageUnderstandingIntentName1", "id1");
recognizer.AddIntent(model, "YourLanguageUnderstandingIntentName2", "id2");
recognizer.AddIntent(model, "YourLanguageUnderstandingIntentName3", "any-IntentId-here");
この例では、AddIntent() 関数を使用して、個別に意図を追加します。 モデルのすべての意図を追加する場合は、AddAllIntents(model) を使用し、モデルを渡します。
意図を認識する
IntentRecognizer オブジェクトから、RecognizeOnceAsync() メソッドを呼び出します。 認識の対象として 1 つの語句を送信しようとしていること、また、その語句が識別された後で、音声認識を停止しようとしていることが、このメソッドを通じて Speech サービスに伝えられます。
using テートメント内で、モデルの下にこのコードを追加します。
// Starts recognizing.
Console.WriteLine("Say something...");

// Starts intent recognition, and returns after a single utterance is recognized. The end of a
// single utterance is determined by listening for silence at the end or until a maximum of 15
// seconds of audio is processed.  The task returns the recognition text as result.
// Note: Since RecognizeOnceAsync() returns only a single utterance, it is suitable only for single
// shot recognition like command or query.
// For long-running multi-utterance recognition, use StartContinuousRecognitionAsync() instead.
var result = await recognizer.RecognizeOnceAsync();
認識結果 (またはエラー) を表示する
音声サービスによって認識結果が返されたら、それを使用して何らかの操作を行います。 シンプルに保ち、結果をコンソールに出力します。
using ステートメント内の RecognizeOnceAsync() の下に、このコードを追加します。
// Checks result.
switch (result.Reason)
{
    case ResultReason.RecognizedIntent:
        Console.WriteLine($"RECOGNIZED: Text={result.Text}");
        Console.WriteLine($"    Intent Id: {result.IntentId}.");
        var json = result.Properties.GetProperty(PropertyId.LanguageUnderstandingServiceResponse_JsonResult);
        Console.WriteLine($"    Language Understanding JSON: {json}.");
        break;
    case ResultReason.RecognizedSpeech:
        Console.WriteLine($"RECOGNIZED: Text={result.Text}");
        Console.WriteLine($"    Intent not recognized.");
        break;
    case ResultReason.NoMatch:
        Console.WriteLine($"NOMATCH: Speech could not be recognized.");
        break;
    case ResultReason.Canceled:
        var cancellation = CancellationDetails.FromResult(result);
        Console.WriteLine($"CANCELED: Reason={cancellation.Reason}");

        if (cancellation.Reason == CancellationReason.Error)
        {
            Console.WriteLine($"CANCELED: ErrorCode={cancellation.ErrorCode}");
            Console.WriteLine($"CANCELED: ErrorDetails={cancellation.ErrorDetails}");
            Console.WriteLine($"CANCELED: Did you update the subscription info?");
        }
        break;
}
コードを確認する
この時点で、コードは次のようになります。
Note
このバージョンにはいくつかのコメントを追加してあります。
//
// Copyright (c) Microsoft. All rights reserved.
// Licensed under the MIT license. See LICENSE.md file in the project root for full license information.
//

// <skeleton_1>
using System;
using System.Threading.Tasks;
using Microsoft.CognitiveServices.Speech;
using Microsoft.CognitiveServices.Speech.Intent;

namespace helloworld
{
    class Program
    {
        public static async Task RecognizeIntentAsync()
        {
            // </skeleton_1>
            // Creates an instance of a speech config with specified subscription key
            // and service region. Note that in contrast to other services supported by
            // the Cognitive Services Speech SDK, the Language Understanding service
            // requires a specific subscription key from https://www.luis.ai/.
            // The Language Understanding service calls the required key 'endpoint key'.
            // Once you've obtained it, replace with below with your own Language Understanding subscription key
            // and service region (e.g., "westus").
            // The default language is "en-us".
            // <create_speech_configuration>
            var config = SpeechConfig.FromSubscription(
                "YourLanguageUnderstandingSubscriptionKey",
                "YourLanguageUnderstandingServiceRegion");
            // </create_speech_configuration>

            // <create_intent_recognizer_1>
            // Creates an intent recognizer using microphone as audio input.
            using (var recognizer = new IntentRecognizer(config))
            {
                // </create_intent_recognizer_1>

                // <add_intents>
                // Creates a Language Understanding model using the app id, and adds specific intents from your model
                var model = LanguageUnderstandingModel.FromAppId("YourLanguageUnderstandingAppId");
                recognizer.AddIntent(model, "YourLanguageUnderstandingIntentName1", "id1");
                recognizer.AddIntent(model, "YourLanguageUnderstandingIntentName2", "id2");
                recognizer.AddIntent(model, "YourLanguageUnderstandingIntentName3", "any-IntentId-here");
                // </add_intents>

                // To add all of the possible intents from a LUIS model to the recognizer, uncomment the line below:
                // recognizer.AddAllIntents(model);

                // <recognize_intent>
                // Starts recognizing.
                Console.WriteLine("Say something...");

                // Starts intent recognition, and returns after a single utterance is recognized. The end of a
                // single utterance is determined by listening for silence at the end or until a maximum of 15
                // seconds of audio is processed.  The task returns the recognition text as result.
                // Note: Since RecognizeOnceAsync() returns only a single utterance, it is suitable only for single
                // shot recognition like command or query.
                // For long-running multi-utterance recognition, use StartContinuousRecognitionAsync() instead.
                var result = await recognizer.RecognizeOnceAsync();
                // </recognize_intent>

                // <print_results>
                // Checks result.
                switch (result.Reason)
                {
                    case ResultReason.RecognizedIntent:
                        Console.WriteLine($"RECOGNIZED: Text={result.Text}");
                        Console.WriteLine($"    Intent Id: {result.IntentId}.");
                        var json = result.Properties.GetProperty(PropertyId.LanguageUnderstandingServiceResponse_JsonResult);
                        Console.WriteLine($"    Language Understanding JSON: {json}.");
                        break;
                    case ResultReason.RecognizedSpeech:
                        Console.WriteLine($"RECOGNIZED: Text={result.Text}");
                        Console.WriteLine($"    Intent not recognized.");
                        break;
                    case ResultReason.NoMatch:
                        Console.WriteLine($"NOMATCH: Speech could not be recognized.");
                        break;
                    case ResultReason.Canceled:
                        var cancellation = CancellationDetails.FromResult(result);
                        Console.WriteLine($"CANCELED: Reason={cancellation.Reason}");

                        if (cancellation.Reason == CancellationReason.Error)
                        {
                            Console.WriteLine($"CANCELED: ErrorCode={cancellation.ErrorCode}");
                            Console.WriteLine($"CANCELED: ErrorDetails={cancellation.ErrorDetails}");
                            Console.WriteLine($"CANCELED: Did you update the subscription info?");
                        }
                        break;
                }
                // </print_results>
            // <create_intent_recognizer_2>
            }
            // </create_intent_recognizer_2>
        // <skeleton_2>
        }

        static async Task Main()
        {
            await RecognizeIntentAsync();
            Console.WriteLine("Please press <Return> to continue.");
            Console.ReadLine();
        }
    }
}
// </skeleton_2>
アプリをビルドして実行する
これで、アプリをビルドし、Speech サービスを使用して音声認識をテストする準備ができました。
- コードをコンパイルする - Visual Studio のメニュー バーで、 [ビルド]>[ソリューションのビルド] の順に選択します。
- アプリを起動する - メニュー バーから [デバッグ]>[デバッグの開始] の順に選択するか、F5 キーを押します。
- 認識を開始する - 英語で語句を読み上げるように求められます。 音声が Speech Service に送信され、テキストとして文字起こしされて、コンソールに表示されます。
リファレンス ドキュメント | パッケージ (NuGet) | GitHub のその他のサンプル
このクイックスタートでは、Speech SDK と Language Understanding (LUIS) サービスを使用して、マイクによってキャプチャされたオーディオ データから意図を認識します。 具体的には、Speech SDK を使用して音声をキャプチャし、LUIS のあらかじめ構築されたドメインを使用してホーム オートメーションに対する意図 (照明のオン/オフなど) を特定します。
前提条件
- Azure サブスクリプション - 無料アカウントを作成します
- Azure portal で言語リソースを作成します。 Free 価格レベル (
`F0` ) を使用してサービスを試用し、後から運用環境用の有料レベルにアップグレードすることができます。 今回、Speech リソースは必要ありません。 - Language リソース キーとエンドポイントを取得します。 言語リソースがデプロイされたら、[リソースに移動] を選択して、キーを表示および管理します。 Azure AI サービス リソースの詳細については、「リソースのキーを取得する」を参照してください。
意図認識用の LUIS アプリを作成する
意図認識を実行するには、LUIS プレビュー ポータルを使用して、LUIS アカウントとプロジェクトを作成する必要があります。 このクイックスタートでは、インテント認識が使用可能なリージョンに LUIS サブスクリプションが必要です。 音声サービスのサブスクリプションは不要です。
まず、LUIS プレビュー ポータルを使用して LUIS アカウントとアプリを作成する必要があります。 作成する LUIS アプリは、意図、エンティティ、および発話例を提供するホーム オートメーション用に事前構築済みのドメインを使用します。 完成すると、クラウド内で LUIS エンドポイントが実行されるようになります。これは、Speech SDK を使用して呼び出すことができます。
LUIS アプリを作成するには、次の手順に従います。
完了すると、次の 4 つが必要になります。
- 再発行 ([Speech priming](音声認識の準備) をオン)
- LUIS のプライマリ キー
- LUIS の場所
- LUIS のアプリ ID
この情報は、LUIS プレビュー ポータルの次の場所で確認できます。
LUIS プレビュー ポータルから目的のアプリをアプリし、[Publish](発行) ボタンを選択します。
[Production](運用) スロットを選択します。
en-USを使用している場合は、 [change settings](設定の変更) を選択し、 [Speech priming](音声プライミング) オプションを [On](オン) の位置に切り替えます。 次に、[Publish](発行) ボタンを選択します。重要
[Speech priming](音声認識の準備) の使用を強くお勧めします。音声認識の精度が向上します。
LUIS プレビュー ポータルで、[管理] を選択し、次に [Azure リソース] を選択します。 このページでは、LUIS 予測リソースの LUIS キーと場所 ("リージョン" と呼ばれることもあります) を確認できます。
キーと場所を確認したら、アプリ ID が必要になります。 [設定] を選択します。 アプリ ID は、このページから入手できます。
Visual Studio でプロジェクトを開きます。
次に、Visual Studio でプロジェクトを開きます。
- Visual Studio 2019 を起動します。
- プロジェクトを読み込んで
helloworld.cppを開きます。
定型コードを使用して開始する
このプロジェクトのスケルトンとして機能するコードを追加しましょう。 recognizeIntent() という非同期メソッドを作成済みであることを確認します。
#include "stdafx.h"
#include <iostream>
#include <speechapi_cxx.h>

using namespace std;
using namespace Microsoft::CognitiveServices::Speech;
using namespace Microsoft::CognitiveServices::Speech::Intent;

void recognizeIntent()
{
}

int wmain()
{
    try
    {
        recognizeIntent();
    }
    catch (exception e)
    {
        cout << e.what();
    }
    cout << "Please press a key to continue.\n";
    cin.get();
    return 0;
}
Speech 構成を作成する
IntentRecognizer オブジェクトを初期化する前に、LUIS 予測リソース用のキーとリージョンを使用する構成を作成する必要があります。
重要
スターター キーとオーサリング キーは機能しません。 前の手順で作成した予測キーと場所を使用する必要があります。 詳細については、「意図認識用の LUIS アプリを作成する」を参照してください。
このコードを recognizeIntent() メソッドに挿入します。 次の値を必ず更新してください。
"YourLanguageUnderstandingSubscriptionKey"を LUIS 予測キーで置き換えます。"YourLanguageUnderstandingServiceRegion"を LUIS の場所で置き換えます。 リージョンのリージョン識別子を使用してください。
ヒント
これらの値を見つける方法については、「意図認識用の LUIS アプリを作成する」を参照してください。
重要
終わったらコードからキーを削除し、公開しないよう注意してください。 運用環境では、Azure Key Vault などの資格情報を格納してアクセスする安全な方法を使用します。 詳しくは、Azure AI サービスのセキュリティに関する記事をご覧ください。
auto config = SpeechConfig::FromSubscription(
    "YourLanguageUnderstandingSubscriptionKey",
    "YourLanguageUnderstandingServiceRegion");
このサンプルでは、FromSubscription() メソッドを使用して SpeechConfig をビルドします。 使用可能なメソッドの完全な一覧については、SpeechConfig クラスに関する記事を参照してください。
Azure Cognitive Service for SpeechSDK では、既定で認識される言語は en-us です。ソース言語の選択については、音声を認識する方法を参照してください。
IntentRecognizer を初期化する
ここで、IntentRecognizer を作成しましょう。 このコードを Speech 構成のすぐ下にある recognizeIntent() メソッドに挿入します。
// Creates an intent recognizer using microphone as audio input.
auto recognizer = IntentRecognizer::FromConfig(config);
LanguageUnderstandingModel と意図を追加する
LanguageUnderstandingModel と意図認識エンジンを関連付け、認識させる意図を追加する必要があります。 ホーム オートメーション用のあらかじめ構築されたドメインの意図を使用します。
次のコードを IntentRecognizer の下に挿入します。 "YourLanguageUnderstandingAppId" は必ずお客様の LUIS app ID で置き換えてください。
ヒント
この値を見つける方法については、「意図認識用の LUIS アプリを作成する」を参照してください。
// Creates a Language Understanding model using the app id, and adds specific intents from your model
auto model = LanguageUnderstandingModel::FromAppId("YourLanguageUnderstandingAppId");
recognizer->AddIntent(model, "YourLanguageUnderstandingIntentName1", "id1");
recognizer->AddIntent(model, "YourLanguageUnderstandingIntentName2", "id2");
recognizer->AddIntent(model, "YourLanguageUnderstandingIntentName3", "any-IntentId-here");
この例では、AddIntent() 関数を使用して、個別に意図を追加します。 モデルのすべての意図を追加する場合は、AddAllIntents(model) を使用し、モデルを渡します。
意図を認識する
IntentRecognizer オブジェクトから、RecognizeOnceAsync() メソッドを呼び出します。 認識の対象として 1 つの語句を送信しようとしていること、また、その語句が識別された後で、音声認識を停止しようとしていることが、このメソッドを通じて Speech サービスに伝えられます。 簡素化のため、結果が返されて完了するまで待機します。
次のコードをモデルの下に挿入します。
cout << "Say something...\n";

// Starts intent recognition, and returns after a single utterance is recognized. The end of a
// single utterance is determined by listening for silence at the end or until a maximum of 15
// seconds of audio is processed.  The task returns the recognition text as result.
// Note: Since RecognizeOnceAsync() returns only a single utterance, it is suitable only for single
// shot recognition like command or query.
// For long-running multi-utterance recognition, use StartContinuousRecognitionAsync() instead.
auto result = recognizer->RecognizeOnceAsync().get();
認識結果 (またはエラー) を表示する
音声サービスによって認識結果が返されたら、それを使用して何らかの操作を行います。 シンプルに保ち、結果をコンソールに出力します。
次のコードを auto result = recognizer->RecognizeOnceAsync().get(); の下に挿入します。
// Checks result.
if (result->Reason == ResultReason::RecognizedIntent)
{
    cout << "RECOGNIZED: Text=" << result->Text << std::endl;
    cout << "  Intent Id: " << result->IntentId << std::endl;
    cout << "  Intent Service JSON: " << result->Properties.GetProperty(PropertyId::LanguageUnderstandingServiceResponse_JsonResult) << std::endl;
}
else if (result->Reason == ResultReason::RecognizedSpeech)
{
    cout << "RECOGNIZED: Text=" << result->Text << " (intent could not be recognized)" << std::endl;
}
else if (result->Reason == ResultReason::NoMatch)
{
    cout << "NOMATCH: Speech could not be recognized." << std::endl;
}
else if (result->Reason == ResultReason::Canceled)
{
    auto cancellation = CancellationDetails::FromResult(result);
    cout << "CANCELED: Reason=" << (int)cancellation->Reason << std::endl;

    if (cancellation->Reason == CancellationReason::Error)
    {
        cout << "CANCELED: ErrorCode=" << (int)cancellation->ErrorCode << std::endl;
        cout << "CANCELED: ErrorDetails=" << cancellation->ErrorDetails << std::endl;
        cout << "CANCELED: Did you update the subscription info?" << std::endl;
    }
}
コードを確認する
この時点で、コードは次のようになります。
Note
このバージョンにはいくつかのコメントを追加してあります。
//
// Copyright (c) Microsoft. All rights reserved.
// Licensed under the MIT license. See LICENSE.md file in the project root for full license information.
//

// <skeleton_1>
#include "stdafx.h"
#include <iostream>
#include <speechapi_cxx.h>

using namespace std;
using namespace Microsoft::CognitiveServices::Speech;
using namespace Microsoft::CognitiveServices::Speech::Intent;

void recognizeIntent()
{
    // </skeleton_1>
    // Creates an instance of a speech config with specified subscription key
    // and service region. Note that in contrast to other services supported by
    // the Cognitive Services Speech SDK, the Language Understanding service
    // requires a specific subscription key from https://www.luis.ai/.
    // The Language Understanding service calls the required key 'endpoint key'.
    // Once you've obtained it, replace with below with your own Language Understanding subscription key
    // and service region (e.g., "westus").
    // The default recognition language is "en-us".
    // <create_speech_configuration>
    auto config = SpeechConfig::FromSubscription(
        "YourLanguageUnderstandingSubscriptionKey",
        "YourLanguageUnderstandingServiceRegion");
    // </create_speech_configuration>

    // <create_intent_recognizer>
    // Creates an intent recognizer using microphone as audio input.
    auto recognizer = IntentRecognizer::FromConfig(config);
    // </create_intent_recognizer>

    // <add_intents>
    // Creates a Language Understanding model using the app id, and adds specific intents from your model
    auto model = LanguageUnderstandingModel::FromAppId("YourLanguageUnderstandingAppId");
    recognizer->AddIntent(model, "YourLanguageUnderstandingIntentName1", "id1");
    recognizer->AddIntent(model, "YourLanguageUnderstandingIntentName2", "id2");
    recognizer->AddIntent(model, "YourLanguageUnderstandingIntentName3", "any-IntentId-here");
    // </add_intents>

    // To add all of the possible intents from a LUIS model to the recognizer, uncomment the line below:
    // recognizer->AddAllIntents(model);

    // <recognize_intent>
    cout << "Say something...\n";

    // Starts intent recognition, and returns after a single utterance is recognized. The end of a
    // single utterance is determined by listening for silence at the end or until a maximum of 15
    // seconds of audio is processed.  The task returns the recognition text as result.
    // Note: Since RecognizeOnceAsync() returns only a single utterance, it is suitable only for single
    // shot recognition like command or query.
    // For long-running multi-utterance recognition, use StartContinuousRecognitionAsync() instead.
    auto result = recognizer->RecognizeOnceAsync().get();
    // </recognize_intent>

    // <print_results>
    // Checks result.
    if (result->Reason == ResultReason::RecognizedIntent)
    {
        cout << "RECOGNIZED: Text=" << result->Text << std::endl;
        cout << "  Intent Id: " << result->IntentId << std::endl;
        cout << "  Intent Service JSON: " << result->Properties.GetProperty(PropertyId::LanguageUnderstandingServiceResponse_JsonResult) << std::endl;
    }
    else if (result->Reason == ResultReason::RecognizedSpeech)
    {
        cout << "RECOGNIZED: Text=" << result->Text << " (intent could not be recognized)" << std::endl;
    }
    else if (result->Reason == ResultReason::NoMatch)
    {
        cout << "NOMATCH: Speech could not be recognized." << std::endl;
    }
    else if (result->Reason == ResultReason::Canceled)
    {
        auto cancellation = CancellationDetails::FromResult(result);
        cout << "CANCELED: Reason=" << (int)cancellation->Reason << std::endl;

        if (cancellation->Reason == CancellationReason::Error)
        {
            cout << "CANCELED: ErrorCode=" << (int)cancellation->ErrorCode << std::endl;
            cout << "CANCELED: ErrorDetails=" << cancellation->ErrorDetails << std::endl;
            cout << "CANCELED: Did you update the subscription info?" << std::endl;
        }
    }
    // </print_results>
    // <skeleton_2>
}

int wmain()
{
    try
    {
        recognizeIntent();
    }
    catch (exception e)
    {
        cout << e.what();
    }
    cout << "Please press a key to continue.\n";
    cin.get();
    return 0;
}
// </skeleton_2>
アプリをビルドして実行する
これで、アプリをビルドし、Speech サービスを使用して音声認識をテストする準備ができました。
- コードをコンパイルする - Visual Studio のメニュー バーで、 [ビルド]>[ソリューションのビルド] の順に選択します。
- アプリを起動する - メニュー バーから [デバッグ]>[デバッグの開始] の順に選択するか、F5 キーを押します。
- 認識を開始する - 英語で語句を読み上げるように求められます。 音声が Speech Service に送信され、テキストとして文字起こしされて、コンソールに表示されます。
リファレンス ドキュメント | GitHub のその他のサンプル
このクイックスタートでは、Speech SDK と Language Understanding (LUIS) サービスを使用して、マイクによってキャプチャされたオーディオ データから意図を認識します。 具体的には、Speech SDK を使用して音声をキャプチャし、LUIS のあらかじめ構築されたドメインを使用してホーム オートメーションに対する意図 (照明のオン/オフなど) を特定します。
前提条件
- Azure サブスクリプション - 無料アカウントを作成します
- Azure portal で言語リソースを作成します。 Free 価格レベル (
`F0` ) を使用してサービスを試用し、後から運用環境用の有料レベルにアップグレードすることができます。 今回、Speech リソースは必要ありません。 - Language リソース キーとエンドポイントを取得します。 言語リソースがデプロイされたら、[リソースに移動] を選択して、キーを表示および管理します。 Azure AI サービス リソースの詳細については、「リソースのキーを取得する」を参照してください。
また、実際の開発環境に対応した Speech SDK をインストールし、空のサンプル プロジェクトを作成する必要もあります。
意図認識用の LUIS アプリを作成する
意図認識を実行するには、LUIS プレビュー ポータルを使用して、LUIS アカウントとプロジェクトを作成する必要があります。 このクイックスタートでは、インテント認識が使用可能なリージョンに LUIS サブスクリプションが必要です。 音声サービスのサブスクリプションは不要です。
まず、LUIS プレビュー ポータルを使用して LUIS アカウントとアプリを作成する必要があります。 作成する LUIS アプリは、意図、エンティティ、および発話例を提供するホーム オートメーション用に事前構築済みのドメインを使用します。 完成すると、クラウド内で LUIS エンドポイントが実行されるようになります。これは、Speech SDK を使用して呼び出すことができます。
LUIS アプリを作成するには、次の手順に従います。
完了すると、次の 4 つが必要になります。
- 再発行 ([Speech priming](音声認識の準備) をオン)
- LUIS のプライマリ キー
- LUIS の場所
- LUIS のアプリ ID
この情報は、LUIS プレビュー ポータルの次の場所で確認できます。
LUIS プレビュー ポータルから目的のアプリをアプリし、[Publish](発行) ボタンを選択します。
[Production](運用) スロットを選択します。
en-USを使用している場合は、 [change settings](設定の変更) を選択し、 [Speech priming](音声プライミング) オプションを [On](オン) の位置に切り替えます。 次に、[Publish](発行) ボタンを選択します。重要
[Speech priming](音声認識の準備) の使用を強くお勧めします。音声認識の精度が向上します。
LUIS プレビュー ポータルで、[管理] を選択し、次に [Azure リソース] を選択します。 このページでは、LUIS 予測リソースの LUIS キーと場所 ("リージョン" と呼ばれることもあります) を確認できます。
キーと場所を確認したら、アプリ ID が必要になります。 [設定] を選択します。 アプリ ID は、このページから入手できます。
プロジェクトを開く
- 好みの IDE を開きます。
- プロジェクトを読み込んで
Main.javaを開きます。
定型コードを使用して開始する
このプロジェクトのスケルトンとして機能するコードを追加しましょう。
package speechsdk.quickstart;

import com.microsoft.cognitiveservices.speech.*;
import com.microsoft.cognitiveservices.speech.intent.*;

/**
 * Quickstart: recognize speech using the Speech SDK for Java.
 */
public class Main {

    /**
     * @param args Arguments are ignored in this sample.
     */
    public static void main(String[] args) {
        } catch (Exception ex) {
            System.out.println("Unexpected exception: " + ex.getMessage());

            assert(false);
            System.exit(1);
        }
    }
}
Speech 構成を作成する
IntentRecognizer オブジェクトを初期化する前に、LUIS 予測リソース用のキーとリージョンを使用する構成を作成する必要があります。
main() の try/catch ブロックにこのコードを挿入します。 次の値を必ず更新してください。
"YourLanguageUnderstandingSubscriptionKey"を LUIS 予測キーで置き換えます。"YourLanguageUnderstandingServiceRegion"を LUIS の場所で置き換えます。 リージョンのリージョン識別子を使用してください。
ヒント
これらの値を見つける方法については、「意図認識用の LUIS アプリを作成する」を参照してください。
重要
終わったらコードからキーを削除し、公開しないよう注意してください。 運用環境では、Azure Key Vault などの資格情報を格納してアクセスする安全な方法を使用します。 詳しくは、Azure AI サービスのセキュリティに関する記事をご覧ください。
// Replace below with with specified subscription key (called 'endpoint key' by the Language Understanding service)
String languageUnderstandingSubscriptionKey = "YourLanguageUnderstandingSubscriptionKey";
// Replace below with your own service region (e.g., "westus").
String languageUnderstandingServiceRegion = "YourLanguageUnderstandingServiceRegion";

// Creates an instance of intent recognizer with a given speech configuration.
// Recognizer is created with the default microphone audio input and default language "en-us".
try (SpeechConfig config = SpeechConfig.fromSubscription(languageUnderstandingSubscriptionKey, languageUnderstandingServiceRegion);
このサンプルでは、FromSubscription() メソッドを使用して SpeechConfig をビルドします。 使用可能なメソッドの完全な一覧については、SpeechConfig クラスに関する記事を参照してください。
Azure Cognitive Service for SpeechSDK では、既定で認識される言語は en-us です。ソース言語の選択については、音声を認識する方法を参照してください。
IntentRecognizer を初期化する
ここで、IntentRecognizer を作成しましょう。 Speech 構成のすぐ下にこのコードを挿入します。
IntentRecognizer recognizer = new IntentRecognizer(config)) {
LanguageUnderstandingModel と意図を追加する
LanguageUnderstandingModel と意図認識エンジンを関連付け、認識させる意図を追加する必要があります。 ホーム オートメーション用のあらかじめ構築されたドメインの意図を使用します。
次のコードを IntentRecognizer の下に挿入します。 "YourLanguageUnderstandingAppId" は必ずお客様の LUIS app ID で置き換えてください。
ヒント
この値を見つける方法については、「意図認識用の LUIS アプリを作成する」を参照してください。
// Creates a language understanding model using the app id, and adds specific intents from your model
LanguageUnderstandingModel model = LanguageUnderstandingModel.fromAppId("YourLanguageUnderstandingAppId");
recognizer.addIntent(model, "YourLanguageUnderstandingIntentName1", "id1");
recognizer.addIntent(model, "YourLanguageUnderstandingIntentName2", "id2");
recognizer.addIntent(model, "YourLanguageUnderstandingIntentName3", "any-IntentId-here");
この例では、addIntent() 関数を使用して、個別に意図を追加します。 モデルのすべての意図を追加する場合は、addAllIntents(model) を使用し、モデルを渡します。
意図を認識する
IntentRecognizer オブジェクトから、recognizeOnceAsync() メソッドを呼び出します。 認識の対象として 1 つの語句を送信しようとしていること、また、その語句が識別された後で、音声認識を停止しようとしていることが、このメソッドを通じて Speech サービスに伝えられます。
次のコードをモデルの下に挿入します。
System.out.println("Say something...");

// Starts recognition. It returns when the first utterance has been recognized.
IntentRecognitionResult result = recognizer.recognizeOnceAsync().get();
認識結果 (またはエラー) を表示する
音声サービスによって認識結果が返されたら、それを使用して何らかの操作を行います。 シンプルに保ち、結果をコンソールに出力します。
このコードを recognizeOnceAsync() の呼び出しの下に挿入します。
// Checks result.
if (result.getReason() == ResultReason.RecognizedIntent) {
    System.out.println("RECOGNIZED: Text=" + result.getText());
    System.out.println("    Intent Id: " + result.getIntentId());
    System.out.println("    Intent Service JSON: " + result.getProperties().getProperty(PropertyId.LanguageUnderstandingServiceResponse_JsonResult));
}
else if (result.getReason() == ResultReason.RecognizedSpeech) {
    System.out.println("RECOGNIZED: Text=" + result.getText());
    System.out.println("    Intent not recognized.");
}
else if (result.getReason() == ResultReason.NoMatch) {
    System.out.println("NOMATCH: Speech could not be recognized.");
}
else if (result.getReason() == ResultReason.Canceled) {
    CancellationDetails cancellation = CancellationDetails.fromResult(result);
    System.out.println("CANCELED: Reason=" + cancellation.getReason());

    if (cancellation.getReason() == CancellationReason.Error) {
        System.out.println("CANCELED: ErrorCode=" + cancellation.getErrorCode());
        System.out.println("CANCELED: ErrorDetails=" + cancellation.getErrorDetails());
        System.out.println("CANCELED: Did you update the subscription info?");
    }
}
コードを確認する
この時点で、コードは次のようになります。
Note
このバージョンにはいくつかのコメントを追加してあります。
//
// Copyright (c) Microsoft. All rights reserved.
// Licensed under the MIT license. See LICENSE.md file in the project root for full license information.
//

// <skeleton_1>
package speechsdk.quickstart;

import com.microsoft.cognitiveservices.speech.*;
import com.microsoft.cognitiveservices.speech.intent.*;

/**
 * Quickstart: recognize speech using the Speech SDK for Java.
 */
public class Main {

    /**
     * @param args Arguments are ignored in this sample.
     */
    public static void main(String[] args) {
    // </skeleton_1>
        // <create_speech_configuration>
        // Replace below with with specified subscription key (called 'endpoint key' by the Language Understanding service)
        String languageUnderstandingSubscriptionKey = "YourLanguageUnderstandingSubscriptionKey";
        // Replace below with your own service region (e.g., "westus").
        String languageUnderstandingServiceRegion = "YourLanguageUnderstandingServiceRegion";

        // Creates an instance of intent recognizer with a given speech configuration.
        // Recognizer is created with the default microphone audio input and default language "en-us".
        try (SpeechConfig config = SpeechConfig.fromSubscription(languageUnderstandingSubscriptionKey, languageUnderstandingServiceRegion);
        // </create_speech_configuration>
            // <create_intent_recognizer>
            IntentRecognizer recognizer = new IntentRecognizer(config)) {
            // </create_intent_recognizer>

            // <add_intents>
            // Creates a language understanding model using the app id, and adds specific intents from your model
            LanguageUnderstandingModel model = LanguageUnderstandingModel.fromAppId("YourLanguageUnderstandingAppId");
            recognizer.addIntent(model, "YourLanguageUnderstandingIntentName1", "id1");
            recognizer.addIntent(model, "YourLanguageUnderstandingIntentName2", "id2");
            recognizer.addIntent(model, "YourLanguageUnderstandingIntentName3", "any-IntentId-here");
            // </add_intents>

            // To add all of the possible intents from a LUIS model to the recognizer, uncomment the line below:
            // recognizer.addAllIntents(model);

            // <recognize_intent>
            System.out.println("Say something...");

            // Starts recognition. It returns when the first utterance has been recognized.
            IntentRecognitionResult result = recognizer.recognizeOnceAsync().get();
            // </recognize_intent>

            // <print_result>
            // Checks result.
            if (result.getReason() == ResultReason.RecognizedIntent) {
                System.out.println("RECOGNIZED: Text=" + result.getText());
                System.out.println("    Intent Id: " + result.getIntentId());
                System.out.println("    Intent Service JSON: " + result.getProperties().getProperty(PropertyId.LanguageUnderstandingServiceResponse_JsonResult));
            }
            else if (result.getReason() == ResultReason.RecognizedSpeech) {
                System.out.println("RECOGNIZED: Text=" + result.getText());
                System.out.println("    Intent not recognized.");
            }
            else if (result.getReason() == ResultReason.NoMatch) {
                System.out.println("NOMATCH: Speech could not be recognized.");
            }
            else if (result.getReason() == ResultReason.Canceled) {
                CancellationDetails cancellation = CancellationDetails.fromResult(result);
                System.out.println("CANCELED: Reason=" + cancellation.getReason());

                if (cancellation.getReason() == CancellationReason.Error) {
                    System.out.println("CANCELED: ErrorCode=" + cancellation.getErrorCode());
                    System.out.println("CANCELED: ErrorDetails=" + cancellation.getErrorDetails());
                    System.out.println("CANCELED: Did you update the subscription info?");
                }
            }
            // </print_result>
        // <skeleton_2>
        } catch (Exception ex) {
            System.out.println("Unexpected exception: " + ex.getMessage());

            assert(false);
            System.exit(1);
        }
    }
}
// </skeleton_2>
アプリをビルドして実行する
F11 キーを押すか、 [Run]>[Debug] の順に選択します。 その後 15 秒間、マイクからの音声入力が認識され、コンソール ウィンドウにログが記録されます。
リファレンスドキュメント | パッケージ (npm) | GitHub のその他のサンプル | ライブラリのソース コード
このクイックスタートでは、Speech SDK と Language Understanding (LUIS) サービスを使用して、マイクによってキャプチャされたオーディオ データから意図を認識します。 具体的には、Speech SDK を使用して音声をキャプチャし、LUIS のあらかじめ構築されたドメインを使用してホーム オートメーションに対する意図 (照明のオン/オフなど) を特定します。
前提条件
- Azure サブスクリプション - 無料アカウントを作成します
- Azure portal で言語リソースを作成します。 Free 価格レベル (
`F0` ) を使用してサービスを試用し、後から運用環境用の有料レベルにアップグレードすることができます。 今回、Speech リソースは必要ありません。 - Language リソース キーとエンドポイントを取得します。 言語リソースがデプロイされたら、[リソースに移動] を選択して、キーを表示および管理します。 Azure AI サービス リソースの詳細については、「リソースのキーを取得する」を参照してください。
また、実際の開発環境に対応した Speech SDK をインストールし、空のサンプル プロジェクトを作成する必要もあります。
意図認識用の LUIS アプリを作成する
意図認識を実行するには、LUIS プレビュー ポータルを使用して、LUIS アカウントとプロジェクトを作成する必要があります。 このクイックスタートでは、インテント認識が使用可能なリージョンに LUIS サブスクリプションが必要です。 音声サービスのサブスクリプションは不要です。
まず、LUIS プレビュー ポータルを使用して LUIS アカウントとアプリを作成する必要があります。 作成する LUIS アプリは、意図、エンティティ、および発話例を提供するホーム オートメーション用に事前構築済みのドメインを使用します。 完成すると、クラウド内で LUIS エンドポイントが実行されるようになります。これは、Speech SDK を使用して呼び出すことができます。
LUIS アプリを作成するには、次の手順に従います。
完了すると、次の 4 つが必要になります。
- 再発行 ([Speech priming](音声認識の準備) をオン)
- LUIS のプライマリ キー
- LUIS の場所
- LUIS のアプリ ID
この情報は、LUIS プレビュー ポータルの次の場所で確認できます。
LUIS プレビュー ポータルから目的のアプリをアプリし、[Publish](発行) ボタンを選択します。
[Production](運用) スロットを選択します。
en-USを使用している場合は、 [change settings](設定の変更) を選択し、 [Speech priming](音声プライミング) オプションを [On](オン) の位置に切り替えます。 次に、[Publish](発行) ボタンを選択します。重要
[Speech priming](音声認識の準備) の使用を強くお勧めします。音声認識の精度が向上します。
LUIS プレビュー ポータルで、[管理] を選択し、次に [Azure リソース] を選択します。 このページでは、LUIS 予測リソースの LUIS キーと場所 ("リージョン" と呼ばれることもあります) を確認できます。
キーと場所を確認したら、アプリ ID が必要になります。 [設定] を選択します。 アプリ ID は、このページから入手できます。
定型コードを使用して開始する
このプロジェクトのスケルトンとして機能するコードを追加しましょう。
    <!DOCTYPE html>
    <html>
    <head>
    <title>Microsoft Azure AI Speech SDK JavaScript Quickstart</title>
    <meta charset="utf-8" />
    </head>
    <body style="font-family:'Helvetica Neue',Helvetica,Arial,sans-serif; font-size:13px;">
    </body>
    </html>
UI 要素を追加する
次に、入力ボックス用の基本的な UI をいくつか追加して、Speech SDK の JavaScript を参照し、承認トークン (利用可能な場合) を取得します。
重要
終わったらコードからキーを削除し、公開しないよう注意してください。 運用環境では、Azure Key Vault などの資格情報を格納してアクセスする安全な方法を使用します。 詳しくは、Azure AI サービスのセキュリティに関する記事をご覧ください。
<body style="font-family:'Helvetica Neue',Helvetica,Arial,sans-serif; font-size:13px;">
  <div id="content" style="display:none">
    <table width="100%">
      <tr>
        <td></td>
        <td><h1 style="font-weight:500;">Microsoft Azure AI Speech SDK JavaScript Quickstart</h1></td>
      </tr>
      <tr>
        <td align="right"><a href="https://learn.microsoft.com/azure/ai-services/speech-service/overview" target="_blank">Subscription</a>:</td>
        <td><input id="subscriptionKey" type="text" size="40" value="subscription"></td>
      </tr>
      <tr>
        <td align="right">Region</td>
        <td><input id="serviceRegion" type="text" size="40" value="YourServiceRegion"></td>
      </tr>
      <tr>
        <td align="right">Application ID:</td>
        <td><input id="appId" type="text" size="60" value="YOUR_LANGUAGE_UNDERSTANDING_APP_ID"></td>
      </tr>
      <tr>
        <td></td>
        <td><button id="startIntentRecognizeAsyncButton">Start Intent Recognition</button></td>
      </tr>
      <tr>
        <td align="right" valign="top">Input Text</td>
        <td><textarea id="phraseDiv" style="display: inline-block;width:500px;height:200px"></textarea></td>
      </tr>
      <tr>
        <td align="right" valign="top">Result</td>
        <td><textarea id="statusDiv" style="display: inline-block;width:500px;height:100px"></textarea></td>
      </tr>
    </table>
  </div>

  <script src="microsoft.cognitiveservices.speech.sdk.bundle.js"></script>

  <script>
  // Note: Replace the URL with a valid endpoint to retrieve
  //       authorization tokens for your subscription.
  var authorizationEndpoint = "token.php";

  function RequestAuthorizationToken() {
    if (authorizationEndpoint) {
      var a = new XMLHttpRequest();
      a.open("GET", authorizationEndpoint);
      a.setRequestHeader("Content-Type", "application/x-www-form-urlencoded");
      a.send("");
      a.onload = function() {
				var token = JSON.parse(atob(this.responseText.split(".")[1]));
				serviceRegion.value = token.region;
				authorizationToken = this.responseText;
				subscriptionKey.disabled = true;
				subscriptionKey.value = "using authorization token (hit F5 to refresh)";
				console.log("Got an authorization token: " + token);
      }
    }
  }
  </script>

  <script>
    // status fields and start button in UI
    var phraseDiv;
    var statusDiv;
    var startIntentRecognizeAsyncButton;

    // subscription key, region, and appId for LUIS services.
    var subscriptionKey, serviceRegion, appId;
    var authorizationToken;
    var SpeechSDK;
    var recognizer;

    document.addEventListener("DOMContentLoaded", function () {
      startIntentRecognizeAsyncButton = document.getElementById("startIntentRecognizeAsyncButton");
      subscriptionKey = document.getElementById("subscriptionKey");
      serviceRegion = document.getElementById("serviceRegion");
      appId = document.getElementById("appId");
      phraseDiv = document.getElementById("phraseDiv");
      statusDiv = document.getElementById("statusDiv");

      startIntentRecognizeAsyncButton.addEventListener("click", function () {
        startIntentRecognizeAsyncButton.disabled = true;
        phraseDiv.innerHTML = "";
        statusDiv.innerHTML = "";
      });

      if (!!window.SpeechSDK) {
        SpeechSDK = window.SpeechSDK;
        startIntentRecognizeAsyncButton.disabled = false;

        document.getElementById('content').style.display = 'block';
        document.getElementById('warning').style.display = 'none';

        // in case we have a function for getting an authorization token, call it.
        if (typeof RequestAuthorizationToken === "function") {
          RequestAuthorizationToken();
        }
      }
    });
  </script>
Speech 構成を作成する
SpeechRecognizer オブジェクトを初期化するには、サブスクリプション キーとサブスクリプション リージョンを使用する構成を作成する必要があります。 このコードを startRecognizeOnceAsyncButton.addEventListener() メソッドに挿入します。
Note
Azure Cognitive Service for SpeechSDK では、既定で認識される言語は en-us です。ソース言語の選択については、音声を認識する方法を参照してください。
        // if we got an authorization token, use the token. Otherwise use the provided subscription key
        var speechConfig;
        if (authorizationToken) {
          speechConfig = SpeechSDK.SpeechConfig.fromAuthorizationToken(authorizationToken, serviceRegion.value);
        } else {
          if (subscriptionKey.value === "" || subscriptionKey.value === "subscription") {
            alert("Please enter your Microsoft Azure AI Speech subscription key!");
            return;
          }
          startIntentRecognizeAsyncButton.disabled = false;
          speechConfig = SpeechSDK.SpeechConfig.fromSubscription(subscriptionKey.value, serviceRegion.value);
        }

        speechConfig.speechRecognitionLanguage = "en-US";
オーディオ構成を作成する
ここで、使用する入力デバイスを指し示す AudioConfig オブジェクトを作成する必要があります。 このコードを Speech 構成のすぐ下にある startIntentRecognizeAsyncButton.addEventListener() メソッドに挿入します。
var audioConfig = SpeechSDK.AudioConfig.fromDefaultMicrophoneInput();
IntentRecognizer を初期化する
ここで、前に作成した SpeechConfig オブジェクトと AudioConfig オブジェクトを使用して IntentRecognizer オブジェクトを作成しましょう。 このコードを startIntentRecognizeAsyncButton.addEventListener() メソッドに挿入します。
recognizer = new SpeechSDK.IntentRecognizer(speechConfig, audioConfig);
LanguageUnderstandingModel と意図を追加する
LanguageUnderstandingModel と意図認識エンジンを関連付け、認識させる意図を追加する必要があります。 ホーム オートメーション用のあらかじめ構築されたドメインの意図を使用します。
次のコードを IntentRecognizer の下に挿入します。 "YourLanguageUnderstandingAppId" は必ずお客様の LUIS app ID で置き換えてください。
        if (appId.value !== "" && appId.value !== "YOUR_LANGUAGE_UNDERSTANDING_APP_ID") {
          var lm = SpeechSDK.LanguageUnderstandingModel.fromAppId(appId.value);

          recognizer.addAllIntents(lm);
        }
Note
Speech SDK では、LUIS v2.0 エンドポイントのみがサポートされています。 V2.0 URL パターンを使用するには、例のクエリ フィールドにある v3.0 エンドポイントの URL を手動で変更する必要があります。 LUIS v2.0 エンドポイントは、常に次の 2 つのパターンのいずれかに従います。
https://{AzureResourceName}.cognitiveservices.azure.com/luis/v2.0/apps/{app-id}?subscription-key={subkey}&verbose=true&q=https://{Region}.api.cognitive.microsoft.com/luis/v2.0/apps/{app-id}?subscription-key={subkey}&verbose=true&q=
意図を認識する
IntentRecognizer オブジェクトから、recognizeOnceAsync() メソッドを呼び出します。 認識の対象として 1 つの語句を送信しようとしていること、また、その語句が識別された後で、音声認識を停止しようとしていることが、このメソッドを通じて Speech サービスに伝えられます。
モデルを追加するコードの下に、このコードを挿入します。
        recognizer.recognizeOnceAsync(
          function (result) {
            window.console.log(result);

            phraseDiv.innerHTML = result.text + "\r\n";

            statusDiv.innerHTML += "(continuation) Reason: " + SpeechSDK.ResultReason[result.reason];
            switch (result.reason) {
              case SpeechSDK.ResultReason.RecognizedSpeech:
                statusDiv.innerHTML += " Text: " + result.text;
                break;
              case SpeechSDK.ResultReason.RecognizedIntent:
                statusDiv.innerHTML += " Text: " + result.text + " IntentId: " + result.intentId;

                // The actual JSON returned from Language Understanding is a bit more complex to get to, but it is available for things like
                // the entity name and type if part of the intent.
                statusDiv.innerHTML += " Intent JSON: " + result.properties.getProperty(SpeechSDK.PropertyId.LanguageUnderstandingServiceResponse_JsonResult);
                phraseDiv.innerHTML += result.properties.getProperty(SpeechSDK.PropertyId.LanguageUnderstandingServiceResponse_JsonResult) + "\r\n";
                break;
              case SpeechSDK.ResultReason.NoMatch:
                var noMatchDetail = SpeechSDK.NoMatchDetails.fromResult(result);
                statusDiv.innerHTML += " NoMatchReason: " + SpeechSDK.NoMatchReason[noMatchDetail.reason];
                break;
              case SpeechSDK.ResultReason.Canceled:
                var cancelDetails = SpeechSDK.CancellationDetails.fromResult(result);
                statusDiv.innerHTML += " CancellationReason: " + SpeechSDK.CancellationReason[cancelDetails.reason];

              if (cancelDetails.reason === SpeechSDK.CancellationReason.Error) {
                statusDiv.innerHTML += ": " + cancelDetails.errorDetails;
              }
            break;
            }
            statusDiv.innerHTML += "\r\n";
            startIntentRecognizeAsyncButton.disabled = false;
          },
          function (err) {
            window.console.log(err);

            phraseDiv.innerHTML += "ERROR: " + err;
            startIntentRecognizeAsyncButton.disabled = false;
          });
コードを確認する
<!DOCTYPE html>
<html>
<head>
  <title>Microsoft Cognitive Services Speech SDK JavaScript Quickstart</title>
  <meta charset="utf-8" />
</head>
<body style="font-family:'Helvetica Neue',Helvetica,Arial,sans-serif; font-size:13px;">
  <div id="warning">
    <h1 style="font-weight:500;">Speech Recognition Speech SDK not found (microsoft.cognitiveservices.speech.sdk.bundle.js missing).</h1>
  </div>

  <div id="content" style="display:none">
    <table width="100%">
      <tr>
        <td></td>
        <td><h1 style="font-weight:500;">Microsoft Cognitive Services Speech SDK JavaScript Quickstart</h1></td>
      </tr>
      <tr>
        <td align="right"><a href="https://docs.microsoft.com/azure/cognitive-services/speech-service/quickstarts/intent-recognition?pivots=programming-language-csharp#create-a-luis-app-for-intent-recognition" target="_blank">LUIS Primary Key</a>:</td>
        <td><input id="subscriptionKey" type="text" size="40" value="subscription"></td>
      </tr>
      <tr>
        <td align="right">LUIS Location</td>
        <td><input id="serviceRegion" type="text" size="40" value="YourServiceRegion"></td>
      </tr>
      <tr>
        <td align="right">LUIS App ID:</td>
        <td><input id="appId" type="text" size="60" value="YOUR_LANGUAGE_UNDERSTANDING_APP_ID"></td>
      </tr>
      <tr>
        <td></td>
        <td><button id="startIntentRecognizeAsyncButton">Start Intent Recognition</button></td>
      </tr>
      <tr>
        <td align="right" valign="top">Input Text</td>
        <td><textarea id="phraseDiv" style="display: inline-block;width:500px;height:200px"></textarea></td>
      </tr>
      <tr>
        <td align="right" valign="top">Result</td>
        <td><textarea id="statusDiv" style="display: inline-block;width:500px;height:100px"></textarea></td>
      </tr>
    </table>
  </div>

  <!-- Speech SDK reference sdk. -->
  <script src="https://aka.ms/csspeech/jsbrowserpackageraw"></script>

  <!-- Speech SDK USAGE -->
  <script>
    // status fields and start button in UI
    var phraseDiv;
    var statusDiv;
    var startIntentRecognizeAsyncButton;

    // subscription key and region for speech services.
    var subscriptionKey, serviceRegion, appId;
    var SpeechSDK;
    var recognizer;

    document.addEventListener("DOMContentLoaded", function () {

      startIntentRecognizeAsyncButton = document.getElementById("startIntentRecognizeAsyncButton");
      subscriptionKey = document.getElementById("subscriptionKey");
      serviceRegion = document.getElementById("serviceRegion");
      appId = document.getElementById("appId");
      phraseDiv = document.getElementById("phraseDiv");
      statusDiv = document.getElementById("statusDiv");

      startIntentRecognizeAsyncButton.addEventListener("click", function () {
        startIntentRecognizeAsyncButton.disabled = true;
        phraseDiv.innerHTML = "";
        statusDiv.innerHTML = "";

        let audioConfig = SpeechSDK.AudioConfig.fromDefaultMicrophoneInput();
        if (subscriptionKey.value === "" || subscriptionKey.value === "subscription") {
          alert("Please enter your Microsoft Cognitive Services Speech subscription key!");
          startIntentRecognizeAsyncButton.disabled = false;
          return;
        }
        var speechConfig = SpeechSDK.SpeechConfig.fromSubscription(subscriptionKey.value, serviceRegion.value);

        speechConfig.speechRecognitionLanguage = "en-US";
        recognizer = new SpeechSDK.IntentRecognizer(speechConfig, audioConfig);

        // Set up a Language Understanding Model from Language Understanding Intelligent Service (LUIS).
        // See https://www.luis.ai/home for more information on LUIS.
        if (appId.value !== "" && appId.value !== "YOUR_LANGUAGE_UNDERSTANDING_APP_ID") {
          var lm = SpeechSDK.LanguageUnderstandingModel.fromAppId(appId.value);

          recognizer.addAllIntents(lm);
        }

        recognizer.recognizeOnceAsync(
          function (result) {
            window.console.log(result);
            phraseDiv.innerHTML = result.text + "\r\n";

            statusDiv.innerHTML += "(continuation) Reason: " + SpeechSDK.ResultReason[result.reason];
            switch (result.reason) {

              case SpeechSDK.ResultReason.RecognizedSpeech:
                statusDiv.innerHTML += " Text: " + result.text;
                break;

              case SpeechSDK.ResultReason.RecognizedIntent:
                statusDiv.innerHTML += " Text: " + result.text + " IntentId: " + result.intentId;

                // The actual JSON returned from Language Understanding is a bit more complex to get to, but it is available for things like
                // the entity name and type if part of the intent.
                statusDiv.innerHTML += " Intent JSON: " + result.properties.getProperty(SpeechSDK.PropertyId.LanguageUnderstandingServiceResponse_JsonResult);
                phraseDiv.innerHTML += result.properties.getProperty(SpeechSDK.PropertyId.LanguageUnderstandingServiceResponse_JsonResult) + "\r\n";
                break;

              case SpeechSDK.ResultReason.NoMatch:
                var noMatchDetail = SpeechSDK.NoMatchDetails.fromResult(result);
                statusDiv.innerHTML += " NoMatchReason: " + SpeechSDK.NoMatchReason[noMatchDetail.reason];
                break;

              case SpeechSDK.ResultReason.Canceled:
                var cancelDetails = SpeechSDK.CancellationDetails.fromResult(result);
                statusDiv.innerHTML += " CancellationReason: " + SpeechSDK.CancellationReason[cancelDetails.reason];

                if (cancelDetails.reason === SpeechSDK.CancellationReason.Error) {
                  statusDiv.innerHTML += ": " + cancelDetails.errorDetails;
                }
                break;
            }
            statusDiv.innerHTML += "\r\n";
            startIntentRecognizeAsyncButton.disabled = false;
          },
          function (err) {
            window.console.log(err);

            phraseDiv.innerHTML += "ERROR: " + err;
            startIntentRecognizeAsyncButton.disabled = false;
        });
      });

      if (!!window.SpeechSDK) {
        SpeechSDK = window.SpeechSDK;
        startIntentRecognizeAsyncButton.disabled = false;

        document.getElementById('content').style.display = 'block';
        document.getElementById('warning').style.display = 'none';
      }
    });

  </script>
</body>
</html>
トークン ソースを作成する (省略可能)
Web サーバーで Web ページをホストする場合は、デモ アプリケーションに対するトークン ソースを必要に応じて指定できます。 これにより、サブスクリプション キーはサーバーに常に存在するようになり、ユーザーは自分で承認コードを入力しなくても音声機能を使用できます。
token.php という名前で新しいファイルを作成します。 この例では、Web サーバーが PHP スクリプト言語をサポートし、curl が有効になっているものと想定します。 次のコードを入力します。
<?php
header('Access-Control-Allow-Origin: ' . $_SERVER['SERVER_NAME']);

// Replace with your own subscription key and service region (e.g., "westus").
$subscriptionKey = 'YourSubscriptionKey';
$region = 'YourServiceRegion';

$ch = curl_init();
curl_setopt($ch, CURLOPT_URL, 'https://' . $region . '.api.cognitive.microsoft.com/sts/v1.0/issueToken');
curl_setopt($ch, CURLOPT_POST, 1);
curl_setopt($ch, CURLOPT_POSTFIELDS, '{}');
curl_setopt($ch, CURLOPT_HTTPHEADER, array('Content-Type: application/json', 'Ocp-Apim-Subscription-Key: ' . $subscriptionKey));
curl_setopt($ch, CURLOPT_RETURNTRANSFER, 1);
echo curl_exec($ch);
?>
Note
承認トークンは有効期間が限られています。 この簡単な例では、承認トークンを自動更新する方法は示されていません。 ユーザーは、ページを読み込みなおすか、F5 キーを押すことにより、手動で更新できます。
サンプルをビルドしてローカルに実行する
アプリを起動するには、index.html ファイルをダブルクリックするか、または好みの Web ブラウザーで index.html を開きます。 LUIS キー、LUIS リージョン、LUIS アプリケーション ID を入力できるシンプルな GUI が表示されます。 これらのフィールドへの入力が済むと、適切なボタンをクリックして、マイクを使った認識をトリガーできます。
Note
Safari ブラウザーでは、この方法が使用できません。 Safari では、サンプル Web ページを Web サーバーでホストする必要があります。Safari では、ローカル ファイルから読み込まれた Web サイトにはマイクの使用が許可されません。
Web サーバーからサンプルをビルドして実行する
アプリを起動するには、適当な Web ブラウザーを開き、フォルダーをホストしているパブリック URL にアクセスして、LUIS リージョンと LUIS アプリケーション ID を入力し、マイクを使用して認識をトリガーします。 構成した場合、トークン ソースからトークンが取得され、話者のコマンドが認識され始めます。
リファレンス ドキュメント | パッケージ (PyPi) | GitHub のその他のサンプル
このクイックスタートでは、Speech SDK と Language Understanding (LUIS) サービスを使用して、マイクによってキャプチャされたオーディオ データから意図を認識します。 具体的には、Speech SDK を使用して音声をキャプチャし、LUIS のあらかじめ構築されたドメインを使用してホーム オートメーションに対する意図 (照明のオン/オフなど) を特定します。
前提条件
- Azure サブスクリプション - 無料アカウントを作成します
- Azure portal で言語リソースを作成します。 Free 価格レベル (
`F0` ) を使用してサービスを試用し、後から運用環境用の有料レベルにアップグレードすることができます。 今回、Speech リソースは必要ありません。 - Language リソース キーとエンドポイントを取得します。 言語リソースがデプロイされたら、[リソースに移動] を選択して、キーを表示および管理します。 Azure AI サービス リソースの詳細については、「リソースのキーを取得する」を参照してください。
また、実際の開発環境に対応した Speech SDK をインストールし、空のサンプル プロジェクトを作成する必要もあります。
意図認識用の LUIS アプリを作成する
意図認識を実行するには、LUIS プレビュー ポータルを使用して、LUIS アカウントとプロジェクトを作成する必要があります。 このクイックスタートでは、インテント認識が使用可能なリージョンに LUIS サブスクリプションが必要です。 音声サービスのサブスクリプションは不要です。
まず、LUIS プレビュー ポータルを使用して LUIS アカウントとアプリを作成する必要があります。 作成する LUIS アプリは、意図、エンティティ、および発話例を提供するホーム オートメーション用に事前構築済みのドメインを使用します。 完成すると、クラウド内で LUIS エンドポイントが実行されるようになります。これは、Speech SDK を使用して呼び出すことができます。
LUIS アプリを作成するには、次の手順に従います。
完了すると、次の 4 つが必要になります。
- 再発行 ([Speech priming](音声認識の準備) をオン)
- LUIS のプライマリ キー
- LUIS の場所
- LUIS のアプリ ID
この情報は、LUIS プレビュー ポータルの次の場所で確認できます。
LUIS プレビュー ポータルから目的のアプリをアプリし、[Publish](発行) ボタンを選択します。
[Production](運用) スロットを選択します。
en-USを使用している場合は、 [change settings](設定の変更) を選択し、 [Speech priming](音声プライミング) オプションを [On](オン) の位置に切り替えます。 次に、[Publish](発行) ボタンを選択します。重要
[Speech priming](音声認識の準備) の使用を強くお勧めします。音声認識の精度が向上します。
LUIS プレビュー ポータルで、[管理] を選択し、次に [Azure リソース] を選択します。 このページでは、LUIS 予測リソースの LUIS キーと場所 ("リージョン" と呼ばれることもあります) を確認できます。
キーと場所を確認したら、アプリ ID が必要になります。 [設定] を選択します。 アプリ ID は、このページから入手できます。
プロジェクトを開く
- 好みの IDE を開きます。
- 新しいプロジェクトを作成し、
quickstart.pyという名前のファイルを作成して開きます。
定型コードを使用して開始する
このプロジェクトのスケルトンとして機能するコードを追加しましょう。
import azure.cognitiveservices.speech as speechsdk

print("Say something...")
Speech 構成を作成する
IntentRecognizer オブジェクトを初期化する前に、LUIS 予測リソース用のキーとリージョンを使用する構成を作成する必要があります。
このコードを quickstart.py に挿入します。 次の値を必ず更新してください。
"YourLanguageUnderstandingSubscriptionKey"を LUIS 予測キーで置き換えます。"YourLanguageUnderstandingServiceRegion"を LUIS の場所で置き換えます。 リージョンのリージョン識別子を使用してください。
ヒント
これらの値を見つける方法については、「意図認識用の LUIS アプリを作成する」を参照してください。
重要
終わったらコードからキーを削除し、公開しないよう注意してください。 運用環境では、Azure Key Vault などの資格情報を格納してアクセスする安全な方法を使用します。 詳しくは、Azure AI サービスのセキュリティに関する記事をご覧ください。
# Set up the config for the intent recognizer (remember that this uses the Language Understanding key, not the Speech Services key)!
intent_config = speechsdk.SpeechConfig(
    subscription="YourLanguageUnderstandingSubscriptionKey",
    region="YourLanguageUnderstandingServiceRegion")
このサンプルでは、LUIS キーとリージョンを使用して SpeechConfig オブジェクトを構築します。 使用可能なメソッドの完全な一覧については、SpeechConfig クラスに関する記事を参照してください。
Azure Cognitive Service for SpeechSDK では、既定で認識される言語は en-us です。ソース言語の選択については、音声を認識する方法を参照してください。
IntentRecognizer を初期化する
ここで、IntentRecognizer を作成しましょう。 Speech 構成のすぐ下にこのコードを挿入します。
# Set up the intent recognizer
intent_recognizer = speechsdk.intent.IntentRecognizer(speech_config=intent_config)
LanguageUnderstandingModel と意図を追加する
LanguageUnderstandingModel と意図認識エンジンを関連付け、認識させる意図を追加する必要があります。 ホーム オートメーション用のあらかじめ構築されたドメインの意図を使用します。
次のコードを IntentRecognizer の下に挿入します。 "YourLanguageUnderstandingAppId" は必ずお客様の LUIS app ID で置き換えてください。
ヒント
この値を見つける方法については、「意図認識用の LUIS アプリを作成する」を参照してください。
# set up the intents that are to be recognized. These can be a mix of simple phrases and
# intents specified through a LanguageUnderstanding Model.
model = speechsdk.intent.LanguageUnderstandingModel(app_id="YourLanguageUnderstandingAppId")
intents = [
    (model, "HomeAutomation.TurnOn"),
    (model, "HomeAutomation.TurnOff"),
    ("This is a test.", "test"),
    ("Switch to channel 34.", "34"),
    ("what's the weather like", "weather"),
]
intent_recognizer.add_intents(intents)
この例では add_intents() 関数を使用して、明示的に定義された意図の一覧を追加します。 モデルのすべての意図を追加する場合は、add_all_intents(model) を使用し、モデルを渡します。
意図を認識する
IntentRecognizer オブジェクトから、recognize_once() メソッドを呼び出します。 認識の対象として 1 つの語句を送信しようとしていること、また、その語句が識別された後で、音声認識を停止しようとしていることが、このメソッドを通じて Speech サービスに伝えられます。
このコードをモデルの下に挿入します。
intent_result = intent_recognizer.recognize_once()
認識結果 (またはエラー) を表示する
音声サービスによって認識結果が返されたら、それを使用して何らかの操作を行います。 シンプルに保ち、結果をコンソールに出力します。
recognize_once() の呼び出しの下にこのコードを追加します。
# Check the results
if intent_result.reason == speechsdk.ResultReason.RecognizedIntent:
    print("Recognized: \"{}\" with intent id `{}`".format(intent_result.text, intent_result.intent_id))
elif intent_result.reason == speechsdk.ResultReason.RecognizedSpeech:
    print("Recognized: {}".format(intent_result.text))
elif intent_result.reason == speechsdk.ResultReason.NoMatch:
    print("No speech could be recognized: {}".format(intent_result.no_match_details))
elif intent_result.reason == speechsdk.ResultReason.Canceled:
    print("Intent recognition canceled: {}".format(intent_result.cancellation_details.reason))
    if intent_result.cancellation_details.reason == speechsdk.CancellationReason.Error:
        print("Error details: {}".format(intent_result.cancellation_details.error_details))
コードを確認する
この時点で、コードは次のようになります。
Note
このバージョンにはいくつかのコメントを追加してあります。
# Copyright (c) Microsoft. All rights reserved.
# Licensed under the MIT license. See LICENSE.md file in the project root for full license information.

# <skeleton>
import azure.cognitiveservices.speech as speechsdk

print("Say something...")
# </skeleton>

"""performs one-shot intent recognition from input from the default microphone"""

# <create_speech_configuration>
# Set up the config for the intent recognizer (remember that this uses the Language Understanding key, not the Speech Services key)!
intent_config = speechsdk.SpeechConfig(
    subscription="YourLanguageUnderstandingSubscriptionKey",
    region="YourLanguageUnderstandingServiceRegion")
# </create_speech_configuration>

# <create_intent_recognizer>
# Set up the intent recognizer
intent_recognizer = speechsdk.intent.IntentRecognizer(speech_config=intent_config)
# </create_intent_recognizer>

# <add_intents>
# set up the intents that are to be recognized. These can be a mix of simple phrases and
# intents specified through a LanguageUnderstanding Model.
model = speechsdk.intent.LanguageUnderstandingModel(app_id="YourLanguageUnderstandingAppId")
intents = [
    (model, "HomeAutomation.TurnOn"),
    (model, "HomeAutomation.TurnOff"),
    ("This is a test.", "test"),
    ("Switch to channel 34.", "34"),
    ("what's the weather like", "weather"),
]
intent_recognizer.add_intents(intents)
# </add_intents>

# To add all of the possible intents from a LUIS model to the recognizer, uncomment the line below:
# intent_recognizer.add_all_intents(model)

# Starts intent recognition, and returns after a single utterance is recognized. The end of a
# single utterance is determined by listening for silence at the end or until a maximum of 15
# seconds of audio is processed. It returns the recognition text as result.
# Note: Since recognize_once() returns only a single utterance, it is suitable only for single
# shot recognition like command or query.
# For long-running multi-utterance recognition, use start_continuous_recognition() instead.
# <recognize_intent>
intent_result = intent_recognizer.recognize_once()
# </recognize_intent>

# <print_results>
# Check the results
if intent_result.reason == speechsdk.ResultReason.RecognizedIntent:
    print("Recognized: \"{}\" with intent id `{}`".format(intent_result.text, intent_result.intent_id))
elif intent_result.reason == speechsdk.ResultReason.RecognizedSpeech:
    print("Recognized: {}".format(intent_result.text))
elif intent_result.reason == speechsdk.ResultReason.NoMatch:
    print("No speech could be recognized: {}".format(intent_result.no_match_details))
elif intent_result.reason == speechsdk.ResultReason.Canceled:
    print("Intent recognition canceled: {}".format(intent_result.cancellation_details.reason))
    if intent_result.cancellation_details.reason == speechsdk.CancellationReason.Error:
        print("Error details: {}".format(intent_result.cancellation_details.error_details))
# </print_results>
アプリをビルドして実行する
コンソールまたは IDE からサンプルを実行します。
python quickstart.py
その後 15 秒間、マイクからの音声入力が認識され、コンソール ウィンドウにログが記録されます。
リファレンス ドキュメント | パッケージ (Go) | GitHub のその他のサンプル
Speech SDK for Go では、意図認識がサポートされていません。 別のプログラミング言語を選択するか、この記事の冒頭でリンクされている、Go のリファレンスとサンプルを使用してください。
リファレンス ドキュメント | パッケージ (ダウンロード) | GitHub のその他のサンプル
Speech SDK for Objective-C では意図認識はサポートされていますが、こちらにはまだガイドは含まれていません。 作業を開始するには別のプログラミング言語を選択して概念について学ぶか、この記事の冒頭でリンクされている Objective-C のリファレンスとサンプルを参照してください。
リファレンス ドキュメント | パッケージ (ダウンロード) | GitHub のその他のサンプル
Speech SDK for Swift では意図認識はサポートされていますが、こちらにはまだガイドは含まれていません。 作業を開始するには、別のプログラミング言語を選択して概念について学ぶか、この記事の冒頭でリンクされている、Swift のリファレンスとサンプルを参照してください。
Speech to text REST API リファレンス | Speech to text REST API for short audio リファレンス | GitHub のその他のサンプル
意図認識用の REST API を使用できますが、こちらにはまだガイドは含まれていません。 使用を開始して概念について学ぶには、別のプログラミング言語を選択してください。
Speech コマンドラインインターフェイス (CLI) では、意図認識はサポートされていますが、こちらにはまだガイドは含まれていません。 別のプログラミング言語を選択して開始し、概念について学ぶか、Speech CLI の概要のページを参照して、CLI の詳細情報を確認してください。