継続的インテグレーションおよびデリバリー (CI/CD) の自動発行
適用対象: Azure Data Factory
  Azure Synapse Analytics
ヒント
企業向けのオールインワン分析ソリューション、Microsoft Fabric の Data Factory をお試しください。 Microsoft Fabric は、データ移動からデータ サイエンス、リアルタイム分析、ビジネス インテリジェンス、レポートまで、あらゆるものをカバーしています。 無料で新しい試用版を開始する方法について説明します。
Note
Synapse Analytics も CI/CD をサポートしています。 詳しくは、Synapse Analytics の CI/CD に関するドキュメントを参照してください。
概要
継続的インテグレーションは、コードベースに対して行われた変更を自動的にテストするプラクティスです。 できるだけ早く、継続的デリバリーで、継続的インテグレーションの間に発生したテストに続けて、変更をステージングまたは実稼働システムにプッシュします。
Azure Data Factory では、CI/CD とは、Data Factory パイプラインをある環境 (開発、テスト、運用など) から別の環境に移動することを意味します。 Data Factory では、Azure Resource Manager テンプレート (ARM テンプレート) を使用して、パイプライン、データ セット、データ フローなどのさまざまな DataFactory エンティティの構成を格納します。
データ ファクトリを別の環境に昇格させる手法が 2 つ提案されています。
- Data Factory と Azure Pipelines の統合を使用した自動デプロイ。
- Data Factory のユーザー エクスペリエンスと Azure Resource Manager の統合を使用した、ARM テンプレートの手動アップロード。
詳細については、「Azure Data Factory における継続的インテグレーションとデリバリー」を参照してください。
この記事では、継続的なデプロイの機能強化と CI/CD の自動発行機能に焦点を当てます。
継続的なデプロイの機能強化
自動発行機能では、Data Factory のユーザー エクスペリエンスの [すべて検証] および [Export ARM template](ARM テンプレートのエクスポート) 機能を利用して、一般公開された npm パッケージ @microsoft/azure-data-factory-utilities 経由でロジックを使用できるようにします。 このため、Data Factory UI にアクセスして手動でボタンを選択しなくても、プログラムを使用してこれらのアクションをトリガーできます。 この機能により、CI/CD パイプラインに真の継続的インテグレーションのエクスペリエンスが提供されます。
Note
パッケージが古いバージョンと互換性がないために発生する可能性があるエラーを回避するには、必ずノード バージョン 18.x とその互換性のあるバージョンを使用してください。
現在の CI/CD フロー
- 各ユーザーは、プライベート ブランチに変更を加えます。
- マスターへのプッシュは許可されていません。 ユーザーは、プル要求を作成して変更を加える必要があります。
- ユーザーは、Data Factory UI を読み込み、 [発行] をクリックして Data Factory に変更をデプロイし、発行ブランチに ARM テンプレートを生成する必要があります。
- DevOps リリース パイプラインは、新しいリリースを作成し、新しい変更が発行ブランチにプッシュされるたびに ARM テンプレートをデプロイするように構成されています。
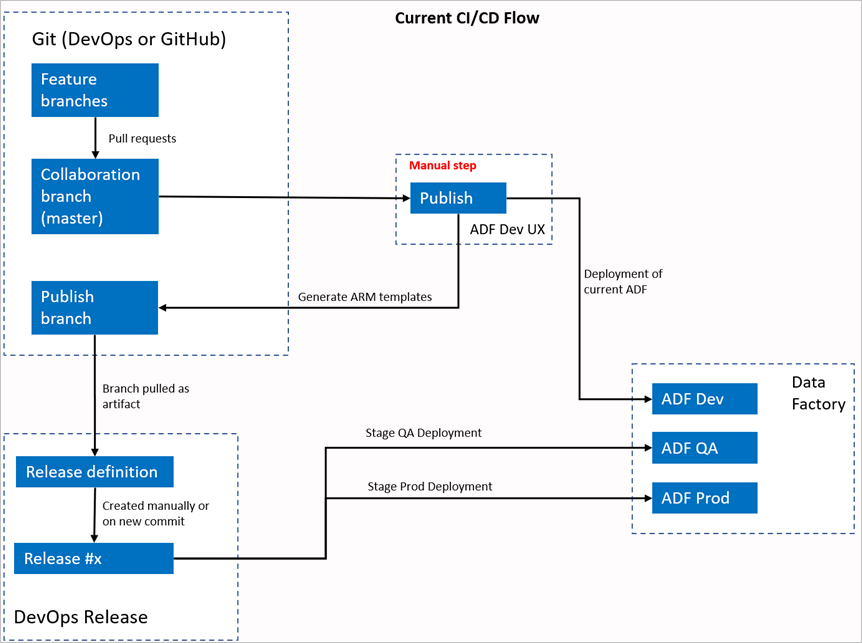
手動操作
現在の CI/CD フローでは、ユーザー エクスペリエンスが ARM テンプレートの作成に介在します。 その結果、ユーザーは Data Factory UI にアクセスし、 [発行] を手動で選択して ARM テンプレートの生成を開始し、発行ブランチにドロップする必要があります。
新しい CI/CD フロー
- 各ユーザーは、プライベート ブランチに変更を加えます。
- マスターへのプッシュは許可されていません。 ユーザーは、プル要求を作成して変更を加える必要があります。
- Azure DevOps パイプラインのビルドは、マスターへの新しいコミットが行われるたびにトリガーされます。 検証が成功した場合にはリソースを検証し、成果物として ARM テンプレートを生成します。
- DevOps リリース パイプラインは、新しいリリースを作成し、新しいビルドが利用可能になるたびに ARM テンプレートをデプロイするように構成されています。
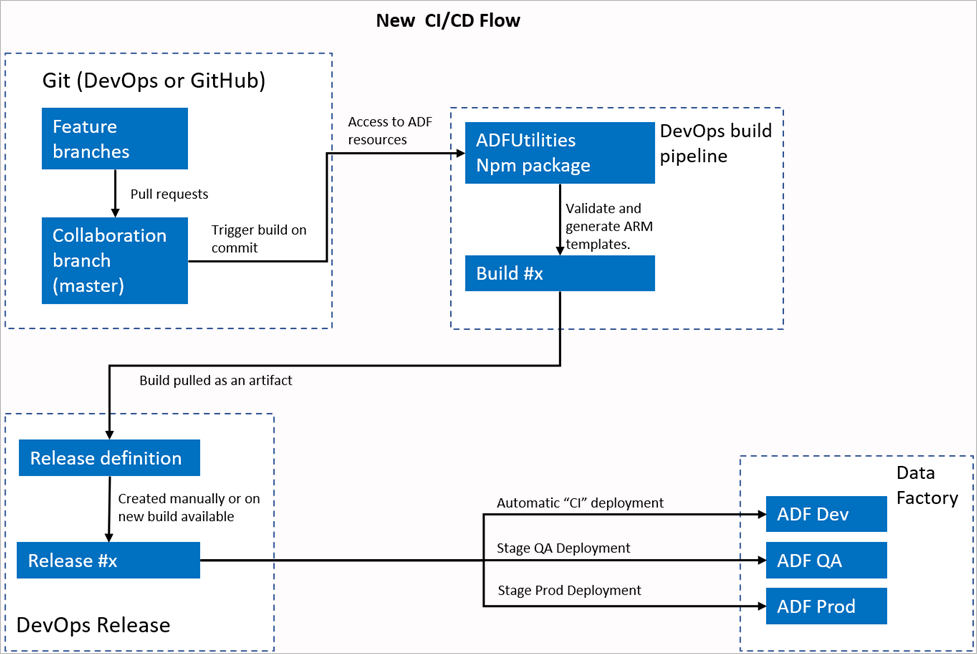
変更箇所
- これで、DevOps ビルド パイプラインを使用するビルド プロセスが完成しました。
- ビルド パイプラインでは、ADFUtilities NPM パッケージを使用します。これにより、すべてのリソースが検証され、ARM テンプレートが生成されます。 これらのテンプレートは単独にすることも、リンクすることもできます。
- ビルド パイプラインは、Data Factory UI ( [発行] ボタン) の代わりに、Data Factory リソースの検証と ARM テンプレートの生成を担当します。
- DevOps リリース定義では、Git アーティファクトではなく、この新しいビルド パイプラインが使用されるようになりました。
注意
引き続き既存のメカニズム (adf_publish ブランチ) を使用することも、新しいフローを使用することもできます。 両方ともサポートされています。
パッケージの概要
現在、パッケージで 2 つのコマンドが使用できます。
- Resource Manager テンプレートのエクスポート
- 検証
Resource Manager テンプレートのエクスポート
npm run build export <rootFolder> <factoryId> [outputFolder] を実行して、特定のフォルダーのリソースを使用して ARM テンプレートをエクスポートします。 このコマンドでは、ARM テンプレートを生成する前に検証チェックも実行されます。 testResourceGroup という名前のリソース グループを使用する例を次に示します。
npm run build export C:\DataFactories\DevDataFactory /subscriptions/xxxxxxxx-xxxx-xxxx-xxxx-xxxxxxxxxxxx/resourceGroups/testResourceGroup/providers/Microsoft.DataFactory/factories/DevDataFactory ArmTemplateOutput
RootFolderは、Data Factory リソースが配置されている場所を表す必須フィールドです。FactoryIdは、Data Factory リソース ID を/subscriptions/<subId>/resourceGroups/<rgName>/providers/Microsoft.DataFactory/factories/<dfName>形式で表す必須フィールドです。OutputFolderは、生成された ARM テンプレートを保存するための相対パスを指定する省略可能なパラメーターです。
更新されたトリガーのみを停止/開始する機能が一般公開され、上記のコマンドにマージできるようになりました。
Note
生成された ARM テンプレートは、ライブ バージョンのファクトリには発行されません。 デプロイは CI/CD パイプラインを使用して行う必要があります。
検証
npm run build validate <rootFolder> <factoryId> を実行して、特定のフォルダーのすべてのリソースを検証します。 次に例を示します。
npm run build validate C:\DataFactories\DevDataFactory /subscriptions/xxxxxxxx-xxxx-xxxx-xxxx-xxxxxxxxxxxx/resourceGroups/testResourceGroup/providers/Microsoft.DataFactory/factories/DevDataFactory
RootFolderは、Data Factory リソースが配置されている場所を表す必須フィールドです。FactoryIdは、Data Factory リソース ID を/subscriptions/<subId>/resourceGroups/<rgName>/providers/Microsoft.DataFactory/factories/<dfName>形式で表す必須フィールドです。
Azure パイプラインを作成する
npm パッケージはさまざまな方法で使用できますが、主な利点の 1 つは、Azure パイプラインを介して使用されることです。 コラボレーション ブランチへの各マージでは、最初にすべてのコードを検証してから、リリース パイプラインで使用できるビルド成果物に ARM テンプレートをエクスポートするパイプラインをトリガーできます。 現在の CI/CD プロセスとの違いは、既存の adf_publish ブランチではなく、この成果物でリリース パイプラインをポイントすることです。
作業を開始するには、次の手順に従います。
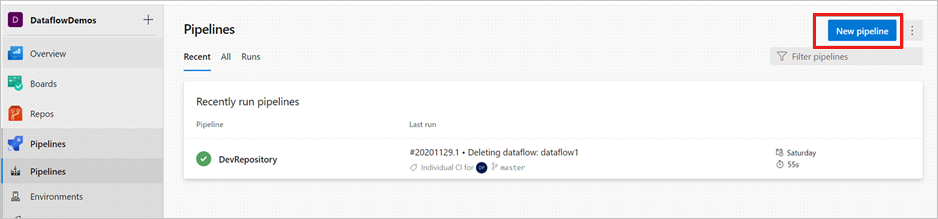
Azure DevOps プロジェクトを開き、 [パイプライン] に移動します。 [新しいパイプライン] を選択します。
パイプライン YAML スクリプトを保存するリポジトリを選択します。 これは Data Factory リソースの同じリポジトリ内の build フォルダーに保存することをお勧めします。 次の例で示すように、このリポジトリ内に、パッケージ名が含まれている package.json ファイルがあることを確認します。
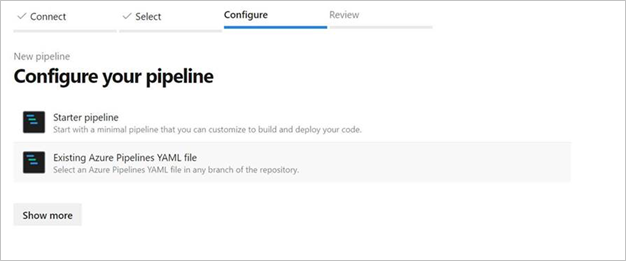
{
    "scripts":{
        "build":"node node_modules/@microsoft/azure-data-factory-utilities/lib/index"
    },
    "dependencies":{
        "@microsoft/azure-data-factory-utilities":"^1.0.0"
    }
}
[スタート パイプライン] を選択します。 次の例で示すように、YAML ファイルをアップロードまたはマージした場合は、それを直接ポイントして編集することもできます。
# Sample YAML file to validate and export an ARM template into a build artifact
# Requires a package.json file located in the target repository

trigger:
- main #collaboration branch

pool:
  vmImage: 'ubuntu-latest'

steps:

# Installs Node and the npm packages saved in your package.json file in the build

- task: UseNode@1
  inputs:
    version: '18.x'
  displayName: 'Install Node.js'

- task: Npm@1
  inputs:
    command: 'install'
    workingDir: '$(Build.Repository.LocalPath)/<folder-of-the-package.json-file>' #replace with the package.json folder
    verbose: true
  displayName: 'Install npm package'

# Validates all of the Data Factory resources in the repository. You'll get the same validation errors as when "Validate All" is selected.
# Enter the appropriate subscription and name for the source factory. Either of the "Validate" or "Validate and Generate ARM temmplate" options are required to perform validation. Running both is unnecessary.

- task: Npm@1
  inputs:
    command: 'custom'
    workingDir: '$(Build.Repository.LocalPath)/<folder-of-the-package.json-file>' #replace with the package.json folder
    customCommand: 'run build validate $(Build.Repository.LocalPath)/<Root-folder-from-Git-configuration-settings-in-ADF> /subscriptions/xxxxxxxx-xxxx-xxxx-xxxx-xxxxxxxxxxxx/resourceGroups/<Your-ResourceGroup-Name>/providers/Microsoft.DataFactory/factories/<Your-Factory-Name>'
  displayName: 'Validate'

# Validate and then generate the ARM template into the destination folder, which is the same as selecting "Publish" from the UX.
# The ARM template generated isn't published to the live version of the factory. Deployment should be done by using a CI/CD pipeline.

- task: Npm@1
  inputs:
    command: 'custom'
    workingDir: '$(Build.Repository.LocalPath)/<folder-of-the-package.json-file>' #replace with the package.json folder
    customCommand: 'run build export $(Build.Repository.LocalPath)/<Root-folder-from-Git-configuration-settings-in-ADF> /subscriptions/xxxxxxxx-xxxx-xxxx-xxxx-xxxxxxxxxxxx/resourceGroups/<Your-ResourceGroup-Name>/providers/Microsoft.DataFactory/factories/<Your-Factory-Name> "ArmTemplate"'
#For using preview that allows you to only stop/ start triggers that are modified, please comment out the above line and uncomment the below line. Make sure the package.json contains the build-preview command.
 #customCommand: 'run build-preview export $(Build.Repository.LocalPath) /subscriptions/222f1459-6ebd-4896-82ab-652d5f6883cf/resourceGroups/GartnerMQ2021/providers/Microsoft.DataFactory/factories/Dev-GartnerMQ2021-DataFactory "ArmTemplate"'
  displayName: 'Validate and Generate ARM template'

# Publish the artifact to be used as a source for a release pipeline.

- task: PublishPipelineArtifact@1
  inputs:
    targetPath: '$(Build.Repository.LocalPath)/<folder-of-the-package.json-file>/ArmTemplate' #replace with the package.json folder
    artifact: 'ArmTemplates'
    publishLocation: 'pipeline'
YAML コードを入力します。 YAML ファイルを出発点として使用することをお勧めします。
保存して実行します。 YAML を使用した場合、main ブランチが更新されるたびにトリガーされます。
Note
生成された成果物には、トリガーのデプロイ前後のスクリプトが既に含まれているため、これらを手動で追加する必要はありません。 それでもデプロイするときに、指定されたスクリプトを実行するため、トリガーの停止と開始に関するドキュメントを参照する必要があります。
関連するコンテンツ
Data Factory での継続的インテグレーションとデリバリーの詳細については、「Azure Data Factory における継続的インテグレーションとデリバリー」を参照してください。