Azure IoT Hub を使用してデバイスからクラウドにファイルをアップロードする (Java)
この記事では、Java を使って、IoT Hub のファイル アップロード機能でファイルを Azure BLOB ストレージにアップロードする方法を説明します。
デバイスから IoT ハブへのテレメトリの送信のクイックスタートと IoT Hub を使用したクラウドからデバイスへのメッセージの送信に関するアーティクルには、IoT Hub のデバイスからクラウドへのメッセージングとクラウドからデバイスへのメッセージングの基本的な機能が示されています。 「IoT Hub を使用してメッセージ ルーティングを構成する」チュートリアルでは、Azure Blob Storage に device-to-cloud メッセージを確実に格納する方法を示しています。 ただし、一部のシナリオでは、デバイスが送信するデータを、IoT Hub が受け付ける比較的小さな device-to-cloud メッセージには簡単にマップできません。 次に例を示します。
- ビデオ
- イメージを含む大きなファイル
- 高頻度でサンプリングされる振動データ
- 何らかの形式の前処理済みデータ
これらのファイルは通常、Azure Data Factory や Hadoop スタックなどのツールを使ってクラウドでバッチ処理されます。 デバイスからファイルをアップロードする必要がある場合も、IoT Hub のセキュリティと信頼性を利用できます。 この記事では、その方法について説明します。 GitHub の azure-iot-sdk-java から 2 つのサンプルを表示します。
注意
IoT Hub は、Azure IoT Device SDK を介して多数のデバイス プラットフォームと言語 (C、.NET、JavaScript など) をサポートしています。 デバイスを Azure IoT Hub に接続する方法については、Azure IoT デベロッパー センターを参照してください。
重要
X.509 証明機関 (CA) 認証を使用するデバイスのファイル アップロード機能はパブリック プレビュー段階であり、プレビュー モードを有効にする必要があります。 これは、Azure デバイス プロビジョニング サービスで x.509 拇印認証または x.509 証明書の構成証明を使用するデバイスで一般提供されています。 IoT Hub での X.509 認証の詳細については、「サポートされている X.509 証明書」を参照してください。
前提条件
IoT Hub。 CLI または Azure portal を使って作成します。
登録済みのデバイス。 Azure portal に登録してください。
Java SE Development Kit 8。 JDK 8 のダウンロードを利用するには、「長期サポート」の「Java 8」を選択します。
ポート 8883 は、ファイアウォールで開放されている必要があります。 この記事のデバイス サンプルでは、ポート 8883 を介して通信する MQTT プロトコルを使用しています。 このポートは、企業や教育用のネットワーク環境によってはブロックされている場合があります。 この問題の詳細と対処方法については、「IoT Hub への接続 (MQTT)」を参照してください。
IoT Hub への Azure Storage アカウントの関連付け
デバイスからファイルをアップロードするには、IoT ハブに関連付けられている Azure Storage アカウントと Azure Blob Storage コンテナーが必要です。 ストレージ アカウントとコンテナーを IoT ハブに関連付けると、デバイスから要求されたときに、その IoT ハブで SAS URI の要素を提供できます。 デバイスではその後、これらの要素を使用して SAS URI を構築でき、この URI を使用して Azure Storage との間で認証を行い、BLOB コンテナーにファイルをアップロードします。
Azure Storage アカウントを IoT ハブに関連付けるには:
IoT ハブの左側のペインにある [Hub settings](ハブの設定) で、 [ファイルのアップロード] を選びます。
![ポータルから [ファイルのアップロード] 設定の選択を示すスクリーン キャプチャ。](../includes/media/iot-hub-include-associate-storage/select-storage.png)
[ファイルのアップロード] ペインで、 [Azure Storage コンテナー] を選択します。 この記事の場合は、ストレージ アカウントと IoT Hub を同じリージョンに配置することをお勧めします。
使おうとしているストレージ アカウントが既にある場合は、一覧からそれを選択します。
新しいストレージ アカウントを作成するには、 [+ストレージ アカウント] を選択します。 ストレージ アカウントの名前を指定し、 [場所] が、お使いの IoT ハブと同じリージョンに設定されていることを確認し、 [OK] を選択します。 IoT ハブと同じリソース グループに新しいアカウントが作成されます。 デプロイが完了したら、一覧からそのストレージ アカウントを選択します。
ストレージ アカウントを選択すると、 [コンテナー] ペインが開きます。
[コンテナー] ペインで、BLOB コンテナーを選択します。
使おうとしている BLOB コンテナーが既にある場合は、一覧からそれを選択し、 [選択] をクリックします。
新しい BLOB コンテナーを作成するには、 [+ コンテナー] を選択します。 新しいコンテナーの名前を指定します。 この記事の目的上、他のフィールドはすべて既定のままにすることができます。 [作成] を選択します デプロイが完了したら、一覧からコンテナーを選択し、 [選択] をクリックします。
[ファイルのアップロード] ペインに戻り、ファイル通知が [オン] に設定されていることを確認します。 他の設定はすべて既定値のままにすることができます。 [保存] を選択し、設定が完了するのを待ってから次のセクションに進みます。
![ポータルの [ファイルのアップロード] 設定の確認を示すスクリーン キャプチャ。](../includes/media/iot-hub-include-associate-storage/file-upload-settings-small.png)
![ポータルから [ファイルのアップロード] 設定の選択を示すスクリーン キャプチャ。](../includes/media/iot-hub-include-associate-storage/select-storage.png#lightbox)
![ポータルの [ファイルのアップロード] 設定の確認を示すスクリーン キャプチャ。](../includes/media/iot-hub-include-associate-storage/file-upload-settings-small.png#lightbox)
Azure Storage アカウントを作成する方法の詳細な手順については、「ストレージ アカウントを作成する」を参照してください。 ストレージ アカウントと BLOB コンテナーを IoT ハブに関連付ける方法の詳細な手順については、Azure portal を使用してファイルのアップロードを構成することに関するページを参照してください。
Maven を使ってプロジェクトを作成する
プロジェクトのディレクトリを作成し、そのディレクトリでシェルを起動します。 コマンド ラインで、以下を実行します
mvn archetype:generate -DgroupId=com.mycompany.app -DartifactId=my-app -DarchetypeArtifactId=maven-archetype-quickstart -DarchetypeVersion=1.4 -DinteractiveMode=false
これにより、artifactId と同じ名前のディレクトリと標準のプロジェクト構造が生成されます。
  my-app
  |-- pom.xml
   -- src
      -- main
         -- java
            -- com
               -- mycompany
                  -- app
                     --App.Java
テキスト エディターを使用して、pom.xml ファイルを以下と置き換えます。
<?xml version="1.0" encoding="UTF-8"?>

<project xmlns="http://maven.apache.org/POM/4.0.0" xmlns:xsi="http://www.w3.org/2001/XMLSchema-instance"
  xsi:schemaLocation="http://maven.apache.org/POM/4.0.0 http://maven.apache.org/xsd/maven-4.0.0.xsd">
  <modelVersion>4.0.0</modelVersion>

  <groupId>com.mycompany.app</groupId>
  <artifactId>my-app</artifactId>
  <version>1.0-SNAPSHOT</version>

  <name>my-app</name>
  <!-- FIXME change it to the project's website -->
  <url>http://www.example.com</url>

  <properties>
    <project.build.sourceEncoding>UTF-8</project.build.sourceEncoding>
    <maven.compiler.source>1.7</maven.compiler.source>
    <maven.compiler.target>1.7</maven.compiler.target>
  </properties>

  <dependencies>
      <dependency>
      <groupId>com.microsoft.azure.sdk.iot</groupId>
      <artifactId>iot-device-client</artifactId>
      <version>1.30.1</version>
    </dependency>
    <dependency>
      <groupId>org.slf4j</groupId>
      <artifactId>slf4j-log4j12</artifactId>
      <version>1.7.29</version>
    </dependency>
    <dependency>
      <groupId>junit</groupId>
      <artifactId>junit</artifactId>
      <version>4.11</version>
      <scope>test</scope>
    </dependency>
  </dependencies>

  <build>
    <pluginManagement><!-- lock down plugins versions to avoid using Maven defaults (may be moved to parent pom) -->
      <plugins>
        <plugin>
          <groupId>org.apache.maven.plugins</groupId>
            <artifactId>maven-compiler-plugin</artifactId>
            <version>3.3</version>
            <configuration>
              <source>1.7</source>
              <target>1.7</target>
            </configuration>
        </plugin>
        <plugin>
          <artifactId>maven-shade-plugin</artifactId>
          <version>2.4</version>
          <executions>
              <execution>
                  <phase>package</phase>
                  <goals>
                    <goal>shade</goal>
                  </goals>
                  <configuration>
                      <filters>
                          <filter>
                              <artifact>*:*</artifact>
                              <excludes>
                                  <exclude>META-INF/*.SF</exclude>
                                  <exclude>META-INF/*.RSA</exclude>
                              </excludes>
                          </filter>
                      </filters>
                      <shadedArtifactAttached>true</shadedArtifactAttached>
                      <shadedClassifierName>with-deps</shadedClassifierName>
                  </configuration>
              </execution>
          </executions>
        </plugin>
      </plugins>
    </pluginManagement>
  </build>
</project>
デバイス アプリからのファイルのアップロード
アップロードするファイルを、プロジェクト ツリー内の my-app フォルダーにコピーします。 テキスト エディターを使用して、App.java を次のコードに置き換えます。 示されたデバイス接続文字列とファイル名を指定します。 デバイス接続文字列は、デバイスの登録時にコピーしたものです。
package com.mycompany.app;

import com.azure.storage.blob.BlobClient;
import com.azure.storage.blob.BlobClientBuilder;
import com.microsoft.azure.sdk.iot.deps.serializer.FileUploadCompletionNotification;
import com.microsoft.azure.sdk.iot.deps.serializer.FileUploadSasUriRequest;
import com.microsoft.azure.sdk.iot.deps.serializer.FileUploadSasUriResponse;
import com.microsoft.azure.sdk.iot.device.DeviceClient;
import com.microsoft.azure.sdk.iot.device.IotHubClientProtocol;

import java.io.BufferedInputStream;
import java.io.File;
import java.io.FileInputStream;
import java.io.IOException;
import java.net.URISyntaxException;
import java.util.Scanner;

public class App
{
    /**
     * Upload a single file to blobs using IoT Hub.
     *
     */
    public static void main(String[] args)throws IOException, URISyntaxException
    {
        String connString = "Your device connection string here";
        String fullFileName = "Path of the file to upload";

        System.out.println("Starting...");
        System.out.println("Beginning setup.");

        // File upload will always use HTTPS, DeviceClient will use this protocol only
        //   for the other services like Telemetry, Device Method and Device Twin.
        IotHubClientProtocol protocol = IotHubClientProtocol.MQTT;

        System.out.println("Successfully read input parameters.");

        DeviceClient client = new DeviceClient(connString, protocol);

        System.out.println("Successfully created an IoT Hub client.");

        try
        {
            File file = new File(fullFileName);
            if (file.isDirectory())
            {
                throw new IllegalArgumentException(fullFileName + " is a directory, please provide a single file name, or use the FileUploadSample to upload directories.");
            }

            System.out.println("Retrieving SAS URI from IoT Hub...");
            FileUploadSasUriResponse sasUriResponse = client.getFileUploadSasUri(new FileUploadSasUriRequest(file.getName()));

            System.out.println("Successfully got SAS URI from IoT Hub");
            System.out.println("Correlation Id: " + sasUriResponse.getCorrelationId());
            System.out.println("Container name: " + sasUriResponse.getContainerName());
            System.out.println("Blob name: " + sasUriResponse.getBlobName());
            System.out.println("Blob Uri: " + sasUriResponse.getBlobUri());

            System.out.println("Using the Azure Storage SDK to upload file to Azure Storage...");

            try
            {
                BlobClient blobClient =
                    new BlobClientBuilder()
                        .endpoint(sasUriResponse.getBlobUri().toString())
                        .buildClient();

                blobClient.uploadFromFile(fullFileName);
            }
            catch (Exception e)
            {
                System.out.println("Exception encountered while uploading file to blob: " + e.getMessage());

                System.out.println("Failed to upload file to Azure Storage.");

                System.out.println("Notifying IoT Hub that the SAS URI can be freed and that the file upload failed.");

                // Note that this is done even when the file upload fails. IoT Hub has a fixed number of SAS URIs allowed active
                // at any given time. Once you are done with the file upload, you should free your SAS URI so that other
                // SAS URIs can be generated. If a SAS URI is not freed through this API, then it will free itself eventually
                // based on how long SAS URIs are configured to live on your IoT Hub.
                FileUploadCompletionNotification completionNotification = new FileUploadCompletionNotification(sasUriResponse.getCorrelationId(), false);
                client.completeFileUpload(completionNotification);

                System.out.println("Notified IoT Hub that the SAS URI can be freed and that the file upload was a failure.");

                client.closeNow();
                return;
            }

            System.out.println("Successfully uploaded file to Azure Storage.");

            System.out.println("Notifying IoT Hub that the SAS URI can be freed and that the file upload was a success.");
            FileUploadCompletionNotification completionNotification = new FileUploadCompletionNotification(sasUriResponse.getCorrelationId(), true);
            client.completeFileUpload(completionNotification);
            System.out.println("Successfully notified IoT Hub that the SAS URI can be freed, and that the file upload was a success");
        }
        catch (Exception e)
        {
            System.out.println("On exception, shutting down \n" + " Cause: " + e.getCause() + " \nERROR: " +  e.getMessage());
            System.out.println("Shutting down...");
            client.closeNow();
        }

        System.out.println("Press any key to exit...");

        Scanner scanner = new Scanner(System.in);
        scanner.nextLine();
        System.out.println("Shutting down...");
        client.closeNow();
    }
}
アプリケーションのビルドと実行
my-app フォルダーのコマンド プロンプトで、次のコマンドを実行します。
mvn clean package -DskipTests
ビルドが完了したら、次のコマンドを実行してアプリケーションを実行します。
mvn exec:java -Dexec.mainClass="com.mycompany.app.App"
ポータルを使用して、構成したストレージ コンテナーにアップロードされたファイルを表示できます。

ファイル アップロードの通知の受信
このセクションでは、IoT Hub からファイル アップロードの通知メッセージを受信する Java コンソール アプリケーションを作成します。
プロジェクトのディレクトリを作成し、そのディレクトリでシェルを起動します。 コマンド ラインで、以下を実行します
mvn archetype:generate -DgroupId=com.mycompany.app -DartifactId=my-app -DarchetypeArtifactId=maven-archetype-quickstart -DarchetypeVersion=1.4 -DinteractiveMode=falseコマンド プロンプトで、新しい
my-appフォルダーに移動します。テキスト エディターを使用して、
my-appフォルダー内のpom.xmlファイルを以下と置き換えます。 サービス クライアントの依存関係を追加することにより、アプリケーションの iothub-java-service-client パッケージを使用して、IoT Hub サービスと通信できます。<?xml version="1.0" encoding="UTF-8"?> <project xmlns="http://maven.apache.org/POM/4.0.0" xmlns:xsi="http://www.w3.org/2001/XMLSchema-instance" xsi:schemaLocation="http://maven.apache.org/POM/4.0.0 http://maven.apache.org/xsd/maven-4.0.0.xsd"> <modelVersion>4.0.0</modelVersion> <groupId>com.mycompany.app</groupId> <artifactId>my-app</artifactId> <version>1.0-SNAPSHOT</version> <name>my-app</name> <!-- FIXME change it to the project's website --> <url>http://www.example.com</url> <properties> <project.build.sourceEncoding>UTF-8</project.build.sourceEncoding> <maven.compiler.source>1.7</maven.compiler.source> <maven.compiler.target>1.7</maven.compiler.target> </properties> <dependencies> <dependency> <groupId>com.microsoft.azure.sdk.iot</groupId> <artifactId>iot-device-client</artifactId> <version>1.30.1</version> </dependency> <dependency> <groupId>com.microsoft.azure.sdk.iot</groupId> <artifactId>iot-service-client</artifactId> <version>1.7.23</version> </dependency> <dependency> <groupId>org.slf4j</groupId> <artifactId>slf4j-log4j12</artifactId> <version>1.7.29</version> </dependency> <dependency> <groupId>junit</groupId> <artifactId>junit</artifactId> <version>4.11</version> <scope>test</scope> </dependency> </dependencies> <build> <pluginManagement><!-- lock down plugins versions to avoid using Maven defaults (may be moved to parent pom) --> <plugins> <plugin> <groupId>org.apache.maven.plugins</groupId> <artifactId>maven-compiler-plugin</artifactId> <version>3.3</version> <configuration> <source>1.7</source> <target>1.7</target> </configuration> </plugin> <plugin> <artifactId>maven-shade-plugin</artifactId> <version>2.4</version> <executions> <execution> <phase>package</phase> <goals> <goal>shade</goal> </goals> <configuration> <filters> <filter> <artifact>*:*</artifact> <excludes> <exclude>META-INF/*.SF</exclude> <exclude>META-INF/*.RSA</exclude> </excludes> </filter> </filters> <shadedArtifactAttached>true</shadedArtifactAttached> <shadedClassifierName>with-deps</shadedClassifierName> </configuration> </execution> </executions> </plugin> </plugins> </pluginManagement> </build> </project>注意
Maven 検索を使用して、iot-service-client の最新バージョンを確認できます。
pom.xmlファイルを保存して閉じます。IoT Hub サービスの接続文字列を取得します。
サービス ポリシーの IoT Hub 接続文字列を取得するには、次の手順を実行します。
Azure portal で、 [リソース グループ] を選択します。 ハブが配置されているリソース グループを選択し、リソースの一覧からハブを選択します。
IoT ハブの左側のウィンドウで、 [共有アクセス ポリシー] を選択します。
ポリシーの一覧から、サービス ポリシーを選択します。
[プライマリ接続文字列] をコピーし、値を保存します。

IoT Hub の共有アクセス ポリシーとアクセス許可の詳細については、「アクセス制御とアクセス許可」を参照してください。
テキスト エディターを使用して、
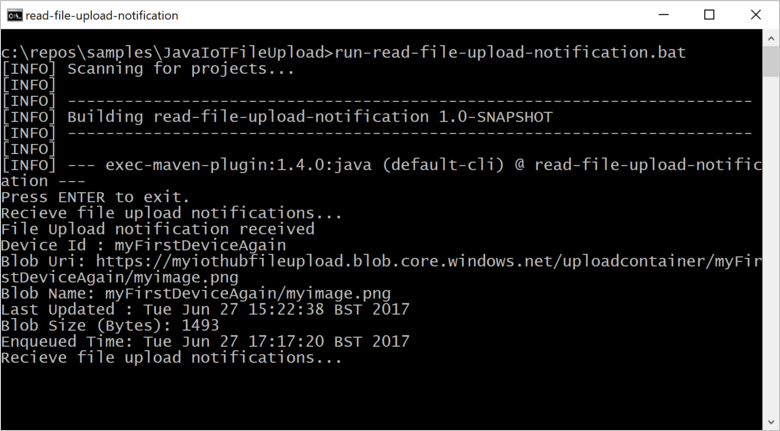
my-app\src\main\java\com\mycompany\app\App.javaファイルを開き、コードを以下に置き換えます。package com.mycompany.app; import com.microsoft.azure.sdk.iot.service.*; import java.io.IOException; import java.net.URISyntaxException; import java.util.concurrent.ExecutorService; import java.util.concurrent.Executors; public class App { private static final String connectionString = "{Your service connection string here}"; private static final IotHubServiceClientProtocol protocol = IotHubServiceClientProtocol.AMQPS; public static void main(String[] args) throws Exception { ServiceClient sc = ServiceClient.createFromConnectionString(connectionString, protocol); FileUploadNotificationReceiver receiver = sc.getFileUploadNotificationReceiver(); receiver.open(); FileUploadNotification fileUploadNotification = receiver.receive(2000); if (fileUploadNotification != null) { System.out.println("File Upload notification received"); System.out.println("Device Id : " + fileUploadNotification.getDeviceId()); System.out.println("Blob Uri: " + fileUploadNotification.getBlobUri()); System.out.println("Blob Name: " + fileUploadNotification.getBlobName()); System.out.println("Last Updated : " + fileUploadNotification.getLastUpdatedTimeDate()); System.out.println("Blob Size (Bytes): " + fileUploadNotification.getBlobSizeInBytes()); System.out.println("Enqueued Time: " + fileUploadNotification.getEnqueuedTimeUtcDate()); } else { System.out.println("No file upload notification"); } receiver.close(); } }my-app\src\main\java\com\mycompany\app\App.javaファイルを保存し、閉じます。次のコマンドを使用して、アプリをビルドし、エラーを確認します。
mvn clean package -DskipTests

アプリケーションの実行
これで、アプリケーションを実行する準備が整いました。
my-app フォルダーのコマンド プロンプトで、次のコマンドを実行します。
mvn exec:java -Dexec.mainClass="com.mycompany.app.App"
次のスクリーン ショットは、read-file-upload-notification アプリからの出力を示しています。
次の手順
この記事では、IoT Hub のファイル アップロード機能を使用して、デバイスからのファイルのアップロードを簡素化する方法を学習しました。 この機能をさらに詳しく知るには、以下の記事を参考にしてください。
IoT Hub の機能を詳しく調べるには、次のリンクを使用してください。