クイック スタート:Azure PowerShell を使用して VM の負荷を分散するパブリック ロード バランサーを作成する
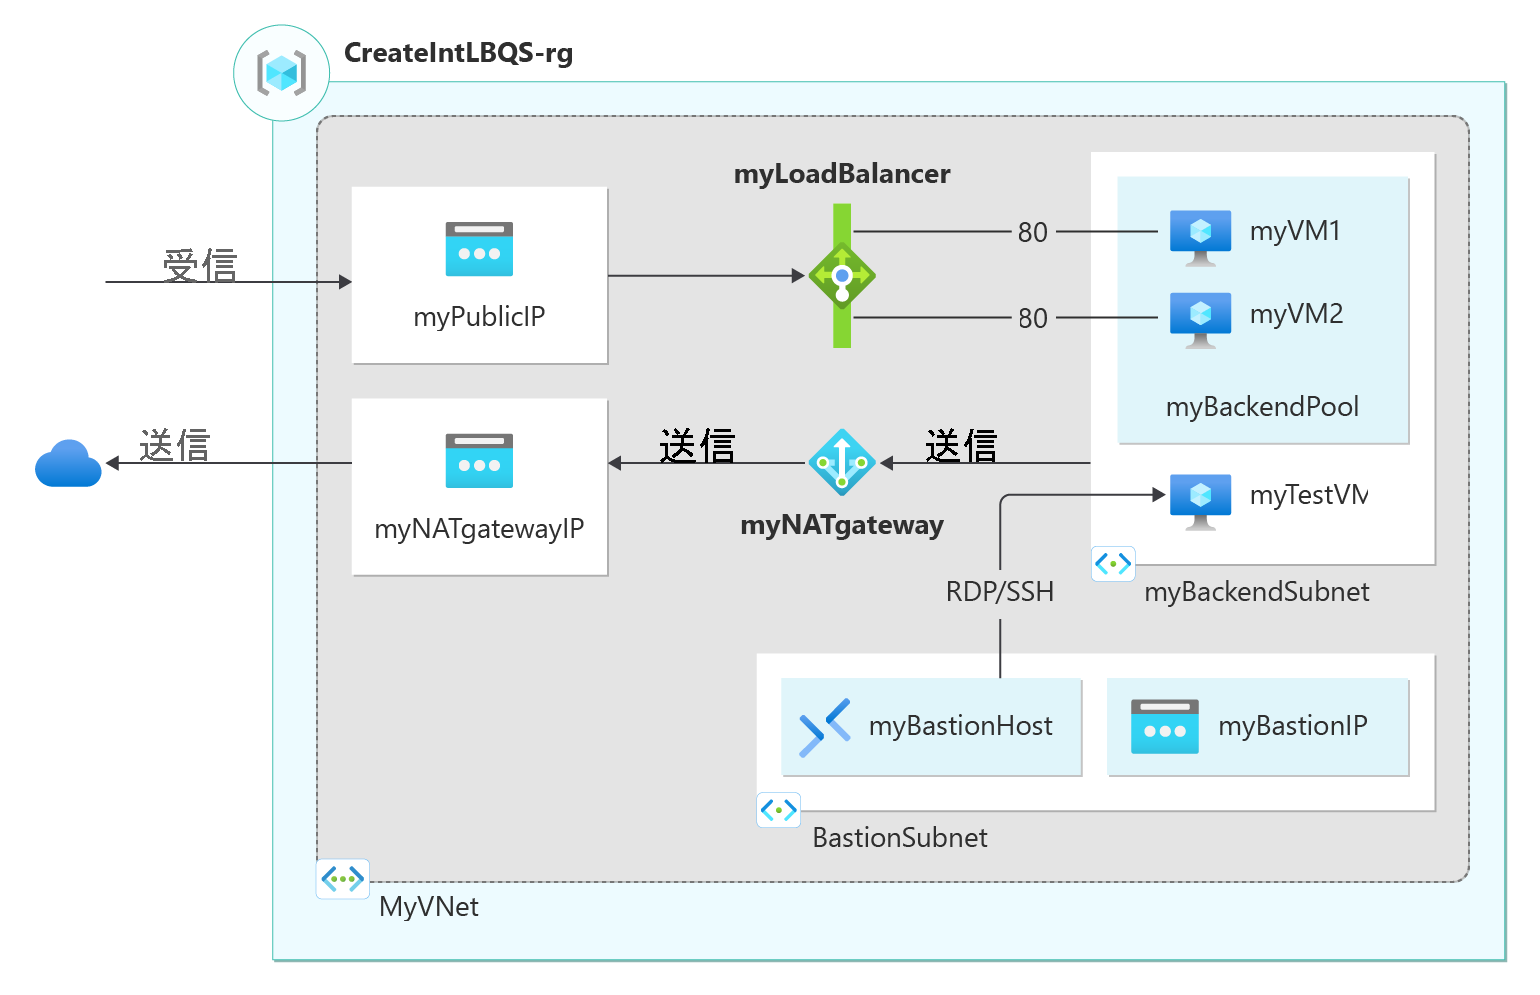
Azure PowerShell を使用してパブリック ロード バランサーと 2 つの仮想マシンを作成することにより、Azure Load Balancer の使用を開始します。 その他のリソースには、Azure Bastion、NAT Gateway、仮想ネットワーク、必要なサブネットなどがあります。
前提条件
アクティブなサブスクリプションが含まれる Azure アカウント。 無料でアカウントを作成する
ローカルにインストールされた Azure PowerShell または Azure Cloud Shell
PowerShell をインストールしてローカルで使用する場合、この記事では Azure PowerShell モジュール バージョン 5.4.1 以降が必要になります。 インストールされているバージョンを確認するには、Get-Module -ListAvailable Az を実行します。 アップグレードする必要がある場合は、Azure PowerShell モジュールのインストールに関するページを参照してください。 PowerShell をローカルで実行している場合、Connect-AzAccount を実行して Azure との接続を作成することも必要です。
リソース グループを作成する
Azure リソース グループとは、Azure リソースのデプロイと管理に使用する論理コンテナーです。
New-AzResourceGroup を使用して、次のようにリソース グループを作成します。
$rg = @{
    Name = 'CreatePubLBQS-rg'
    Location = 'eastus'
}
New-AzResourceGroup @rg
パブリック IP アドレスの作成
パブリック IP アドレスを作成するには、New-AzPublicIpAddress を使用します。
$publicip = @{
    Name = 'myPublicIP'
    ResourceGroupName = 'CreatePubLBQS-rg'
    Location = 'eastus'
    Sku = 'Standard'
    AllocationMethod = 'static'
    Zone = 1,2,3
}
New-AzPublicIpAddress @publicip
ゾーンのパブリック IP アドレスをゾーン 1 に作成するには、次のコマンドを使用します。
$publicip = @{
    Name = 'myPublicIP'
    ResourceGroupName = 'CreatePubLBQS-rg'
    Location = 'eastus'
    Sku = 'Standard'
    AllocationMethod = 'static'
    Zone = 1
}
New-AzPublicIpAddress @publicip
ロード バランサーの作成
このセクションでは、ロード バランサーの以下のコンポーネントを作成および構成する方法について説明します。
フロントエンド IP プールに対し、New-AzLoadBalancerFrontendIpConfig を使用してフロントエンド IP を作成します。 ロード バランサーでは、この IP で受信トラフィックを受け取ります。
ロード バランサーのフロントエンドから送信されるトラフィック用に、New-AzLoadBalancerBackendAddressPoolConfig でバックエンド アドレス プールを作成します。 このプールが、バックエンド仮想マシンのデプロイ先となります。
バックエンド VM インスタンスの正常性を調べる正常性プローブを Add-AzLoadBalancerProbeConfig で作成します。
Add-AzLoadBalancerRuleConfig を使用して、複数の VM に対してどのようにトラフィックを配布させるかを定義するロード バランサー規則を作成します
New-AzLoadBalancer を使用して、次のようにパブリック ロード バランサーを作成します。
## Place public IP created in previous steps into variable. ##
$pip = @{
    Name = 'myPublicIP'
    ResourceGroupName = 'CreatePubLBQS-rg'
}
$publicIp = Get-AzPublicIpAddress @pip

## Create load balancer frontend configuration and place in variable. ##
$fip = @{
    Name = 'myFrontEnd'
    PublicIpAddress = $publicIp
}
$feip = New-AzLoadBalancerFrontendIpConfig @fip

## Create backend address pool configuration and place in variable. ##
$bepool = New-AzLoadBalancerBackendAddressPoolConfig -Name 'myBackEndPool'

## Create the health probe and place in variable. ##
$probe = @{
    Name = 'myHealthProbe'
    Protocol = 'tcp'
    Port = '80'
    IntervalInSeconds = '360'
    ProbeCount = '5'
}
$healthprobe = New-AzLoadBalancerProbeConfig @probe

## Create the load balancer rule and place in variable. ##
$lbrule = @{
    Name = 'myHTTPRule'
    Protocol = 'tcp'
    FrontendPort = '80'
    BackendPort = '80'
    IdleTimeoutInMinutes = '15'
    FrontendIpConfiguration = $feip
    BackendAddressPool = $bePool
}
$rule = New-AzLoadBalancerRuleConfig @lbrule -EnableTcpReset -DisableOutboundSNAT

## Create the load balancer resource. ##
$loadbalancer = @{
    ResourceGroupName = 'CreatePubLBQS-rg'
    Name = 'myLoadBalancer'
    Location = 'eastus'
    Sku = 'Standard'
    FrontendIpConfiguration = $feip
    BackendAddressPool = $bePool
    LoadBalancingRule = $rule
    Probe = $healthprobe
}
New-AzLoadBalancer @loadbalancer
仮想ネットワークを構成する
VM をデプロイしてロード バランサーをテストする前に、サポート用の仮想ネットワーク リソースを作成します。
バックエンド仮想マシン用の仮想ネットワーク カードを作成します。
ネットワーク セキュリティ グループを作成して、仮想ネットワークへの受信接続を定義します。
バックエンド プールで仮想マシンを安全に管理するAzure Bastion ホストを作成します。
NAT ゲートウェイを使用して、ロード バランサーのバックエンド プール内のリソースへの送信インターネット アクセスを提供します。
仮想ネットワーク、ネットワーク セキュリティ グループ、bastion ホスト、NATゲートウェイを作成する
New-AzVirtualNetwork を使用して、仮想ネットワークを作成します
New-AzNetworkSecurityRuleConfig を使用して、ネットワーク セキュリティ グループの規則を作成します
New-AzBastion を使用して Azure Bastion ホストを作成します。
New-AzNetworkSecurityGroup を使用して、ネットワーク セキュリティ グループを作成します。
New-AzNatGateway を使用して、NAT ゲートウェイ リソースを作成します
New-AzVirtualNetworkSubnetConfigを使用して、NAT ゲートウェイを仮想ネットワークのサブネットに関連付けます。
重要
時間単位の料金は、送信データの使用量に関係なく、Bastion がデプロイされた時点から発生します。 詳しくは、「価格」および「SKU」を参照してください。 チュートリアルまたはテストの一環で Bastion をデプロイする場合は、使用終了後に該当のリソースを削除することをお勧めします。
## Create public IP address for NAT gateway ##
$ip = @{
    Name = 'myNATgatewayIP'
    ResourceGroupName = 'CreatePubLBQS-rg'
    Location = 'eastus'
    Sku = 'Standard'
    AllocationMethod = 'Static'
}
$publicIP = New-AzPublicIpAddress @ip

## Create NAT gateway resource ##
$nat = @{
    ResourceGroupName = 'CreatePubLBQS-rg'
    Name = 'myNATgateway'
    IdleTimeoutInMinutes = '10'
    Sku = 'Standard'
    Location = 'eastus'
    PublicIpAddress = $publicIP
}
$natGateway = New-AzNatGateway @nat

## Create backend subnet config ##
$subnet = @{
    Name = 'myBackendSubnet'
    AddressPrefix = '10.1.0.0/24'
    NatGateway = $natGateway
}
$subnetConfig = New-AzVirtualNetworkSubnetConfig @subnet

## Create Azure Bastion subnet. ##
$bastsubnet = @{
    Name = 'AzureBastionSubnet'
    AddressPrefix = '10.1.1.0/24'
}
$bastsubnetConfig = New-AzVirtualNetworkSubnetConfig @bastsubnet

## Create the virtual network ##
$net = @{
    Name = 'myVNet'
    ResourceGroupName = 'CreatePubLBQS-rg'
    Location = 'eastus'
    AddressPrefix = '10.1.0.0/16'
    Subnet = $subnetConfig,$bastsubnetConfig
}
$vnet = New-AzVirtualNetwork @net

## Create public IP address for bastion host. ##
$ip = @{
    Name = 'myBastionIP'
    ResourceGroupName = 'CreatePubLBQS-rg'
    Location = 'eastus'
    Sku = 'Standard'
    AllocationMethod = 'Static'
}
$publicip = New-AzPublicIpAddress @ip

## Create bastion host ##
$bastion = @{
    ResourceGroupName = 'CreatePubLBQS-rg'
    Name = 'myBastion'
    PublicIpAddress = $publicip
    VirtualNetwork = $vnet
}
New-AzBastion @bastion -AsJob

## Create rule for network security group and place in variable. ##
$nsgrule = @{
    Name = 'myNSGRuleHTTP'
    Description = 'Allow HTTP'
    Protocol = '*'
    SourcePortRange = '*'
    DestinationPortRange = '80'
    SourceAddressPrefix = 'Internet'
    DestinationAddressPrefix = '*'
    Access = 'Allow'
    Priority = '2000'
    Direction = 'Inbound'
}
$rule1 = New-AzNetworkSecurityRuleConfig @nsgrule

## Create network security group ##
$nsg = @{
    Name = 'myNSG'
    ResourceGroupName = 'CreatePubLBQS-rg'
    Location = 'eastus'
    SecurityRules = $rule1
}
New-AzNetworkSecurityGroup @nsg
仮想マシンを作成する
このセクションでは、ロード バランサーのバックエンド プール用に 2 つの仮想マシンを作成します。
New-AzNetworkInterface を使用して、次のように 2 つのネットワーク インターフェイスを作成します。
Get-Credential を使用して、次のように VM の管理者のユーザー名とパスワードを設定します
以下を使用して、仮想マシンを作成します。
# Set the administrator and password for the VMs. ##
$cred = Get-Credential

## Place the virtual network into a variable. ##
$net = @{
    Name = 'myVNet'
    ResourceGroupName = 'CreatePubLBQS-rg'
}
$vnet = Get-AzVirtualNetwork @net

## Place the load balancer into a variable. ##
$lb = @{
    Name = 'myLoadBalancer'
    ResourceGroupName = 'CreatePubLBQS-rg'
}
$bepool = Get-AzLoadBalancer @lb  | Get-AzLoadBalancerBackendAddressPoolConfig

## Place the network security group into a variable. ##
$ns = @{
    Name = 'myNSG'
    ResourceGroupName = 'CreatePubLBQS-rg'
}
$nsg = Get-AzNetworkSecurityGroup @ns

## For loop with variable to create virtual machines for load balancer backend pool. ##
for ($i=1; $i -le 2; $i++){

    ## Command to create network interface for VMs ##
    $nic = @{
        Name = "myNicVM$i"
        ResourceGroupName = 'CreatePubLBQS-rg'
        Location = 'eastus'
        Subnet = $vnet.Subnets[0]
        NetworkSecurityGroup = $nsg
        LoadBalancerBackendAddressPool = $bepool
    }
    $nicVM = New-AzNetworkInterface @nic

    ## Create a virtual machine configuration for VMs ##
    $vmsz = @{
        VMName = "myVM$i"
        VMSize = 'Standard_DS1_v2'
    }
    $vmos = @{
        ComputerName = "myVM$i"
        Credential = $cred
    }
    $vmimage = @{
        PublisherName = 'MicrosoftWindowsServer'
        Offer = 'WindowsServer'
        Skus = '2019-Datacenter'
        Version = 'latest'
    }
    $vmConfig = New-AzVMConfig @vmsz `
        | Set-AzVMOperatingSystem @vmos -Windows `
        | Set-AzVMSourceImage @vmimage `
        | Add-AzVMNetworkInterface -Id $nicVM.Id

    ## Create the virtual machine for VMs ##
    $vm = @{
        ResourceGroupName = 'CreatePubLBQS-rg'
        Location = 'eastus'
        VM = $vmConfig
        Zone = "$i"
    }
    New-AzVM @vm -AsJob
}
仮想マシンと bastion ホストのデプロイは、PowerShell ジョブとして送信されます。 ジョブの状態を表示するには、Get-Job を使用します。
Get-Job

Id     Name            PSJobTypeName   State         HasMoreData     Location             Command
--     ----            -------------   -----         -----------     --------             -------
1      Long Running O… AzureLongRunni… Completed     True            localhost            New-AzBastion
2      Long Running O… AzureLongRunni… Completed     True            localhost            New-AzVM
3      Long Running O… AzureLongRunni… Completed     True            localhost            New-AzVM
次の手順に 進む前に、VM の作成の [状態] が [完了] に設定されている必要があります。
Note
パブリック IP が割り当てられていない VM、または内部の Basic Azure Load Balancer のバックエンド プール内にある VM に対しては、Azure によって既定のアウトバウンド アクセス IP が提供されます。 デフォルト送信アクセス IP メカニズムは、構成できないアウトバウンド IP アドレスを提供します。
次のいずれかのイベントが発生すると、既定のアウトバウンド アクセス IP は無効になります。
- パブリック IP アドレスが VM に割り当てられます。
- アウトバウンド規則の有無にかかわらず、VM は標準ロード バランサーのバックエンド プール内に配置されます。
- Azure NAT Gateway リソースが VM のサブネットに割り当てられます。
フレキシブル オーケストレーション モードの仮想マシン スケール セットによって作成された VM には、既定のアウトバウンド アクセスがありません。
Azure のアウトバウンド接続の詳細については、「Azure での既定の送信アクセス」および「送信接続での送信元ネットワーク アドレス変換 (SNAT)を使用する」を参照してください。
IIS のインストール
Set-AzVMExtension を使用して、カスタム スクリプト拡張機能をインストールします。
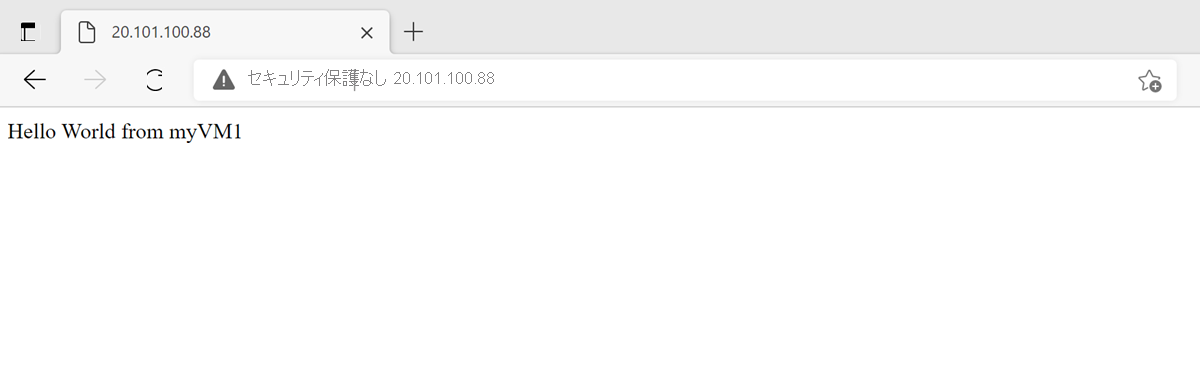
この拡張機能によって PowerShell Add-WindowsFeature Web-Server が実行され、IIS Web サーバーがインストールされます。次に、VM のホスト名を表示するように Default.htm ページが更新されます。
重要
前の手順で行った仮想マシンのデプロイが完了したことを確認してから次に進んでください。 仮想マシンのデプロイ ジョブの状態は、Get-Job を使用して確認します。
## For loop with variable to install custom script extension on virtual machines. ##
for ($i=1; $i -le 2; $i++)
{
$ext = @{
    Publisher = 'Microsoft.Compute'
    ExtensionType = 'CustomScriptExtension'
    ExtensionName = 'IIS'
    ResourceGroupName = 'CreatePubLBQS-rg'
    VMName = "myVM$i"
    Location = 'eastus'
    TypeHandlerVersion = '1.8'
    SettingString = '{"commandToExecute":"powershell Add-WindowsFeature Web-Server; powershell Add-Content -Path \"C:\\inetpub\\wwwroot\\Default.htm\" -Value $($env:computername)"}'
}
Set-AzVMExtension @ext -AsJob
}
拡張機能は、PowerShell ジョブとしてデプロイされます。 インストール ジョブの状態を表示するには、Get-Job を使用します。
Get-Job

Id     Name            PSJobTypeName   State         HasMoreData     Location             Command
--     ----            -------------   -----         -----------     --------             -------
8      Long Running O… AzureLongRunni… Running       True            localhost            Set-AzVMExtension
9      Long Running O… AzureLongRunni… Running       True            localhost            Set-AzVMExtension
次の手順に進む前に 、ジョブの [状態] が [完了] に設定されている必要があります。
ロード バランサーをテストする
Get-AzPublicIpAddress を使用して、ロード バランサーのパブリック IP アドレスを取得します。
$ip = @{
    ResourceGroupName = 'CreatePubLBQS-rg'
    Name = 'myPublicIP'
}
Get-AzPublicIPAddress @ip | select IpAddress
そのパブリック IP アドレスをコピーし、ブラウザーのアドレス バーに貼り付けます。 IIS Web サーバーの既定のページがブラウザーに表示されます。
リソースをクリーンアップする
必要がなくなれば、Remove-AzResourceGroup コマンドを使用して、リソース グループやロード バランサー、その他のリソースを削除できます。
Remove-AzResourceGroup -Name 'CreatePubLBQS-rg'
次のステップ
このクイック スタートでは次の作業を行います。
Azure Load Balancer を作成しました
2 つの VM をロード バランサーにアタッチしました。
ロード バランサーをテストしました
Azure Load Balancer についてさらに学習するには、次の記事に進んでください。