データ テンプレートの概要
WPF のデータ テンプレート モデルは、データのプレゼンテーションを定義する優れた柔軟性を提供します。 WPF のコントロールには、データ プレゼンテーションのカスタマイズをサポートする組み込み機能があります。 このトピックでは、最初に DataTemplate の定義方法を示した後、カスタム ロジックに基づくテンプレートの選択や、階層データの表示のサポートなど、他のデータ テンプレート機能について説明します。
必須コンポーネント
このトピックは、データ テンプレートの機能に関するものであり、データ バインディングの概念の紹介ではありません。 データ バインディングの基本概念については、「データ バインディングの概要」をご覧ください。
DataTemplate はデータのプレゼンテーションに関するものであり、WPF のスタイルおよびテンプレート モデルによって提供される多くの機能の 1 つです。 Style を使ってコントロールのプロパティを設定する方法など、WPF のスタイルおよびテンプレート モデルの概要については、「スタイルとテンプレート」のトピックをご覧ください。
さらに、Resources について理解することが重要です。これは、基本的に、Style や DataTemplate などのオブジェクトを再利用できるようにするものです。 リソースについて詳しくは、「XAML リソース」をご覧ください。
データ テンプレートの基礎
DataTemplate が重要である理由を示すため、データ バインディングの例を見ていきます。 この例では、Task オブジェクトのリストにバインドされた ListBox があります。 各 Task オブジェクトには TaskName (string)、Description (string)、Priority (int)、および TaskType 型のプロパティがあり、これは値が Home と Work の Enum です。
<Window x:Class="SDKSample.Window1"
  xmlns="http://schemas.microsoft.com/winfx/2006/xaml/presentation"
  xmlns:x="http://schemas.microsoft.com/winfx/2006/xaml"
  xmlns:local="clr-namespace:SDKSample"
  Title="Introduction to Data Templating Sample">
  <Window.Resources>
    <local:Tasks x:Key="myTodoList"/>
</Window.Resources>
  <StackPanel>
    <TextBlock Name="blah" FontSize="20" Text="My Task List:"/>
    <ListBox Width="400" Margin="10"
             ItemsSource="{Binding Source={StaticResource myTodoList}}"/>
  </StackPanel>
</Window>
DataTemplate がない場合
DataTemplate がないので、現在の ListBox は次のようになります。
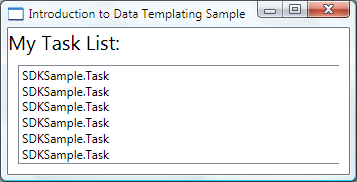
特定の指示がないと、ListBox では、コレクションのオブジェクトを表示しようとしたときに、既定で ToString が呼び出されます。 したがって、Task オブジェクトによって ToString メソッドがオーバーライドされる場合、ListBox では基になっているコレクションの各ソース オブジェクトの文字列表現が表示されます。
たとえば、Task クラスが ToString メソッドを次のようにオーバーライドするものとします。name は TaskName プロパティのフィールドです。
public override string ToString()
{
    return name.ToString();
}
Public Overrides Function ToString() As String
    Return _name.ToString()
End Function
ListBox は次のようになります。
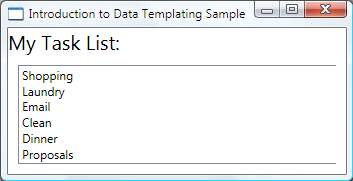
ただし、これは制限があり、柔軟性ではありません。 また、XML データにバインドしている場合、ToString をオーバーライドすることはできません。
簡単な DataTemplate の定義
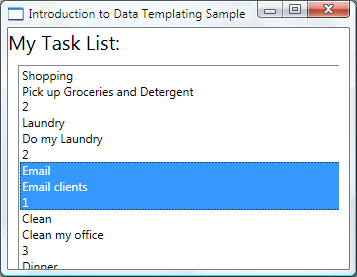
解決策は、DataTemplate を定義することです。 そのための 1 つの方法として、ListBox の ItemTemplate プロパティを DataTemplate に設定します。 DataTemplate で指定したものが、データ オブジェクトの視覚的な構造になります。 次の DataTemplate はかなり単純です。 各項目を StackPanel 内の 3 つの TextBlock 要素として表示するように指示しています。 各 TextBlock 要素は、Task クラスのプロパティにバインドされています。
<ListBox Width="400" Margin="10"
         ItemsSource="{Binding Source={StaticResource myTodoList}}">
   <ListBox.ItemTemplate>
     <DataTemplate>
       <StackPanel>
         <TextBlock Text="{Binding Path=TaskName}" />
         <TextBlock Text="{Binding Path=Description}"/>
         <TextBlock Text="{Binding Path=Priority}"/>
       </StackPanel>
     </DataTemplate>
   </ListBox.ItemTemplate>
 </ListBox>
このトピックの例の基になるデータは、CLR オブジェクトのコレクションです。 XML データにバインドしている場合は、基本的な概念は同じですが、構文がわずかに違います。 たとえば、Path=TaskName ではなく、XPath を @TaskName に設定します (TaskName が XML ノードの属性の場合)。
今度は、ListBox は次のようになります。
リソースとしての DataTemplate の作成
上の例では、DataTemplate をインラインで定義しました。 再利用可能なオブジェクトになるように、リソース セクションで定義する方が一般的です。次に例を示します。
<Window.Resources>
<DataTemplate x:Key="myTaskTemplate">
  <StackPanel>
    <TextBlock Text="{Binding Path=TaskName}" />
    <TextBlock Text="{Binding Path=Description}"/>
    <TextBlock Text="{Binding Path=Priority}"/>
  </StackPanel>
</DataTemplate>
</Window.Resources>
これで、次の例のように、myTaskTemplate をリソースとして使用できるようになります。
<ListBox Width="400" Margin="10"
         ItemsSource="{Binding Source={StaticResource myTodoList}}"
         ItemTemplate="{StaticResource myTaskTemplate}"/>
myTaskTemplate はリソースなので、DataTemplate 型を受け取るプロパティがある他のコントロールで使うことができます。 上に示したように、ListBox などの ItemsControl オブジェクトの場合は、ItemTemplate プロパティです。 ContentControl オブジェクトの場合は、ContentTemplate プロパティです。
DataType プロパティ
DataTemplate クラスには、Style クラスの TargetType プロパティと非常によく似た DataType プロパティがあります。 したがって、上の例の DataTemplate に対して x:Key を指定する代わりに、次のように指定できます。
<DataTemplate DataType="{x:Type local:Task}">
  <StackPanel>
    <TextBlock Text="{Binding Path=TaskName}" />
    <TextBlock Text="{Binding Path=Description}"/>
    <TextBlock Text="{Binding Path=Priority}"/>
  </StackPanel>
</DataTemplate>
この DataTemplate は、すべての Task オブジェクトに自動的に適用されます。 この場合、x:Key は暗黙的に設定されることに注意してください。 したがって、この DataTemplate に x:Key 値を割り当てると、暗黙の x:Key がオーバーライドされて、DataTemplate は自動的に適用されなくなります。
ContentControl を Task オブジェクトのコレクションにバインドしている場合、ContentControl では上の DataTemplate は自動的には使用されません。 これは、ContentControl でのバインドが、コレクション全体または個別オブジェクトのどちらにバインドすればいいのかを区別するためにさらに情報を必要とするためです。 ContentControl で ItemsControl 型の選択が追跡されている場合は、ContentControl バインディングの Path プロパティを "/" に設定して、ユーザーが現在の項目に関心を持っていることを示すことができます。 この例については、「コレクションにバインドして選択に基づく情報を表示する」をご覧ください。 そうでない場合は、ContentTemplate プロパティを設定することにより、DataTemplate を明示的に指定する必要があります。
異なる型のデータ オブジェクトの CompositeCollection がある場合、DataType プロパティは特に役に立ちます。 例については、「CompositeCollection を実装する」をご覧ください。
DataTemplate へのその他の追加
現在、データでは必要な情報が表示されますが、間違いなく改善の余地があります。 Border 要素、Grid 要素、および表示されているデータについて説明するいくつかの TextBlock 要素を追加することで、プレゼンテーションを改善しましょう。
<DataTemplate x:Key="myTaskTemplate">
  <Border Name="border" BorderBrush="Aqua" BorderThickness="1"
          Padding="5" Margin="5">
    <Grid>
      <Grid.RowDefinitions>
        <RowDefinition/>
        <RowDefinition/>
        <RowDefinition/>
      </Grid.RowDefinitions>
      <Grid.ColumnDefinitions>
        <ColumnDefinition />
        <ColumnDefinition />
      </Grid.ColumnDefinitions>
      <TextBlock Grid.Row="0" Grid.Column="0" Text="Task Name:"/>
      <TextBlock Grid.Row="0" Grid.Column="1" Text="{Binding Path=TaskName}" />
      <TextBlock Grid.Row="1" Grid.Column="0" Text="Description:"/>
      <TextBlock Grid.Row="1" Grid.Column="1" Text="{Binding Path=Description}"/>
      <TextBlock Grid.Row="2" Grid.Column="0" Text="Priority:"/>
      <TextBlock Grid.Row="2" Grid.Column="1" Text="{Binding Path=Priority}"/>
    </Grid>
  </Border>
</DataTemplate>
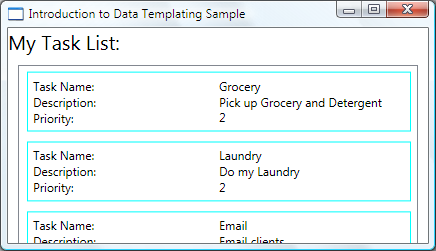
次のスクリーンショットは、この変更した DataTemplate を使用する ListBox を示しています。

ListBox の HorizontalContentAlignment を Stretch に設定して、項目の幅がスペース全体を占めるようにできます。
<ListBox Width="400" Margin="10"
     ItemsSource="{Binding Source={StaticResource myTodoList}}"
     ItemTemplate="{StaticResource myTaskTemplate}"
     HorizontalContentAlignment="Stretch"/>
HorizontalContentAlignment プロパティが Stretch に設定されているので、ListBox は次のようになります。
DataTrigger を使ってプロパティ値を適用する
現在のプレゼンテーションでは、Task が家のタスクか会社のタスクかわかりません。 Task オブジェクトには TaskType 型の TaskType プロパティがあり、これは値が Home と Work の列挙であることを思い出してください。
次の例の DataTrigger では、TaskType プロパティが TaskType.Home である場合、border という名前の要素の BorderBrush が Yellow に設定されます。
<DataTemplate x:Key="myTaskTemplate">
<DataTemplate.Triggers>
  <DataTrigger Binding="{Binding Path=TaskType}">
    <DataTrigger.Value>
      <local:TaskType>Home</local:TaskType>
    </DataTrigger.Value>
    <Setter TargetName="border" Property="BorderBrush" Value="Yellow"/>
  </DataTrigger>
</DataTemplate.Triggers>
</DataTemplate>
これで、アプリケーションの表示は次のようになります。 家のタスクは黄色の境界線で、会社のタスクは水色の境界線で示されます。
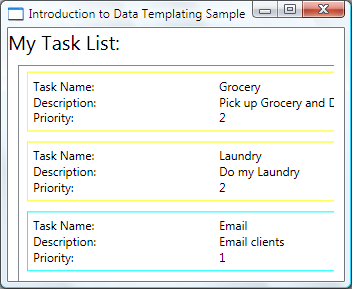
この例では、DataTrigger では Setter を使ってプロパティの値が設定されます。 トリガー クラスには EnterActions および ExitActions プロパティもあり、アニメーションなどのアクションのセットを開始できます。 さらに、複数のデータ バインドされたプロパティ値に基づいて変更を適用できる MultiDataTrigger クラスもあります。
同じ効果を実現できるもう 1 つの方法は、BorderBrush プロパティを TaskType プロパティにバインドし、値コンバーターを使って TaskType の値に基づく色を返すというものです。 コンバーターを使って上の効果を作成するのは、パフォーマンスに関して若干効率的です。 さらに、独自のコンバーターを作成すると、独自のロジックを提供できるので柔軟性が向上します。 最終的に、どの手法を選ぶかは、シナリオと設定に依存します。 コンバーターを作成する方法については、「IValueConverter」をご覧ください。
DataTemplate に含まれるもの
前の例では、DataTemplate.Triggers プロパティを使って DataTemplate にトリガーを追加しました。 トリガーの Setter では、DataTemplate 内にある要素 (Border 要素) のプロパティの値が設定されます。 ただし、Setters が関係するプロパティが現在の DataTemplate 内にある要素のプロパティではない場合は、ListBoxItem クラスの Style を使ってプロパティを設定する方が適切な場合があります (バインドしているコントロールが ListBox である場合)。 たとえば、項目がマウスでポイントされたときに項目の Opacity の値を Trigger でアニメーション化したい場合は、ListBoxItem スタイルの中でトリガーを定義します。 例については、「Introduction to Styling and Templating Sample」(スタイルとテンプレートのサンプルの概要) をご覧ください。
一般に、DataTemplate は生成される各 ListBoxItem に適用されることに注意してください (実際に適用される方法と場所について詳しくは、「ItemTemplate」のページをご覧ください)。 DataTemplate は、データ オブジェクトのプレゼンテーションと外観だけに関係します。 ほとんどの場合、項目が選択されたときの表示や、ListBox での項目のレイアウト方法など、プレゼンテーションの他のすべての部分は、DataTemplate の定義には含まれません。 例については、「ItemsControl のスタイルとテンプレートの設定」セクションをご覧ください。
データ オブジェクトのプロパティに基づく DataTemplate の選択
「DataType プロパティ」セクションでは、異なるデータ オブジェクトに対して異なるデータ テンプレートを定義できることを説明しました。 これは、異なる型の CompositeCollection または異なる型の項目を含むコレクションがある場合に特に便利です。 「DataTrigger を使ってプロパティ値を適用する」セクションでは、同じ型のデータ オブジェクトのコレクションがある場合は、DataTemplate を作成し、トリガーを使って各データ オブジェクトのプロパティ値に基づく変更を適用できることを示しました。 ただし、トリガーではプロパティ値を適用したりアニメーションを開始することはできますが、データ オブジェクトの構造を再構築できるような柔軟性はありません。 シナリオによっては、型が同じでもプロパティが異なるデータ オブジェクトに対して異なる DataTemplate を作成することが必要になる場合があります。
たとえば、Task オブジェクトの Priority の値が 1 のときは、自分用の警告としてまったく異なる外観にしたいような場合です。 この場合は、高優先度の Task オブジェクトの表示用に DataTemplate を作成します。 リソース セクションに次の DataTemplate を追加してみましょう。
<DataTemplate x:Key="importantTaskTemplate">
  <DataTemplate.Resources>
    <Style TargetType="TextBlock">
      <Setter Property="FontSize" Value="20"/>
    </Style>
  </DataTemplate.Resources>
  <Border Name="border" BorderBrush="Red" BorderThickness="1"
          Padding="5" Margin="5">
    <DockPanel HorizontalAlignment="Center">
      <TextBlock Text="{Binding Path=Description}" />
      <TextBlock>!</TextBlock>
    </DockPanel>
  </Border>
</DataTemplate>
この例では、DataTemplate.Resources プロパティを使用します。 そのセクションで定義されているリソースは、DataTemplate 内の要素によって共有されます。
データ オブジェクトの Priority の値に基づいて使用する DataTemplate を選択するロジックを提供するには、DataTemplateSelector のサブクラスを作成し、SelectTemplate メソッドをオーバーライドします。 次の例の SelectTemplate メソッドでは、Priority プロパティの値に基づいて適切なテンプレートを返すロジックが提供されます。 返すテンプレートは、囲んでいる Window 要素のリソース内に見つかります。
using System.Windows;
using System.Windows.Controls;

namespace SDKSample
{
    public class TaskListDataTemplateSelector : DataTemplateSelector
    {
        public override DataTemplate
            SelectTemplate(object item, DependencyObject container)
        {
            FrameworkElement element = container as FrameworkElement;

            if (element != null && item != null && item is Task)
            {
                Task taskitem = item as Task;

                if (taskitem.Priority == 1)
                    return
                        element.FindResource("importantTaskTemplate") as DataTemplate;
                else
                    return
                        element.FindResource("myTaskTemplate") as DataTemplate;
            }

            return null;
        }
    }
}
Namespace SDKSample
    Public Class TaskListDataTemplateSelector
        Inherits DataTemplateSelector
        Public Overrides Function SelectTemplate(ByVal item As Object, ByVal container As DependencyObject) As DataTemplate

            Dim element As FrameworkElement
            element = TryCast(container, FrameworkElement)

            If element IsNot Nothing AndAlso item IsNot Nothing AndAlso TypeOf item Is Task Then

                Dim taskitem As Task = TryCast(item, Task)

                If taskitem.Priority = 1 Then
                    Return TryCast(element.FindResource("importantTaskTemplate"), DataTemplate)
                Else
                    Return TryCast(element.FindResource("myTaskTemplate"), DataTemplate)
                End If
            End If

            Return Nothing
        End Function
    End Class
End Namespace
その後、リソースとして TaskListDataTemplateSelector を宣言できます。
<Window.Resources>
<local:TaskListDataTemplateSelector x:Key="myDataTemplateSelector"/>
</Window.Resources>
テンプレート セレクター リソースを使用するには、ListBox の ItemTemplateSelector プロパティにそれを割り当てます。 ListBox では、基になっているコレクションの項目ごとに TaskListDataTemplateSelector の SelectTemplate メソッドが呼び出されます。 呼び出しでは、項目パラメーターとしてデータ オブジェクトを渡します。 メソッドによって返される DataTemplate が、そのデータ オブジェクトに適用されます。
<ListBox Width="400" Margin="10"
         ItemsSource="{Binding Source={StaticResource myTodoList}}"
         ItemTemplateSelector="{StaticResource myDataTemplateSelector}"
         HorizontalContentAlignment="Stretch"/>
テンプレート セレクターを追加した ListBox は次のようになります。
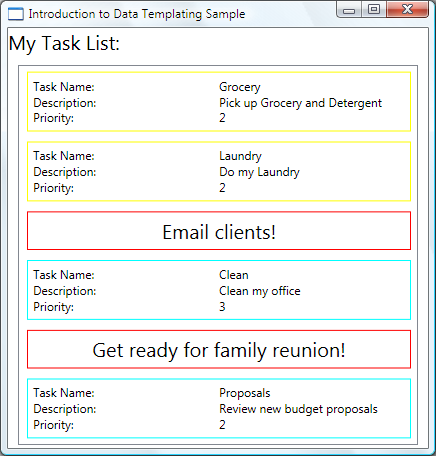
これがこの例の結論です。 完全なサンプルについては、「Introduction to Data Templating Sample」(データ テンプレート サンプルの概要) をご覧ください。
ItemsControl のスタイルとテンプレートの設定
ItemsControl は DataTemplate で使用できる唯一のコントロールの種類ではありませんが、ItemsControl をコレクションにバインドするのはとてもよくあるシナリオです。 「DataTemplate に含まれるもの」セクションでは、DataTemplate の定義はデータのプレゼンテーションに関するものだけである必要があることを説明しました。 DataTemplate を使うのが適切ではない場合を知るには、ItemsControl によって提供されるさまざまなスタイルとテンプレートのプロパティについて理解することが重要です。 次の例は、これらの各プロパティの機能がわかるように設計されています。 この例の ItemsControl は、前の例と同じ Tasks コレクションにバインドされています。 わかりやすいように、この例のスタイルとテンプレートはすべてインラインで宣言されています。
<ItemsControl Margin="10"
              ItemsSource="{Binding Source={StaticResource myTodoList}}">
  <!--The ItemsControl has no default visual appearance.
      Use the Template property to specify a ControlTemplate to define
      the appearance of an ItemsControl. The ItemsPresenter uses the specified
      ItemsPanelTemplate (see below) to layout the items. If an
      ItemsPanelTemplate is not specified, the default is used. (For ItemsControl,
      the default is an ItemsPanelTemplate that specifies a StackPanel.-->
  <ItemsControl.Template>
    <ControlTemplate TargetType="ItemsControl">
      <Border BorderBrush="Aqua" BorderThickness="1" CornerRadius="15">
        <ItemsPresenter/>
      </Border>
    </ControlTemplate>
  </ItemsControl.Template>
  <!--Use the ItemsPanel property to specify an ItemsPanelTemplate
      that defines the panel that is used to hold the generated items.
      In other words, use this property if you want to affect
      how the items are laid out.-->
  <ItemsControl.ItemsPanel>
    <ItemsPanelTemplate>
      <WrapPanel />
    </ItemsPanelTemplate>
  </ItemsControl.ItemsPanel>
  <!--Use the ItemTemplate to set a DataTemplate to define
      the visualization of the data objects. This DataTemplate
      specifies that each data object appears with the Proriity
      and TaskName on top of a silver ellipse.-->
  <ItemsControl.ItemTemplate>
    <DataTemplate>
      <DataTemplate.Resources>
        <Style TargetType="TextBlock">
          <Setter Property="FontSize" Value="18"/>
          <Setter Property="HorizontalAlignment" Value="Center"/>
        </Style>
      </DataTemplate.Resources>
      <Grid>
        <Ellipse Fill="Silver"/>
        <StackPanel>
          <TextBlock Margin="3,3,3,0"
                     Text="{Binding Path=Priority}"/>
          <TextBlock Margin="3,0,3,7"
                     Text="{Binding Path=TaskName}"/>
        </StackPanel>
      </Grid>
    </DataTemplate>
  </ItemsControl.ItemTemplate>
  <!--Use the ItemContainerStyle property to specify the appearance
      of the element that contains the data. This ItemContainerStyle
      gives each item container a margin and a width. There is also
      a trigger that sets a tooltip that shows the description of
      the data object when the mouse hovers over the item container.-->
  <ItemsControl.ItemContainerStyle>
    <Style>
      <Setter Property="Control.Width" Value="100"/>
      <Setter Property="Control.Margin" Value="5"/>
      <Style.Triggers>
        <Trigger Property="Control.IsMouseOver" Value="True">
          <Setter Property="Control.ToolTip"
                  Value="{Binding RelativeSource={x:Static RelativeSource.Self},
                          Path=Content.Description}"/>
        </Trigger>
      </Style.Triggers>
    </Style>
  </ItemsControl.ItemContainerStyle>
</ItemsControl>
次に示すのは、この例がレンダリングされたときのスクリーンショットです。

ItemTemplate を使う代わりに ItemTemplateSelector を使うことができることに注意してください。 例については、前のセクションをご覧ください。 同様に、ItemContainerStyle を使う代わりに、ItemContainerStyleSelector を使うこともできます。
ここでは示されていない ItemsControl の他の 2 つのスタイル関連のプロパティは、GroupStyle と GroupStyleSelector です。
階層データのサポート
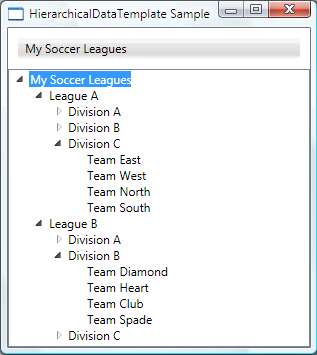
これまでは、1 つのコレクションにバインドして表示する方法のみを説明してきました。 場合によっては、コレクションに他のコレクションが含まれることがあります。 HierarchicalDataTemplate クラスは、そのようなデータを表示するために、HeaderedItemsControl 型と共に使われるように設計されています。 次の例で、ListLeagueList は League オブジェクトのリストです。 各 League オブジェクトには、Name と、Division オブジェクトのコレクションがあります。 各 Division には、Name と Team オブジェクトのコレクションがあり、各 Team オブジェクトには Name があります。
<Window x:Class="SDKSample.Window1"
  xmlns="http://schemas.microsoft.com/winfx/2006/xaml/presentation"
  xmlns:x="http://schemas.microsoft.com/winfx/2006/xaml"
  Title="HierarchicalDataTemplate Sample"
  xmlns:src="clr-namespace:SDKSample">
  <DockPanel>
    <DockPanel.Resources>
      <src:ListLeagueList x:Key="MyList"/>

      <HierarchicalDataTemplate DataType    = "{x:Type src:League}"
                                ItemsSource = "{Binding Path=Divisions}">
        <TextBlock Text="{Binding Path=Name}"/>
      </HierarchicalDataTemplate>

      <HierarchicalDataTemplate DataType    = "{x:Type src:Division}"
                                ItemsSource = "{Binding Path=Teams}">
        <TextBlock Text="{Binding Path=Name}"/>
      </HierarchicalDataTemplate>

      <DataTemplate DataType="{x:Type src:Team}">
        <TextBlock Text="{Binding Path=Name}"/>
      </DataTemplate>
    </DockPanel.Resources>

    <Menu Name="menu1" DockPanel.Dock="Top" Margin="10,10,10,10">
        <MenuItem Header="My Soccer Leagues"
                  ItemsSource="{Binding Source={StaticResource MyList}}" />
    </Menu>

    <TreeView>
      <TreeViewItem ItemsSource="{Binding Source={StaticResource MyList}}" Header="My Soccer Leagues" />
    </TreeView>

  </DockPanel>
</Window>
この例は、HierarchicalDataTemplate を使うことで、他のリストを含むリスト データを簡単に表示できることを示しています。 次に示すのは、この例のスクリーンショットです。
関連項目
.NET Desktop feedback
フィードバック
以下は間もなく提供いたします。2024 年を通じて、コンテンツのフィードバック メカニズムとして GitHub の issue を段階的に廃止し、新しいフィードバック システムに置き換えます。 詳細については、「https://aka.ms/ContentUserFeedback」を参照してください。
フィードバックの送信と表示
