StackLayout
 サンプルを参照する
.NET マルチプラットフォーム アプリ UI (.NET MAUI) StackLayout は、子ビューを 1 次元スタック (水平方向または垂直方向) に整理します。 既定では、StackLayout は垂直方向に配置されます。 さらに、StackLayout は、他の子レイアウトを含む親レイアウトとして使用できます。
StackLayout クラスでは、次のプロパティが定義されます。
StackOrientation型のOrientationは、子ビューが配置される方向を表します。 このプロパティの既定値はVerticalです。double型のSpacingは、各子ビュー間のスペースの量を示します。 このプロパティの既定値は 0です。
これらのプロパティは、BindableProperty オブジェクトを基盤としています。つまり、プロパティをデータ バインディングの対象にして、スタイル設定することができます。
垂直方向
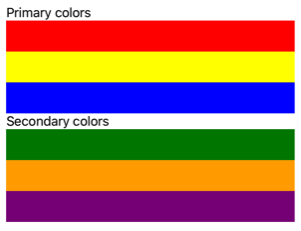
次の XAML は、異なる子ビューを含む縦方向の StackLayout を作成する方法を示しています。
<ContentPage xmlns="http://schemas.microsoft.com/dotnet/2021/maui"
             xmlns:x="http://schemas.microsoft.com/winfx/2009/xaml"
             x:Class="StackLayoutDemos.Views.XAML.VerticalStackLayoutPage"
             Title="Vertical StackLayout demo">
    <StackLayout Margin="20">
        <Label Text="Primary colors" />
        <BoxView Color="Red"
                 HeightRequest="40" />
        <BoxView Color="Yellow"
                 HeightRequest="40" />
        <BoxView Color="Blue"
                 HeightRequest="40" />
        <Label Text="Secondary colors" />
        <BoxView Color="Green"
                 HeightRequest="40" />
        <BoxView Color="Orange"
                 HeightRequest="40" />
        <BoxView Color="Purple"
                 HeightRequest="40" />
    </StackLayout>
</ContentPage>
この例では、Label オブジェクトと BoxView オブジェクトを含む縦方向の StackLayout を作成します。 既定では、子ビュー間にスペースはありません。
同等の C# コードを次に示します。
public class VerticalStackLayoutPage : ContentPage
{
    public VerticalStackLayoutPage()
    {
        Title = "Vertical StackLayout demo";

        StackLayout stackLayout = new StackLayout { Margin = new Thickness(20) };

        stackLayout.Add(new Label { Text = "Primary colors" });
        stackLayout.Add(new BoxView { Color = Colors.Red, HeightRequest = 40 });
        stackLayout.Add(new BoxView { Color = Colors.Yellow, HeightRequest = 40 });
        stackLayout.Add(new BoxView { Color = Colors.Blue, HeightRequest = 40 });
        stackLayout.Add(new Label { Text = "Secondary colors" });
        stackLayout.Add(new BoxView { Color = Colors.Green, HeightRequest = 40 });
        stackLayout.Add(new BoxView { Color = Colors.Orange, HeightRequest = 40 });
        stackLayout.Add(new BoxView { Color = Colors.Purple, HeightRequest = 40 });

        Content = stackLayout;
    }
}
Note
Margin プロパティの値は、要素とその隣接する要素の間の距離を表します。 詳細については、「コントロールの位置定する」を参照してください。
水平方向
次の XAML は、Orientation プロパティを Horizontal に設定して、水平方向の StackLayout を作成する方法を示しています。
<ContentPage xmlns="http://schemas.microsoft.com/dotnet/2021/maui"
             xmlns:x="http://schemas.microsoft.com/winfx/2009/xaml"
             x:Class="StackLayoutDemos.Views.XAML.HorizontalStackLayoutPage"
             Title="Horizontal StackLayout demo">
    <StackLayout Margin="20"
                 Orientation="Horizontal"
                 HorizontalOptions="Center">
        <BoxView Color="Red"
                 WidthRequest="40" />
        <BoxView Color="Yellow"
                 WidthRequest="40" />
        <BoxView Color="Blue"
                 WidthRequest="40" />
        <BoxView Color="Green"
                 WidthRequest="40" />
        <BoxView Color="Orange"
                 WidthRequest="40" />
        <BoxView Color="Purple"
                 WidthRequest="40" />
    </StackLayout>
</ContentPage>
この例では、BoxView オブジェクトを含む水平方向の StackLayout を、子ビューの間にスペースを入れずに作成します。

同等の C# コードを次に示します。
public class HorizontalStackLayoutPage : ContentPage
{
    public HorizontalStackLayoutPage()
    {
        Title = "Horizontal StackLayout demo";

        StackLayout stackLayout = new StackLayout
        {
            Margin = new Thickness(20),
            Orientation = StackOrientation.Horizontal,
            HorizontalOptions = LayoutOptions.Center
        };

        stackLayout.Add(new BoxView { Color = Colors.Red, WidthRequest = 40 });
        stackLayout.Add(new BoxView { Color = Colors.Yellow, WidthRequest = 40 });
        stackLayout.Add(new BoxView { Color = Colors.Blue, WidthRequest = 40 });
        stackLayout.Add(new BoxView { Color = Colors.Green, WidthRequest = 40 });
        stackLayout.Add(new BoxView { Color = Colors.Orange, WidthRequest = 40 });
        stackLayout.Add(new BoxView { Color = Colors.Purple, WidthRequest = 40 });

        Content = stackLayout;
    }
}
子ビュー間のスペース
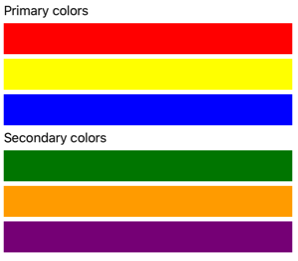
StackLayout 内の子ビュー間の間隔は、Spacing プロパティを double 値に設定することで変更できます。
<ContentPage xmlns="http://schemas.microsoft.com/dotnet/2021/maui"
             xmlns:x="http://schemas.microsoft.com/winfx/2009/xaml"
             x:Class="StackLayoutDemos.Views.XAML.StackLayoutSpacingPage"
             Title="StackLayout Spacing demo">
    <StackLayout Margin="20"
                 Spacing="6">
        <Label Text="Primary colors" />
        <BoxView Color="Red"
                 HeightRequest="40" />
        <BoxView Color="Yellow"
                 HeightRequest="40" />
        <BoxView Color="Blue"
                 HeightRequest="40" />
        <Label Text="Secondary colors" />
        <BoxView Color="Green"
                 HeightRequest="40" />
        <BoxView Color="Orange"
                 HeightRequest="40" />
        <BoxView Color="Purple"
                 HeightRequest="40" />
    </StackLayout>
</ContentPage>
この例では、Label オブジェクトと BoxView オブジェクトを含む垂直方向の StackLayout を作成し、それらの間に垂直方向のスペースがデバイスに依存しない 6 単位あります。
ヒント
Spacing プロパティを負の値に設定すると、子ビューを重ね合わせることができます。
同等の C# コードを次に示します。
public class StackLayoutSpacingPage : ContentPage
{
    public StackLayoutSpacingPage()
    {
        Title = "StackLayout Spacing demo";

        StackLayout stackLayout = new StackLayout
        {
            Margin = new Thickness(20),
            Spacing = 6
        };

        stackLayout.Add(new Label { Text = "Primary colors" });
        stackLayout.Add(new BoxView { Color = Colors.Red, HeightRequest = 40 });
        stackLayout.Add(new BoxView { Color = Colors.Yellow, HeightRequest = 40 });
        stackLayout.Add(new BoxView { Color = Colors.Blue, HeightRequest = 40 });
        stackLayout.Add(new Label { Text = "Secondary colors" });
        stackLayout.Add(new BoxView { Color = Colors.Green, HeightRequest = 40 });
        stackLayout.Add(new BoxView { Color = Colors.Orange, HeightRequest = 40 });
        stackLayout.Add(new BoxView { Color = Colors.Purple, HeightRequest = 40 });

        Content = stackLayout;
    }
}
子ビューの位置とサイズ
StackLayout 内の子ビューのサイズと位置は、子ビューの HeightRequest プロパティと WidthRequest プロパティの値、および HorizontalOptions プロパティと VerticalOptions プロパティの値によって異なります。 垂直方向の StackLayoutでは、子ビューは、サイズが明示的に設定されていない場合に、使用可能な幅に合わせて展開されます。 同様に、水平方向の StackLayoutでは、子ビューは、サイズが明示的に設定されていない場合に、使用可能な高さに合わせて展開されます。
StackLayout の HorizontalOptions プロパティと VerticalOptions プロパティは、配置レイアウト設定をカプセル化する LayoutOptions 構造体のフィールドに設定できます。 このレイアウト設定は、親レイアウト内の子ビューの位置とサイズを決定します。
次の XAML 例では、StackLayout の各子ビューに配置の基本設定を設定します。
<ContentPage xmlns="http://schemas.microsoft.com/dotnet/2021/maui"
             xmlns:x="http://schemas.microsoft.com/winfx/2009/xaml"
             x:Class="StackLayoutDemos.Views.XAML.AlignmentPage"
             Title="Alignment demo">
    <StackLayout Margin="20"
                 Spacing="6">
        <Label Text="Start"
               BackgroundColor="Gray"
               HorizontalOptions="Start" />
        <Label Text="Center"
               BackgroundColor="Gray"
               HorizontalOptions="Center" />
        <Label Text="End"
               BackgroundColor="Gray"
               HorizontalOptions="End" />
        <Label Text="Fill"
               BackgroundColor="Gray"
               HorizontalOptions="Fill" />
    </StackLayout>
</ContentPage>
この例では、StackLayout 内での位置を制御するために、Label オブジェクトに配置設定が設定されています。 Start、Center、End、Fill の各フィールドは、親 StackLayout 内の Label オブジェクトの配置を定義するために使用します。
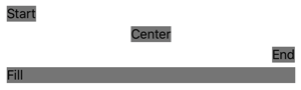
StackLayout は、StackLayout の方向とは反対方向にある子ビューの配置設定のみに従います。 したがって、垂直方向の StackLayout 内の Label 子ビューは、それらの HorizontalOptions プロパティを次の配置フィールドの 1 つに設定します。
Startは、Label を StackLayout の左側に配置します。Center。これは Label を StackLayout の中央に配置します。Endは、Label を StackLayout の右側に配置します。Fill。これにより、Label によって StackLayout の幅が埋まるようになります。
同等の C# コードを次に示します。
public class AlignmentPage : ContentPage
{
    public AlignmentPage()
    {
        Title = "Alignment demo";

        StackLayout stackLayout = new StackLayout
        {
            Margin = new Thickness(20),
            Spacing = 6
        };

        stackLayout.Add(new Label { Text = "Start", BackgroundColor = Colors.Gray, HorizontalOptions = LayoutOptions.Start });
        stackLayout.Add(new Label { Text = "Center", BackgroundColor = Colors.Gray, HorizontalOptions = LayoutOptions.Center });
        stackLayout.Add(new Label { Text = "End", BackgroundColor = Colors.Gray, HorizontalOptions = LayoutOptions.End });
        stackLayout.Add(new Label { Text = "Fill", BackgroundColor = Colors.Gray, HorizontalOptions = LayoutOptions.Fill });

        Content = stackLayout;
    }
}
配置の詳細については、「レイアウトのビューを配置」を参照してください。
入れ子になった StackLayout オブジェクト
StackLayout は、入れ子になった子 StackLayout オブジェクトまたはその他の子レイアウトを含む親レイアウトとして使用できます。
次の XAML は、入れ子になった StackLayout オブジェクトの例を示しています。
<ContentPage xmlns="http://schemas.microsoft.com/dotnet/2021/maui"
             xmlns:x="http://schemas.microsoft.com/winfx/2009/xaml"
             x:Class="StackLayoutDemos.Views.XAML.CombinedStackLayoutPage"
             Title="Combined StackLayouts demo">
    <StackLayout Margin="20">
        ...
        <Frame BorderColor="Black"
               Padding="5">
            <StackLayout Orientation="Horizontal"
                         Spacing="15">
                <BoxView Color="Red"
                         WidthRequest="40" />
                <Label Text="Red"
                       FontSize="18"
                       VerticalOptions="Center" />
            </StackLayout>
        </Frame>
        <Frame BorderColor="Black"
               Padding="5">
            <StackLayout Orientation="Horizontal"
                         Spacing="15">
                <BoxView Color="Yellow"
                         WidthRequest="40" />
                <Label Text="Yellow"
                       FontSize="18"
                       VerticalOptions="Center" />
            </StackLayout>
        </Frame>
        <Frame BorderColor="Black"
               Padding="5">
            <StackLayout Orientation="Horizontal"
                         Spacing="15">
                <BoxView Color="Blue"
                         WidthRequest="40" />
                <Label Text="Blue"
                       FontSize="18"
                       VerticalOptions="Center" />
            </StackLayout>
        </Frame>
        ...
    </StackLayout>
</ContentPage>
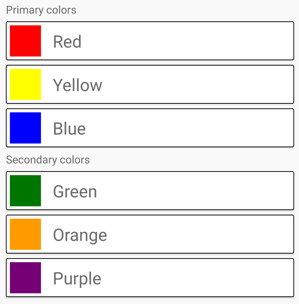
この例では、親 StackLayout には、Frame オブジェクト内に入れ子になった StackLayout オブジェクトが含まれています。 親 StackLayout は垂直方向に配置され、子 StackLayout オブジェクトは水平方向に配置されます。
重要
StackLayout オブジェクトやその他のレイアウトの入れ子が深くなるほど、より多くのレイアウト計算が実行され、パフォーマンスに影響を与える可能性があります。 詳細については、「正しいレイアウトの選択」を参照してください。
同等の C# コードを次に示します。
public class CombinedStackLayoutPage : ContentPage
{
    public CombinedStackLayoutPage()
    {
        Title = "Combined StackLayouts demo";

        Frame frame1 = new Frame
        {
            BorderColor = Colors.Black,
            Padding = new Thickness(5)
        };
        StackLayout frame1StackLayout = new StackLayout
        {
            Orientation = StackOrientation.Horizontal,
            Spacing = 15
        };
        frame1StackLayout.Add(new BoxView { Color = Colors.Red, WidthRequest = 40 });
        frame1StackLayout.Add(new Label { Text = "Red", FontSize = 22, VerticalOptions = LayoutOptions.Center });
        frame1.Content = frame1StackLayout;

        Frame frame2 = new Frame
        {
            BorderColor = Colors.Black,
            Padding = new Thickness(5)
        };
        StackLayout frame2StackLayout = new StackLayout
        {
            Orientation = StackOrientation.Horizontal,
            Spacing = 15
        };
        frame2StackLayout.Add(new BoxView { Color = Colors.Yellow, WidthRequest = 40 });
        frame2StackLayout.Add(new Label { Text = "Yellow", FontSize = 22, VerticalOptions = LayoutOptions.Center });
        frame2.Content = frame2StackLayout;

        Frame frame3 = new Frame
        {
            BorderColor = Colors.Black,
            Padding = new Thickness(5)
        };
        StackLayout frame3StackLayout = new StackLayout
        {
            Orientation = StackOrientation.Horizontal,
            Spacing = 15
        };
        frame3StackLayout.Add(new BoxView { Color = Colors.Blue, WidthRequest = 40 });
        frame3StackLayout.Add(new Label { Text = "Blue", FontSize = 22, VerticalOptions = LayoutOptions.Center });
        frame3.Content = frame3StackLayout;

        ...

        StackLayout stackLayout = new StackLayout { Margin = new Thickness(20) };
        stackLayout.Add(new Label { Text = "Primary colors" });
        stackLayout.Add(frame1);
        stackLayout.Add(frame2);
        stackLayout.Add(frame3);
        stackLayout.Add(new Label { Text = "Secondary colors" });
        stackLayout.Add(frame4);
        stackLayout.Add(frame5);
        stackLayout.Add(frame6);

        Content = stackLayout;
    }
}
.NET MAUI
フィードバック
以下は間もなく提供いたします。2024 年を通じて、コンテンツのフィードバック メカニズムとして GitHub の issue を段階的に廃止し、新しいフィードバック システムに置き換えます。 詳細については、「https://aka.ms/ContentUserFeedback」を参照してください。
フィードバックの送信と表示