Kongregate と Unity を使用して PlayFab 認証を設定する
このチュートリアルでは、PlayFab で Kongregate と Unity を使用してプレイヤーを認証するのに必要な最小限の設定について説明します。
要件
- 登録済みの Kongregate アカウント。
- Kongregate のデベロッパー向けガイドを理解していること。
- 登録済みの PlayFab タイトル。
- PlayFab を使用してタイトル向けに設定された Unity プロジェクト。
- Unity WebGL サポートがインストール済み。
- ログインの基本とベスト プラクティス を理解していること。
Kongregate アプリを設定する
Kongregate では、必要なアプリ情報にアクセスする前に、アプリのプレビュー版をアップロードする必要があります。 まず、次に示す内容を含む index.html ファイルを用意します。
<!doctype html>
<html lang="en-us">
<head></head>
<body>
 <h1>Placeholder</h1>
</body>
</html>
Kongregate の Web サイトにアクセスします。
- [Games (ゲーム)] タブを選択します。
- 次に、[Upload your game (ゲームをアップロード)] を選択します。
![Kongregate の [Games] (ゲーム) タブ](media/tutorials/kongregate-games-tab.png)
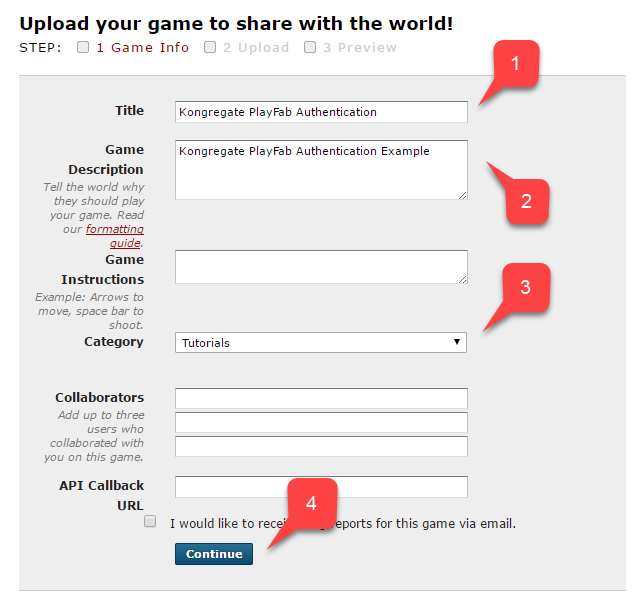
新しいアプリケーションの設定ページが開きます。
- 必ずアプリケーション名 を入力します。
- ゲームの説明 を入力します。
- その後、カテゴリ を選択します。
- [Continue] (続行) を選択して新しいアプリを送信します。
[Application Upload] (アプリケーションのアップロード) ページが表示されます。
非常に重要な手順として、まず、Web アドレス バーに表示されている URL を、アクセスしやすい安全な場所に必ず保存してください。 これにより、このページを閉じた後でも、アプリケーションへのアクセスの復旧が迅速に行えます。
- 完了後、[Game File (ゲーム ファイル)] として、用意した index.html ファイルを選択します。
- 次に、画面のサイズを設定します。
- 必要なすべてのライセンスに同意します。
- 最後に、[Upload] (アップロード) を選択して、アプリケーションをアップロードします。
![Kongregate の [Application Upload] (アプリケーションのアップロード) ページ](media/tutorials/kongregate-app-upload-page.png)
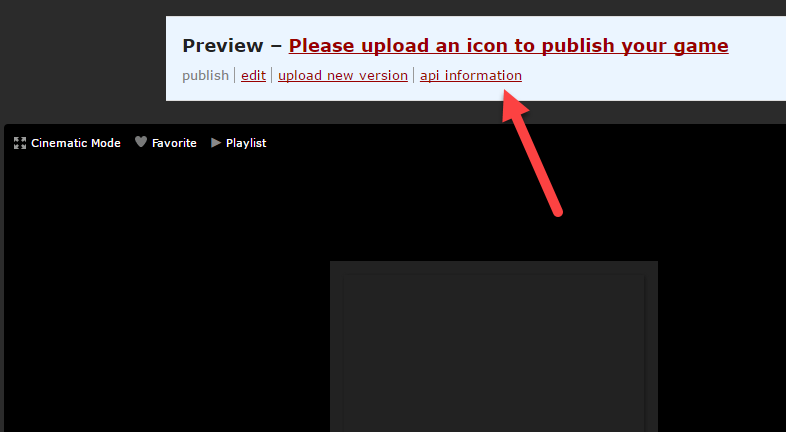
プレビューが開いたら、内容は無視して、API 情報のリンクを開きます。
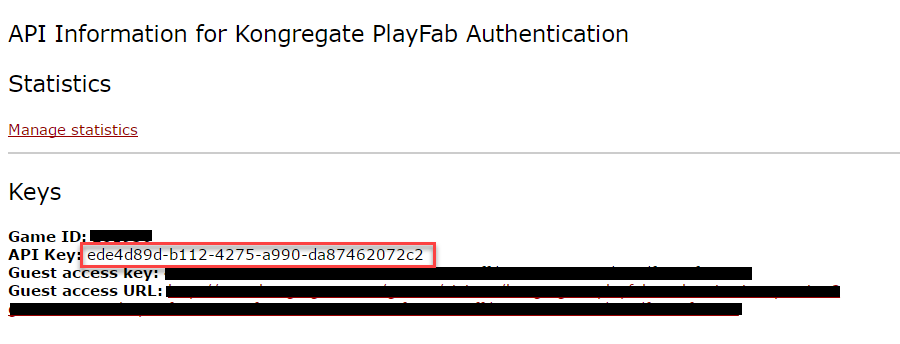
[API Information] (API 情報) ページが開いたら、API キーを探して、後で使用できるようにアクセスしやすい安全な場所に保存します。
PlayFab タイトルを構成する
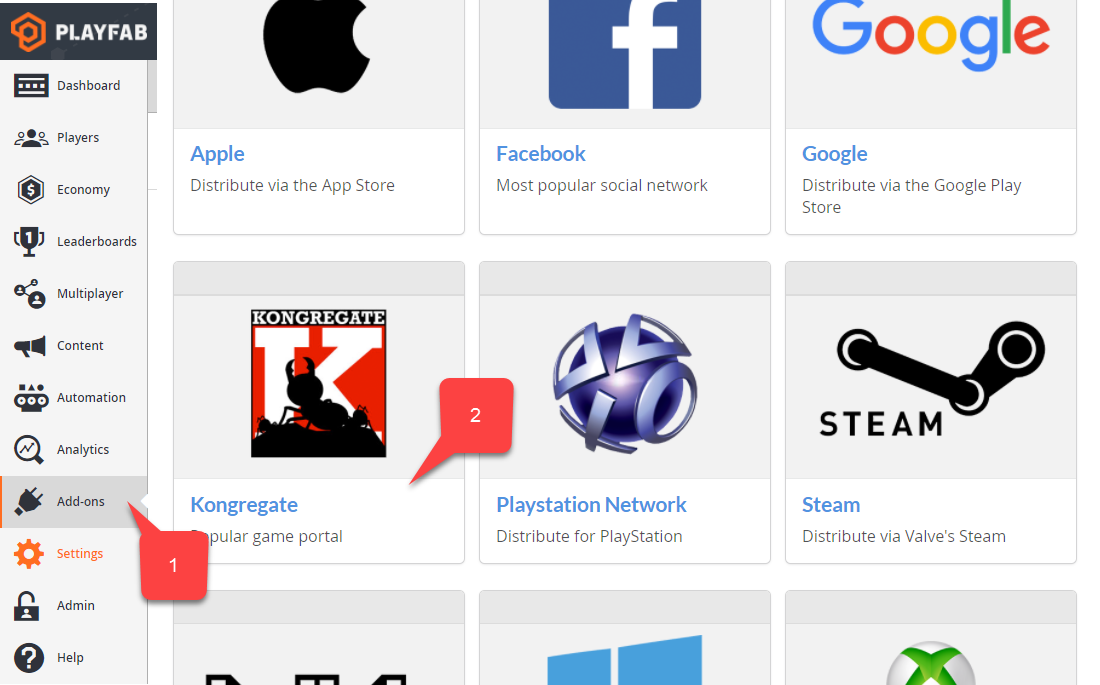
PlayFab タイトルで、ゲーム マネージャーを使用して以下の操作を実行します。
- 左側のメニューの [追加コンテンツ] を選択します。
- Kongregate アイコンを探して選択します。
新しいページが開き、Kongregate の統合が設定できます。
- 以前のセクションで取得した API キー を入力します。
- [Install Kongregate (Kongregate のインストール)] を選択します。
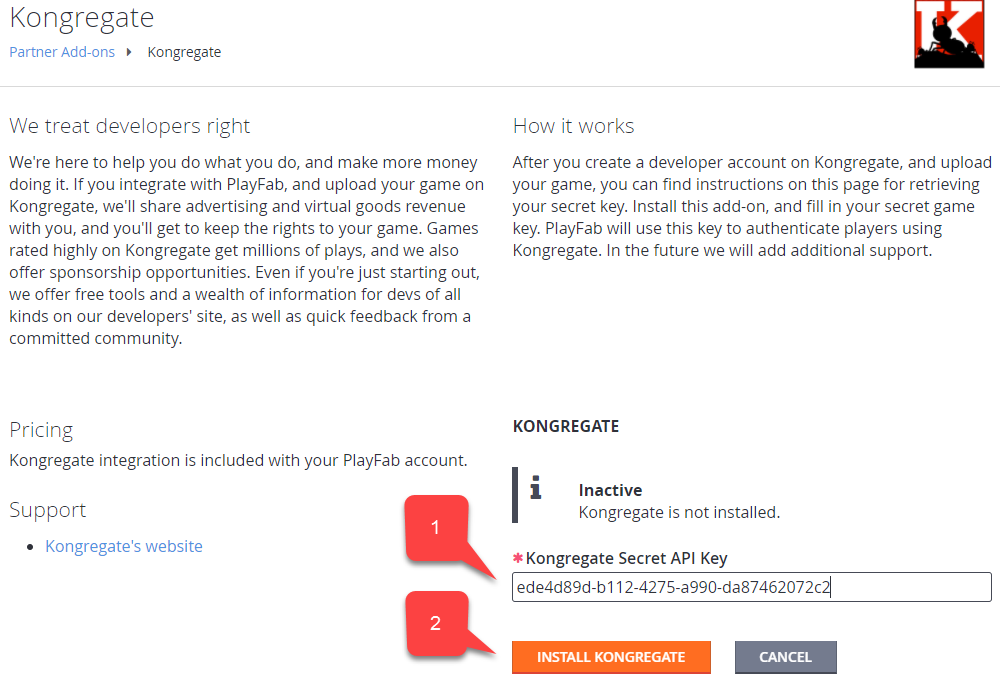
この時点でエラー メッセージが表示されなければ、PlayFab タイトルの Kongregate アプリケーションとの統合が適切に設定されました。
Unity プロジェクトを設定する
以下の Unity 設定のチェックリストを使用してください。
- [オプション] PlayFab エディターの拡張機能をインストールします。
PlayFabSharedSettingsスクリプト可能オブジェクトのTitleIdを設定します。
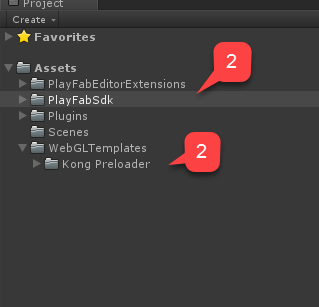
- Unity 5.6 以降の場合は、Kongregate Preloader WebGL のテンプレートをダウンロードし、
Assets/WebGLTemplatesフォルダー (2) 内に配置します。 - Unity < 5.6 については、Kongregate Preloader WebGL テンプレート 5.5 以下をダウンロードし、
Assets/WebGLTemplatesフォルダー (2) 内に配置します。
では、作業するシーンを作成しましょう。
- テスト目的の場合は、複数のテキスト ラベルを使用して、画面と同じ大きさのキャンバスを使用します。
注意
デバッグ メッセージの表示には、テキスト ラベルが 1 つだけ必要です。
- 空の GameObject を作成し、この名前を Kongregate に変更します。
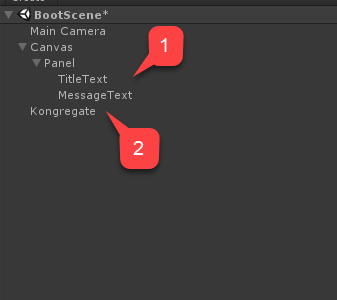
この GameObject には、デバッグ メッセージに関連付けられたテキスト ラベルを含む KongregateHandler コンポーネントが含まれています。
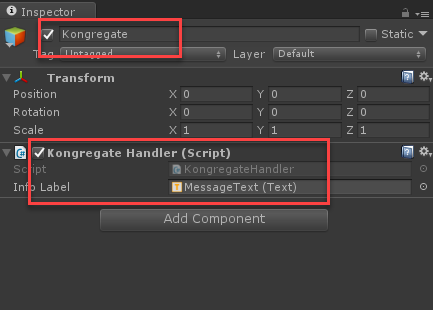
KongregateHandler コンポーネントのコードは以下のとおりです。
// We are specifically interested in importing PlayFab related namespaces
using PlayFab;
using PlayFab.ClientModels;
using UnityEngine;
using UnityEngine.UI;

public class KongregateHandler : MonoBehaviour
{

    // Standard unity callback, executed once for the script to start
    public void Start()
    {
        // Utility: show feedback
        SetMessage("Loading kongregate api...");

        /*
         * Important: execute Javascript in the external context to initialize
         * Kongregate API, Unity Support and set up callback GameObject and Method.
         * In this case, callback is set to a GameObject called Kongregate and a
         * method called OnKongregateAPILoaded, which we define later in this class.
         * Once Kongregate API is initialized, Unity will locate this object by name
         * ("Kongregate") and execute a method "OnKongregateAPILoaded" passing in user
         * info string as an argument.
         */
        Application.ExternalEval(
          "if(typeof(kongregateUnitySupport) != 'undefined'){" +
          " kongregateUnitySupport.initAPI('Kongregate', 'OnKongregateAPILoaded');" +
          "} else {" +
          " console.error('No unity support!');" +
          "};"
        );
    }

    /*
     * Executed once Kongregate API is ready. This method is invoked by KongregateAPI
     * and receives a structured text with multiple pieces of data you must parse manually.
     * The userInfo string parameter has the following structure: 'user_identifier|user_name|auth_token'
     */
    public void OnKongregateAPILoaded(string userInfo)
    {
        SetMessage("Received user info! Logging though playfab...");

        // We split userInfo string using '|' character to acquire auth token and Kongregate ID.
        var userInfoArray = userInfo.Split('|');
        var authTicket = userInfoArray[2];
        var kongregateId = userInfoArray[0];

        LogToBrowser("Auth Token: " + authTicket);
        LogToBrowser("Kongregate Id: " + kongregateId);

        /*
         * We then execute PlayFab API call called LoginWithKongregate.
         * LoginWithKongregate requires KongregateID and AuthTicket.
         * We also pass CreateAccount flag, to automatically create player account.
         */
        PlayFabClientAPI.LoginWithKongregate(new LoginWithKongregateRequest
        {
            KongregateId = kongregateId,
            AuthTicket = authTicket,
            CreateAccount = true
        }, OnLoggedIn, OnFailed);
    }


    /*
     * The rest of the code serves as a utility to process results, log debug statements
     * and display them using Text message label.
     */

    private void OnLoggedIn(LoginResult obj)
    {
        SetMessage("Logged in through PlayFab!");
    }
    private void OnFailed(PlayFabError error)
    {
        SetMessage("Failed to login in with PlayFab: " + error.GenerateErrorReport());
    }

    private void SetMessage(string message)
    {
        InfoLabel.text = message;
    }

    private void LogToBrowser(string message)
    {
        Application.ExternalEval(string.Format("console.log('{0}')", message));
    }

    public Text InfoLabel;
}
テスト
本当の意味で統合をテストする唯一の方法は、Kongregate にプロトタイプをアップロードすることです。
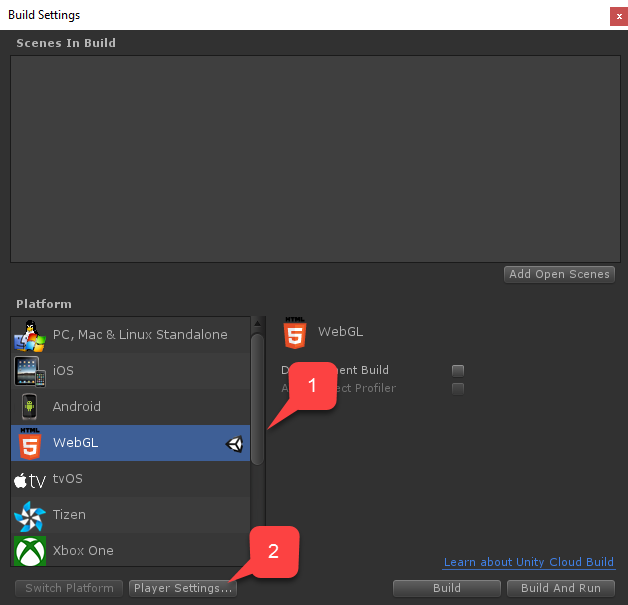
- [Build] (ビルド) ウィンドウを開き、メニューで [WebGL] が選択されていることを確認します。
- 次に、[Player Settings] (プレイヤーの設定) を選択して開きます。
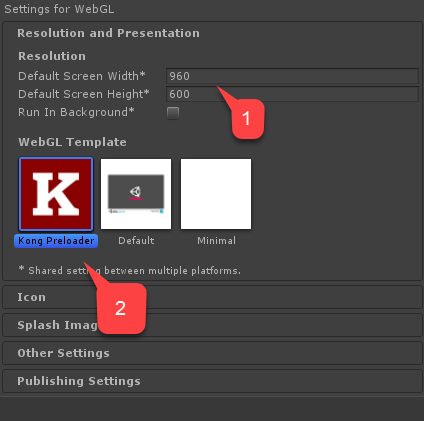
[Player Settings] (プレイヤーの設定) 画面で、[Settings for WebGL] (WebGL の設定) を見つけます。
- サイズが正しく設定されていることを確認します。
- 次に、Kongregate Preloader テンプレートを選択します。
アプリケーションをビルドして、Build フォルダーを開きます。
- index.html と他の一連のファイル (Unity のバージョンにより異なります) が表示されます。
- 次の例に示すように、index.html 以外のすべてのファイルを zip アーカイブに配置します。

以前に保存した URL を使用して、[Application Upload] (アプリケーションのアップロード) ページにアクセスします。
- [Game File (ゲーム ファイル)] で index.html を選択します。
- その後、[Additional files] (追加ファイル) として zip アーカイブを選択します。
- ライセンスに同意して、アップロードします。
![Kongregate の [Application Upload] (アプリケーションのアップロード) ページ - ファイルの追加](media/tutorials/kongregate-unity/kongregate-app-upload-page-add-files.png)
プレビューを開くと、ゲームでのメッセージの変遷がライブで確認できます。
最後に、PlayFab でのログインが成功したことを示すメッセージが示されます。
これで、PlayFab と Kongregate が正常に統合されました。