クイック スタート: クライアント アプリケーションの初期化 (C++)
このクイックスタートでは、実行時に MIP C++ SDK によって使用される、クライアントの初期化パターンを実装する方法について説明します。
Note
MIP File、MIP Policy、MIP Protection の各 SDK を使用するすべてのクライアント アプリケーションに対して、このクイック スタートで概説されている手順を実施する必要があります。 このクイック スタートでは File SDK の使用方法を示しますが、この同じパターンを、Policy と Protection の SDK を使用するクライアントにも適用できます。 以降の各クイック スタートは、先行するものに基づいて作成されるため、これを最初に、順次実行してください。
前提条件
まだ実施していない場合は、必ず次の作業を行ってください。
- 「Microsoft Information Protection (MIP) SDK のセットアップと構成」の手順を完了します。 この "クライアント アプリケーションの初期化" クイック スタートは、適切な SDK のセットアップと構成に依存します。
- 必要に応じて:
- プロファイルとエンジンのオブジェクトに関する記事を確認します。 プロファイルとエンジンのオブジェクトは、MIP File、MIP Policy、MIP Protection の各 SDK を使用するクライアントによって必要とされるユニバーサルな概念です。
- 認証の概念に関する記事を確認して、認証と同意が SDK とクライアント アプリケーションによってどのように実装されるかについて学習します。
- オブザーバーの概念に関する記事を確認して、オブザーバーの詳細およびその実装方法について学習します。 MIP SDK では、オブザーバー パターンを使用して、非同期イベント通知を実装します。
Visual Studio のソリューションとプロジェクトを作成する
まず、最初の Visual Studio のソリューションとプロジェクトを作成して構成します。他のクイック スタートは、これに基づいて作成されます。
Visual Studio 2017 を開いて、[ファイル] メニュー、[新規]、[プロジェクト] の順に選択します。 [新しいプロジェクト] ダイアログで次の操作を行います。
左側のペインの [インストール済み] の下の [その他の言語] で、[Visual C++] を選択します。
中央のペインで、[Windows コンソール アプリケーション] を選択します
下部のペインで、プロジェクトの [名前]、[場所]、含める [ソリューション名] を適宜更新します。
完了したら、右下の [OK] ボタンをクリックします。

MIP File SDK 用の Nuget パッケージをプロジェクトに追加します。
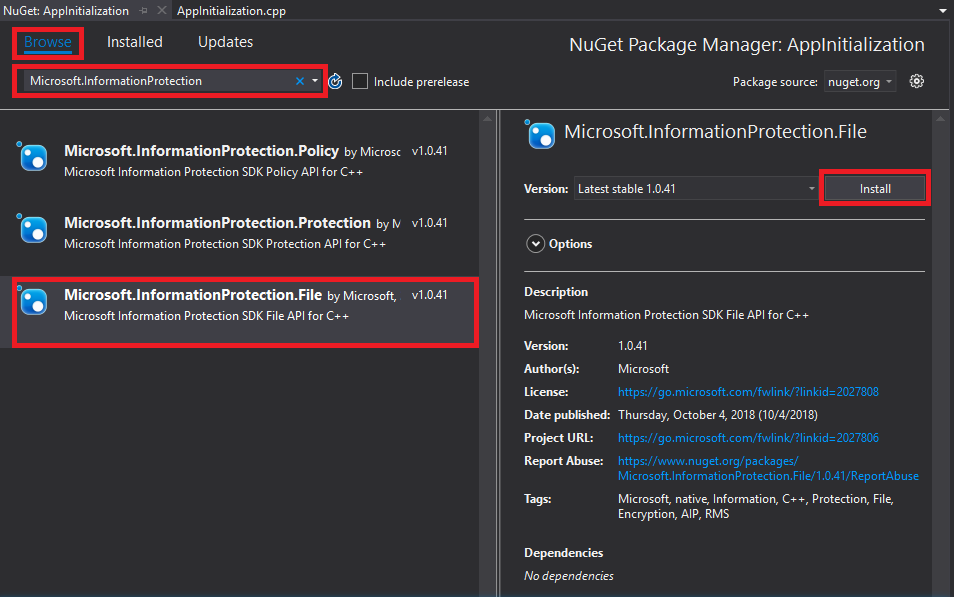
ソリューション エクスプローラーで、プロジェクト ノード (最上位/ソリューション ノードのすぐ下) を右クリックして、[NuGet パッケージの管理] を選択します。
[エディター グループ] タブ領域で [NuGet パッケージ マネージャー] タブが開いたら、次の操作を行います。
- 参照を選択します。
- 検索ボックスに「Microsoft.InformationProtection」と入力します。
- [Microsoft.InformationProtection.File] パッケージを選択します。
- [インストール] をクリックし、[変更のプレビュー] の確認ダイアログが表示されたら [OK] をクリックします。


ファイル プロファイルとエンジンのオブジェクトを監視するためのオブザーバー クラスを実装する
次に、SDK の mip::FileProfile::Observer クラスを拡張して、ファイル プロファイル オブザーバー クラスの基本的な実装を作成します。 このオブザーバーはインスタンス化され、ファイル プロファイル オブジェクトの読み込みと、プロファイルへのエンジン オブジェクトの追加を監視するために、後で使用されます。
新しいクラスをプロジェクトに追加します。これにより、header/.h と implementation/.cpp の両方のファイルが生成されます。
ソリューション エクスプローラーでもう一度プロジェクト ノードを右クリックし、[追加]、[クラス] の順に選択します。
[クラスの追加] ダイアログで、以下の操作を行います。
- [クラス名] フィールドに「profile_observer」と入力します。 [.h ファイル] と [.cpp ファイル] の両方のフィールドが、入力した名前に基づいて自動的に設定されることに注意してください。
- 完了したら、[OK] ボタンをクリックします。

クラスの .h と .cpp のファイルを作成すると、両方のファイルが [エディター グループ] タブに表示されます。 次に、各ファイルを更新して、新しいオブザーバー クラスを実装します。
生成した
profile_observerクラスを選択または削除して、"profile_observer.h" を更新します。 前の手順で生成された、プリプロセッサ ディレクティブ (#pragma、#include) は削除しないでください。 次に、次のソースをコピーし、ファイル内で、既存の任意のプリプロセッサ ディレクティブの後に貼り付けます。#include <memory> #include "mip/file/file_profile.h" class ProfileObserver final : public mip::FileProfile::Observer { public: ProfileObserver() { } void OnLoadSuccess(const std::shared_ptr<mip::FileProfile>& profile, const std::shared_ptr<void>& context) override; void OnLoadFailure(const std::exception_ptr& error, const std::shared_ptr<void>& context) override; void OnAddEngineSuccess(const std::shared_ptr<mip::FileEngine>& engine, const std::shared_ptr<void>& context) override; void OnAddEngineFailure(const std::exception_ptr& error, const std::shared_ptr<void>& context) override; };生成した
profile_observerクラス実装を選択または削除して、"profile_observer.cpp" を更新します。 前の手順で生成された、プリプロセッサ ディレクティブ (#pragma、#include) は削除しないでください。 次に、次のソースをコピーし、ファイル内で、既存の任意のプリプロセッサ ディレクティブの後に貼り付けます。#include <future> using std::promise; using std::shared_ptr; using std::static_pointer_cast; using mip::FileEngine; using mip::FileProfile; void ProfileObserver::OnLoadSuccess(const shared_ptr<FileProfile>& profile, const shared_ptr<void>& context) { auto promise = static_pointer_cast<std::promise<shared_ptr<FileProfile>>>(context); promise->set_value(profile); } void ProfileObserver::OnLoadFailure(const std::exception_ptr& error, const shared_ptr<void>& context) { auto promise = static_pointer_cast<std::promise<shared_ptr<FileProfile>>>(context); promise->set_exception(error); } void ProfileObserver::OnAddEngineSuccess(const shared_ptr<FileEngine>& engine, const shared_ptr<void>& context) { auto promise = static_pointer_cast<std::promise<shared_ptr<FileEngine>>>(context); promise->set_value(engine); } void ProfileObserver::OnAddEngineFailure(const std::exception_ptr& error, const shared_ptr<void>& context) { auto promise = static_pointer_cast<std::promise<shared_ptr<FileEngine>>>(context); promise->set_exception(error); }
続行する前に、必要に応じて、F6 キー ([ソリューションのビルド]) を使用してソリューションのテスト コンパイルとリンクを実行し、正しくビルドされていることを確認します。

認証の委任を実装する
MIP SDK では、クラスの拡張機能を使用して認証を実装します。これにより、認証作業をクライアント アプリケーションと共有するメカニズムが提供されます。 クライアントは、適切な OAuth2 アクセス トークンを取得し、実行時に MIP SDK に提供する必要があります。
SDK の mip::AuthDelegate クラスを拡張し、mip::AuthDelegate::AcquireOAuth2Token() 純粋仮想関数をオーバーライドまたは実装することで、認証の委任の実装を作成します。 この認証の委任はインスタンス化され、ファイル プロファイルとファイル エンジンのオブジェクトによって後で使用されます。
前のセクションの手順 1 で使用したものと同じ Visual Studio の "クラスの追加" 機能を使用して、別のクラスをプロジェクトに追加します。 今度は、[クラス名] フィールドに「auth_delegate」と入力します。
次に、各ファイルを更新して、新しい認証の委任クラスを実装します。
生成された
auth_delegateクラス コードをすべて次のソースに置き換えることにより、"auth_delegate.h" を更新します。 前の手順で生成された、プリプロセッサ ディレクティブ (#pragma、#include) は削除しないでください。#include <string> #include "mip/common_types.h" class AuthDelegateImpl final : public mip::AuthDelegate { public: AuthDelegateImpl() = delete; // Prevents default constructor AuthDelegateImpl( const std::string& appId) // AppID for registered AAD app : mAppId(appId) {}; bool AcquireOAuth2Token( // Called by MIP SDK to get a token const mip::Identity& identity, // Identity of the account to be authenticated, if known const OAuth2Challenge& challenge, // Authority (AAD tenant issuing token), and resource (API being accessed; "aud" claim). OAuth2Token& token) override; // Token handed back to MIP SDK private: std::string mAppId; std::string mToken; std::string mAuthority; std::string mResource; };生成された
auth_delegateクラスの実装をすべて次のソースに置き換えることにより、"auth_delegate.cpp" を更新します。 前の手順で生成された、プリプロセッサ ディレクティブ (#pragma、#include) は削除しないでください。重要
次のトークン取得コードは、運用環境での使用には適していません。 運用環境では、以下のものを使用して、これを、トークンを動的に取得するコードに置き換える必要があります。
- お使いの Microsoft Entra アプリ登録で指定されたアプリケーション ID と応答またはリダイレクトの URI (応答またはリダイレクト URI は、お使いのアプリ登録と一致する必要があります)
challenge引数で SDK によって渡された機関とリソースの URL (リソース URL はお使いのアプリ登録の API およびアクセス許可と一致する必要があります)- アカウントが SDK によって渡された
identity引数と一致する、有効なアプリまたはユーザーの資格情報。 OAuth2 の "ネイティブ" クライアントではユーザーの資格情報を求める確認メッセージを表示し、"認証コード" フローを使用する必要があります。 OAuth2 の "Confidential クライアント" では、"クライアントの資格情報" フロー (サービスなど) で、セキュリティで保護された独自の資格情報を使用したり、"認証コード" フロー (Web アプリなど) を使用してユーザーの資格情報を求める確認メッセージを表示したりすることができます。
OAuth2 トークンの取得は複雑なプロトコルであり、通常はライブラリを使用することによって実現されます。 TokenAcquireOAuth2Token() は、必要に応じて MIP SDK によってのみ呼び出されます。
#include <iostream>
using std::cout;
using std::cin;
using std::string;

bool AuthDelegateImpl::AcquireOAuth2Token(const mip::Identity& identity, const OAuth2Challenge& challenge, OAuth2Token& token)
{
     // Acquire a token manually, reuse previous token if same authority/resource. In production, replace with token acquisition code.
     string authority = challenge.GetAuthority();
     string resource = challenge.GetResource();
     if (mToken == "" || (authority != mAuthority || resource != mResource))
     {
         cout << "\nRun the PowerShell script to generate an access token using the following values, then copy/paste it below:\n";
         cout << "Set $authority to: " + authority + "\n";
         cout << "Set $resourceUrl to: " + resource + "\n";
         cout << "Sign in with user account: " + identity.GetEmail() + "\n";
         cout << "Enter access token: ";
         cin >> mToken;
         mAuthority = authority;
         mResource = resource;
         system("pause");
     }

     // Pass access token back to MIP SDK
     token.SetAccessToken(mToken);

     // True = successful token acquisition; False = failure
     return true;
}
続行する前に、必要に応じて、F6 キー ([ソリューションのビルド]) を使用してソリューションのテスト コンパイルとリンクを実行し、正しくビルドされていることを確認します。
同意の委任を実装する
次に、SDK の mip::ConsentDelegate クラスを拡張し、mip::AuthDelegate::GetUserConsent() 純粋仮想関数をオーバーライドまたは実装することで、同意の委任の実装を作成します。 この同意の委任はインスタンス化され、ファイル プロファイルとファイル エンジンのオブジェクトによって後で使用されます。
前に使用したものと同じ Visual Studio の "クラスの追加" 機能を使用して、別のクラスをプロジェクトに追加します。 今度は、[クラス名] フィールドに「consent_delegate」と入力します。
次に、各ファイルを更新して、新しい同意の委任クラスを実装します。
生成された
consent_delegateクラス コードをすべて次のソースに置き換えることにより、"consent_delegate.h" を更新します。 前の手順で生成された、プリプロセッサ ディレクティブ (#pragma、#include) は削除しないでください。#include "mip/common_types.h" #include <string> class ConsentDelegateImpl final : public mip::ConsentDelegate { public: ConsentDelegateImpl() = default; virtual mip::Consent GetUserConsent(const std::string& url) override; };生成された
consent_delegateクラスの実装をすべて次のソースに置き換えることにより、"consent_delegate.cpp" を更新します。 前の手順で生成された、プリプロセッサ ディレクティブ (#pragma、#include) は削除しないでください。#include <iostream> using mip::Consent; using std::string; Consent ConsentDelegateImpl::GetUserConsent(const string& url) { // Accept the consent to connect to the url std::cout << "SDK will connect to: " << url << std::endl; return Consent::AcceptAlways; }
続行する前に、必要に応じて、F6 キー ([ソリューションのビルド]) を使用してソリューションのテスト コンパイルとリンクを実行し、正しくビルドされていることを確認します。
ファイルのプロファイルとエンジンを作成する
前述のとおり、MIP API を使用する SDK クライアントには、プロファイルとエンジンのオブジェクトが必要です。 プロファイルとエンジンのオブジェクトをインスタンス化するコードを追加して、このクイック スタートのコード部分を完了します。
ソリューション エクスプローラーから、
main()メソッドの実装が含まれる .cpp ファイルをプロジェクトで開きます。 既定の名前は、それが含まれるプロジェクトと同じであり、プロジェクトの作成時に指定したものです。生成された
main()の実装を削除します。 プロジェクトの作成時に Visual Studio によって生成されたプリプロセッサ ディレクティブ (#pragma, #include) は削除しないでください。 任意のプリプロセッサ ディレクティブの後に次のコードを追加します。
#include "mip/mip_context.h"
#include "auth_delegate.h"
#include "consent_delegate.h"
#include "profile_observer.h"

using std::promise;
using std::future;
using std::make_shared;
using std::shared_ptr;
using std::string;
using std::cout;
using mip::ApplicationInfo;
using mip::FileProfile;
using mip::FileEngine;

int main()
{
  // Construct/initialize objects required by the application's profile object
  // ApplicationInfo object (App ID, name, version)
  ApplicationInfo appInfo{"<application-id>",
                          "<application-name>",
                          "<application-version>"};

  // Create MipConfiguration object.
  std::shared_ptr<mip::MipConfiguration> mipConfiguration = std::make_shared<mip::MipConfiguration>(appInfo,
				                                                                                               "mip_data",
                                                                                      			         mip::LogLevel::Trace,
                                                                                                     false);


  std::shared_ptr<mip::MipContext> mMipContext = mip::MipContext::Create(mipConfiguration);

  auto profileObserver = make_shared<ProfileObserver>();                     // Observer object
  auto authDelegateImpl = make_shared<AuthDelegateImpl>("<application-id>"); // Authentication delegate object (App ID)
  auto consentDelegateImpl = make_shared<ConsentDelegateImpl>();             // Consent delegate object

  // Construct/initialize profile object
  FileProfile::Settings profileSettings(
                                mMipContext,
                                mip::CacheStorageType::OnDisk,
                                consentDelegateImpl,
                                profileObserver);

  // Set up promise/future connection for async profile operations; load profile asynchronously
  auto profilePromise = make_shared<promise<shared_ptr<FileProfile>>>();
  auto profileFuture = profilePromise->get_future();

  try
	  {
		  mip::FileProfile::LoadAsync(profileSettings, profilePromise);
  }
	  catch (const std::exception& e)
	  {
		  cout << "An exception occurred... are the Settings and ApplicationInfo objects populated correctly?\n\n" << e.what() << "'\n";

		  system("pause");
		  return 1;
	  }
	  auto profile = profileFuture.get();

  // Construct/initialize engine object
  FileEngine::Settings engineSettings(
                                  mip::Identity("<engine-account>"), // Engine identity (account used for authentication)
                                  authDelegateImpl,		       // Token acquisition implementation
				    "<engine-state>",                  // User-defined engine state
                                  "en-US");                          // Locale (default = en-US)

  // Set the engineId for caching.
  engineSettings.SetEngineId("<engine-account>");
  // Set up promise/future connection for async engine operations; add engine to profile asynchronously
  auto enginePromise = make_shared<promise<shared_ptr<FileEngine>>>();
  auto engineFuture = enginePromise->get_future();
  profile->AddEngineAsync(engineSettings, enginePromise);
  std::shared_ptr<FileEngine> engine;
  try
  {
    engine = engineFuture.get();
  }
  catch (const std::exception& e)
  {
    cout << "An exception occurred... is the access token incorrect/expired?\n\n" << e.what() << "'\n";

    system("pause");
    return 1;
  }

  // Application shutdown. Null out profile and engine, call ReleaseAllResources();
  // Application may crash at shutdown if resources aren't properly released.
  // handler = nullptr; // This will be used in later quick starts.
  engine = nullptr;
  profile = nullptr;
  mMipContext->ShutDown();
  mMipContext = nullptr;

  return 0;
  }
次の文字列定数を使用して、貼り付けたソース コードのすべてのプレースホルダー値を置き換えます。
プレースホルダー 値 例 <application-id> "MIP SDK のセットアップと構成" に関する記事の手順 2 で登録したアプリケーションに割り当てられた Microsoft Entra アプリケーション ID (GUID)。 2 つのインスタンスを置き換えます。 "0edbblll-8773-44de-b87c-b8c6276d41eb"<application-name> アプリケーションのユーザー定義のフレンドリ名。 有効な ASCII 文字 (';' を除く) が含まれている必要があります。Microsoft Entra 登録で使用したアプリケーション名と一致するものが理想的です。 "AppInitialization"<application-version> アプリケーションのユーザー定義のバージョン情報。 有効な ASCII 文字 (';' を除く) が含まれている必要があります。 "1.1.0.0"<engine-account> エンジンの ID に使用されるアカウント。 トークン取得時の認証では、この値と一致するユーザー アカウントを使用する必要があります。 "user1@tenant.onmicrosoft.com"<engine-state> エンジンに関連付けられるユーザー定義の状態。 "My App State"ここで、アプリケーションの最終ビルドを行い、すべてのエラーを解決します。 コードは正常にビルドされますが、次のクイック スタートを完了するまでは、正しく実行されません。 アプリケーションを実行すると、次のような出力が表示されます。 次のクイック スタートを完了するまで、提供するアクセス トークンはありません。
次のステップ
これで、初期化コードが完成したので、次のクイック スタートに進み、MIP File SDK の操作を開始する準備ができました。
フィードバック
以下は間もなく提供いたします。2024 年を通じて、コンテンツのフィードバック メカニズムとして GitHub の issue を段階的に廃止し、新しいフィードバック システムに置き換えます。 詳細については、「https://aka.ms/ContentUserFeedback」を参照してください。
フィードバックの送信と表示