Azure VM Image Builder テンプレートを使用して Windows 仮想マシンを作成する
Azure VM Image Builder をテストして、Contoso IT 運用スタッフのニーズを満たすことができるかどうかを確認します。 Azure VM Image Builder と、GitHub ライブラリからダウンロードしたサンプルの .json テンプレートを使用して、Windows VM を作成することを計画します。 ただし、まず、Azure サブスクリプションに Azure VM Image Builder を登録する必要があります。
Note
このプレビューでは、Azure portal を使用して Azure VM Image Builder を操作することはできません。
Azure VM Image Builder を登録する
パブリック プレビューで Azure VM Image Builder を使用するには、Azure サブスクリプションの機能を登録する必要があります。 次の手順で、このプロセスについて説明します。
Azure VM Image Builder を登録するには、次の Azure CLI コマンドを実行します。
az feature register --namespace Microsoft.VirtualMachineImages --name VirtualMachineTemplatePreview`次のコマンドを使用して、機能登録の状態を確認します。
az feature show --namespace Microsoft.VirtualMachineImages --name VirtualMachineTemplatePreview | grep state次のコマンドを使用して、登録状態を確認します。
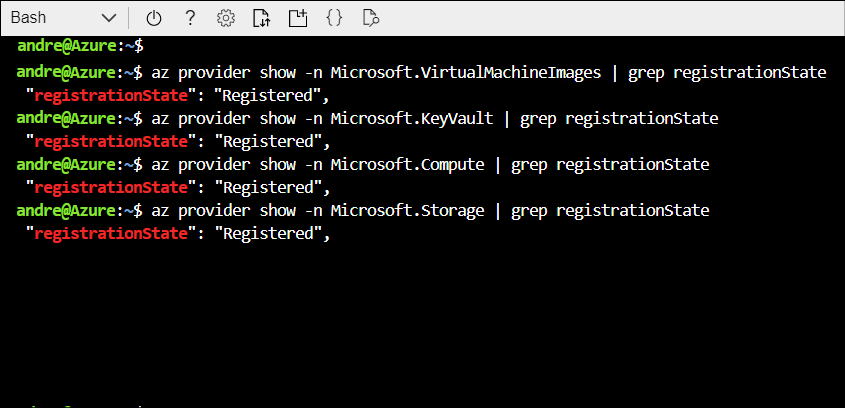
az provider show -n Microsoft.VirtualMachineImages | grep registrationState
az provider show -n Microsoft.KeyVault | grep registrationState
az provider show -n Microsoft.Compute | grep registrationState
az provider show -n Microsoft.Storage | grep registrationState
プロバイダーに
Registeredが表示されない場合、次のコマンドを実行します。az provider register -n Microsoft.VirtualMachineImages az provider register -n Microsoft.Compute az provider register -n Microsoft.KeyVault az provider register -n Microsoft.Storage
すべてのプロバイダーの準備が完了すると、すべてのプロバイダーが Registered として表示されます。
イメージを作成する
次の手順では、イメージを作成してから、イメージから VM を作成します。 イメージを作成するには、次の手順を実行します。
ビルド処理中に使用する変数を設定します。
# Resource group name
imageResourceGroup=ContosoWinImgBuilderRG
# Region location
location=WestUS2
# Name for the image
imageName=ContosoWinBuilderImage
# Run output name
runOutputName=ContosoWindows
# name of the image to be created
imageName=ContosoWinImage
# Create a variable for your subscription ID
subscriptionID=<Your subscription ID>
ヒント
az account show | grep idコマンドを使用して、サブスクリプション ID を確認できます。リソース グループを作成します。
az group create -n $imageResourceGroup -l $locationヒント
もちろん、既存のリソース グループを使用してもかまいません。 ただし、この特定の目的のために作成する場合は、この方法が (クリーンアップの観点から) 管理が簡単です。
ユーザー割り当て ID を作成し、リソース グループにアクセス許可を設定します。
 # create user assigned identity for image builder to access the storage account where the script is located
 identityName=aibBuiUserId$(date +'%s')
 az identity create -g $imageResourceGroup -n $identityName

 # get identity id
 imgBuilderCliId=$(az identity show -g $imageResourceGroup -n $identityName | grep "clientId" | cut -c16- | tr -d '",')

 # get the user identity URI, needed for the template
 imgBuilderId=/subscriptions/$subscriptionID/resourcegroups/$imageResourceGroup/providers/Microsoft.ManagedIdentity/userAssignedIdentities/$identityName

 # download preconfigured role definition example
 curl https://raw.githubusercontent.com/danielsollondon/azvmimagebuilder/master/solutions/12_Creating_AIB_Security_Roles/aibRoleImageCreation.json -o aibRoleImageCreation.json

 imageRoleDefName="Azure Image Builder Image Def"$(date +'%s')

 # update the definition
 sed -i -e "s/<subscriptionID>/$subscriptionID/g" aibRoleImageCreation.json
 sed -i -e "s/<rgName>/$imageResourceGroup/g" aibRoleImageCreation.json
 sed -i -e "s/Azure Image Builder Service Image Creation Role/$imageRoleDefName/g" aibRoleImageCreation.json

 # create role definitions
 az role definition create --role-definition ./aibRoleImageCreation.json

 # grant role definition to the user assigned identity
 az role assignment create \
 --assignee $imgBuilderCliId \
 --role $imageRoleDefName \
 --scope /subscriptions/$subscriptionID/resourceGroups/$imageResourceGroup
イメージ構成テンプレートをダウンロードします。
curl https://raw.githubusercontent.com/danielsollondon/azvmimagebuilder/master/quickquickstarts/0_Creating_a_Custom_Windows_Managed_Image/helloImageTemplateWin.json -o helloImageTemplateWin.json
sed -i -e "s/<subscriptionID>/$subscriptionID/g" helloImageTemplateWin.json
sed -i -e "s/<rgName>/$imageResourceGroup/g" helloImageTemplateWin.json
sed -i -e "s/<region>/$location/g" helloImageTemplateWin.json
sed -i -e "s/<imageName>/$imageName/g" helloImageTemplateWin.json
sed -i -e "s/<runOutputName>/$runOutputName/g" helloImageTemplateWin.json
sed -i -e "s%<imgBuilderId>%$imgBuilderId%g" helloImageTemplateWin.json
イメージを作成するには、イメージ構成を VM Azure VM Image Builder サービスに送信します。
az resource create \
 --resource-group $imageResourceGroup \
 --properties @helloImageTemplateWin.json \
 --is-full-object \
 --resource-type Microsoft.VirtualMachineImages/imageTemplates \
 -n helloImageTemplateWin01
ヒント
テキスト エディターを使って、コードを編集できます。
イメージの作成が完了すると、Azure VM Image Builder によってコンソールに成功メッセージが表示され、Azure VM Image Builder 構成テンプレートが
$imageResourceGroupに作成されます。 [非表示の型の表示] を有効にした場合は、Azure portal のリソース グループでこのリソースを確認できます。 また、バックグラウンドで、Azure VM Image Builder により、サブスクリプションにステージング リソース グループが作成されます。 このリソース グループがイメージのビルドに使用されます。 この形式はIT_<DestinationResourceGroup>_<TemplateName>_<GUID>です。イメージのビルドを開始します。
 az resource invoke-action \
  --resource-group $imageResourceGroup \
  --resource-type  Microsoft.VirtualMachineImages/imageTemplates \
  -n helloImageTemplateWin01 \
  --action Run
Note
イメージのビルドには最大 15 分かかることがあります。
仮想マシンをビルドする
最後の手順では、新しくビルドされたイメージから VM を作成します。 VM をビルドするには、Azure CLI で次のコマンドを実行します。
az vm create \
  --resource-group $imageResourceGroup \
  --name aibImgWinVm00 \
  --admin-username azureuser \
  --admin-password <password> \
  --image $imageName \
  --location $location
ヒント
要件に合わせて、上記のコードの管理者名を変更します。
VM を作成したら、カスタマイズを確認する必要があります。 これを行うには、VM へのリモート デスクトップ プロトコル (RDP) 接続を開き、定義されているユーザー名とパスワードを使用してサインインし、次のオブジェクトの存在を確認します。
- buildActions
- buildArtifacts
Note
完了したら、ビルド プロセス中に作成したすべてのリソースをクリーンアップします。 詳細については、「クリーン アップ」を参照してください。
追加の参考資料
詳しくは、次のドキュメントをご覧ください。