Command-line installation for R Server 9.1 on Hadoop (CDH, HDP, MapR)
Looking for the latest release? See Machine Learning Server for Hadoop installation
R Server for Hadoop is supported on Hadoop distributions provided by Cloudera, HortonWorks, and MapR. For most users, installing R Server on a cluster involves running the same series of steps on each data node of the cluster. A summary of setup tasks is as follows:
- Download the installer
- Unpack the distribution
- Run the install script with a -p parameter (for Hadoop)
- Verify the installation
- Repeat on the next data node.
The install script uses an internet connection to download and install missing dependencies, Microsoft R Open (MRO), and the .NET Core for Linux. If internet connections are restricted, use the alternate offline instructions instead.
If you previously installed version 9.0.1, it will be replaced with the 9.1 version. An 8.x version can run side-by-side 9.x, unaffected by the new installation.
Recommendations for installation
We recommend installing R Server on all data nodes of the cluster to avoid Hadoop queuing up jobs on nodes that don't actually have R Server. Although the task will eventually get reassigned to a node that has R Server, you will see errors from the worker node and experience unnecessary delay while waiting for the error to resolve.
Microsoft Azure offers virtual machines with Hadoop templates. If you don't have a Hadoop cluster, you can purchase and provision virtual machines on Azure using templates provided by several vendors.
- Sign in to Azure portal.
- Click New in the top left side bar.
- In the search box, type the name of one of these vendors: Cloudera, HortonWorks, and MapR. Several of these vendors offer sandbox deployments that make it easier to get started.
Installation requirements
Installation requires administrator permissions and must be performed as a root installation. Non-root installations are not supported.
R Server must be installed on at least one master or client node which will serve as the submit node; it should be installed on as many workers as is practical to maximize the available compute resources. Nodes must have the same version of R Server within the cluster.
Setup checks the operating system and detects the Hadoop cluster, but it doesn't check for specific distributions. Microsoft R Server works with the Hadoop distributions listed here: Supported platforms
Microsoft R Server requires Hadoop MapReduce, the Hadoop Distributed File System (HDFS), and Apache YARN. Optionally, Spark version 1.6-2.0 is supported for Microsoft R Server 9.x.
System requirements
Minimum system configuration requirements for Microsoft R Server are as follows:
Processor: 64-bit CPU with x86-compatible architecture (variously known as AMD64, Intel64, x86-64, IA-32e, EM64T, or x64 CPUs). Itanium-architecture CPUs (also known as IA-64) are not supported. Multiple-core CPUs are recommended.
Memory: A minimum of 8 GB of RAM is required for Microsoft R Server; 16 GB or more are recommended. Hadoop itself has substantial memory requirements; see your Hadoop distribution’s documentation for specific recommendations.
Disk Space: A minimum of 500 MB of disk space is required on each node for R Server. Hadoop itself has substantial disk space requirements; see your Hadoop distribution’s documentation for specific recommendations.
Download R Server installer
Get the zipped RServerSetup installer file from one of the following download sites.
| Site | Edition | Details |
|---|---|---|
| Visual Studio Dev Essentials | Developer (free) | This option provides a zipped file, free when you sign up for Visual Studio Dev Essentials. Developer edition has the same features as Enterprise, except it is licensed for development scenarios. |
| Volume Licensing Service Center (VLSC) | Enterprise | Sign in, search for R Server for Hadoop. A selection for R Server 9.1.0 for Hadoop is provided on this site. |
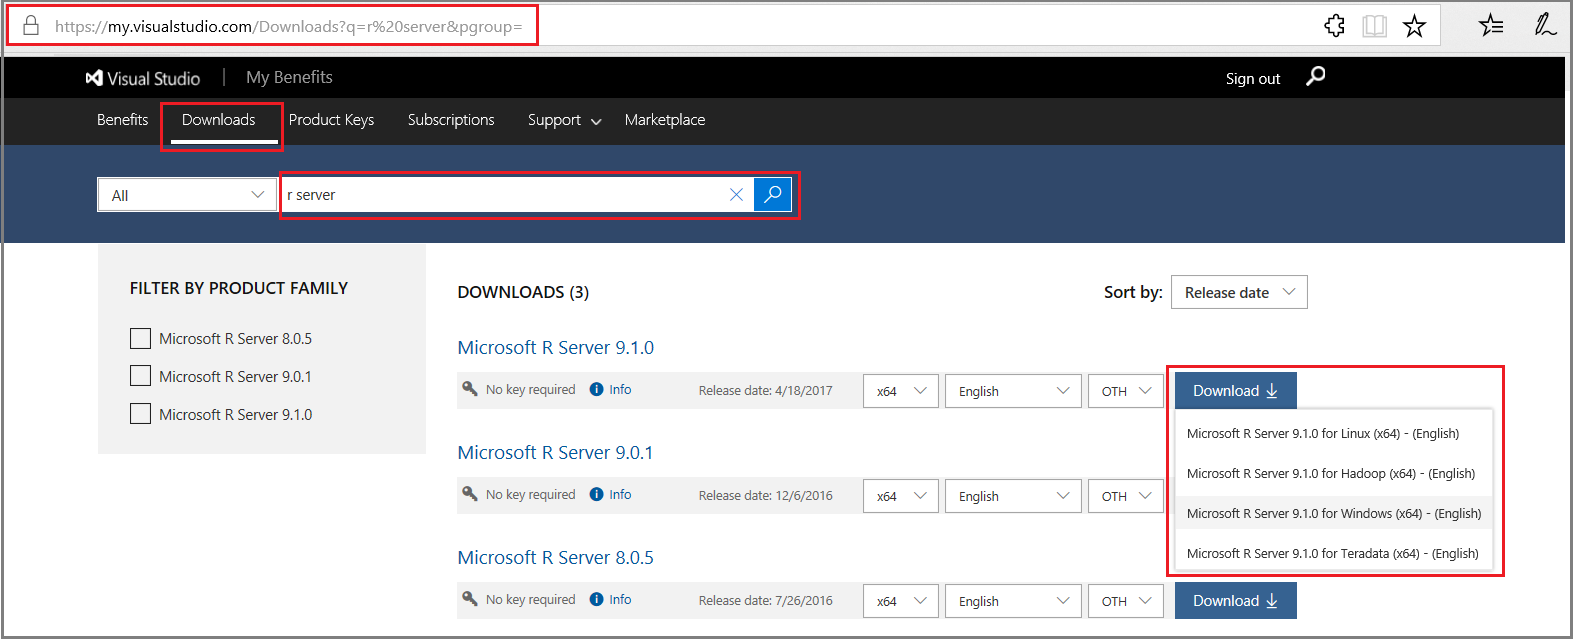
For downloads from Visual Studio Dev Essentials:
- Click Join or access now to sign up for download benefits.
- Check the URL to verify it changed to https://my.visualstudio.com/.
- Click Downloads to search for R Server.
- Click Downloads for a specific version to select the platform.
Unpack the distribution
Download the software to a writable directory, such as /tmp, unpack the distribution and then run the installation script.
The distribution includes one installer for Microsoft R Server. For a gzipped TAR file, you should unpack the file as follows (be sure you have downloaded the file to a writable directory, such as /tmp):
- Log in as root or a user with super user privileges (
sudo su). - Switch to the /tmp directory (assuming it's the download location)
- Unpack the file:
[tmp] $ tar zxvf en_microsoft_r_server_910_for_hadoop_x64_10323951.tar.gz
Run the install script
The Hadoop component is deployed by running the install script with the -p parameter, which you can install at the root, or as super user via sudo.
- Log in as root or as a user with super user privileges (
sudo -s). - Verify system repositories are up-to-date:
[username] $
sudo yum clean all - Change to the directory to which you mounted or unpacked the installer (for example, /tmp/MRS91Hadoop if you unpacked the tar.gz file):
[username] $
cd /tmp[username tmp] $cd MRS91Hadoop - Run the script with the -p parameter, specifying the Hadoop component. Optionally, add the pre-trained machine learning models:
[username tmp MRS91Hadoop] $
sudo bash install.sh -p -m - When prompted to accept the license terms for Microsoft R Open, click Enter to read the EULA, click q when you are finished reading, and then click y to accept the terms.
- Repeat the key sequence to accept license terms for Microsoft R Server.
- Installer output shows the packages and location of the log file.
Unattended install options
You can perform a silent install to bypass prompts during setup. In MRS91Hadoop, run the install script with the following parameters:
[tmp MRS91Hadoop] $ install.sh -a -s
Additional flags are available, as follows:
| flag | Option | Description |
|---|---|---|
| -a | --accept-eula | Accept all end user license agreements. |
| -d | --download-mro | Download microsoft r open for distribution to an offline system. |
| -m | --models | Install Microsoft pre-trained machine learning models. |
| -p | --hadoop | Install the Hadoop component. |
| -r | --no-dotnet-core | Opt out of installing .NET Core (required for mrsdeploy and MicrosoftML) |
| -s | --silent | Perform a silent, unattended install. |
| -u | --unattended | Perform an unattended install. |
| -h | --help | Print this help text. |
Verify installation
- List installed packages and get package names:
[MRS91Hadoop] $ yum list \*microsoft\* - Check the version of Microsoft R Open using
rpm -qi:[MRS91Hadoop] $ rpm -qi microsoft-r-open-mro-3.3.3.x86_64 - Check the version of Microsoft R Server:
[MRS91Hadoop] $ rpm -qi microsoft-r-server-packages-9.1.x86_64 - Partial output is as follows (note version 9.1.0):
		Name        : microsoft-r-server-packages-9.1.0    Relocations: /usr/lib64
		Version     : 9.1.0                             Vendor: Microsoft
		. . .
For further verification, check folders and permissions. Following that, you should run the Revo64 program, a sample Hadoop job, and if applicable, a sample Spark job.
Check folders and permissions
Each user should ensure that the appropriate user directories exist, and if necessary, create them with the following shell commands:
	$ `hadoop fs -mkdir /user/RevoShare/$USER`
	$ `hadoop fs -chmod uog+rwx /user/RevoShare/$USER`
	$ `mkdir -p /var/RevoShare/$USER`
	$ `chmod uog+rwx /var/RevoShare/$USER`
The HDFS directory can also be created in a user’s R session (provided the top-level /user/RevoShare has the appropriate permissions) using the following RevoScaleR commands (substitute your actual user name for "username"). Run the RevoScaleR commands in a Revo64 session.
	$ `cd MRS91Hadoop`
	$ `Revo64`
	> rxHadoopMakeDir("/user/RevoShare/username")
	> rxHadoopCommand("fs -chmod uog+rwx /user/RevoShare/username")
Output for each command should be [1] TRUE.
As part of this process, make sure the base directories /user and /user/RevoShare have uog+rwx permissions as well.
Run programs and sample jobs using sample data
The next procedure loads sample data and runs the Revo64 program to further verify the installation.
Send sample data to HDFS.
 $ hadoop fs -mkdir -p /share/SampleData
 $ hadoop fs -copyFromLocal /usr/lib64/microsoft-r/9.0/lib64/R/library/RevoScaleR/SampleData/AirlineDemoSmall.csv /share/SampleData/
 $ hadoop fs -ls /share/SampleData
Start Revo64.
 $ cd MRS90Linux
 $ Revo64
Run a simple local computation. This step uses the proprietary Microsoft libraries.
> rxSummary(~., iris)Partial output is as follows (showing the first 4 lines).
 Rows Read: 150, Total Rows Processed: 150, Total Chunk Time: 0.003 seconds
 Computation time: 0.010 seconds.
 Call:
 rxSummary(formula = ~., data = iris)
Run a sample local job.
This step uses the sample dataset and downloads data from HDFS, confirming that your local session can access HDFS.
Paste the following code into your Revo64 session.
 input <- file.path("/share/SampleData/AirlineDemoSmall.csv")

 colInfo <- list(DayOfWeek = list(type = "factor",
 levels = c("Monday", "Tuesday", "Wednesday", "Thursday","Friday", "Saturday", "Sunday")))

 airDS <- RxTextData(file = input, missingValueString = "M", colInfo  = colInfo, fileSystem = RxHdfsFileSystem())

 adsSummary <- rxSummary(~ArrDelay+CRSDepTime+DayOfWeek, data = airDS)
 adsSummary
Partial output is as follows (showing the last 8 lines).
 DayOfWeek Counts
 Monday    97975
 Tuesday   77725
 Wednesday 78875
 Thursday  81304
 Friday    82987
 Saturday  86159
 Sunday    94975
Run a sample Hadoop job.
This step uses the sample dataset to run a Hadoop job.
Paste the following code into your Revo64 session. This snippet differs from the previous snippet by the first line.
 rxSetComputeContext(RxHadoopMR(consoleOutput=TRUE))
 input <- file.path("/share/SampleData/AirlineDemoSmall.csv")

 colInfo <- list(DayOfWeek = list(type = "factor",
 levels = c("Monday", "Tuesday", "Wednesday", "Thursday","Friday", "Saturday", "Sunday")))

 airDS <- RxTextData(file = input, missingValueString = "M", colInfo  = colInfo, fileSystem = RxHdfsFileSystem())

 adsSummary <- rxSummary(~ArrDelay+CRSDepTime+DayOfWeek, data = airDS)
 adsSummary
Partial output is as follows (showing the first 10 lines).
 ======  sandbox.hortonworks.com (Master HPA Process) has started run at Fri Jun 10 18:26:15 2016  ======
 Jun 10, 2016 6:26:21 PM RevoScaleR main
 INFO: DEBUG: allArgs = '[-Dmapred.reduce.tasks=1, -libjars=/usr/hdp/2.4.0.0-169/hadoop/conf,/usr/hdp/2.4.0.0-169/hadoop-mapreduce/hadoop-streaming.jar, /user/RevoShare/A73041E9D41041A18CB93FCCA16E013E/.input, /user/RevoShare/lukaszb/A73041E9D41041A18CB93FCCA16E013E/IRO.iro, /share/SampleData/AirlineDemoSmall.csv, default, 0, /usr/bin/Revo64-8]'
 End of allArgs.
 16/06/10 18:26:26 INFO impl.TimelineClientImpl: Timeline service address:
Run a sample Spark job.
 rxSetComputeContext(RxSpark(consoleOutput=TRUE, executorMem="1g", driverMem="1g", executorOverheadMem="1g", numExecutors=2))
     input <- file.path("/share/SampleData/AirlineDemoSmall.csv")

     colInfo <- list(DayOfWeek = list(type = "factor",
     levels = c("Monday", "Tuesday", "Wednesday", "Thursday","Friday", "Saturday", "Sunday")))

     airDS <- RxTextData(file = input, missingValueString = "M", colInfo  = colInfo, fileSystem = RxHdfsFileSystem())

     adsSummary <- rxSummary(~ArrDelay+CRSDepTime+DayOfWeek, data = airDS)
     adsSummary
To quit the program, type
q()at the command line with no arguments.
Automate a distributed installation
If you have multiple nodes, you can automate the installation across nodes using any distributed shell. Examples include the following
- dsh ("Dancer’s shell")
- pdsh (Parallel Distributed Shell)
- PyDSH (the Python Distributed Shell)
- fabric
Each distributed shell has its own methods for specifying hosts, authentication, and so on, but ultimately all that is required is the ability to run a shell command on multiple hosts. If possible, use a distributed shell that provides a top-level copy command, such as the pdcp command that is part of pdsh.
Download Microsoft R Open rpm and the Microsoft R Server installer tar.gz file and copy all to /tmp.
Mount the IMG file. The following commands create a mount point and mount the file to that mount point:
 mkdir /mnt/mrsimage
 mount –o loop <filename> /mnt/mrsimage
For RHEL/CENTOS systems; tar zxvf MRS80RHEL.tar.gz
For SLES systems; tar zxvf MRS80SLES.tar.gz
Copy the installer gzipped tar file to a writable directory, such as /tmp:
From the mounted img file: cp /mnt/mrsimage/Microsoft-R-Server-
*.tar.gz /tmpFrom the unpacked tar file: cp /tmp/MRS80/Microsoft-R-Server-
</em>.tar.gz /tmpThe following commands use pdsh and pdcp to distribute and install Microsoft R Server (ensure that each command is run on a single logical line, even if it spans two lines below due to space constraints; lines beginning with “>” indicate commands typed into an interactive pdsh session):
The following commands use pdsh and pdcp to distribute and install Microsoft R Server:
	alias pdshw=’pdsh -w\`cat myhosts.txt\` -R ssh’
	alias pdcpw=’pdcp -w\`cat myhosts.txt\` -R ssh’
	pdshw
	> mkdir -p /var/tmp/revo-install
	> exit
	pdcpw /tmp/MRS91Hadoop.tar.gz /var/tmp/revo-install
	pdshw
	> cd /var/tmp/revo-install; yum clean all
	> tar zxf MRS91Hadoop.tar.gz
	> cd MRS91Hadoop; sudo bash ./install.sh -a -p
	> exit
Each command must run on a single logical line, even if it spans two lines below due to space constraints. Lines beginning with > indicate commands typed into an interactive pdsh session.
Enable Remote Connections and Analytic Deployment
The server can be used as-is if you install and use an R IDE on the same box, but to benefit from the deployment and consumption of web services with Microsoft R Server, then you must configure R Server after installation to act as a deployment server and host analytic web services. Possible configurations are a one-box setup or an enterprise setup. Doing so also enables remote execution, allowing you to connect to R Server from an R Client workstation and execute code on the server.
Next Steps
Review the following walkthroughs to move forward with using R Server and the RevoScaleR package in Spark and MapReduce processing models.