Custom function sample using web worker
Summary
This sample shows how to use web workers in custom functions to prevent blocking the UI of your Office Add-in.
Features
- Custom Functions
- Web workers
Applies to
- Excel on Windows, Mac, and in a browser.
Prerequisites
To learn more about custom functions, see Create custom functions in Excel. See Custom Functions requirement sets for a list of the platforms that support custom functions.
Solution
| Solution | Author(s) |
|---|---|
| Office Add-in Custom Function Using Web Workers | Microsoft |
Version history
| Version | Date | Comments |
|---|---|---|
| 1.0 | 12-16-2020 | Initial release |
| 1.1 | 07-28-2022 | Update JavaScript variable declarations |
Disclaimer
THIS CODE IS PROVIDED AS IS WITHOUT WARRANTY OF ANY KIND, EITHER EXPRESS OR IMPLIED, INCLUDING ANY IMPLIED WARRANTIES OF FITNESS FOR A PARTICULAR PURPOSE, MERCHANTABILITY, OR NON-INFRINGEMENT.
Scenario
When using the shared runtime, custom functions block the UI of your Office Add-in when they run. If you have long-running custom functions, this can cause poor performance in your Office Add-in UI when the spreadsheet is calculated. For example, if someone has a table with thousands of rows, each of which is calling a long-running custom function, this can lead to the UI being blocked during a recalculation.
You can unblock the UI by using web workers to do the calculations for your custom functions.
Run the sample
You can run this sample in Excel in a browser. The add-in web files are served from this repo on GitHub.
- Download the manifest.xml file from this sample to a folder on your computer.
- Open Office on the web.
- Choose Excel, and then open a new document.
- Open the Insert tab on the ribbon and choose Office Add-ins.
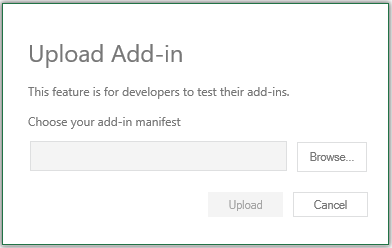
- On the Office Add-ins dialog, select the MY ADD-INS tab, choose Manage My Add-ins, and then Upload My Add-in.
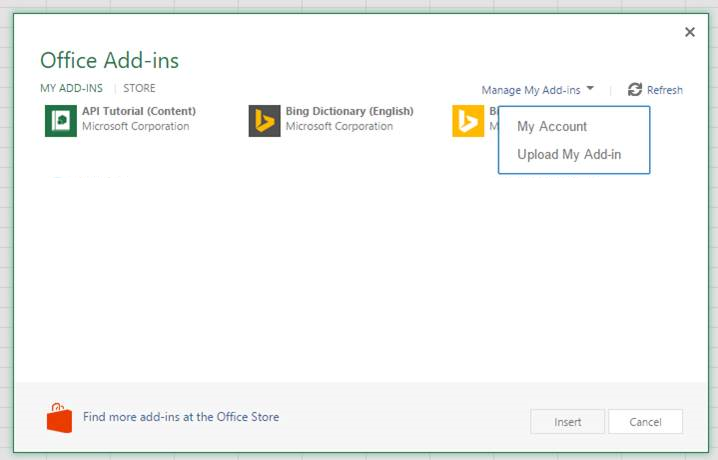
- Browse to the add-in manifest file, and then select Upload.
- Verify that the add-in loaded successfully. You will see a Web worker task pane button on the Home tab on the ribbon.
Now you can use the following custom functions:
=WebWorkerSample.TEST(2)
=WebWorkerSample.TEST_PROMISE(2)
=WebWorkerSample.TEST_ERROR(2)
=WebWorkerSample.TEST_ERROR_PROMISE(2)
=WebWorkerSample.TEST_UI_THREAD(2)
If you open the task pane you will see an animated bouncing ball. You can see the effect of blocking the UI thread by entering =WebWorkerSample.TEST_UI_THREAD(50000) into a cell. The bouncing ball will stop for a few seconds while the result is calculated.
Run the sample from Localhost
You host the web server for the sample on your computer by following these steps:
You need http-server to run the local web server. If you haven't installed this yet you can do this with the following command:
npm install --global http-serverUse a tool such as openssl to generate a self-signed certificate that you can use for the web server. Move the cert.pem and key.pem files to the webworker-customfunction folder for this sample.
From a command prompt, go to the web-worker folder and run the following command:
http-server -S --cors .To reroute to localhost run office-addin-https-reverse-proxy. If you haven't installed this you can do this with the following command:
npm install --global office-addin-https-reverse-proxyTo reroute run the following in another command prompt:
office-addin-https-reverse-proxy --url http://localhost:8080Sideload the add-in using the the previous steps (1 - 7). Upload the
manifest-localhost.xmlfile for step 6.
Details
Dispatch to web worker
When a custom function needs to use a web worker, we turn the calculation into a job and dispatch it to a web worker. The dispatchCalculationJob function takes the function name and parameters from a custom function, and creates a job object that is posted to a web worker. For more details see the dispatchCalculationJob function in functions.js.
    // Post a job to the web worker to do the calculation
    function dispatchCalculationJob(functionName, parameters) {
        const jobId = g_nextJobId++;
        return new Promise(function(resolve, reject) {
            // store the promise information.
            g_jobIdToPromiseInfoMap[jobId] = {resolve: resolve, reject: reject};
            const worker = getOrCreateWebWorker(jobId);
            worker.postMessage({
                jobId: jobId,
                name: functionName,
                parameters: parameters
            });
        });
    }
Web worker runs the job and returns the result
The web worker runs the job specified in the job object to do the actual calculation. The web worker code is in a separate file in functions-worker.js.
The functions-worker.js will:
- Receive a message containing the job to run.
- Invoke a function to perform the calculation.
- Call postMessage to post the result back to the main thread.
self.addEventListener('message',
    function(event) {
        let data = event.data;
        if (typeof(data) == "string") {
            data = JSON.parse(data);
        }

        const jobId = data.jobId;
        try {
            const result = invokeFunction(data.name, data.parameters);
            // check whether the result is a promise
            if (typeof(result) == "function" || typeof(result) == "object" && typeof(result.then) == "function") {
                result.then(function(realResult) {
                    postMessage(
                        {
                            jobId: jobId,
                            result: realResult
                        }
                    );
                })
                .catch(function(ex) {
                    postMessage(
                        {
                            jobId: jobId,
                            error: true
                        }
                    )
                });
            }
            else {
                postMessage({
                    jobId: jobId,
                    result: result
                });
            }
        }
        catch(ex) {
            postMessage({
                jobId: jobId,
                error: true
            });
        }
    }
);
Most of the previous code handles the error case and Promise case.
Process results from the web worker
In functions.js, when a new web worker is created, it is provided a callback function to process the result. The callback function parses the data to determine the outcome of the job. It resolves or rejects the promise as determined by the job result data.
        // create a new web worker
        const webWorker = new Worker("functions-worker.js");
        webWorker.addEventListener('message', function(event) {
            let data = event.data;
            if (typeof(data) == "string") {
                data = JSON.parse(data);
            }

            if (typeof(data.jobId) == "number") {
                const jobId = data.jobId;
                // get the promise info associated with the job id
                const promiseInfo = g_jobIdToPromiseInfoMap[jobId];
                if (promiseInfo) {
                    if (data.error) {
                        // The web worker returned an error
                        promiseInfo.reject(new Error());
                    }
                    else {
                        // The web worker returned a result
                        promiseInfo.resolve(data.result);
                    }
                    delete g_jobIdToPromiseInfoMap[jobId];
                }
            }
        });
Copyright
Copyright (c) 2020 Microsoft Corporation. All rights reserved.
This project has adopted the Microsoft Open Source Code of Conduct. For more information, see the Code of Conduct FAQ or contact opencode@microsoft.com with any additional questions or comments.