SharePoint で Web プロキシを使用してリモート サービスに問い合わせる
SharePoint アドインを作成する場合、通常は、さまざまなソースのデータを組み込む必要があります。 セキュリティ上の理由から、クロスドメイン通信を防止するブロック メカニズムが存在します。 Web プロキシを使用すると、アドインに含まれる Web ページから、リモート ドメインおよび SharePoint ドメインのデータにアクセスできます。
開発者は、JavaScript や .NET クライアント オブジェクト モデルなど、クライアント API で公開される Web プロキシを使用できます。 Web プロキシを使用している場合は、SharePoint に最初の要求を発行します。 そうすると、指定されたエンドポイントに対して SharePoint がデータを要求し、応答をページに転送します。
サーバー レベルで通信を行う場合に Web プロキシを使用します。 詳細については、「SharePoint アドインのセキュリティで保護されたデータ アクセスとクライアント オブジェクト モデル」を参照してください。
SharePoint Web プロキシは、コードと外部データ ソース間の中間である

この記事の例を使用するための前提条件
この例の手順を実行するには、以下が必要です。
SharePoint 開発環境 (オンプレミス シナリオではアドインの分離が必要)
Web プロキシを使用する前に理解しておくべき主要概念
次の表に、SharePoint アドインにおけるクロスドメイン シナリオに関連する概念の理解に役立ついくつかの有用な記事を示します。
| 記事のタイトル | 説明 |
|---|---|
| SharePoint アドイン | エンド ユーザー向けの小型で使いやすいソリューションであるアドインを作成できる、SharePoint の新しいアドイン モデルについて説明します。 |
| SharePoint アドインのセキュリティで保護されたデータ アクセスとクライアント オブジェクト モデル | SharePoint アドインにおけるデータ アクセス オプションについて説明しています。この記事では、アドインでデータを操作する際に選択する必要がある代替手段の概要についてのガイダンスを示しています。 |
| SharePoint のホスト Web、アドイン Web、および SharePoint コンポーネント | ホスト Web とアドイン Web の違いについて説明します。 SharePoint アドイン に含めることができる SharePoint コンポーネント、ホスト Web に展開されるコンポーネント、アドイン Web に展開されるコンポーネント、および分離ドメインでのアドイン Web の展開方法を示しています。 |
| クライアント側のクロスドメイン セキュリティ | クロスドメインにおける脅威とユース ケース、クロスオリジン要求でのセキュリティ原則を示し、開発者がブラウザーで動作する Web アプリケーションからのクロスドメイン アクセスを拡張する場合のリスクについて詳しく説明しています。 |
コード例: Web プロキシを使用したリモート サービス上のデータへのアクセス
リモート サービスからデータを読み取るには、以下を実行する必要があります。
SharePoint アドイン プロジェクトを作成します。
Web プロキシを使用してリモート サービスにクエリを実行するように Default.aspx ページを変更します。
リモート ドメインとの通信を許可するようにアドイン マニフェストを変更します。
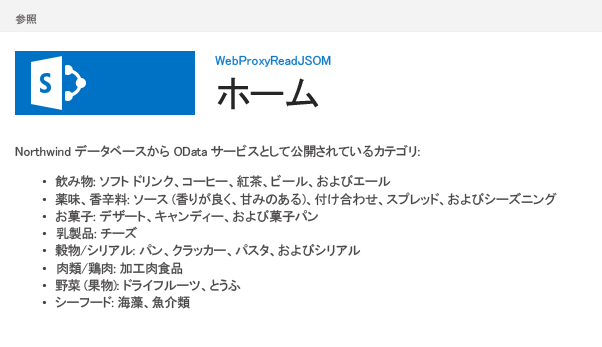
次の図は、SharePoint Web ページにリモート サービスからのデータが表示されたブラウザー ウィンドウを示しています。
リモート サービスからのデータが表示された SharePoint Web ページ
SharePoint アドイン プロジェクトを作成するには
管理者として 2015 を開きます (これを行うには、[スタート] メニューで 2015 アイコンを右クリックし、[管理者として実行] を選択します)。
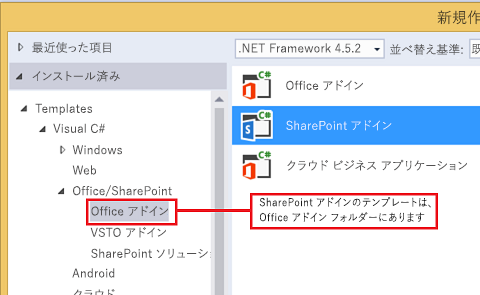
SharePoint アドイン テンプレートを使用して、新しいプロジェクトを作成します。
次の図は、[テンプレート]>[Visual C#]>[Office/SharePoint]>[Office アドイン] の下の 2015 の SharePoint アドイン テンプレートの場所を示しています。
SharePoint アドイン Visual Studio テンプレート
デバッグに使用する SharePoint Web サイトの URL を入力します。
アドインのホスティング オプションとして、[ SharePoint ホスト型] を選択します。
JavaScript オブジェクト モデルを使用して、Web プロキシを使用するように Default.aspx ページを変更するには
[ ページ] フォルダー内の [ Default.aspx] ページをダブルクリックします。
以下のマークアップをコピーし、ページの PlaceHolderMain コンテンツ タグに貼り付けます。 このマークアップは、次のタスクを実行します。
リモート データのプレースホルダーを提供する。
SharePoint JavaScript ファイルを参照する。
WebRequestInfo オブジェクトを使用した要求を準備する。
JavaScript Object Notation (JSON) 形式の応答を指定する Accept 要求ヘッダーを準備する。
リモート エンドポイントに対する呼び出しを発行する。
成功した実行を処理し、SharePoint Web ページにリモート データを表示する。
エラーを処理し、SharePoint Web ページにエラー メッセージを表示する。
Categories from the Northwind database exposed as an OData service: <!-- Placeholder for the remote content --> <span id="categories"></span> <!-- Add references to the JavaScript libraries. --> <script type="text/javascript" src="../_layouts/15/SP.Runtime.js"> </script> <script type="text/javascript" src="../_layouts/15/SP.js"> </script> <script type="text/javascript"> (function () { "use strict"; // Prepare the request to an OData source // using the GET verb. var context = SP.ClientContext.get_current(); var request = new SP.WebRequestInfo(); request.set_url( "http://services.odata.org/Northwind/Northwind.svc/Categories" ); request.set_method("GET"); // We need the response formatted as JSON. request.set_headers({ "Accept": "application/json;odata=verbose" }); var response = SP.WebProxy.invoke(context, request); // Let users know that there is some // processing going on. document.getElementById("categories").innerHTML = "<P>Loading categories...</P>"; // Set the event handlers and invoke the request. context.executeQueryAsync(successHandler, errorHandler); // Event handler for the success event. // Get the totalResults node in the response. // Render the value in the placeholder. function successHandler() { // Check for status code == 200 // Some other status codes, such as 302 redirect // do not trigger the errorHandler. if (response.get_statusCode() == 200) { var categories; var output; // Load the OData source from the response. categories = JSON.parse(response.get_body()); // Extract the CategoryName and Description // from each result in the response. // Build the output as a list. output = "<UL>"; for (var i = 0; i < categories.d.results.length; i++) { var categoryName; var description; categoryName = categories.d.results[i].CategoryName; description = categories.d.results[i].Description; output += "<LI>" + categoryName + ":&nbsp;" + description + "</LI>"; } output += "</UL>"; document.getElementById("categories").innerHTML = output; } else { var errordesc; errordesc = "<P>Status code: " + response.get_statusCode() + "<br/>"; errordesc += response.get_body(); document.getElementById("categories").innerHTML = errordesc; } } // Event handler for the error event. // Render the response body in the placeholder. // The body includes the error message. function errorHandler() { document.getElementById("categories").innerHTML = response.get_body(); } })(); </script>
(オプション) REST エンドポイントを使用して、Web プロキシを使用するように Default.aspx ページを変更するには
[ ページ] フォルダー内の [ Default.aspx] ページをダブルクリックします。
以下のマークアップをコピーし、ページの PlaceHolderMain コンテンツ タグに貼り付けます。 このマークアップは、次のタスクを実行します。
リモート データのプレースホルダーを提供する。
jQuery ライブラリを参照する。
SP.WebRequest.Invoke エンドポイントに対する要求を準備する。
SP.WebrequestInfo オブジェクトを使用した要求の本文を準備する。 オブジェクトには、JavaScript Object Notation (JSON) 形式の応答を指定する Accept ヘッダーが含まれます。
リモート エンドポイントに対する呼び出しを発行する。
成功した実行を処理し、SharePoint Web ページにリモート データを表示する。
エラーを処理し、SharePoint Web ページにエラー メッセージを表示する。
Categories from the Northwind database exposed as an OData service: <!-- Placeholder for the remote content --> <span id="categories"></span> <script type="text/javascript" src="//ajax.aspnetcdn.com/ajax/jQuery/jquery-1.8.0.min.js"> </script> <script type="text/javascript"> (function () { "use strict"; // The Northwind categories endpoint. var url = "http://services.odata.org/Northwind/Northwind.svc/Categories"; // Let users know that there is some // processing going on. document.getElementById("categories").innerHTML = "<P>Loading categories...</P>"; // Issue a POST request to the SP.WebProxy.Invoke endpoint. // The body has the information to issue a GET request // to the Northwind service. $.ajax({ url: "../_api/SP.WebProxy.invoke", type: "POST", data: JSON.stringify( { "requestInfo": { "__metadata": { "type": "SP.WebRequestInfo" }, "Url": url, "Method": "GET", "Headers": { "results": [{ "__metadata": { "type": "SP.KeyValue" }, "Key": "Accept", "Value": "application/json;odata=verbose", "ValueType": "Edm.String" }] } } }), headers: { "Accept": "application/json;odata=verbose", "Content-Type": "application/json;odata=verbose", "X-RequestDigest": $("#__REQUESTDIGEST").val() }, success: successHandler, error: errorHandler }); // Event handler for the success event. // Get the totalResults node in the response. // Render the value in the placeholder. function successHandler(data) { // Check for status code == 200 // Some other status codes, such as 302 redirect, // do not trigger the errorHandler. if (data.d.Invoke.StatusCode == 200) { var categories; var output; // Load the OData source from the response. categories = JSON.parse(data.d.Invoke.Body); // Extract the CategoryName and Description // from each result in the response. // Build the output as a list output = "<UL>"; for (var i = 0; i < categories.d.results.length; i++) { var categoryName; var description; categoryName = categories.d.results[i].CategoryName; description = categories.d.results[i].Description; output += "<LI>" + categoryName + ":&nbsp;" + description + "</LI>"; } output += "</UL>"; document.getElementById("categories").innerHTML = output; } else { var errordesc; errordesc = "<P>Status code: " + data.d.Invoke.StatusCode + "<br/>"; errordesc += response.get_body(); document.getElementById("categories").innerHTML = errordesc; } } // Event handler for the error event. // Render the response body in the placeholder. // The 2nd argument includes the error message. function errorHandler() { document.getElementById("categories").innerHTML = arguments[2]; } })(); </script>
アドイン マニフェスト ファイルを編集するには
ソリューション エクスプローラーで、AppManifest.xml ファイルのショートカット メニューを開き、[コードの表示] を選択します。
以下の RemoteEndPoints 定義を App ノードの子としてコピーします。
<RemoteEndpoints>
    <RemoteEndpoint Url=" http://services.odata.org" />
</RemoteEndpoints>
RemoteEndpoint 要素は、リモート ドメインを指定するために使用されます。 Web プロキシは、リモート ドメインに対して発行された要求がアドイン マニフェストで宣言されていることを検証します。 RemoteEndpoints 要素には、最大 20 個のエントリを作成できます。 権限部分のみが考慮されます。 http://domain:port と http://domain:port/website は同じエンドポイントと見なされます。 同じドメイン内の多数の異なるエンドポイントへの呼び出しを、1 つの RemoteEndpoint 定義だけで発行できます。
ソリューションをビルドして実行するには
F5 キーを選択します。
注:
F5 キーを押すと、Visual Studio がソリューションをビルドして、アドインを展開し、アドインのアクセス許可ページを開きます。
[信頼する] ボタンを選択します。
[サイト コンテンツ] ページのアドイン アイコンを選択します。
次の図は、SharePoint Web ページで表示されたリモート データを示しています。
SharePoint Web ページで表示されたリモート データ
ソリューションのトラブルシューティング
| 問題 | 解決方法 |
|---|---|
| Visual Studio で F5 キーを押してもブラウザーが開かない。 | SharePoint アドイン プロジェクトをスタートアップ プロジェクトとして設定してください。 |
| "SP は定義されていません" というハンドルされない例外が発生します。 | ブラウザー ウィンドウで SP.RequestExecutor.js ファイルにアクセスできることを確認してください。 ローカル サーバーを開発環境として使用している場合は、IIS のループバック チェックを無効にする必要があります。 Windows PowerShell コマンド プロンプトから次のコマンドを実行します: New-ItemProperty HKLM:\System\CurrentControlSet\Control\Lsa -Name "DisableLoopbackCheck" -value "1" -PropertyType dword注意: 運用環境では、IIS ループバック チェックを無効にすることはお勧めしません。 |
| リモート エンドポイントからの応答のサイズが、構成された制限を超えています。 | Web プロキシ要求の応答のサイズは 200 KB 未満でなければなりません。 |
| スキーマとポートの組み合わせがサポートされない。 | 呼び出しのスキーマとポートの組み合わせは、以下の条件に当てはまっている必要があります。 スキーマ - ポート http - 80 https - 443 http または https - 7000-10000 重要な: 送信ポートは、ファイアウォールの可用性をホストするためのものです。 特に、SharePoint Online で使用できるのは http-80 と https-443 のみです。 |