チュートリアル: 複数のプラットフォームを対象とするシンプルなフォト ビューアーを構築する
スターターのシンプルなフォト ビューアー WinUI 3 アプリを作成したら、アプリを書き換えることなく、より多くのユーザーにリーチするにはどうすればよいか、思いを巡らせるかもしれません。 このチュートリアルでは、Uno Platform を使用して、既存の C# WinUI 3 アプリケーションのリーチ範囲を拡大し、ネイティブ モバイル、Web、デスクトップ全体にわたってビジネス ロジックと UI レイヤーを再利用できるようにします。 シンプルなフォト ビューアー アプリに最小限の変更を加えるだけで、これらのプラットフォームに移植されたアプリのピクセル パーフェクトなコピーを実行できます。
前提条件
- Visual Studio 2022 17.4 以降
- Windows App SDK 用のツール
- ASP.NET と Web 開発のワークロード (WebAssembly 開発用)

- インストール済みの .NET マルチプラットフォーム アプリ UI 開発 (iOS、Android、Mac Catalyst 開発用)。
- インストール済みの .NET デスクトップ開発 (Gtk、Wpf、Linux Framebuffer 開発用)
環境の最終処理
コマンド ライン プロンプト、インストールされている場合は Windows ターミナル、それ以外の場合は [スタート] メニューから [コマンド プロンプト] または [Windows Powershell] を開きます。
uno-checkツールを次のようにインストールまたは更新します。次のコマンドを使用します:
dotnet tool install -g uno.check前のバージョンが既にインストールされている場合にツールを更新するには次のようにします。
dotnet tool update -g uno.check
次のコマンドでツールを実行します。
uno-checkツールから示されている指示に従います。 システムを変更する必要があるため、管理者特権のアクセス許可を求められる場合があります。
Uno Platform ソリューション テンプレートをインストールする
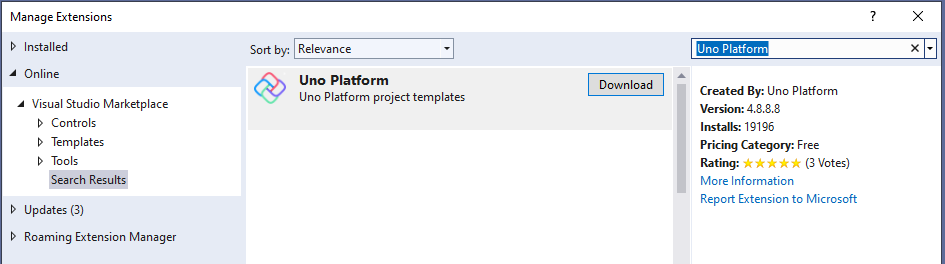
Visual Studio を起動し、Continue without code をクリックします。 メニュー バーの Extensions ->Manage Extensions をクリックします。

拡張機能マネージャーで [オンライン] ノードを展開し、Uno を検索して Uno Platform 拡張機能をインストールするか、Visual Studio Marketplace からダウンロードしてインストールしてから、Visual Studio を再起動します。
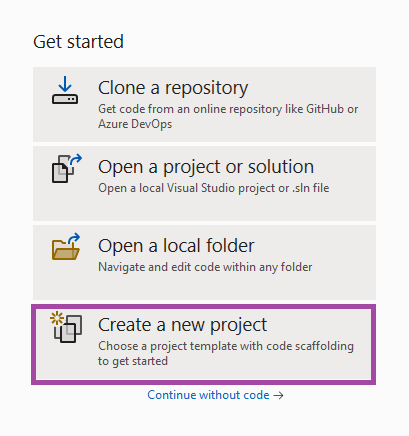
アプリケーションの作成
マルチプラットフォーム アプリケーションを作成する準備ができたので、次に実行する手順は、新しい Uno Platform アプリケーションを作成することです。 前のチュートリアルの SimplePhotos WinUI 3 プロジェクトのコードをマルチプラットフォーム プロジェクトにコピーします。 これが可能なのは、Uno Platform で既存のコードベースを再利用できるからです。 各プラットフォームによって提供される OS API に依存する機能については、簡単に時間をかけて機能するようにできます。 この方法は、他のプラットフォームに移植する既存のアプリケーションがある場合に特に便利です。
使い慣れた XAML フレーバーと既にあるコードベースを使用して、より多くのプラットフォームをターゲットにできるため、十分短期間で、このアプローチの利点を得ることができます。
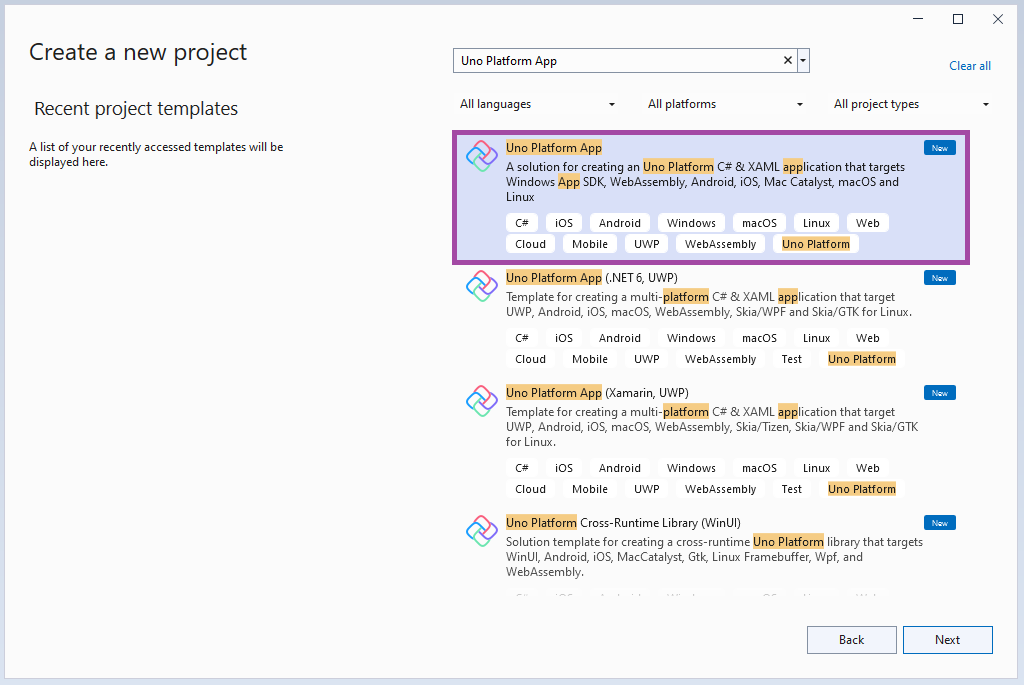
Visual Studio を開き、File>New>Project で新しいプロジェクトを作成します。
Uno を検索し、Uno Platform App プロジェクト テンプレートを選択します。
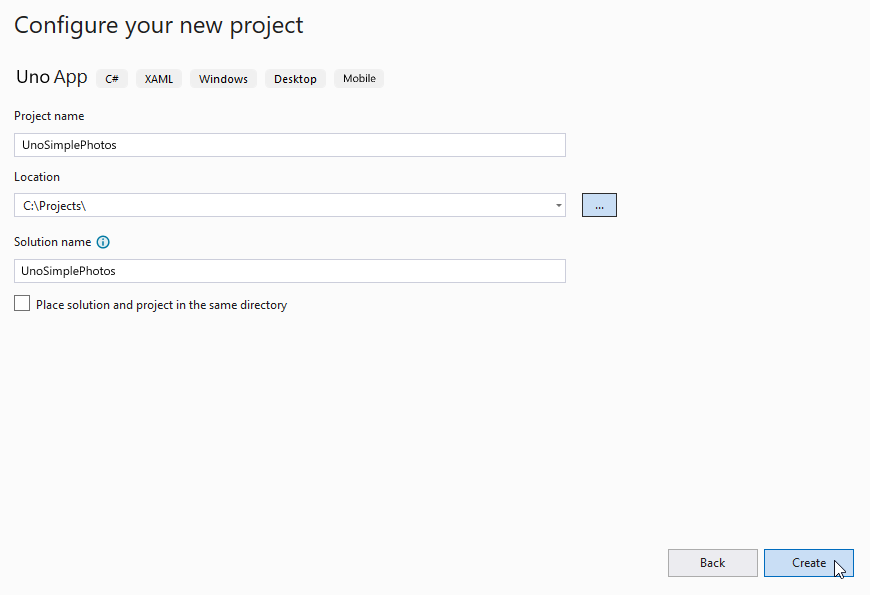
Visual Studio の開始ページから Uno Platform App の種類を使用して、新しい C# ソリューションを作成します。 前のチュートリアルのコードとの競合を回避するために、このソリューションに異なる名前 "UnoSimplePhotos" を付けます。 プロジェクト名、ソリューション名、ディレクトリを指定します。 この例では、UnoSimplePhotos マルチプラットフォーム プロジェクトは UnoSimplePhotos ソリューションに属していて、C:\Projects に配置されます。
次に、基本テンプレートを選択して、シンプルなフォト ギャラリー アプリケーションをマルチプラットフォームに移植します。
Uno Platform App テンプレートには、すぐに作業を開始できる 2 つのプリセット オプション (空白りソリューション、または Uno.Material および Uno.Toolkit ライブラリへの参照を含む既定の構成) が用意されています。 既定の構成には、依存関係の挿入、構成、ナビゲーション、ログ記録に使用される Uno.Extensions も含まれています。 さらに、MVVM の代わりに MVUX を使用するため、現実世界のアプリケーションを迅速に構築するための優れた出発点になります。

簡略化するために、[空白] プリセットを選択します。 次に [作成] ボタンをクリックします。 プロジェクトが作成され、それらの依存関係が復元されるまで待ちます。
次のように、プロジェクトの再読み込みを求めるバナーがエディターの上部に表示されることがあります。その場合は、[Reload projects](プロジェクトの再読み込み) をクリックしてください。

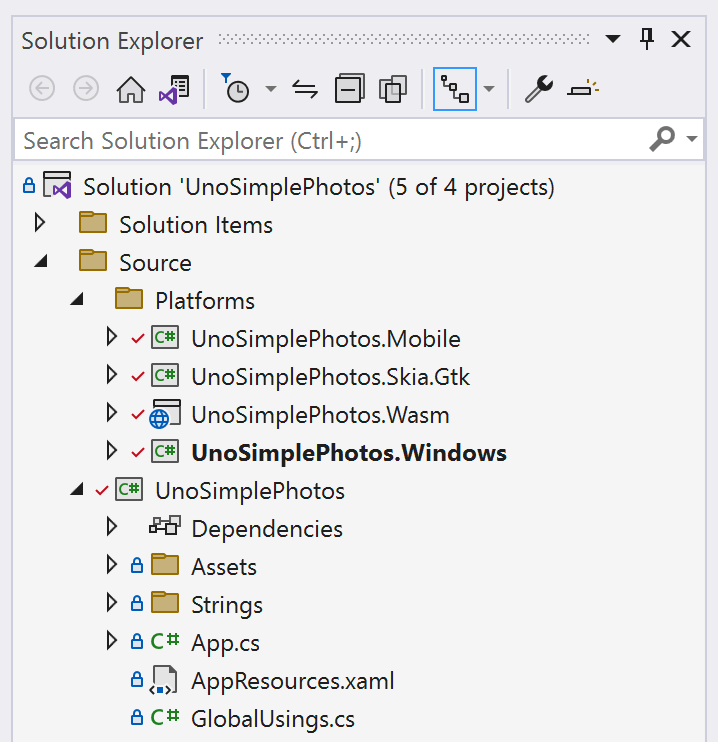
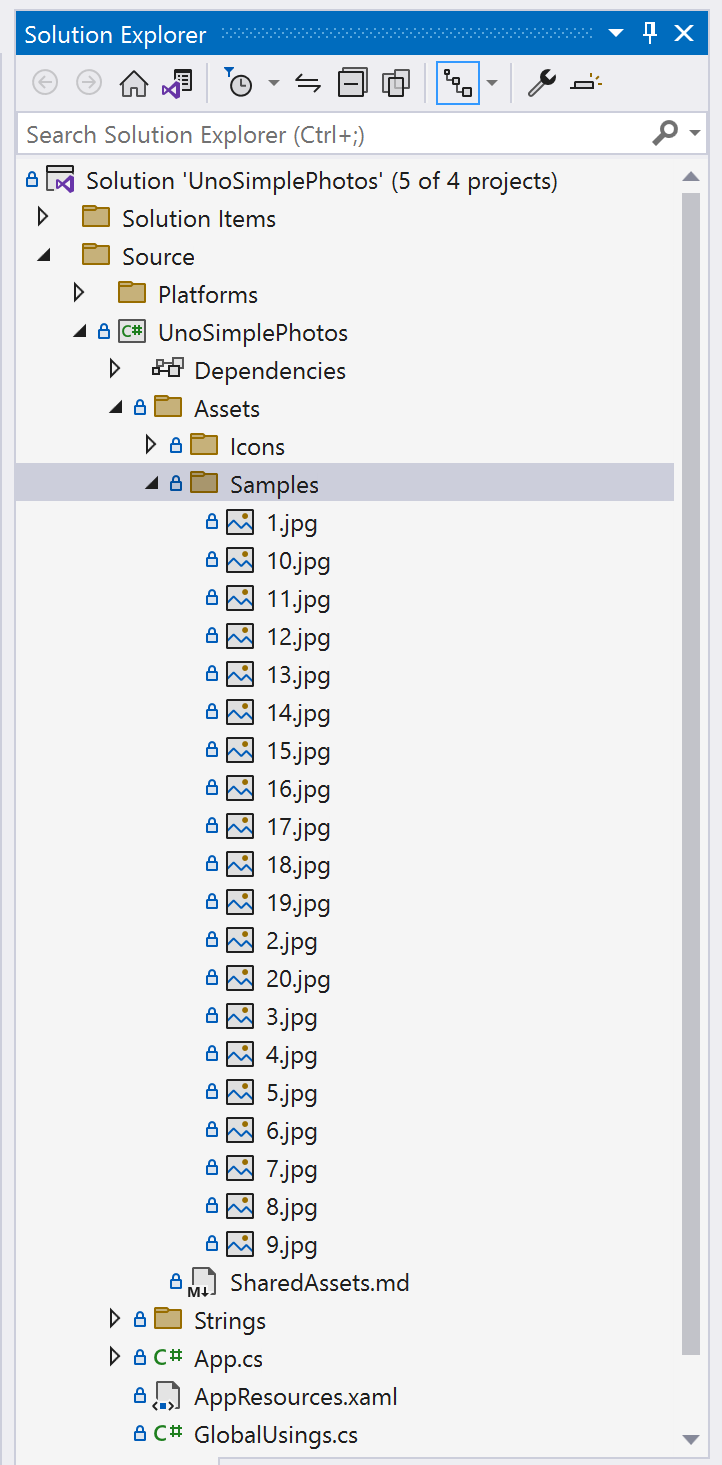
次の既定のファイル構造がソリューション エクスプローラーに表示されます。
プロジェクトにイメージ アセットを追加する
アプリには、表示するイメージがいくつか必要です。 前のチュートリアルと同じイメージを使用できます。
UnoSimplePhotos プロジェクトで、Assets という名前の新しいフォルダーを作成し、JPG イメージ ファイルを Samples サブフォルダーにコピーします。 これで、Assets フォルダーの構造が次のようになります。
Assets フォルダーを作成し、それに画像を追加する方法の詳細については、アセットとイメージの表示に関する Uno Platform のドキュメントを参照してください。
アプリを準備する
マルチプラットフォーム WinUI アプリケーションの機能的な開始点を生成したので、そこにデスクトップ プロジェクトからコードをコピーできます。
ビューをコピーする
Uno Platform では、既に使い慣れた XAML フレーバーを使用できるため、前のチュートリアルで作成したコードと同じコードを再度コピーできます。
前のチュートリアルの SimplePhotos プロジェクトに戻ります。 ソリューション エクスプローラーで、MainWindow.xaml という名前のファイルを見つけて開きます。 ビューの内容が Page ではなく Window 要素内で定義されていることを確認します。 これは、デスクトップ プロジェクトが、Window 要素を使用してビューの内容を定義できる WinUI 3 アプリケーションであるためです。
<Window x:Class="SimplePhotos.MainWindow"
        xmlns="http://schemas.microsoft.com/winfx/2006/xaml/presentation"
        xmlns:x="http://schemas.microsoft.com/winfx/2006/xaml"
        xmlns:local="using:SimplePhotos"
        xmlns:d="http://schemas.microsoft.com/expression/blend/2008"
        xmlns:mc="http://schemas.openxmlformats.org/markup-compatibility/2006"
        mc:Ignorable="d">

    <Grid>
        <Grid.Resources>
            <DataTemplate x:Key="ImageGridView_ItemTemplate"
                          x:DataType="local:ImageFileInfo">
                <Grid Height="300"
                      Width="300"
                      Margin="8">
                    <Grid.RowDefinitions>
                        <RowDefinition />
                        <RowDefinition Height="Auto" />
                    </Grid.RowDefinitions>

                    <Image x:Name="ItemImage"
                           Source="Assets/StoreLogo.png"
                           Stretch="Uniform" />

                    <StackPanel Orientation="Vertical"
                                Grid.Row="1">
                        <TextBlock Text="{x:Bind ImageTitle}"
                                   HorizontalAlignment="Center"
                                   Style="{StaticResource SubtitleTextBlockStyle}" />
                        <StackPanel Orientation="Horizontal"
                                    HorizontalAlignment="Center">
                            <TextBlock Text="{x:Bind ImageFileType}"
                                       HorizontalAlignment="Center"
                                       Style="{StaticResource CaptionTextBlockStyle}" />
                            <TextBlock Text="{x:Bind ImageDimensions}"
                                       HorizontalAlignment="Center"
                                       Style="{StaticResource CaptionTextBlockStyle}"
                                       Margin="8,0,0,0" />
                        </StackPanel>

                        <RatingControl Value="{x:Bind ImageRating}"
                                       IsReadOnly="True"/>
                    </StackPanel>
                </Grid>
            </DataTemplate>

            <Style x:Key="ImageGridView_ItemContainerStyle"
                   TargetType="GridViewItem">
                <Setter Property="Background"
                        Value="Gray"/>
                <Setter Property="Margin"
                        Value="8"/>
            </Style>

            <ItemsPanelTemplate x:Key="ImageGridView_ItemsPanelTemplate">
                    <ItemsWrapGrid Orientation="Horizontal"
                                   HorizontalAlignment="Center"/>
                </ItemsPanelTemplate>
        </Grid.Resources>

        <GridView x:Name="ImageGridView"
                  ItemsSource="{x:Bind Images}"
                  ItemTemplate="{StaticResource ImageGridView_ItemTemplate}"
                  ItemContainerStyle="{StaticResource ImageGridView_ItemContainerStyle}"
                  ItemsPanel="{StaticResource ImageGridView_ItemsPanelTemplate}"
                  ContainerContentChanging="ImageGridView_ContainerContentChanging" />
    </Grid>
</Window>
Uno Platform の Window 要素で見つかったコントロール (GridView、Image、RatingControl など) のマルチプラットフォーム実装により、わずかな労力で、サポートされているすべてのプラットフォームでビュー自体が動作するようになります。 この Window の内容をコピーし、UnoSimplePhotos Uno Platform プロジェクトの MainPage.xaml ファイルの Page 要素に貼り付けます。 MainPage ビュー XAML は次のようになります。
<Page x:Class="UnoSimplePhotos.MainPage"
      xmlns="http://schemas.microsoft.com/winfx/2006/xaml/presentation"
      xmlns:x="http://schemas.microsoft.com/winfx/2006/xaml"
      xmlns:local="using:UnoSimplePhotos"
      xmlns:d="http://schemas.microsoft.com/expression/blend/2008"
      xmlns:mc="http://schemas.openxmlformats.org/markup-compatibility/2006"
      mc:Ignorable="d">

    <Grid>
        <Grid.Resources>
            <DataTemplate x:Key="ImageGridView_ItemTemplate"
                          x:DataType="local:ImageFileInfo">
                <Grid Height="300"
                      Width="300"
                      Margin="8">
                    <Grid.RowDefinitions>
                        <RowDefinition />
                        <RowDefinition Height="Auto" />
                    </Grid.RowDefinitions>

                    <Image x:Name="ItemImage"
                           Source="Assets/StoreLogo.png"
                           Stretch="Uniform" />

                    <StackPanel Orientation="Vertical"
                                Grid.Row="1">
                        <TextBlock Text="{x:Bind ImageTitle}"
                                   HorizontalAlignment="Center"
                                   Style="{StaticResource SubtitleTextBlockStyle}" />
                        <StackPanel Orientation="Horizontal"
                                    HorizontalAlignment="Center">
                            <TextBlock Text="{x:Bind ImageFileType}"
                                       HorizontalAlignment="Center"
                                       Style="{StaticResource CaptionTextBlockStyle}" />
                            <TextBlock Text="{x:Bind ImageDimensions}"
                                       HorizontalAlignment="Center"
                                       Style="{StaticResource CaptionTextBlockStyle}"
                                       Margin="8,0,0,0" />
                        </StackPanel>

                        <RatingControl Value="{x:Bind ImageRating}"
                                       IsReadOnly="True"/>
                    </StackPanel>
                </Grid>
            </DataTemplate>

            <Style x:Key="ImageGridView_ItemContainerStyle"
                   TargetType="GridViewItem">
                <Setter Property="Background"
                        Value="Gray"/>
                <Setter Property="Margin"
                        Value="8"/>
            </Style>

            <ItemsPanelTemplate x:Key="ImageGridView_ItemsPanelTemplate">
                <ItemsWrapGrid Orientation="Horizontal"
                               HorizontalAlignment="Center"/>
            </ItemsPanelTemplate>
        </Grid.Resources>

        <GridView x:Name="ImageGridView"
                  ItemsSource="{x:Bind Images}"
                  ItemTemplate="{StaticResource ImageGridView_ItemTemplate}"
                  ItemContainerStyle="{StaticResource ImageGridView_ItemContainerStyle}"
                  ItemsPanel="{StaticResource ImageGridView_ItemsPanelTemplate}"
                  ContainerContentChanging="ImageGridView_ContainerContentChanging">
        </GridView>
    </Grid>
</Page>
デスクトップ ソリューションには、ビューに対応する分離コードを含む MainWindow.xaml.cs ファイルも含まれていることを思い出してください。 Uno Platform プロジェクトでは、コピー先の MainPage ビューの分離コードが MainPage.xaml.cs ファイルに含まれています。
この分離コードをマルチプラットフォームに移植するには、まず次を MainPage.xaml.cs ファイルに移植する必要があります。
Imagesプロパティ: イメージ ファイルの監視可能なコレクションがあるGridViewを提供しますコンストラクターの内容:
GetItemsAsync()を呼び出して、イメージ ファイルを表す項目をImagesコレクションに設定しますImageGridViewコントロールのItemsSourceプロパティの手動変更を削除しますImageGridView_ContainerContentChangingメソッド:GridView項目がビューにスクロールされたときに、それらを段階的に読み込むための戦略の一部として使用されますShowImageメソッド: イメージ ファイルをGridViewに読み込みますGetItemsAsyncメソッド:Samplesフォルダーからイメージ アセット ファイルを取得しますLoadImageInfoAsyncメソッド: 作成されたStorageFileからImageFileInfoオブジェクトを構築します
すべての移植が完了すると、MainPage.xaml.cs は次のようになります。
using Microsoft.UI.Xaml.Controls;
using System.Collections.ObjectModel;
using Windows.Storage;
using Windows.Storage.Search;

namespace UnoSimplePhotos;

public sealed partial class MainPage : Page
{
    public ObservableCollection<ImageFileInfo> Images { get; }
    = new ObservableCollection<ImageFileInfo>();

    public MainPage()
    {
        this.InitializeComponent();
        GetItemsAsync();
    }

    private void ImageGridView_ContainerContentChanging(ListViewBase sender,
        ContainerContentChangingEventArgs args)
    {
        if (args.InRecycleQueue)
        {
            var templateRoot = args.ItemContainer.ContentTemplateRoot as Grid;
            var image = templateRoot.FindName("ItemImage") as Image;
            image.Source = null;
        }

        if (args.Phase == 0)
        {
            args.RegisterUpdateCallback(ShowImage);
            args.Handled = true;
        }
    }

    private async void ShowImage(ListViewBase sender, ContainerContentChangingEventArgs args)
    {
        if (args.Phase == 1)
        {
            // It's phase 1, so show this item's image.
            var templateRoot = args.ItemContainer.ContentTemplateRoot as Grid;
            var image = templateRoot.FindName("ItemImage") as Image;
            var item = args.Item as ImageFileInfo;
            image.Source = await item.GetImageThumbnailAsync();
        }
    }

    private async Task GetItemsAsync()
    {
        StorageFolder appInstalledFolder = Package.Current.InstalledLocation;
        StorageFolder picturesFolder = await appInstalledFolder.GetFolderAsync("Assets\\Samples");

        var result = picturesFolder.CreateFileQueryWithOptions(new QueryOptions());

        IReadOnlyList<StorageFile> imageFiles = await result.GetFilesAsync();
        foreach (StorageFile file in imageFiles)
        {
            Images.Add(await LoadImageInfoAsync(file));
        }
    }

    public async static Task<ImageFileInfo> LoadImageInfoAsync(StorageFile file)
    {
        var properties = await file.Properties.GetImagePropertiesAsync();
        ImageFileInfo info = new(properties,
                                    file, file.DisplayName, file.DisplayType);

        return info;
    }
}
Note
Uno アプリ プロジェクト内のファイルは、名前空間として UnoSimplePhotos を使用する必要があります。
これまで、作業しているメイン ビューのファイルには、デスクトップ ソリューションのすべての機能が含まれています。 ImageFileInfo.cs モデル ファイルをコピーしたら、マルチプラットフォームの互換性のためにデスクトップ指向のコード ブロックを変更する方法について説明します。
デスクトップ プロジェクトから ImageFileInfo をコピーし、ImageFileInfo.cs ファイルに貼り付けます。 次の変更を行います。
名前空間の名前を
SimplePhotosの代わりにUnoSimplePhotosに変更します。// Found towards the top of the file namespace UnoSimplePhotos;OnPropertyChangedメソッドのパラメーターの種類を null 許容に変更します。// string -> string? protected void OnPropertyChanged([CallerMemberName] string? propertyName = null) ...PropertyChangedEventHandlerを null 許容にします。// PropertyChangedEventHandler -> PropertyChangedEventHandler? public event PropertyChangedEventHandler? PropertyChanged;
まとめると、ファイルは次のようになります。
using Microsoft.UI.Xaml.Media.Imaging;
using System.ComponentModel;
using System.Runtime.CompilerServices;
using Windows.Storage;
using Windows.Storage.FileProperties;
using Windows.Storage.Streams;
using ThumbnailMode = Windows.Storage.FileProperties.ThumbnailMode;

namespace UnoSimplePhotos;

public class ImageFileInfo : INotifyPropertyChanged
{
    public ImageFileInfo(ImageProperties properties,
        StorageFile imageFile,
        string name,
        string type)
    {
        ImageProperties = properties;
        ImageName = name;
        ImageFileType = type;
        ImageFile = imageFile;
        var rating = (int)properties.Rating;
        var random = new Random();
        ImageRating = rating == 0 ? random.Next(1, 5) : rating;
    }

    public StorageFile ImageFile { get; }

    public ImageProperties ImageProperties { get; }

    public async Task<BitmapImage> GetImageSourceAsync()
    {
        using IRandomAccessStream fileStream = await ImageFile.OpenReadAsync();

        // Create a bitmap to be the image source.
        BitmapImage bitmapImage = new();
        bitmapImage.SetSource(fileStream);

        return bitmapImage;
    }

    public async Task<BitmapImage> GetImageThumbnailAsync()
    {
        StorageItemThumbnail thumbnail =
            await ImageFile.GetThumbnailAsync(ThumbnailMode.PicturesView);
        // Create a bitmap to be the image source.
        var bitmapImage = new BitmapImage();
        bitmapImage.SetSource(thumbnail);
        thumbnail.Dispose();

        return bitmapImage;
    }

    public string ImageName { get; }

    public string ImageFileType { get; }

    public string ImageDimensions => $"{ImageProperties.Width} x {ImageProperties.Height}";

    public string ImageTitle
    {
        get => string.IsNullOrEmpty(ImageProperties.Title) ? ImageName : ImageProperties.Title;
        set
        {
            if (ImageProperties.Title != value)
            {
                ImageProperties.Title = value;
                _ = ImageProperties.SavePropertiesAsync();
                OnPropertyChanged();
            }
        }
    }

    public int ImageRating
    {
        get => (int)ImageProperties.Rating;
        set
        {
            if (ImageProperties.Rating != value)
            {
                ImageProperties.Rating = (uint)value;
                _ = ImageProperties.SavePropertiesAsync();
                OnPropertyChanged();
            }
        }
    }

    public event PropertyChangedEventHandler? PropertyChanged;

    protected void OnPropertyChanged([CallerMemberName] string? propertyName = null) =>
        PropertyChanged?.Invoke(this, new PropertyChangedEventArgs(propertyName));
}
このクラスは、GridView 内のイメージ ファイルを表すモデルとして機能します。 この時点でアプリを実行することは技術的には可能ですが、イメージのレンダリングや、そのプロパティの表示が正しく行われない可能性があります。 以降のセクションでは、マルチプラットフォーム コンテキストで互換性を持つように、コピーしたこれらのファイルに一連の変更を加えます。
プリプロセッサ ディレクティブを使用する
前のチュートリアルのデスクトップ プロジェクトでは、MainPage.xaml.cs ファイルに、インストールされているパッケージの場所を表す StorageFolder から項目を列挙する GetItemsAsync メソッドが含まれています。 この場所は WebAssembly などの特定のプラットフォームでは使用できないため、すべてのプラットフォームと互換性を持つように、このメソッドを変更する必要があります。 それに応じて、互換性を確保するために ImageFileInfo クラスにいくつかの変更を加えます。
まず、GetItemsAsync メソッドに必要な変更を加えます。 MainPage.xaml.cs ファイル内の GetItemsAsync メソッドを次のコードに置き換えます。
private async Task GetItemsAsync()
{
#if WINDOWS
    StorageFolder appInstalledFolder = Package.Current.InstalledLocation;
    StorageFolder picturesFolder = await appInstalledFolder.GetFolderAsync("UnoSimplePhotos\\Assets\\Samples");

    var result = picturesFolder.CreateFileQueryWithOptions(new QueryOptions());

    IReadOnlyList<StorageFile> imageFiles = await result.GetFilesAsync();
#else
    var imageFileNames = Enumerable.Range(1, 20).Select(i => new Uri($"ms-appx:///UnoSimplePhotos/Assets/Samples/{i}.jpg"));
    var imageFiles = new List<StorageFile>();

    foreach (var file in imageFileNames)
    {
        imageFiles.Add(await StorageFile.GetFileFromApplicationUriAsync(file));
    }
#endif
    foreach (StorageFile file in imageFiles)
    {
        Images.Add(await LoadImageInfoAsync(file));
    }
}
これで、このメソッドが、プリプロセッサ ディレクティブを使用して、プラットフォームに基づいて実行するコードを決定するようになりました。 Windows では、このメソッドは、インストールされているパッケージの場所を表す StorageFolder を取得し、それを使用して Samples フォルダーを返します。 他のプラットフォームでは、このメソッドは、イメージ ファイルを表す Uri を使用して Samples フォルダーから、最大 20 個を数えるイメージ ファイルを取得します。
次に、GetItemsAsync メソッドに加えた変更に合わせて LoadImageInfoAsync メソッドを調整します。 MainPage.xaml.cs ファイル内の LoadImageInfoAsync メソッドを次のコードに置き換えます。
public async static Task<ImageFileInfo> LoadImageInfoAsync(StorageFile file)
{
#if WINDOWS
    var properties = await file.Properties.GetImagePropertiesAsync();
    ImageFileInfo info = new(properties,
                                file, file.DisplayName, $"{file.FileType} file");
#else
    ImageFileInfo info = new(file, file.DisplayName, $"{file.FileType} file");
#endif
    return info;
}
GetItemsAsync メソッドと同様に、このメソッドが、プリプロセッサ ディレクティブを使用して、プラットフォームに基づいて実行するコードを決定するようになりました。 Windows では、このメソッドは、StorageFile から ImageProperties を取得し、それを使用して ImageFileInfo オブジェクトを作成します。 他のプラットフォームでは、このメソッドは、ImageProperties パラメーターを使用せずに ImageFileInfo オブジェクトを構築します。 後で、この変更に対応するために ImageFileInfo クラスに変更を加えます。
GridView などのコントロールを使用すると、更新された項目コンテナー コンテンツがビューポートにスクロールされたときのプログレッシブ読み込みが可能になります。 この処理を実行するには、ContainerContentChanging イベントを使用します。 前のチュートリアルのデスクトップ プロジェクトで、ImageGridView_ContainerContentChanging メソッドはこのイベントを使用してイメージ ファイルを GridView に読み込みます。 このイベントの特定の側面はすべてのプラットフォームでサポートされていないので、それらと互換性を持つようにするには、このメソッドを変更する必要があります。
たとえば、ContainerContentChangingEventArgs.Phase プロパティは現在、Windows 以外のプラットフォームではサポートされていません。 この変更に対応するには、ImageGridView_ContainerContentChanging メソッドに変更を加える必要があります。 MainPage.xaml.cs ファイル内の ImageGridView_ContainerContentChanging メソッドを次のコードに置き換えます。
private void ImageGridView_ContainerContentChanging(
ListViewBase sender,
ContainerContentChangingEventArgs args)
{

    if (args.InRecycleQueue)
    {
        var templateRoot = args.ItemContainer.ContentTemplateRoot as Grid;
        var image = templateRoot?.FindName("ItemImage") as Image;
        if (image is not null)
        {
            image.Source = null;
        }
    }

#if WINDOWS
        if (args.Phase == 0)
        {
            args.RegisterUpdateCallback(ShowImage);
            args.Handled = true;
        }
#else
    ShowImage(sender, args);
#endif
}
特殊化されたコールバックは現在、プラットフォームが Windows の場合にのみ ContainerContentChangingEventArgs.RegisterUpdateCallback() を使用して登録されます。 それ以外の場合は、ShowImage メソッドが直接呼び出されます。 ImageGridView_ContainerContentChanging メソッドに加えられた変更とともに動作するように、ShowImage メソッドにも変更を加える必要があります。 MainPage.xaml.cs ファイル内の ShowImage メソッドを次のコードに置き換えます。
private async void ShowImage(ListViewBase sender, ContainerContentChangingEventArgs args)
{
    if (
#if WINDOWS
            args.Phase == 1
#else
        true
#endif
        )
    {

        // It's phase 1, so show this item's image.
        var templateRoot = args.ItemContainer.ContentTemplateRoot as Grid;
        var image = templateRoot?.FindName("ItemImage") as Image;
        var item = args.Item as ImageFileInfo;
#if WINDOWS
        if (image is not null && item is not null)
        {
            image.Source = await item.GetImageThumbnailAsync();
        }
#else
        if (item is not null)
        {
            await item.GetImageSourceAsync();
        }
#endif
    }
}
ここでも、プリプロセッサ ディレクティブにより、ContainerContentChangingEventArgs.Phase プロパティは、サポートされているプラットフォームでのみ使用されるようになります。 前は使用しなかった GetImageSourceAsync() メソッドを利用して、Windows 以外のプラットフォーム上の GridView にイメージ ファイルを読み込みます。 この時点で、ImageFileInfo クラスを編集して、上記で加えた変更に対応します。
他のプラットフォーム用に別個のコード パスを作成する
イメージ ファイルの読み込みに使用される ImageSource という新しいプロパティを含むように ImageFileInfo.cs を更新します。
public BitmapImage? ImageSource { get; private set; }
Web などのプラットフォームでは、Windows ですぐに使用できる高度なイメージ ファイル プロパティはサポートされていないため、ImageProperties 型指定のパラメーターを必要としないコンストラクター オーバーロードを追加します。 次のコードを使用して、既存のオーバーロードの後に新しいものを追加します。
public ImageFileInfo(StorageFile imageFile,
    string name,
    string type)
{
    ImageName = name;
    ImageFileType = type;
    ImageFile = imageFile;
}
このコンストラクター オーバーロードは、Windows 以外のプラットフォームで ImageFileInfo オブジェクトを構築するために使用されます。 この操作を行ったので、ImageProperties プロパティを null 許容にするのは合理的です。 次のコードを使用して、ImageProperties プロパティを null 許容に更新します。
public ImageProperties? ImageProperties { get; }
BitmapImage オブジェクトを返すのみではなく、GetImageSourceAsync プロパティを使用するように ImageSource メソッドを更新します。 ImageFileInfo.cs ファイル内の GetImageSourceAsync メソッドを次のコードに置き換えます。
public async Task<BitmapImage> GetImageSourceAsync()
{
    using IRandomAccessStream fileStream = await ImageFile.OpenReadAsync();

    // Create a bitmap to be the image source.
    BitmapImage bitmapImage = new();
    bitmapImage.SetSource(fileStream);

    ImageSource = bitmapImage;
    PropertyChanged?.Invoke(this, new PropertyChangedEventArgs(nameof(ImageSource)));

    return bitmapImage;
}
null のときに ImageProperties の値が取得されないようにするために、次の変更を行います。
null 条件演算子を使用するように
ImageDimensionsプロパティを変更します。public string ImageDimensions => $"{ImageProperties?.Width} x {ImageProperties?.Height}";null 条件演算子を使用するように
ImageTitleプロパティを変更します。public string ImageTitle { get => string.IsNullOrEmpty(ImageProperties?.Title) ? ImageName : ImageProperties?.Title; set { if (ImageProperties is not null) { if (ImageProperties.Title != value) { ImageProperties.Title = value; _ = ImageProperties.SavePropertiesAsync(); OnPropertyChanged(); } } } }デモの目的でランダムな星評価を生成して、
ImagePropertiesに依存しないようにImageRatingを変更します。public int ImageRating { get => (int)((ImageProperties?.Rating == null || ImageProperties.Rating == 0) ? (uint)Random.Shared.Next(1, 5) : ImageProperties.Rating); set { if (ImageProperties is not null) { if (ImageProperties.Rating != value) { ImageProperties.Rating = (uint)value; _ = ImageProperties.SavePropertiesAsync(); OnPropertyChanged(); } } } }ランダムな整数を生成するコンストラクターを更新して、もうこれを行わないようにします。
public ImageFileInfo(ImageProperties properties, StorageFile imageFile, string name, string type) { ImageProperties = properties; ImageName = name; ImageFileType = type; ImageFile = imageFile; }
これらの編集により、ImageFileInfo クラスに次のコードが含まれるようになります。 これで、Windows 以外のプラットフォーム用に新しく分離されたコード パスが追加されました。
using Microsoft.UI.Xaml.Media.Imaging;
using System.ComponentModel;
using System.Runtime.CompilerServices;
using Windows.Storage;
using Windows.Storage.FileProperties;
using Windows.Storage.Streams;
using ThumbnailMode = Windows.Storage.FileProperties.ThumbnailMode;
namespace UnoSimplePhotos;
public class ImageFileInfo : INotifyPropertyChanged
{
public BitmapImage? ImageSource { get; private set; }
public ImageFileInfo(ImageProperties properties,
StorageFile imageFile,
string name,
string type)
{
ImageProperties = properties;
ImageName = name;
ImageFileType = type;
ImageFile = imageFile;
}
public ImageFileInfo(StorageFile imageFile,
string name,
string type)
{
ImageName = name;
ImageFileType = type;
ImageFile = imageFile;
}
public StorageFile ImageFile { get; }
public ImageProperties? ImageProperties { get; }
public async Task<BitmapImage> GetImageSourceAsync()
{
using IRandomAccessStream fileStream = await ImageFile.OpenReadAsync();
// Create a bitmap to be the image source.
BitmapImage bitmapImage = new();
bitmapImage.SetSource(fileStream);
ImageSource = bitmapImage;
PropertyChanged?.Invoke(this, new PropertyChangedEventArgs(nameof(ImageSource)));
return bitmapImage;
}
public async Task<BitmapImage> GetImageThumbnailAsync()
{
StorageItemThumbnail thumbnail =
await ImageFile.GetThumbnailAsync(ThumbnailMode.PicturesView);
// Create a bitmap to be the image source.
var bitmapImage = new BitmapImage();
bitmapImage.SetSource(thumbnail);
thumbnail.Dispose();
return bitmapImage;
}
public string ImageName { get; }
public string ImageFileType { get; }
public string ImageDimensions => $"{ImageProperties?.Width} x {ImageProperties?.Height}";
public string ImageTitle
{
get => string.IsNullOrEmpty(ImageProperties?.Title) ? ImageName : ImageProperties.Title;
set
{
if (ImageProperties is not null)
{
if (ImageProperties.Title != value)
{
ImageProperties.Title = value;
_ = ImageProperties.SavePropertiesAsync();
OnPropertyChanged();
}
}
}
}
public int ImageRating
{
    get => (int)((ImageProperties?.Rating == null || ImageProperties.Rating == 0) ? (uint)Random.Shared.Next(1, 5) : ImageProperties.Rating);
    set
    {
        if (ImageProperties is not null)
        {
            if (ImageProperties.Rating != value)
            {
                ImageProperties.Rating = (uint)value;
                _ = ImageProperties.SavePropertiesAsync();
                OnPropertyChanged();
            }
        }
    }
}
public event PropertyChangedEventHandler? PropertyChanged;
protected void OnPropertyChanged([CallerMemberName] string? propertyName = null) =>
PropertyChanged?.Invoke(this, new PropertyChangedEventArgs(propertyName));
}
この ImageFileInfo クラスは、GridView 内のイメージ ファイルを表すために使用されます。 最後に、モデルの変更に対応するために MainPage.xaml ファイルに変更を加えます。
プラットフォーム固有の XAML マークアップを使用する
ビュー マークアップには、評価を Windows でのみ行う必要がある項目がいくつかあります。 次のように、MainPage.xaml ファイルの Page 要素に新しい名前空間を追加します。
...
xmlns:win="http://schemas.microsoft.com/winfx/2006/xaml/presentation"
ここで、MainPage.xaml で、GridView 要素の ItemsPanel プロパティ セッターを次のコードに置き換えます。
win:ItemsPanel="{StaticResource ImageGridView_ItemsPanelTemplate}"
プロパティ名の前に win: を付加すると、プロパティが Windows でのみ設定されます。 ImageGridView_ItemTemplate リソース内でこれをもう一度行います。 Windows では、ImageDimensions プロパティを使用する要素のみを読み込むようにしようと考えています。 ImageDimensions プロパティを使用する TextBlock 要素を次のコードに置き換えます。
<win:TextBlock Text="{x:Bind ImageDimensions}"
               HorizontalAlignment="Center"
               Style="{StaticResource CaptionTextBlockStyle}"
               Margin="8,0,0,0" />
これで、MainPage.xaml ファイルは次のようになります。
<Page x:Class="UnoSimplePhotos.MainPage"
      xmlns="http://schemas.microsoft.com/winfx/2006/xaml/presentation"
      xmlns:x="http://schemas.microsoft.com/winfx/2006/xaml"
      xmlns:local="using:UnoSimplePhotos"
      xmlns:d="http://schemas.microsoft.com/expression/blend/2008"
      xmlns:mc="http://schemas.openxmlformats.org/markup-compatibility/2006"
      xmlns:win="http://schemas.microsoft.com/winfx/2006/xaml/presentation"
      mc:Ignorable="d"
      Background="{ThemeResource ApplicationPageBackgroundThemeBrush}">

    <Grid>
        <Grid.Resources>
            <DataTemplate x:Key="ImageGridView_ItemTemplate"
                          x:DataType="local:ImageFileInfo">
                <Grid Height="300"
                      Width="300"
                      Margin="8">
                    <Grid.RowDefinitions>
                        <RowDefinition />
                        <RowDefinition Height="Auto" />
                    </Grid.RowDefinitions>

                    <Image x:Name="ItemImage"
                           Source="{x:Bind ImageSource}"
                           Stretch="Uniform" />

                    <StackPanel Orientation="Vertical"
                                Grid.Row="1">
                        <TextBlock Text="{x:Bind ImageTitle}"
                                   HorizontalAlignment="Center"
                                   Style="{StaticResource SubtitleTextBlockStyle}" />
                        <StackPanel Orientation="Horizontal"
                                    HorizontalAlignment="Center">
                            <TextBlock Text="{x:Bind ImageFileType}"
                                       HorizontalAlignment="Center"
                                       Style="{StaticResource CaptionTextBlockStyle}" />
                            <win:TextBlock Text="{x:Bind ImageDimensions}"
                                           HorizontalAlignment="Center"
                                           Style="{StaticResource CaptionTextBlockStyle}"
                                           Margin="8,0,0,0" />
                        </StackPanel>

                        <RatingControl Value="{x:Bind ImageRating}"
                                       IsReadOnly="True" />
                    </StackPanel>
                </Grid>
            </DataTemplate>

            <Style x:Key="ImageGridView_ItemContainerStyle"
                   TargetType="GridViewItem">
                <Setter Property="Background"
                        Value="Gray" />
                <Setter Property="Margin"
                        Value="8"/>
            </Style>

            <ItemsPanelTemplate x:Key="ImageGridView_ItemsPanelTemplate">
                <ItemsWrapGrid Orientation="Horizontal"
                               HorizontalAlignment="Center"/>
            </ItemsPanelTemplate>
        </Grid.Resources>

        <GridView x:Name="ImageGridView"
                  ItemsSource="{x:Bind Images, Mode=OneWay}"
                  win:ItemsPanel="{StaticResource ImageGridView_ItemsPanelTemplate}"
                  ContainerContentChanging="ImageGridView_ContainerContentChanging"
                  ItemContainerStyle="{StaticResource ImageGridView_ItemContainerStyle}"
                  ItemTemplate="{StaticResource ImageGridView_ItemTemplate}" />
    </Grid>
</Page>
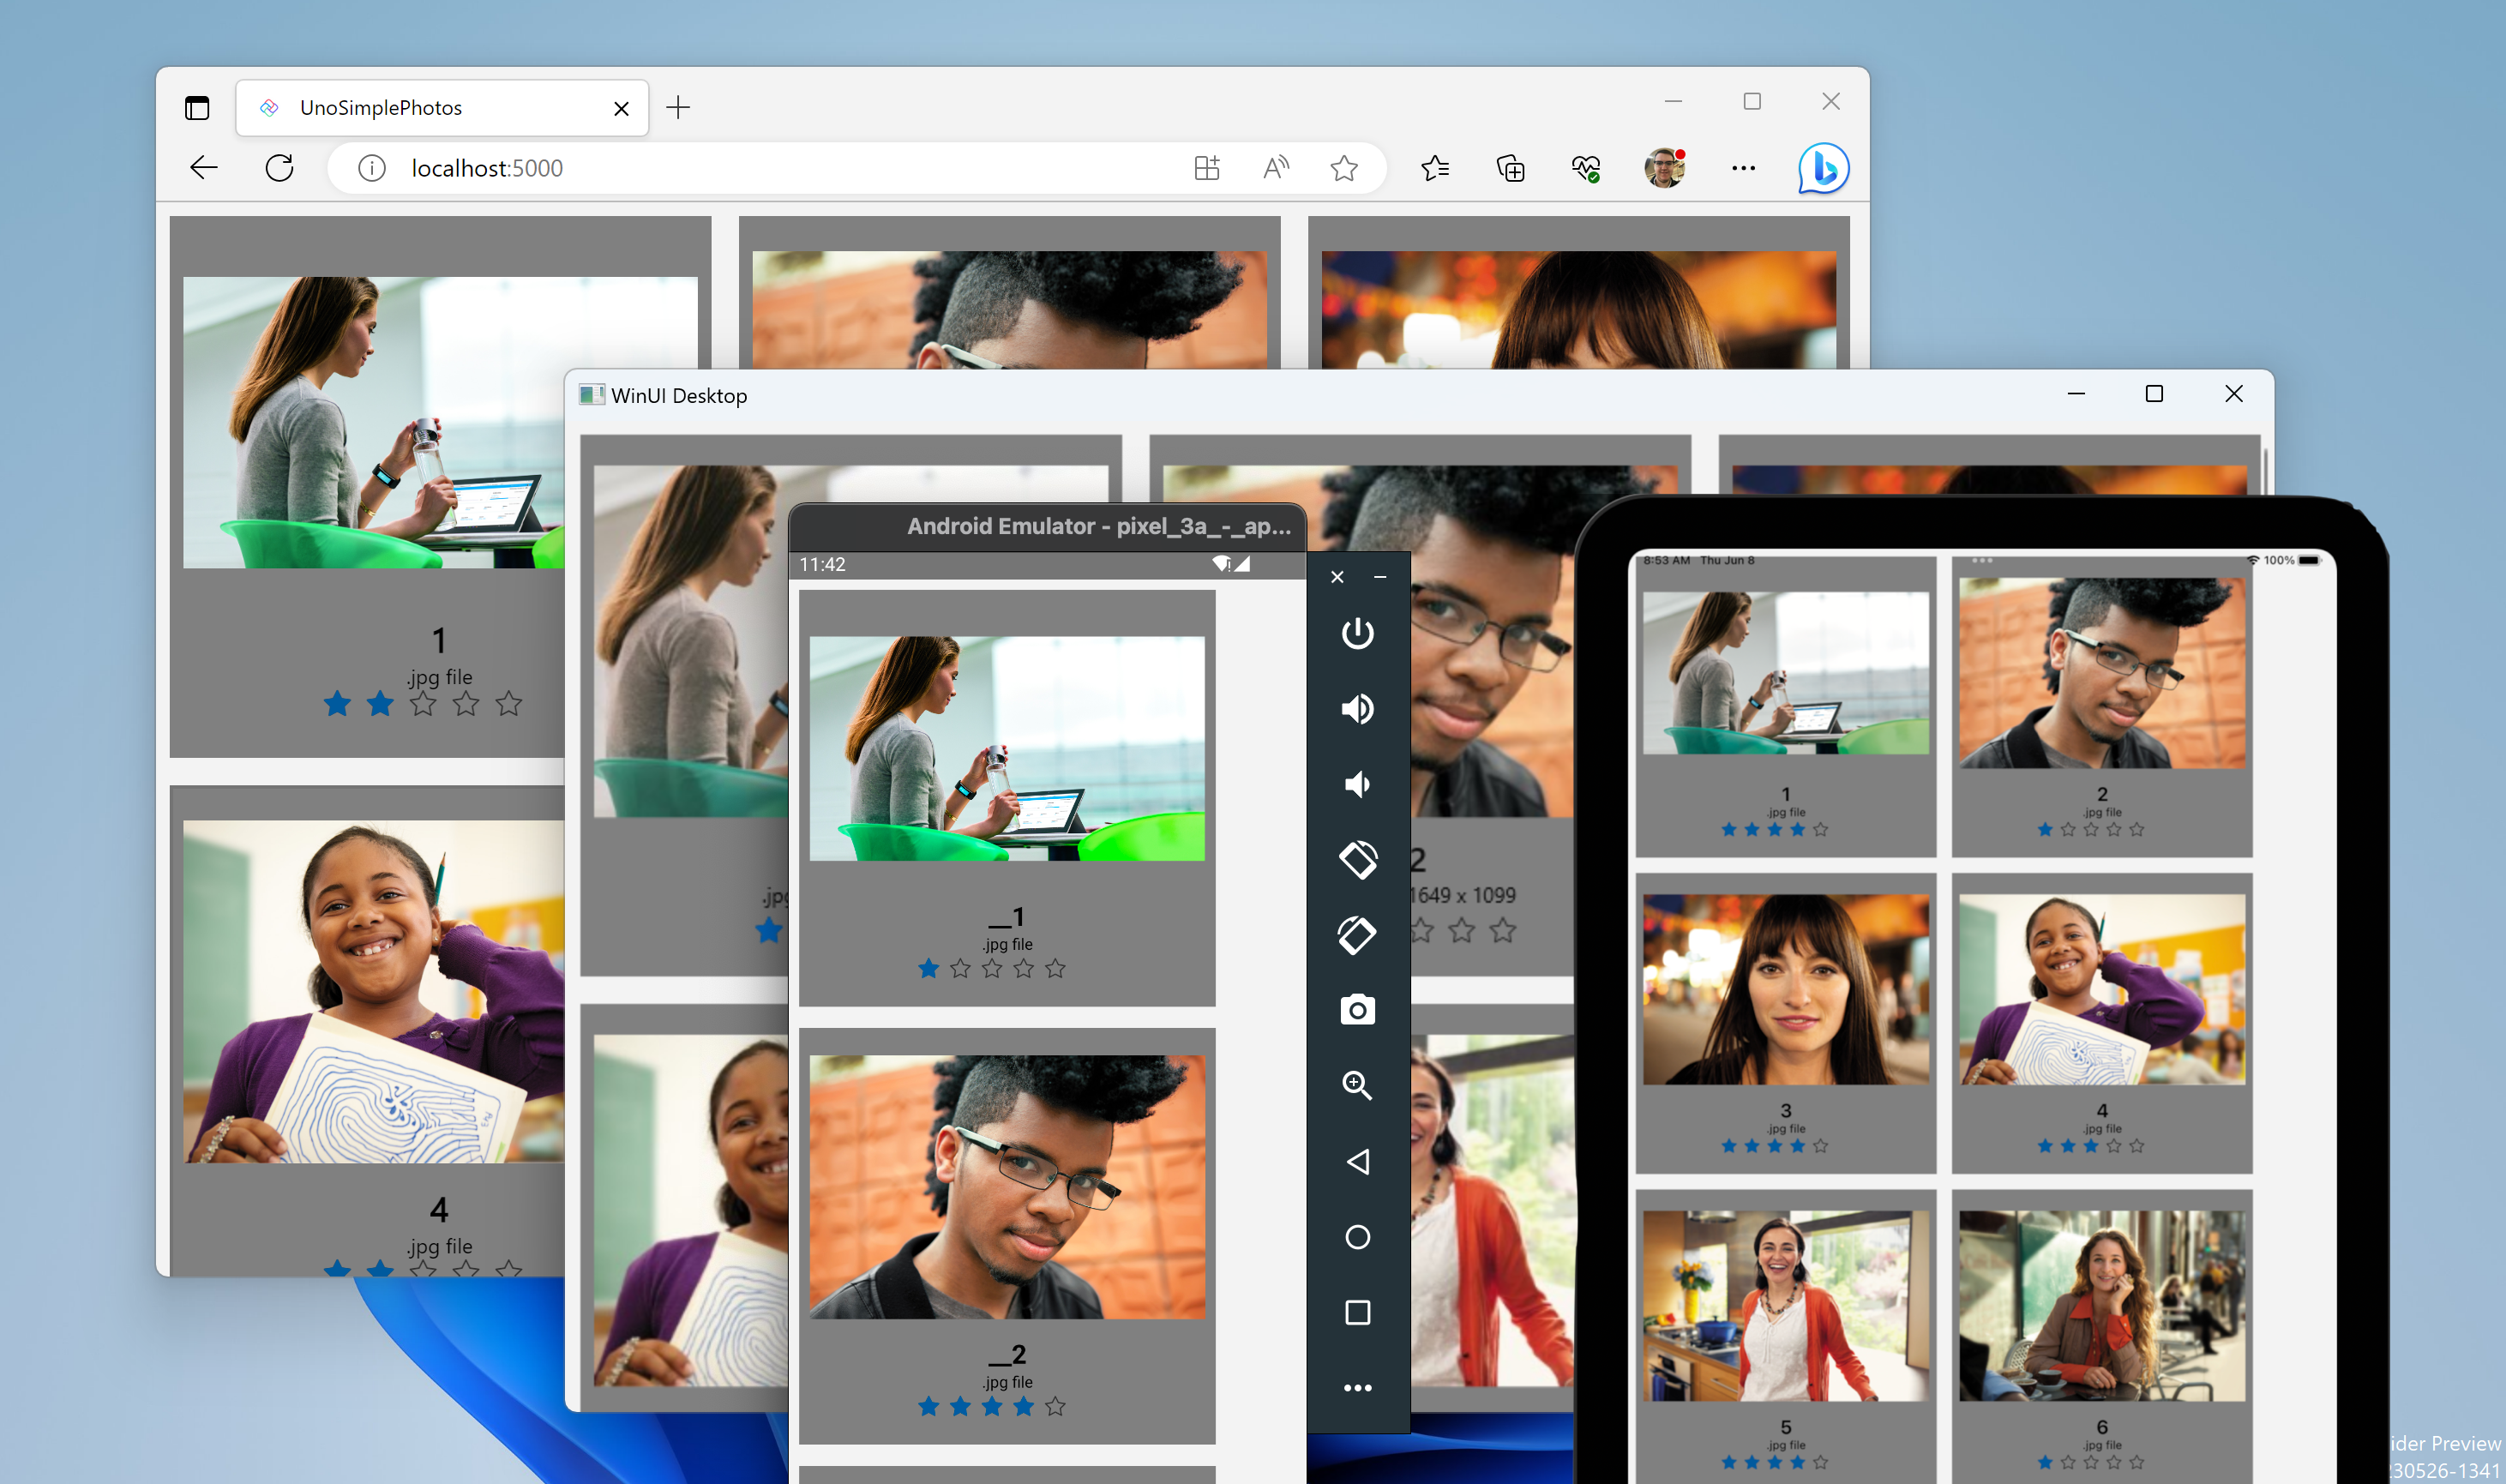
アプリの実行
UnoSimplePhotos.Windows ターゲットを起動します。 この WinUI アプリが前のチュートリアルとよく似ていることを確認します。
これで、サポートされている任意のプラットフォームでアプリをビルドして実行できるようになりました。 これを行うために、デバッグ ツール バーのドロップダウンを使用して、デプロイするターゲット プラットフォームを選択できます。
WebAssembly (Wasm) ヘッドを実行するには:
UnoSimplePhotos.Wasmプロジェクトを右クリックし、[スタートアップ プロジェクトとして設定] を選択しますUnoSimplePhotos.Wasmボタンを押してアプリをデプロイします- 必要に応じて、代替として
UnoSimplePhotos.Serverプロジェクトを追加して使用できます
iOS に対してデバッグするには:
UnoSimplePhotos.Mobileプロジェクトを右クリックし、[スタートアップ プロジェクトとして設定] を選択しますデバッグ ツール バーのドロップダウンで、アクティブな iOS デバイスまたはシミュレーターを選択します。 これを機能させるには、Mac と組み合わされている必要があります。
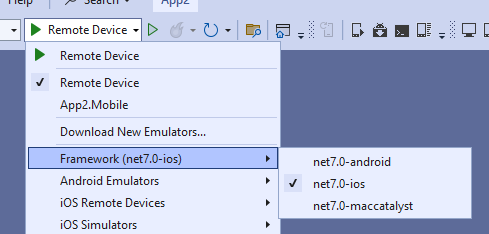
Mac Catalyst に対してデバッグするには:
UnoSimplePhotos.Mobileプロジェクトを右クリックし、[スタートアップ プロジェクトとして設定] を選択します- デバッグ ツール バーのドロップダウンで、リモート macOS デバイスを選択します。 これを機能させるには、それと組み合わされている必要があります。
Android プラットフォームをデバッグするには:
UnoSimplePhotos.Mobileプロジェクトを右クリックし、[スタートアップ プロジェクトとして設定] を選択します- デバッグ ツール バーのドロップダウンで、アクティブな Android デバイスまたはエミュレーターを選択します
- [デバイス] サブメニューでアクティブなデバイスを選択します
Skia GTK を使用する Linux でデバッグするには:
UnoSimplePhotos.Skia.Gtkプロジェクトを右クリックし、[スタートアップ プロジェクトとして設定] を選択しますUnoSimplePhotos.Skia.Gtkボタンを押してアプリをデプロイします
関連項目

Windows developer
フィードバック
以下は間もなく提供いたします。2024 年を通じて、コンテンツのフィードバック メカニズムとして GitHub の issue を段階的に廃止し、新しいフィードバック システムに置き換えます。 詳細については、「https://aka.ms/ContentUserFeedback」を参照してください。
フィードバックの送信と表示