パラメーターを使用した Windows アプリの起動
調査
スタート メニューの一部の Windows アプリ起動ツールでは、Windows アプリの起動時にパラメーターを実行可能ファイルに渡す必要があります。 これを実現するには、まず、パラメーターを必要とする起動ツールを特定してから、Windows アプリをパッケージ サポート フレームワークと統合する必要があります。
Windows アプリ起動ツールのパラメーター要件の特定
テスト マシンに Windows アプリをインストールします。
Windows の [スタート] メニューを開きます。
スタート メニューから Windows アプリ起動ツールを見つけて選択します。
アプリが起動した場合、問題はありません ([スタート] メニューで関連するすべての Windows アプリ起動ツールをテストします)。
テスト コンピューターから Windows アプリをアンインストールします。
Win32 インストール メディアを使用して、アプリケーションをテスト用マシンにインストールします。
Windows の [スタート] メニューを開きます。
スタート メニューから Windows アプリを見つけて右クリックします。
ドロップダウン メニューから [その他]>>[ファイルの場所を開く] を選択します。
関連付けられている最初のアプリケーション ショートカットを右クリックします (関連するすべてのアプリケーション ショートカットについて、次の 3 つの手順を繰り返します)。
ドロップダウン メニューの [プロパティ] を選択します。
[リンク先] の右側にあるテキスト ボックスの値を確認します。 アプリケーション ファイル パスの後にパラメーターが一覧表示されている場合は、このアプリ
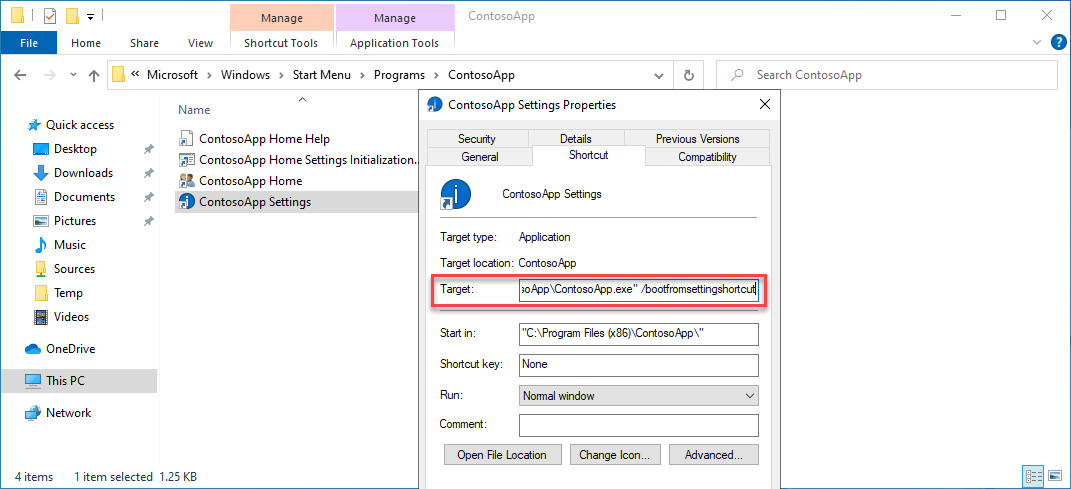
後で確認できるように、パラメーターの値を記録します。
解決方法
Windows アプリは、アプリケーションに関連する特定のディレクトリをフォルダーに C:\Program Files\WindowsApps リダイレクトします。 アプリケーションが Windows アプリ コンテナーに書き込もうとすると、エラーがトリガーされ、書き込みは失敗します。
Windows アプリコンテナーへの書き込みに失敗した Windows アプリに関連する問題を解決するには、次の 4 つの手順に従う必要があります。
- Windows アプリをローカル ディレクトリにステージングする
- Config.json を作成し、必要な PSF ファイルを挿入する
- Windows アプリ AppxManifest ファイルを更新する
- Windows アプリを再パッケージ化して署名する
上記の手順では、Windows アプリのコンテンツをローカルのステージング ディレクトリに抽出し、PSF 修正ファイルをステージングされた Windows アプリ ディレクトリに挿入し、PSF ランチャーを指すアプリケーション 起動ツールを構成し、PSF config.json ファイルを構成して PSF ランチャーを作業ディレクトリを指定するアプリにリダイレクトする方法について説明します。
必要なツールをダウンロードしてインストールする
このプロセスでは、次のツールの取得方法と使用方法について説明します。
- NuGet クライアント ツール
- パッケージ サポート フレームワーク
- Windows 10 SDK (最新バージョン)
- SysInternals プロセス モニター
次に、必要なツールをダウンロードしてインストールする方法について順を追って説明します。
最新 (非プレビュー) バージョンのNuGet クライアント ツールをダウンロードし、nuget.exe を
C:\PSF\nugetフォルダーに保存します。管理 PowerShell ウィンドウから次を実行して、Nuget を使用してパッケージ サポート フレームワークをダウンロードします。
Set-Location "C:\PSF"
.\nuget\nuget.exe install Microsoft.PackageSupportFramework
Windows 10 ソフトウェア開発ツールキット (Win 10 SDK) をダウンロードしてインストールします。
- Win 10 SDK をダウンロードします。
- 前の手順でダウンロードした winsdksetup.exe を実行します。
- [次へ] ボタンを選択します。
- インストールには、次の 3 つの機能のみを選択します。
- デスクトップ アプリ用の Windows SDK 署名ツール
- UWP C++ アプリ用 Windows SDK
- UWP アプリのローカライズ用 Windows SDK
- [インストール] ボタンを選択します。
- [OK] ボタンを選択します。
Windows アプリをステージングする
Windows アプリをステージングすることで、Windows アプリの内容をローカル ディレクトリに抽出/アンパックします。 Windows アプリがステージングの場所に展開されると、PSF Fixup ファイルを挿入して不要なエクスペリエンスを修正できます。
管理 PowerShell ウィンドウを開きます。
特定のアプリ ファイルと Windows 10 SDK バージョンを対象とする次の変数を設定します。
$AppPath          = "C:\PSF\SourceApp\PSFSampleApp.msix"         ## Path to the MSIX App Installer
$StagingFolder    = "C:\PSF\Staging\PSFSampleApp"                ## Path to where the MSIX App will be staged
$OSArchitecture   = "x$((gcim Win32_Processor).AddressWidth)"    ## Operating System Architecture
$Win10SDKVersion  = "10.0.19041.0"                               ## Latest version of the Win10 SDK
次の PowerShell コマンドレットを実行して、Windows アプリをステージング フォルダーに展開します。
## Sets the directory to the Windows 10 SDK
Set-Location "${env:ProgramFiles(x86)}\Windows Kits\10\Bin\$Win10SDKVersion\$OSArchitecture"

## Unpackages the Windows app to the staging folder
.\makeappx.exe unpack /p "$AppPath" /d "$StagingFolder"
必要な PSF ファイルを作成して挿入する
修正アクションを Windows アプリに適用するには、 config.json ファイルを作成し、失敗している Windows アプリ起動ツールに関する情報を提供する必要があります。 複数の Windows アプリ起動ツールで問題が発生している場合は、 config.json ファイルを複数のエントリで更新できます。
config.json ファイルを更新した後、config.json ファイルとサポート PSF 修正ファイルを Windows アプリ パッケージのルートに移動する必要があります。
Visual Studio Code (VS Code)、またはその他のテキスト エディターを開きます。
VS Code の上部にある [ファイル] メニューを選択し、ドロップダウン メニューから [新しいファイル] を選択して、新しいファイルを作成します。
VS Code ウィンドウの上部にある [ファイル] メニューを選択し、ドロップダウン メニューから [保存] を選択して、このファイルを config.json として保存します。 [名前を付けて保存] ウィンドウで、Windows アプリのステージング ディレクトリ (C:\PSF\Staging\PSFSampleApp) に移動し、ファイル名
config.jsonを . 保存ボタンを選択します。新しく作成した config.json ファイルに次のコードをコピーします。
{
    "applications": [
        {
            "id": "",
            "executable": "",
            "arguments": ""
        }
    ]
}
VS Code または別のテキスト エディターを使用して、Windows アプリステージング フォルダー (C:\PSF\Staging\PSFSampleApp\AppxManifest.xml) にあるステージングされた Windows アプリ AppxManifest ファイルを開きます。
<Applications>
    <Application Id="PSFSAMPLE" Executable="VFS\ProgramFilesX64\PS Sample App\PSFSample.exe" EntryPoint="Windows.FullTrustApplication">
    <uap:VisualElements BackgroundColor="transparent" DisplayName="PSFSample" Square150x150Logo="Assets\StoreLogo.png" Square44x44Logo="Assets\StoreLogo.png" Description="PSFSample">
        <uap:DefaultTile Wide310x150Logo="Assets\StoreLogo.png" Square310x310Logo="Assets\StoreLogo.png" Square71x71Logo="Assets\StoreLogo.png" />
    </uap:VisualElements>
    </Application>
</Applications>
config.json の
applications.id値を、AppxManifest.xml ファイルの Applications.Application.ID フィールドと同じ値になるように設定します。
config.json の
applications.executable値を、AppxManifest.xml ファイルの Applications.Application.Executable フィールドにあるアプリケーションへの相対パスをターゲットとするように設定します。
config.json の
applications.arguments値を、アプリケーションを起動するために使用される引数と一致するように設定します。 「調査 - Windows アプリ起動ツールのパラメーター要件の特定」ガイダンスの最後の手順で記録された値を参照してください。config.json の
applications.workingdirectory値を、AppxManifest.xml ファイルの Applications.Application.Executable フィールドにある相対フォルダー パスをターゲットとするように設定します。
更新した config.json ファイルを保存します。
{
    "applications": [
        {
        "id": "PSFSample",
        "executable": "VFS/ProgramFilesX64/PS Sample App/PSFSample.exe",
        "arguments": "/bootfromsettingshortcut"
        }
    ]
}
アプリケーションの実行可能アーキテクチャに基づくパッケージ サポート フレームワークから、ステージングされた Windows アプリのルートに次の 4 つのファイルをコピーします。 次のファイルは .\Microsoft.PackageSupportFramework.<Version>\bin 内にあります。
アプリケーション (x64) アプリケーション (x86) PSFLauncher64.exe PSFLauncher32.exe PSFRuntime64.dll PSFRuntime32.dll PSFRunDll64.exe PSFRunDll32.exe
AppxManifest を更新する
config.json ファイルを作成して更新した後、config.json に含まれていた Windows アプリ起動ツールごとに、Windows アプリの AppxManifest.xml を更新する必要があります。 AppxManifest のアプリケーションは、アプリケーション アーキテクチャに関連付けられた PSFLauncher.exe をターゲットにしている必要があります。
エクスプローラーを開き、ステージングされた MSIX アプリ フォルダー (C:\PSF\Staging\PSFSampleApp) に移動します。
AppxManifest.xml を右クリックし、ドロップダウン メニューから [Open with Code] (コード付きで開く) を選択します (必要に応じて、別のテキスト エディターで開いてもかまいません)。
次の情報を使用して AppxManifest.xml ファイルを更新します。
<Package ...>
...
<Applications>
    <Application Id="PSFSample"
                Executable="PSFLauncher32.exe"
                EntryPoint="Windows.FullTrustApplication">
    ...
    </Application>
</Applications>
</Package>
アプリケーションを再パッケージ化する
すべての修正が適用され、Windows アプリを MSIX に再パッケージ化し、コード署名証明書を使用して署名できるようになりました。
管理 PowerShell ウィンドウを開きます。
次の変数を設定します。
$AppPath          = "C:\PSF\SourceApp\PSFSampleApp_Updated.msix" ## Path to the MSIX App Installer
$CodeSigningCert  = "C:\PSF\Cert\CodeSigningCertificate.pfx"     ## Path to your code signing certificate
$CodeSigningPass  = "<Password>"                                 ## Password used by the code signing certificate
$StagingFolder    = "C:\PSF\Staging\PSFSampleApp"                ## Path to where the MSIX App will be staged
$OSArchitecture   = "x$((gcim Win32_Processor).AddressWidth)"    ## Operating System Architecture
$Win10SDKVersion  = "10.0.19041.0"                               ## Latest version of the Win10 SDK
次の PowerShell コマンドレットを実行して、ステージング フォルダーから Windows アプリを再パックします。
Set-Location "${env:ProgramFiles(x86)}\Windows Kits\10\Bin\$Win10SDKVersion\$OSArchitecture"
.\makeappx.exe pack /p "$AppPath" /d "$StagingFolder"
次の PowerShell コマンドレットを実行して、Windows アプリに署名します。
Set-Location "${env:ProgramFiles(x86)}\Windows Kits\10\Bin\$Win10SDKVersion\$OSArchitecture"
.\signtool.exe sign /v /fd sha256 /f $CodeSigningCert /p $CodeSigningPass $AppPath
フィードバック
以下は間もなく提供いたします。2024 年を通じて、コンテンツのフィードバック メカニズムとして GitHub の issue を段階的に廃止し、新しいフィードバック システムに置き換えます。 詳細については、「https://aka.ms/ContentUserFeedback」を参照してください。
フィードバックの送信と表示