Xamarin.Mac でのコレクション ビュー
この記事では、Xamarin.Mac アプリでのコレクション ビューの操作について説明します。 Xcode と Interface Builder でのコレクション ビューの作成と保守、およびそれらのプログラムでの操作について説明します。
Xamarin.Mac アプリで C# と .NET を操作するとき、開発者は、Objective-C と Xcode で作業する開発者と同じ AppKit コレクション ビュー コントロールにアクセスできます。 Xamarin.Mac と Xcode は直接統合するため、開発者は Xcode の Interface Builder を使ってコレクション ビューを作成および管理します。
NSCollectionView には、NSCollectionViewLayout を使って編成されたサブビューのグリッドが表示されます。 グリッド内の各サブビューは、.xib ファイルからのビューの内容の読み込みを管理する NSCollectionViewItem によって表されます。

この記事では、Xamarin.Mac アプリでのコレクション ビューの操作の基礎について説明します。 最初に、「Hello, Mac」の記事、特に「Xcode と Interface Builder の概要」と「Outlet と Action」のセクションを読むことを強くお勧めします。この記事を通して使用する主要な概念と手法が説明されています。
Xamarin.Mac Internals ドキュメントの 「C# クラス/メソッドの Objective-C への公開」のセクションも参照することをお勧めします。C# クラスを Objective-C オブジェクトと UI 要素に結び付けるために使われる Register および Export コマンドについて説明されています。
コレクション ビューについて
コレクション ビュー (NSCollectionView) の主な目的は、それぞれが大きなコレクションの独自のビューを取得している個々のオブジェクト (NSCollectionViewItem) のグループを、コレクション ビュー レイアウト (NSCollectionViewLayout) を使って視覚的に整然と配置することです。 コレクション ビューは、データ バインディングとキー値コーディングの手法によって動作するので、この記事を読み進む前に、データ バインディングとキー値コーディングに関する ドキュメントを読む必要があります。
コレクション ビューには (アウトラインやテーブル ビューで行われるような) 標準で組み込みまれるコレクション ビュー項目はないため、開発者が、画像フィールド、テキスト フィールド、ラベルなどの他の AppKit コントロールを使って、"プロトタイプ ビュー" を設計および実装する必要があります。このプロトタイプ ビューは、コレクション ビューによって管理される各項目の表示と操作に使われ、.xib ファイルに格納されます。
コレクション ビュー項目の外観は開発者が責任を負っているため、コレクション ビューには、グリッド内の選択項目を強調表示するサポートは組み込まれていません。 この機能の実装については、この記事で説明します。
データ モデルの定義
Interface Builder でコレクション ビューをデータ バインドする前に、バインドに対する "データ モデル" として機能するように、Xamarin.Mac アプリでキー値コーディング (KVC) とキー値監視 (KVO) の準拠クラスを定義する必要があります。 データ モデルは、コレクションに表示されるすべてのデータを提供し、アプリケーションの実行中にユーザーが UI で行うデータへの変更を受け取ります。
従業員のグループを管理するアプリを例にすると、次のクラスを使ってデータ モデルを定義できます。
using System;
using Foundation;
using AppKit;

namespace MacDatabinding
{
    [Register("PersonModel")]
    public class PersonModel : NSObject
    {
        #region Private Variables
        private string _name = "";
        private string _occupation = "";
        private bool _isManager = false;
        private NSMutableArray _people = new NSMutableArray();
        #endregion

        #region Computed Properties
        [Export("Name")]
        public string Name {
            get { return _name; }
            set {
                WillChangeValue ("Name");
                _name = value;
                DidChangeValue ("Name");
            }
        }

        [Export("Occupation")]
        public string Occupation {
            get { return _occupation; }
            set {
                WillChangeValue ("Occupation");
                _occupation = value;
                DidChangeValue ("Occupation");
            }
        }

        [Export("isManager")]
        public bool isManager {
            get { return _isManager; }
            set {
                WillChangeValue ("isManager");
                WillChangeValue ("Icon");
                _isManager = value;
                DidChangeValue ("isManager");
                DidChangeValue ("Icon");
            }
        }

        [Export("isEmployee")]
        public bool isEmployee {
            get { return (NumberOfEmployees == 0); }
        }

        [Export("Icon")]
        public NSImage Icon
        {
            get
            {
                if (isManager)
                {
                    return NSImage.ImageNamed("IconGroup");
                }
                else
                {
                    return NSImage.ImageNamed("IconUser");
                }
            }
        }

        [Export("personModelArray")]
        public NSArray People {
            get { return _people; }
        }

        [Export("NumberOfEmployees")]
        public nint NumberOfEmployees {
            get { return (nint)_people.Count; }
        }
        #endregion

        #region Constructors
        public PersonModel ()
        {
        }

        public PersonModel (string name, string occupation)
        {
            // Initialize
            this.Name = name;
            this.Occupation = occupation;
        }

        public PersonModel (string name, string occupation, bool manager)
        {
            // Initialize
            this.Name = name;
            this.Occupation = occupation;
            this.isManager = manager;
        }
        #endregion

        #region Array Controller Methods
        [Export("addObject:")]
        public void AddPerson(PersonModel person) {
            WillChangeValue ("personModelArray");
            isManager = true;
            _people.Add (person);
            DidChangeValue ("personModelArray");
        }

        [Export("insertObject:inPersonModelArrayAtIndex:")]
        public void InsertPerson(PersonModel person, nint index) {
            WillChangeValue ("personModelArray");
            _people.Insert (person, index);
            DidChangeValue ("personModelArray");
        }

        [Export("removeObjectFromPersonModelArrayAtIndex:")]
        public void RemovePerson(nint index) {
            WillChangeValue ("personModelArray");
            _people.RemoveObject (index);
            DidChangeValue ("personModelArray");
        }

        [Export("setPersonModelArray:")]
        public void SetPeople(NSMutableArray array) {
            WillChangeValue ("personModelArray");
            _people = array;
            DidChangeValue ("personModelArray");
        }
        #endregion
    }
}
この記事の残りの部分では、PersonModel データ モデルを使います。
コレクション ビューの操作
コレクション ビューでのデータ バインディングは、コレクションのデータを提供するために NSCollectionViewDataSource が使われるため、テーブル ビューでのバインディングとよく似ています。 コレクション ビューには事前設定された表示形式がないため、ユーザー操作のフィードバックを提供し、ユーザーの選択を追跡するために、さらに多くの作業が必要です。
セル プロトタイプの作成
コレクション ビューには既定のセル プロトタイプが含まれていないため、開発者が Xamarin.Mac アプリに 1 つ以上の .xib ファイルを追加して、個々のセルのレイアウトと内容を定義する必要があります。
次の操作を行います。
ソリューション エクスプローラーで、プロジェクト名を右クリックして、[追加]>[新しいファイル] を選びます。
[Mac]>[View Controller] を選び、名前 (この例での
EmployeeItemなど) を指定し、[新規] ボタンをクリックして作成します。
これにより、
EmployeeItem.cs、EmployeeItemController.cs、EmployeeItemController.xibファイルがプロジェクトのソリューションに追加されます。EmployeeItemController.xibファイルをダブルクリックして、Xcode の Interface Builder で編集用に開きます。NSBox、NSImageView、および 2 つのNSLabelコントロールをビューに追加し、次のようにレイアウトします。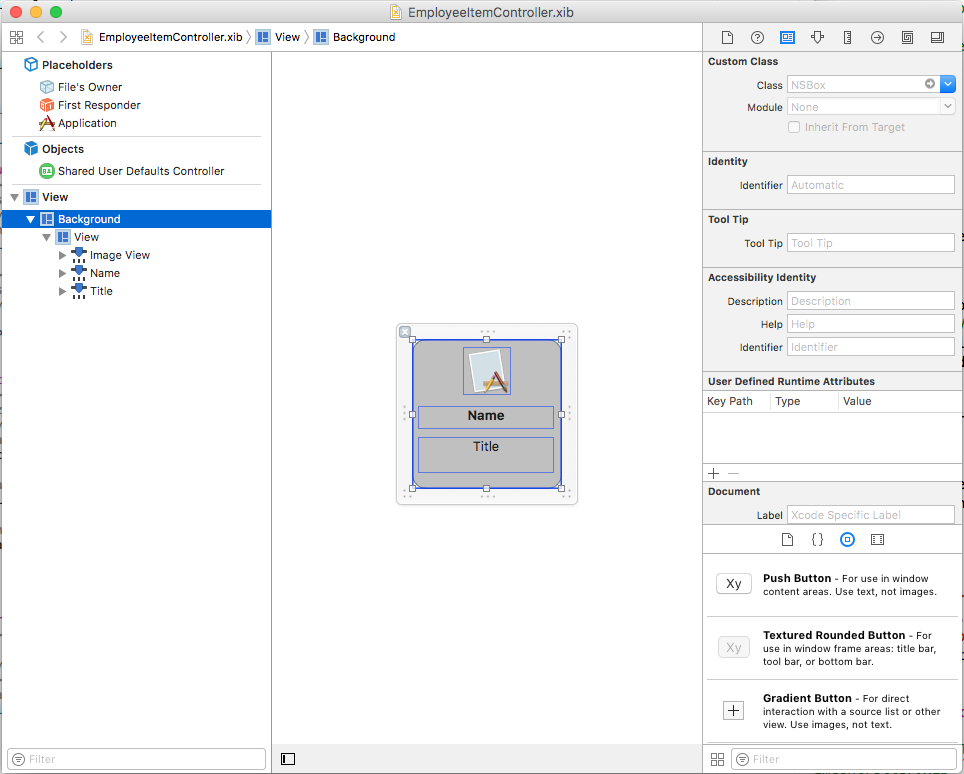
アシスタント エディターを開き、セルの選択状態を示すために使用できるように、
NSBoxのアウトレットを作成します。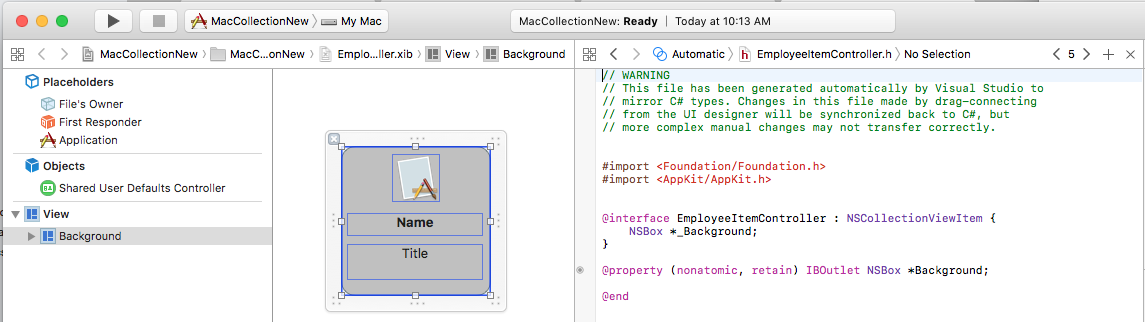
標準エディターに戻って、画像ビューを選びます。
バインドインスペクターで、[バインド先]>[ファイルの所有者] を選んで、[モデル キー パス] に「
self.Person.Icon」と入力します。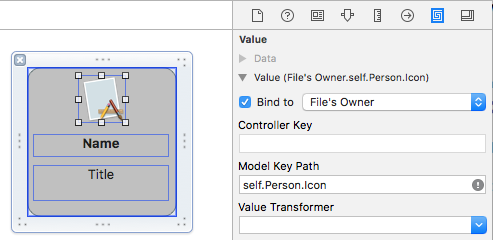
1 つ目のラベルを選び、バインドインスペクターで、[バインド先]>[ファイルの所有者] を選んで、[モデル キー パス] に「
self.Person.Name」と入力します。
2 つ目のラベルを選び、バインドインスペクターで、[バインド先]>[ファイルの所有者] を選んで、[モデル キー パス] に「
self.Person.Occupation」と入力します。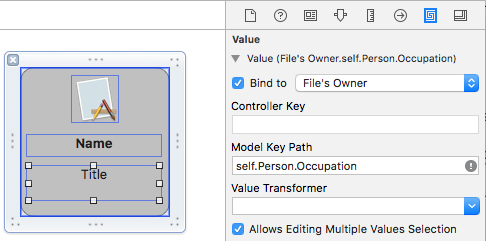
.xibファイルに変更を保存し、Visual Studio に戻って変更を同期します。
EmployeeItemController.cs ファイルを編集して、次のようにします。
using System;
using System.Collections.Generic;
using System.Linq;
using Foundation;
using AppKit;

namespace MacCollectionNew
{
    /// <summary>
    /// The Employee item controller handles the display of the individual items that will
    /// be displayed in the collection view as defined in the associated .XIB file.
    /// </summary>
    public partial class EmployeeItemController : NSCollectionViewItem
    {
        #region Private Variables
        /// <summary>
        /// The person that will be displayed.
        /// </summary>
        private PersonModel _person;
        #endregion

        #region Computed Properties
        // strongly typed view accessor
        public new EmployeeItem View
        {
            get
            {
                return (EmployeeItem)base.View;
            }
        }

        /// <summary>
        /// Gets or sets the person.
        /// </summary>
        /// <value>The person that this item belongs to.</value>
        [Export("Person")]
        public PersonModel Person
        {
            get { return _person; }
            set
            {
                WillChangeValue("Person");
                _person = value;
                DidChangeValue("Person");
            }
        }

        /// <summary>
        /// Gets or sets the color of the background for the item.
        /// </summary>
        /// <value>The color of the background.</value>
        public NSColor BackgroundColor {
            get { return Background.FillColor; }
            set { Background.FillColor = value; }
        }

        /// <summary>
        /// Gets or sets a value indicating whether this <see cref="T:MacCollectionNew.EmployeeItemController"/> is selected.
        /// </summary>
        /// <value><c>true</c> if selected; otherwise, <c>false</c>.</value>
        /// <remarks>This also changes the background color based on the selected state
        /// of the item.</remarks>
        public override bool Selected
        {
            get
            {
                return base.Selected;
            }
            set
            {
                base.Selected = value;

                // Set background color based on the selection state
                if (value) {
                    BackgroundColor = NSColor.DarkGray;
                } else {
                    BackgroundColor = NSColor.LightGray;
                }
            }
        }
        #endregion

        #region Constructors
        // Called when created from unmanaged code
        public EmployeeItemController(IntPtr handle) : base(handle)
        {
            Initialize();
        }

        // Called when created directly from a XIB file
        [Export("initWithCoder:")]
        public EmployeeItemController(NSCoder coder) : base(coder)
        {
            Initialize();
        }

        // Call to load from the XIB/NIB file
        public EmployeeItemController() : base("EmployeeItem", NSBundle.MainBundle)
        {
            Initialize();
        }

        // Added to support loading from XIB/NIB
        public EmployeeItemController(string nibName, NSBundle nibBundle) : base(nibName, nibBundle) {

            Initialize();
        }

        // Shared initialization code
        void Initialize()
        {
        }
        #endregion
    }
}
このコードを詳しく見ると、クラスはコレクション ビュー セルのプロトタイプとして機能できるように NSCollectionViewItem を継承しています。 Person プロパティは、Xcode の画像ビューとラベルへのデータ バインドに使われたクラスを公開します。 これは、上で作成した PersonModel のインスタンスです。
BackgroundColor プロパティは、セルの選択状態を示すために使われる NSBox コントロールの FillColor へのショートカットです。 次のコードは、NSCollectionViewItem の Selected プロパティをオーバーライドして、この選択状態を設定またはクリアします。
public override bool Selected
{
    get
    {
        return base.Selected;
    }
    set
    {
        base.Selected = value;

        // Set background color based on the selection state
        if (value) {
            BackgroundColor = NSColor.DarkGray;
        } else {
            BackgroundColor = NSColor.LightGray;
        }
    }
}
コレクション ビュー データ ソースの作成
コレクション ビュー データ ソース (NSCollectionViewDataSource) は、コレクション ビューのすべてのデータを提供し、コレクション内の各項目に必要に応じてコレクション ビュー セルを作成して設定します (.xib プロトタイプを使用)。
プロジェクトに CollectionViewDataSource という名前の新しいクラスを追加して、次のようにします。
using System;
using System.Collections.Generic;
using AppKit;
using Foundation;

namespace MacCollectionNew
{
    /// <summary>
    /// Collection view data source provides the data for the collection view.
    /// </summary>
    public class CollectionViewDataSource : NSCollectionViewDataSource
    {
        #region Computed Properties
        /// <summary>
        /// Gets or sets the parent collection view.
        /// </summary>
        /// <value>The parent collection view.</value>
        public NSCollectionView ParentCollectionView { get; set; }

        /// <summary>
        /// Gets or sets the data that will be displayed in the collection.
        /// </summary>
        /// <value>A collection of PersonModel objects.</value>
        public List<PersonModel> Data { get; set; } = new List<PersonModel>();
        #endregion

        #region Constructors
        /// <summary>
        /// Initializes a new instance of the <see cref="T:MacCollectionNew.CollectionViewDataSource"/> class.
        /// </summary>
        /// <param name="parent">The parent collection that this datasource will provide data for.</param>
        public CollectionViewDataSource(NSCollectionView parent)
        {
            // Initialize
            ParentCollectionView = parent;

            // Attach to collection view
            parent.DataSource = this;

        }
        #endregion

        #region Override Methods
        /// <summary>
        /// Gets the number of sections.
        /// </summary>
        /// <returns>The number of sections.</returns>
        /// <param name="collectionView">The parent Collection view.</param>
        public override nint GetNumberOfSections(NSCollectionView collectionView)
        {
            // There is only one section in this view
            return 1;
        }

        /// <summary>
        /// Gets the number of items in the given section.
        /// </summary>
        /// <returns>The number of items.</returns>
        /// <param name="collectionView">The parent Collection view.</param>
        /// <param name="section">The Section number to count items for.</param>
        public override nint GetNumberofItems(NSCollectionView collectionView, nint section)
        {
            // Return the number of items
            return Data.Count;
        }

        /// <summary>
        /// Gets the item for the give section and item index.
        /// </summary>
        /// <returns>The item.</returns>
        /// <param name="collectionView">The parent Collection view.</param>
        /// <param name="indexPath">Index path specifying the section and index.</param>
        public override NSCollectionViewItem GetItem(NSCollectionView collectionView, NSIndexPath indexPath)
        {
            var item = collectionView.MakeItem("EmployeeCell", indexPath) as EmployeeItemController;
            item.Person = Data[(int)indexPath.Item];

            return item;
        }
        #endregion
    }
}
このコードを詳しく見ると、クラスは NSCollectionViewDataSource を継承し、Data プロパティを介して PersonModel インスタンスのリストを公開しています。
このコレクションにはセクションが 1 つしかないため、コードは GetNumberOfSections メソッドをオーバーライドし、常に 1 を返します。 さらに、GetNumberofItems メソッドは、Data プロパティ リスト内の項目数を返すようにオーバーライドされています。
GetItem メソッドは、新しいセルが必要なとき常に呼び出され、次のようになります。
public override NSCollectionViewItem GetItem(NSCollectionView collectionView, NSIndexPath indexPath)
{
    var item = collectionView.MakeItem("EmployeeCell", indexPath) as EmployeeItemController;
    item.Person = Data[(int)indexPath.Item];

    return item;
}
コレクション ビューの MakeItem メソッドは、EmployeeItemController の再利用可能なインスタンスを作成または返すために呼び出され、その Person プロパティには、要求されたセルに表示される項目が設定されます。
EmployeeItemController は、次のコードを使って、コレクション ビュー コントローラーに事前に登録する必要があります。
EmployeeCollection.RegisterClassForItem(typeof(EmployeeItemController), "EmployeeCell");
MakeItem の呼び出しで使われる識別子 (EmployeeCell) は、コレクション ビューに登録されたビュー コントローラーの名前と一致している必要があります。 このステップについては、以下で詳しく説明します。
項目選択の処理
コレクション内の項目の選択と選択解除を処理するには、NSCollectionViewDelegate が必要です。 この例では組み込みの NSCollectionViewFlowLayout レイアウト型を使うため、このデリゲートの NSCollectionViewDelegateFlowLayout 固有のバージョンが必要です。
新しいクラスをプロジェクトに追加し、CollectionViewDelegate という名前を付けて、次のような内容にします。
using System;
using Foundation;
using AppKit;

namespace MacCollectionNew
{
    /// <summary>
    /// Collection view delegate handles user interaction with the elements of the
    /// collection view for the Flow-Based layout type.
    /// </summary>
    public class CollectionViewDelegate : NSCollectionViewDelegateFlowLayout
    {
        #region Computed Properties
        /// <summary>
        /// Gets or sets the parent view controller.
        /// </summary>
        /// <value>The parent view controller.</value>
        public ViewController ParentViewController { get; set; }
        #endregion

        #region Constructors
        /// <summary>
        /// Initializes a new instance of the <see cref="T:MacCollectionNew.CollectionViewDelegate"/> class.
        /// </summary>
        /// <param name="parentViewController">Parent view controller.</param>
        public CollectionViewDelegate(ViewController parentViewController)
        {
            // Initialize
            ParentViewController = parentViewController;
        }
        #endregion

        #region Override Methods
        /// <summary>
        /// Handles one or more items being selected.
        /// </summary>
        /// <param name="collectionView">The parent Collection view.</param>
        /// <param name="indexPaths">The Index paths of the items being selected.</param>
        public override void ItemsSelected(NSCollectionView collectionView, NSSet indexPaths)
        {
            // Dereference path
            var paths = indexPaths.ToArray<NSIndexPath>();
            var index = (int)paths[0].Item;

            // Save the selected item
            ParentViewController.PersonSelected = ParentViewController.Datasource.Data[index];

        }

        /// <summary>
        /// Handles one or more items being deselected.
        /// </summary>
        /// <param name="collectionView">The parent Collection view.</param>
        /// <param name="indexPaths">The Index paths of the items being deselected.</param>
        public override void ItemsDeselected(NSCollectionView collectionView, NSSet indexPaths)
        {
            // Dereference path
            var paths = indexPaths.ToArray<NSIndexPath>();
            var index = paths[0].Item;

            // Clear selection
            ParentViewController.PersonSelected = null;
        }
        #endregion
    }
}
ItemsSelected と ItemsDeselected メソッドはオーバーライドされており、ユーザーが項目を選択または選択解除したときにコレクション ビューを処理する、ビュー コントローラーの PersonSelected プロパティを設定またはクリアするために使われます。 これについては、以下で詳しく説明します。
Interface Builder でのコレクション ビューの作成
必要なサポート要素をすべて配置したら、メイン ストーリーボードを編集して、それにコレクション ビューを追加できます。
次の操作を行います。
ソリューション エクスプローラーで
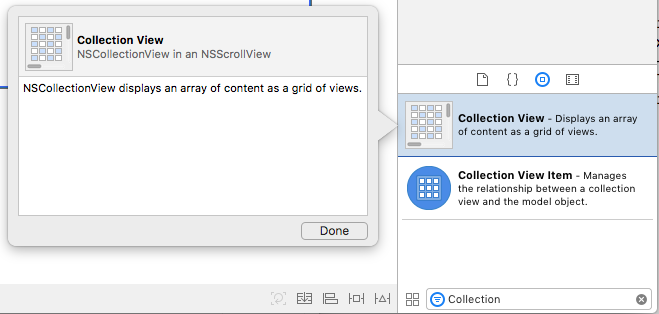
Main.Storyboardファイルをダブルクリックして、Xcode の Interface Builder で編集するために開きます。コレクション ビューをメイン ビューにドラッグし、ビュー全体を占めるようにサイズを変更します。
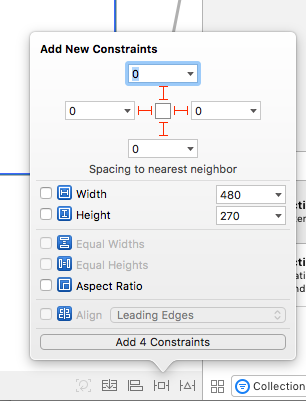
コレクション ビューを選択し、制約エディターを使って、サイズが変更されたときにビューにピン留めします。
デザイン サーフェイスでコレクション ビューが (それが含まれている枠線付きスクロール ビューまたはクリップ ビューではなく) 選ばれていることを確認します。アシスタント エディターに切り替えて、コレクション ビューのアウトレットを作成します。
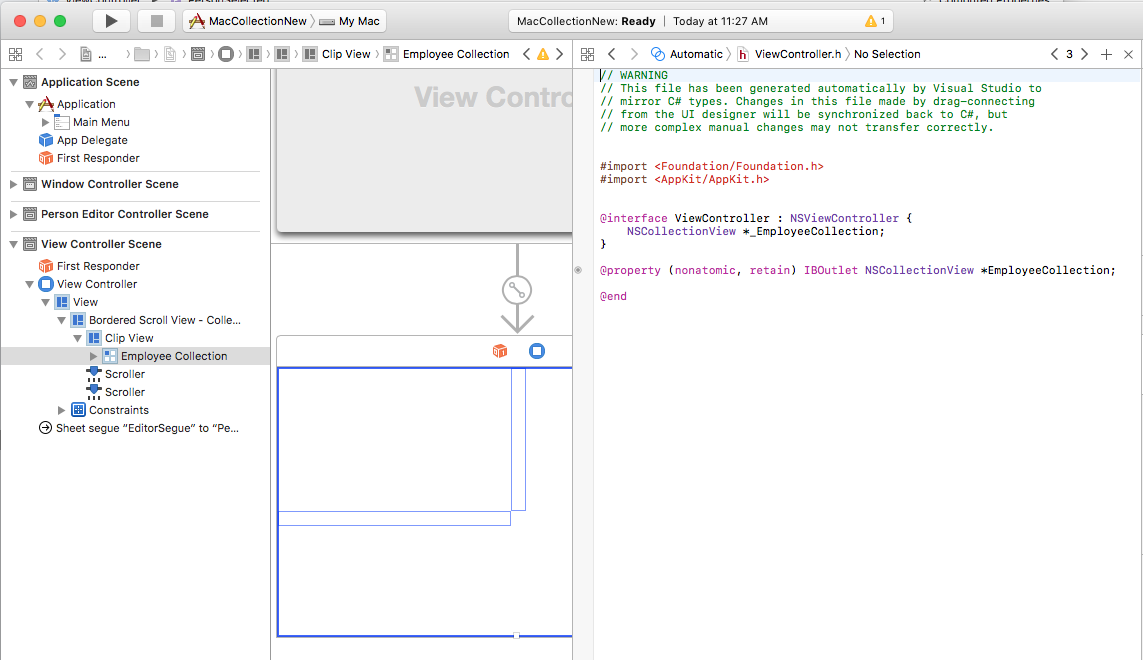
変更を保存し、Visual Studio に戻って同期します。
すべてをまとめる
すべてのサポート部分がデータ モデル (PersonModel) として機能するクラスを使って配置され、NSCollectionViewDataSource がデータを提供するために追加され、NSCollectionViewDelegateFlowLayout が項目の選択を処理するために作成され、NSCollectionView がメイン ストーリーボードに追加され、アウトレット (EmployeeCollection) として公開されました。
最後のステップでは、コレクション ビューを含むビュー コントローラーを編集し、すべての要素をまとめてコレクションを設定し、項目の選択を処理します。
ViewController.cs ファイルを編集して、次のようにします。
using System;
using AppKit;
using Foundation;
using CoreGraphics;

namespace MacCollectionNew
{
    /// <summary>
    /// The View controller controls the main view that houses the Collection View.
    /// </summary>
    public partial class ViewController : NSViewController
    {
        #region Private Variables
        private PersonModel _personSelected;
        private bool shouldEdit = true;
        #endregion

        #region Computed Properties
        /// <summary>
        /// Gets or sets the datasource that provides the data to display in the
        /// Collection View.
        /// </summary>
        /// <value>The datasource.</value>
        public CollectionViewDataSource Datasource { get; set; }

        /// <summary>
        /// Gets or sets the person currently selected in the collection view.
        /// </summary>
        /// <value>The person selected or <c>null</c> if no person is selected.</value>
        [Export("PersonSelected")]
        public PersonModel PersonSelected
        {
            get { return _personSelected; }
            set
            {
                WillChangeValue("PersonSelected");
                _personSelected = value;
                DidChangeValue("PersonSelected");
                RaiseSelectionChanged();
            }
        }
        #endregion

        #region Constructors
        /// <summary>
        /// Initializes a new instance of the <see cref="T:MacCollectionNew.ViewController"/> class.
        /// </summary>
        /// <param name="handle">Handle.</param>
        public ViewController(IntPtr handle) : base(handle)
        {
        }
        #endregion

        #region Override Methods
        /// <summary>
        /// Called after the view has finished loading from the Storyboard to allow it to
        /// be configured before displaying to the user.
        /// </summary>
        public override void ViewDidLoad()
        {
            base.ViewDidLoad();

            // Initialize Collection View
            ConfigureCollectionView();
            PopulateWithData();
        }
        #endregion

        #region Private Methods
        /// <summary>
        /// Configures the collection view.
        /// </summary>
        private void ConfigureCollectionView()
        {
            EmployeeCollection.RegisterClassForItem(typeof(EmployeeItemController), "EmployeeCell");

            // Create a flow layout
            var flowLayout = new NSCollectionViewFlowLayout()
            {
                ItemSize = new CGSize(150, 150),
                SectionInset = new NSEdgeInsets(10, 10, 10, 20),
                MinimumInteritemSpacing = 10,
                MinimumLineSpacing = 10
            };
            EmployeeCollection.WantsLayer = true;

            // Setup collection view
            EmployeeCollection.CollectionViewLayout = flowLayout;
            EmployeeCollection.Delegate = new CollectionViewDelegate(this);

        }

        /// <summary>
        /// Populates the Datasource with data and attaches it to the collection view.
        /// </summary>
        private void PopulateWithData()
        {
            // Make datasource
            Datasource = new CollectionViewDataSource(EmployeeCollection);

            // Build list of employees
            Datasource.Data.Add(new PersonModel("Craig Dunn", "Documentation Manager", true));
            Datasource.Data.Add(new PersonModel("Amy Burns", "Technical Writer"));
            Datasource.Data.Add(new PersonModel("Joel Martinez", "Web & Infrastructure"));
            Datasource.Data.Add(new PersonModel("Kevin Mullins", "Technical Writer"));
            Datasource.Data.Add(new PersonModel("Mark McLemore", "Technical Writer"));
            Datasource.Data.Add(new PersonModel("Tom Opgenorth", "Technical Writer"));
            Datasource.Data.Add(new PersonModel("Larry O'Brien", "API Docs Manager", true));
            Datasource.Data.Add(new PersonModel("Mike Norman", "API Documentor"));

            // Populate collection view
            EmployeeCollection.ReloadData();
        }
        #endregion

        #region Events
        /// <summary>
        /// Selection changed delegate.
        /// </summary>
        public delegate void SelectionChangedDelegate();

        /// <summary>
        /// Occurs when selection changed.
        /// </summary>
        public event SelectionChangedDelegate SelectionChanged;

        /// <summary>
        /// Raises the selection changed event.
        /// </summary>
        internal void RaiseSelectionChanged() {
            // Inform caller
            if (this.SelectionChanged != null) SelectionChanged();
        }
        #endregion
    }
}
このコードを詳しく見ると、コレクション ビューのデータを提供する CollectionViewDataSource のインスタンスを保持するために、Datasource プロパティが定義されています。 コレクション ビューで現在選ばれている項目を表す PersonModel を保持するため、PersonSelected プロパティが定義されています。 このプロパティは、選択が変更されると SelectionChanged イベントも発生させます。
次の行を使って、セル プロトタイプとして機能するビュー コントローラーをコレクション ビューに登録するには、ConfigureCollectionView クラスが使われます。
EmployeeCollection.RegisterClassForItem(typeof(EmployeeItemController), "EmployeeCell");
プロトタイプの登録に使われる識別子 (EmployeeCell) が、上で定義した CollectionViewDataSource の GetItem メソッドで呼び出されているものと一致していることに注意してください。
var item = collectionView.MakeItem("EmployeeCell", indexPath) as EmployeeItemController;
...
さらに、ビュー コントローラーの種類は、プロトタイプを定義している .xib ファイルの名前と正確に一致している必要があります。 この例の場合は、EmployeeItemController と EmployeeItemController.xib です。
コレクション ビュー内の項目の実際のレイアウトは、コレクション ビュー レイアウト クラスによって制御され、新しいインスタンスを CollectionViewLayout プロパティに割り当てて、実行時に動的に変更できます。 このプロパティを変更すると、変更をアニメーション化せずにコレクション ビューの外観が更新されます。
Apple からは、最も一般的な用途を処理する 2 種類の組み込みレイアウト (NSCollectionViewFlowLayout と NSCollectionViewGridLayout) がコレクション ビューで提供されています。 開発者は、項目を円にレイアウトするといったカスタム形式を必要とする場合、NSCollectionViewLayout のカスタム インスタンスを作成し、必要なメソッドをオーバーライドして目的の効果を得ることができます。
この例では、既定のフロー レイアウトを使っているので、NSCollectionViewFlowLayout クラスのインスタンスを作成して、次のように構成します。
var flowLayout = new NSCollectionViewFlowLayout()
{
    ItemSize = new CGSize(150, 150),
    SectionInset = new NSEdgeInsets(10, 10, 10, 20),
    MinimumInteritemSpacing = 10,
    MinimumLineSpacing = 10
};
ItemSize プロパティでは、コレクション内の個々のセルのサイズを定義します。 SectionInset プロパティでは、セルをレイアウトするコレクションの端からのインセットを定義します。 MinimumInteritemSpacing では項目間の最小間隔を定義し、MinimumLineSpacing ではコレクション内の行間の最小間隔を定義します。
レイアウトがコレクション ビューに割り当てられ、項目の選択を処理するために CollectionViewDelegate のインスタンスがアタッチされます。
// Setup collection view
EmployeeCollection.CollectionViewLayout = flowLayout;
EmployeeCollection.Delegate = new CollectionViewDelegate(this);
PopulateWithData メソッドは、CollectionViewDataSource の新しいインスタンスを作成し、それにデータを設定してコレクション ビューにアタッチし、ReloadData メソッドを呼び出して項目を表示します。
private void PopulateWithData()
{
    // Make datasource
    Datasource = new CollectionViewDataSource(EmployeeCollection);

    // Build list of employees
    Datasource.Data.Add(new PersonModel("Craig Dunn", "Documentation Manager", true));
    ...

    // Populate collection view
    EmployeeCollection.ReloadData();
}
ViewDidLoad メソッドはオーバーライドされ、ConfigureCollectionView と PopulateWithData メソッドを呼び出して、最終的なコレクション ビューをユーザーに表示します。
public override void ViewDidLoad()
{
    base.ViewDidLoad();

    // Initialize Collection View
    ConfigureCollectionView();
    PopulateWithData();
}
まとめ
この記事では、Xamarin.Mac アプリケーションでのコレクション ビューの使用について詳しく説明しました。 最初に、キー値コーディング (KVC) とキー値監視 (KVO) を使って C# クラスを Objective-C に公開する方法を見ました。 次に、KVO 準拠クラスを使用し、Xcode の Interface Builder でそれをコレクション ビューにデータ バインドする方法を示しました。 最後に、C# のコードでコレクション ビューを操作する方法を示しました。