Xamarin.Forms のトリガー
 サンプルのダウンロード
トリガーを使用すると、イベントまたはプロパティの変更に基づいてコントロールの外観を変更するアクションを XAML での宣言として表すことができます。 また、トリガーの特殊なグループである状態トリガーでは、VisualState を適用する条件を定義できます。
トリガーは、コントロールに直接割り当てることも、ページ レベルまたはアプリケーション レベルのリソース ディクショナリに追加して複数のコントロールに適用することもできます。
プロパティ トリガー
コントロールのトリガー コレクションに Trigger 要素を追加して、XAML 内だけでシンプルなトリガーを表現できます。
次の例では、フォーカスが設定されると背景色を Entry に変更するトリガーを示します。
<Entry Placeholder="enter name">
    <Entry.Triggers>
        <Trigger TargetType="Entry"
                 Property="IsFocused" Value="True">
            <Setter Property="BackgroundColor" Value="Yellow" />
            <!-- multiple Setters elements are allowed -->
        </Trigger>
    </Entry.Triggers>
</Entry>
トリガーの宣言の重要な部分は次のとおりです。
TargetType - トリガーを適用するコントロールの種類です。
Property - コントロール上で監視するプロパティです。
Value - 監視対象のプロパティがこの値になったら、トリガーをアクティブにします。
Setter - トリガー条件が満たされたときの
Setter要素のコレクションを追加できます。 設定するには、PropertyとValueを指定する必要があります。EnterActions と ExitActions (示されていません) - コードで記述され、
Setter要素に加えて (または代えて) 使用できます。 これらについては、後で説明します。
スタイルを使用してトリガーを適用する
トリガーは、コントロール、ページ、またはアプリケーションの ResourceDictionary の Style 宣言に追加することもできます。 次の例では、暗黙的なスタイルを宣言しています (つまり、Key が設定されていません)。これは、ページ上のすべての Entry コントロールに適用されることを意味します。
<ContentPage.Resources>
    <ResourceDictionary>
        <Style TargetType="Entry">
                        <Style.Triggers>
                <Trigger TargetType="Entry"
                         Property="IsFocused" Value="True">
                    <Setter Property="BackgroundColor" Value="Yellow" />
                    <!-- multiple Setters elements are allowed -->
                </Trigger>
            </Style.Triggers>
        </Style>
    </ResourceDictionary>
</ContentPage.Resources>
データ トリガー
データ トリガーでは、データ バインディングを使用して別のコントロールが監視され、Setter が呼び出されます。 プロパティ トリガーでの Property 属性の代わりに、指定した値を監視する Binding 属性を設定します。
次の例では、データ バインディング構文 を使用しています{Binding Source={x:Reference entry}, Path=Text.Length} これは、別のコントロールのプロパティを参照する方法です。 entry の長さが 0 の場合、トリガーがアクティブにされます。 このサンプルでは、入力が空の場合、トリガーでボタンが無効にされます。
<!-- the x:Name is referenced below in DataTrigger-->
<!-- tip: make sure to set the Text="" (or some other default) -->
<Entry x:Name="entry"
       Text=""
       Placeholder="required field" />

<Button x:Name="button" Text="Save"
        FontSize="Large"
        HorizontalOptions="Center">
    <Button.Triggers>
        <DataTrigger TargetType="Button"
                     Binding="{Binding Source={x:Reference entry},
                                       Path=Text.Length}"
                     Value="0">
            <Setter Property="IsEnabled" Value="False" />
            <!-- multiple Setters elements are allowed -->
        </DataTrigger>
    </Button.Triggers>
</Button>
ヒント
Path=Text.Length の評価時には、ターゲット プロパティ (例: Text="") の既定値を常に指定します。指定しない場合は null になり、トリガーが想定どおりに動作しなくなるからです。
Setter を指定するだけでなく、EnterActions と ExitActions を提供することもできます。
Event triggers (イベント トリガー)
次の例での "Clicked" のように、EventTrigger 要素では Event プロパティのみが必要です。
<EventTrigger Event="Clicked">
    <local:NumericValidationTriggerAction />
</EventTrigger>
Setter 要素はなく、代わりにページの XAML で xmlns:local が宣言されている必要のある local:NumericValidationTriggerAction によって定義されたクラスへの参照があることに注意してください。
<ContentPage xmlns="http://xamarin.com/schemas/2014/forms"
             xmlns:x="http://schemas.microsoft.com/winfx/2009/xaml"
             xmlns:local="clr-namespace:WorkingWithTriggers;assembly=WorkingWithTriggers"
クラス自体では TriggerAction が実装されています。これは、トリガー イベントが発生するたびに呼び出される Invoke メソッドに対するオーバーライドを提供する必要があることを意味します。
トリガー アクションは次のように実装する必要があります。
トリガーの適用対象であるコントロールの種類に対応するジェネリック パラメーターを使用してジェネリック
TriggerAction<T>クラスを実装します。VisualElementのようなスーパークラスを使用してさまざまなコントロールで動作するトリガーを記述したり、Entryのようなコントロールの種類を指定したりできます。Invokeメソッドをオーバーライドします。これは、トリガー条件が満たされるたびに呼び出されます。必要に応じて、トリガーを宣言するときに XAML で設定できるプロパティを公開します。 この例については、付属のサンプル アプリケーションの
VisualElementPopTriggerActionクラスを参照してください。
public class NumericValidationTriggerAction : TriggerAction<Entry>
{
    protected override void Invoke (Entry entry)
    {
        double result;
        bool isValid = Double.TryParse (entry.Text, out result);
        entry.TextColor = isValid ? Color.Default : Color.Red;
    }
}
これにより、イベント トリガーを XAML から使用できるようになります。
<EventTrigger Event="TextChanged">
    <local:NumericValidationTriggerAction />
</EventTrigger>
ResourceDictionary でトリガーを共有する場合は注意が必要です。コントロール間で 1 つのインスタンスが共有されるので、1 つで構成された状態がすべてに適用されます。
イベント トリガーでは、後で説明するEnterActions と ExitActions がサポートされていないことに注意してください。
マルチ トリガー
MultiTrigger は Trigger や DataTrigger と似ていますが、複数の条件を使用できる点が異なります。 Setter がトリガーされるには、すべての条件が満たされる必要があります。
2 つの異なる入力 (email と phone) にバインドされているボタンに対するトリガーの例を次に示します。
<MultiTrigger TargetType="Button">
    <MultiTrigger.Conditions>
        <BindingCondition Binding="{Binding Source={x:Reference email},
                                   Path=Text.Length}"
                               Value="0" />
        <BindingCondition Binding="{Binding Source={x:Reference phone},
                                   Path=Text.Length}"
                               Value="0" />
    </MultiTrigger.Conditions>
    <Setter Property="IsEnabled" Value="False" />
    <!-- multiple Setter elements are allowed -->
</MultiTrigger>
Conditions コレクションには、次のように PropertyCondition 要素を含めることもできます。
<PropertyCondition Property="Text" Value="OK" />
"すべて必要" マルチ トリガーの作成
マルチ トリガーでは、すべての条件が真のときにのみコントロールが更新されます。 "すべてのフィールドの長さが 0" であることをテストするのは (すべての入力が完了する必要のあるログイン ページなど)、簡単ではありません。"Text.Length > 0 の場合" という条件が必要ですが、XAML でこれを表現することができないためです。
これは、IValueConverter を使用して行うことができます。 次のコンバーター コードでは、Text.Length のバインドが、フィールドが空かどうかを示す bool に変換されています。
public class MultiTriggerConverter : IValueConverter
{
    public object Convert(object value, Type targetType,
        object parameter, CultureInfo culture)
    {
        if ((int)value > 0) // length > 0 ?
            return true;            // some data has been entered
        else
            return false;            // input is empty
    }

    public object ConvertBack(object value, Type targetType,
        object parameter, CultureInfo culture)
    {
        throw new NotSupportedException ();
    }
}
このコンバーターをマルチ トリガーで使用するには、最初に、ページのリソース ディクショナリに追加します (カスタム xmlns:local 名前空間の定義と共に)。
<ResourceDictionary>
   <local:MultiTriggerConverter x:Key="dataHasBeenEntered" />
</ResourceDictionary>
XAML を以下に示します。 最初のマルチ トリガーの例と次の点が異なることに注意してください。
- ボタンには、
IsEnabled="false"が既定で設定されます。 - マルチ トリガーの条件では、コンバーターを使用して
Text.Lengthの値がbooleanに変換されます。 - すべての条件が
trueの場合、セッターはボタンのIsEnabledプロパティをtrueにします。
<Entry x:Name="user" Text="" Placeholder="user name" />

<Entry x:Name="pwd" Text="" Placeholder="password" />

<Button x:Name="loginButton" Text="Login"
        FontSize="Large"
        HorizontalOptions="Center"
        IsEnabled="false">
  <Button.Triggers>
    <MultiTrigger TargetType="Button">
      <MultiTrigger.Conditions>
        <BindingCondition Binding="{Binding Source={x:Reference user},
                              Path=Text.Length,
                              Converter={StaticResource dataHasBeenEntered}}"
                          Value="true" />
        <BindingCondition Binding="{Binding Source={x:Reference pwd},
                              Path=Text.Length,
                              Converter={StaticResource dataHasBeenEntered}}"
                          Value="true" />
      </MultiTrigger.Conditions>
      <Setter Property="IsEnabled" Value="True" />
    </MultiTrigger>
  </Button.Triggers>
</Button>
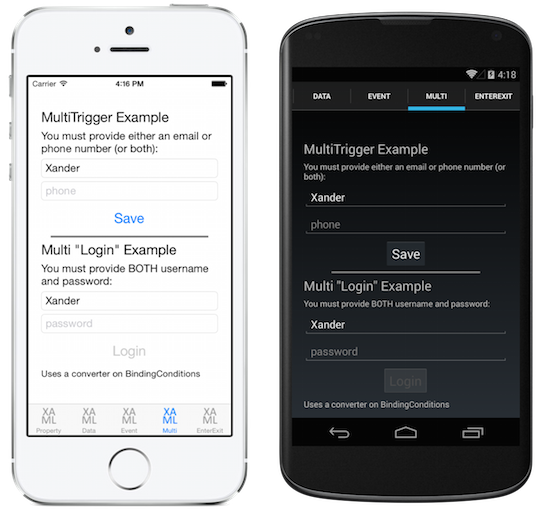
次のスクリーンショットは、上記の 2 つのマルチ トリガーの例の違いを示したものです。 画面の上部では、[Save] ボタンを有効にするには、1 つの Entry へのテキスト入力だけで十分です。
画面の下部では、両方のフィールドにデータを入力するまで、[Login] ボタンはアクティブになりません。
EnterActions と ExitActions
トリガーが発生したときの変更を実装するもう 1 つの方法は、EnterActions および ExitActions コレクションを追加して、TriggerAction<T> の実装を指定することです。
EnterActions コレクションは、トリガー条件が満たされると呼び出される TriggerAction オブジェクトの IList を定義するのに使用されます。 ExitActions コレクションは、トリガー条件が満たされなくなったら呼び出される TriggerAction オブジェクトの IList を定義するのに使用されます。
Note
EnterActions コレクションと ExitActions コレクションで定義されている TriggerAction オブジェクトは、EventTrigger クラスによって無視されます。
トリガーで Setter と共に EnterActions と ExitActions の "両方" を提供できますが、Setter はすぐに呼び出されることに注意してください (EnterAction または ExitAction が完了するのを待機しません)。 代わりに、コードですべてを実行し、Setter をまったく使用しないこともできます。
<Entry Placeholder="enter job title">
    <Entry.Triggers>
        <Trigger TargetType="Entry"
                 Property="Entry.IsFocused" Value="True">
            <Trigger.EnterActions>
                <local:FadeTriggerAction StartsFrom="0" />
            </Trigger.EnterActions>

            <Trigger.ExitActions>
                <local:FadeTriggerAction StartsFrom="1" />
            </Trigger.ExitActions>
            <!-- You can use both Enter/Exit and Setter together if required -->
        </Trigger>
    </Entry.Triggers>
</Entry>
例のごとく、XAML でクラスを参照するときは、次のように xmlns:local などの名前空間を宣言する必要があります。
<ContentPage xmlns="http://xamarin.com/schemas/2014/forms"
             xmlns:x="http://schemas.microsoft.com/winfx/2009/xaml"
             xmlns:local="clr-namespace:WorkingWithTriggers;assembly=WorkingWithTriggers"
FadeTriggerAction のコードを次に示します。
public class FadeTriggerAction : TriggerAction<VisualElement>
{
    public int StartsFrom { set; get; }

    protected override void Invoke(VisualElement sender)
    {
        sender.Animate("FadeTriggerAction", new Animation((d) =>
        {
            var val = StartsFrom == 1 ? d : 1 - d;
            // so i was aiming for a different color, but then i liked the pink :)
            sender.BackgroundColor = Color.FromRgb(1, val, 1);
        }),
        length: 1000, // milliseconds
        easing: Easing.Linear);
    }
}
状態トリガー
状態トリガーは VisualState が適用される条件を定義するための特殊なトリガーのグループです。
状態トリガーは、VisualState の StateTriggers コレクションに追加されます。 このコレクションには、1 つの状態トリガーを含めることも、複数の状態トリガーを含めることもできます。 コレクション内のいずれかの状態トリガーがアクティブになっていると、VisualState が適用されます。
状態トリガーを使用してビジュアルの状態を制御する場合、Xamarin.Forms では、アクティブにするトリガー (および対応する VisualState) を決定するために、次の優先順位規則が使用されます。
StateTriggerBaseから派生したトリガー。MinWindowWidth条件の適用によってアクティブにされたAdaptiveTrigger。MinWindowHeight条件の適用によってアクティブにされたAdaptiveTrigger。
複数のトリガーが同時にアクティブにされた場合 (たとえば、2 つのカスタム トリガー)、マークアップで最初に宣言されたトリガーが優先されます。
Note
状態トリガーは、Style で設定することも、要素で直接設定することもできます。
ビジュアルの状態の詳細については、「Xamarin.Forms Visual State Manager」をご覧ください。
状態トリガー
StateTriggerBase クラスから派生する StateTrigger クラスには、バインド可能な IsActive プロパティがあります。 StateTrigger では、IsActive プロパティの値が変更されたときに VisualState の変更がトリガーされます。
すべての状態トリガーの基底クラスである StateTriggerBase クラスには、IsActive プロパティと IsActiveChanged イベントがあります。 このイベントは、VisualState が変更されるたびに発生します。 さらに、StateTriggerBase クラスには、オーバーライド可能な OnAttached メソッドと OnDetached メソッドがあります。
重要
バインド可能な StateTrigger.IsActive プロパティによって、継承された StateTriggerBase.IsActive プロパティが隠されます。
次の XAML の例は、StateTrigger オブジェクトを含む Style を示しています。
<Style TargetType="Grid">
    <Setter Property="VisualStateManager.VisualStateGroups">
        <VisualStateGroupList>
            <VisualStateGroup>
                <VisualState x:Name="Checked">
                    <VisualState.StateTriggers>
                        <StateTrigger IsActive="{Binding IsToggled}"
                                      IsActiveChanged="OnCheckedStateIsActiveChanged" />
                    </VisualState.StateTriggers>
                    <VisualState.Setters>
                        <Setter Property="BackgroundColor"
                                Value="Black" />
                    </VisualState.Setters>
                </VisualState>
                <VisualState x:Name="Unchecked">
                    <VisualState.StateTriggers>
                        <StateTrigger IsActive="{Binding IsToggled, Converter={StaticResource inverseBooleanConverter}}"
                                      IsActiveChanged="OnUncheckedStateIsActiveChanged" />
                    </VisualState.StateTriggers>
                    <VisualState.Setters>
                        <Setter Property="BackgroundColor"
                                Value="White" />
                    </VisualState.Setters>
                </VisualState>
            </VisualStateGroup>
        </VisualStateGroupList>
    </Setter>
</Style>
この例では、暗黙的な Style によって Grid オブジェクトがターゲットにされています。 バインドされたオブジェクトの IsToggled プロパティが true の場合、Grid の背景色は黒に設定されます。 バインドされたオブジェクトの IsToggled プロパティが false になると、VisualState の変更がトリガーされ、Grid の背景色が白になります。
さらに、VisualState の変更が発生するたびに、VisualState の IsActiveChanged イベントが発生します。 各 VisualState によって、このイベントに対するイベント ハンドラーが登録されます。
void OnCheckedStateIsActiveChanged(object sender, EventArgs e)
{
    StateTriggerBase stateTrigger = sender as StateTriggerBase;
    Console.WriteLine($"Checked state active: {stateTrigger.IsActive}");
}

void OnUncheckedStateIsActiveChanged(object sender, EventArgs e)
{
    StateTriggerBase stateTrigger = sender as StateTriggerBase;
    Console.WriteLine($"Unchecked state active: {stateTrigger.IsActive}");
}
この例では、IsActiveChanged イベントに対するハンドラーが起動すると、ハンドラーによって VisualState がアクティブかどうかを示す情報が出力されます。 たとえば、ビジュアルの状態が Checked から Unchecked に変更されると、次のメッセージがコンソール ウィンドウに出力されます。
Checked state active: False
Unchecked state active: True
Note
カスタム状態のトリガーを作成するには、StateTriggerBase クラスから派生させ、OnAttached メソッドと OnDetached メソッドをオーバーライドして、必要な登録とクリーンアップを実行します。
アダプティブ トリガー
AdaptiveTrigger では、ウィンドウが指定した高さまたは幅になると、VisualState の変更がトリガーされます。 このトリガーには、次の 2 つのバインド可能なプロパティがあります。
MinWindowHeight(double型)。VisualStateが適用されるウィンドウの最小の高さを示します。MinWindowWidth(double型)。VisualStateが適用されるウィンドウの最小の幅を示します。
Note
AdaptiveTrigger は StateTriggerBase クラスから派生しているため、IsActiveChanged イベントに対してイベント ハンドラーをアタッチできます。
次の XAML の例は、AdaptiveTrigger オブジェクトを含む Style を示しています。
<Style TargetType="StackLayout">
    <Setter Property="VisualStateManager.VisualStateGroups">
        <VisualStateGroupList>
            <VisualStateGroup>
                <VisualState x:Name="Vertical">
                    <VisualState.StateTriggers>
                        <AdaptiveTrigger MinWindowWidth="0" />
                    </VisualState.StateTriggers>
                    <VisualState.Setters>
                        <Setter Property="Orientation"
                                Value="Vertical" />
                    </VisualState.Setters>
                </VisualState>
                <VisualState x:Name="Horizontal">
                    <VisualState.StateTriggers>
                        <AdaptiveTrigger MinWindowWidth="800" />
                    </VisualState.StateTriggers>
                    <VisualState.Setters>
                        <Setter Property="Orientation"
                                Value="Horizontal" />
                    </VisualState.Setters>
                </VisualState>
            </VisualStateGroup>
        </VisualStateGroupList>
    </Setter>
</Style>
この例では、暗黙的な Style によって StackLayout オブジェクトがターゲットにされています。 ウィンドウの幅が、デバイスに依存しない単位で 0 から 800 である場合、Style が適用される StackLayout オブジェクトの向きは垂直方向になります。 ウィンドウの幅が、デバイスに依存しない単位で >= 800 である場合、VisualState の変更がトリガーされ、StackLayout の向きが水平に変わります。


MinWindowHeight および MinWindowWidth プロパティは、個別に使用することも、相互に組み合わせて使用することもできます。 次の XAML では、両方のプロパティを設定する例を示します。
<AdaptiveTrigger MinWindowWidth="800"
                 MinWindowHeight="1200"/>
この例では、AdaptiveTrigger によって、現在のウィンドウの幅がデバイスに依存しない単位で > = 800 であり、かつ現在のウィンドウの高さがデバイスに依存しない単位で > = 1200 である場合に、対応する VisualState が適用されることが示されています。
状態トリガーの比較
CompareStateTrigger では、プロパティが特定の値と等しいときに VisualState の変更がトリガーされます。 このトリガーには、次の 2 つのバインド可能なプロパティがあります。
Property(object型)。トリガーによって比較されているプロパティを示します。Value(object型)。VisualStateが適用される値を示します。
Note
CompareStateTrigger は StateTriggerBase クラスから派生しているため、IsActiveChanged イベントに対してイベント ハンドラーをアタッチできます。
次の XAML の例は、CompareStateTrigger オブジェクトを含む Style を示しています。
<Style TargetType="Grid">
    <Setter Property="VisualStateManager.VisualStateGroups">
        <VisualStateGroupList>
            <VisualStateGroup>
                <VisualState x:Name="Checked">
                    <VisualState.StateTriggers>
                        <CompareStateTrigger Property="{Binding Source={x:Reference checkBox}, Path=IsChecked}"
                                             Value="True" />
                    </VisualState.StateTriggers>
                    <VisualState.Setters>
                        <Setter Property="BackgroundColor"
                                Value="Black" />
                    </VisualState.Setters>
                </VisualState>
                <VisualState x:Name="Unchecked">
                    <VisualState.StateTriggers>
                        <CompareStateTrigger Property="{Binding Source={x:Reference checkBox}, Path=IsChecked}"
                                             Value="False" />
                    </VisualState.StateTriggers>
                    <VisualState.Setters>
                        <Setter Property="BackgroundColor"
                                Value="White" />
                    </VisualState.Setters>
                </VisualState>
            </VisualStateGroup>
        </VisualStateGroupList>
    </Setter>
</Style>
...
<Grid>
    <Frame BackgroundColor="White"
           CornerRadius="12"
           Margin="24"
           HorizontalOptions="Center"
           VerticalOptions="Center">
        <StackLayout Orientation="Horizontal">
            <CheckBox x:Name="checkBox"
                      VerticalOptions="Center" />
            <Label Text="Check the CheckBox to modify the Grid background color."
                   VerticalOptions="Center" />
        </StackLayout>
    </Frame>
</Grid>
この例では、暗黙的な Style によって Grid オブジェクトがターゲットにされています。 CheckBox の IsChecked プロパティが false の場合、Grid の背景色は白に設定されます。 CheckBox.IsChecked プロパティが true になると、VisualState の変更がトリガーされ、Grid の背景色が黒になります。


デバイスの状態トリガー
DeviceStateTrigger では、アプリが実行されているデバイスのプラットフォームに基づいて VisualState の変更がトリガーされます。 このトリガーには、1 つのバインド可能なプロパティがあります。
Device(string型)。VisualStateが適用されるデバイスのプラットフォームを示します。
Note
DeviceStateTrigger は StateTriggerBase クラスから派生しているため、IsActiveChanged イベントに対してイベント ハンドラーをアタッチできます。
次の XAML の例は、DeviceStateTrigger オブジェクトを含む Style を示しています。
<Style x:Key="DeviceStateTriggerPageStyle"
       TargetType="ContentPage">
    <Setter Property="VisualStateManager.VisualStateGroups">
        <VisualStateGroupList>
            <VisualStateGroup>
                <VisualState x:Name="iOS">
                    <VisualState.StateTriggers>
                        <DeviceStateTrigger Device="iOS" />
                    </VisualState.StateTriggers>
                    <VisualState.Setters>
                        <Setter Property="BackgroundColor"
                                Value="Silver" />
                    </VisualState.Setters>
                </VisualState>
                <VisualState x:Name="Android">
                    <VisualState.StateTriggers>
                        <DeviceStateTrigger Device="Android" />
                    </VisualState.StateTriggers>
                    <VisualState.Setters>
                        <Setter Property="BackgroundColor"
                                Value="#2196F3" />
                    </VisualState.Setters>
                </VisualState>
                <VisualState x:Name="UWP">
                    <VisualState.StateTriggers>
                        <DeviceStateTrigger Device="UWP" />
                    </VisualState.StateTriggers>
                    <VisualState.Setters>
                        <Setter Property="BackgroundColor"
                                Value="Aquamarine" />
                    </VisualState.Setters>
                </VisualState>
            </VisualStateGroup>
        </VisualStateGroupList>
    </Setter>
</Style>
この例では、明示的な Style によって ContentPage オブジェクトがターゲットにされています。 このスタイルを使用する ContentPage オブジェクトでは、その背景色が、iOS ではシルバーに、Android では淡い青に、UWP ではアクアマリンに設定されます。 次のスクリーンショットは、iOS と Android で生成されるページを示しています。

向きの状態トリガー
OrientationStateTrigger では、デバイスの向きが変更されたときに VisualState の変更がトリガーされます。 このトリガーには、1 つのバインド可能なプロパティがあります。
Orientation(DeviceOrientation型)。VisualStateが適用される向きを示します。
Note
OrientationStateTrigger は StateTriggerBase クラスから派生しているため、IsActiveChanged イベントに対してイベント ハンドラーをアタッチできます。
次の XAML の例は、OrientationStateTrigger オブジェクトを含む Style を示しています。
<Style x:Key="OrientationStateTriggerPageStyle"
       TargetType="ContentPage">
    <Setter Property="VisualStateManager.VisualStateGroups">
        <VisualStateGroupList>
            <VisualStateGroup>
                <VisualState x:Name="Portrait">
                    <VisualState.StateTriggers>
                        <OrientationStateTrigger Orientation="Portrait" />
                    </VisualState.StateTriggers>
                    <VisualState.Setters>
                        <Setter Property="BackgroundColor"
                                Value="Silver" />
                    </VisualState.Setters>
                </VisualState>
                <VisualState x:Name="Landscape">
                    <VisualState.StateTriggers>
                        <OrientationStateTrigger Orientation="Landscape" />
                    </VisualState.StateTriggers>
                    <VisualState.Setters>
                        <Setter Property="BackgroundColor"
                                Value="White" />
                    </VisualState.Setters>
                </VisualState>
            </VisualStateGroup>
        </VisualStateGroupList>
    </Setter>
</Style>
この例では、明示的な Style によって ContentPage オブジェクトがターゲットにされています。 このスタイルを使用する ContentPage オブジェクトでは、縦向きのときはその背景色がシルバーに、横向きのときはその背景色が白に設定されます。