Xamarin.Forms BoxView
BoxView は、指定した幅、高さ、色の単純な四角形をレンダリングします。 BoxView は、装飾、基本的なグラフィックス、およびタッチによるユーザーとの対話に使用できます。
Xamarin.Forms には組み込みのベクター グラフィックス システムがないため、BoxView は補正に役立ちます。 この記事で説明するサンプル プログラムの一部では、BoxView をグラフィックスのレンダリングに使用します。 BoxView を特定の幅と太さの線になるようにサイズ設定し、Rotation プロパティを使用して任意の角度で回転させることができます。
BoxView は単純なグラフィックスを模倣することもできますが、より高度なグラフィックス要件については、「Xamarin.Forms での SkiaSharp の使用」を調べることもできます。
BoxView の色とサイズの設定
通常は、次の BoxView のプロパティを設定します。
Colorを使用して色を設定します。CornerRadiusを使用してそのコーナー半径を設定します。WidthRequestを使用して、デバイスに依存しない単位でBoxViewの幅を設定します。HeightRequestを使用して、BoxViewの高さを設定します。
Color プロパティの型は Color です。このプロパティは、AliceBlue から YellowGreen までのアルファベット順の名前付きの色の 141 個の静的読み取り専用フィールドを含む、任意の Color 値に設定できます。
CornerRadius プロパティの型は CornerRadius です。このプロパティは、単一の double の均一なコーナー半径値、または BoxView の左上、右上、左下、右下に適用される 4 つの double 値で定義された CornerRadius 構造体に設定できます。
WidthRequest および HeightRequest プロパティは、BoxView がレイアウトで "制約されていない" 場合にのみ役割を果たします。 これは、レイアウト コンテナーが子のサイズを認識する必要がある場合 (たとえば、BoxView が Grid レイアウト内の自動サイズのセルの子である場合) です。 BoxView は、その HorizontalOptions および VerticalOptions プロパティが LayoutOptions.Fill 以外の値に設定されている場合にも制約されません。 BoxView が制約されておらず、WidthRequest および HeightRequest プロパティが設定されていない場合、幅または高さは既定値の 40 単位、モバイル デバイスでは約 1/4 インチに設定されます。
BoxView がレイアウト内で "制約されている" 場合、WidthRequest および HeightRequest プロパティは無視されます。その場合、レイアウト コンテナーによって独自のサイズが BoxView で設定されます。
BoxView では、一方の寸法を制約ありにし、他の寸法を制約なしにすることができます。 たとえば、BoxView が垂直 StackLayout の子である場合、BoxView の垂直ディメンションは制約されず、その水平ディメンションは一般に制約されます。 ただし、その水平ディメンションには例外があります。BoxView でその HorizontalOptions プロパティが LayoutOptions.Fill 以外のものに設定されている場合、水平ディメンションも制約されません。 また、StackLayout 自体が制約のない水平ディメンションを持つことも可能です。その場合、BoxView も、水平方向に制約されなくなります。
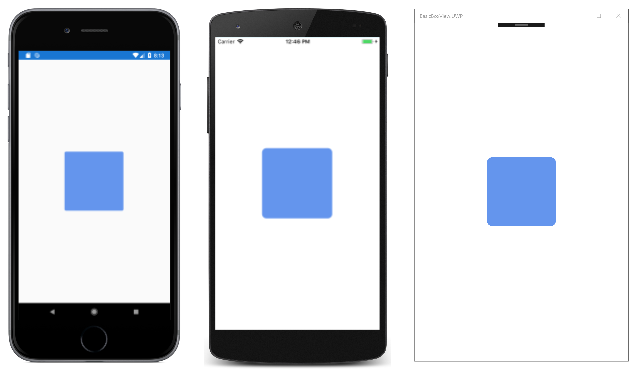
BasicBoxView サンプルでは、ページの中央に 1 インチの四角形の制約のない BoxView が表示されます。
<ContentPage xmlns="http://xamarin.com/schemas/2014/forms"
             xmlns:x="http://schemas.microsoft.com/winfx/2009/xaml"
             xmlns:local="clr-namespace:BasicBoxView"
             x:Class="BasicBoxView.MainPage">

    <BoxView Color="CornflowerBlue"
             CornerRadius="10"
             WidthRequest="160"
             HeightRequest="160"
             VerticalOptions="Center"
             HorizontalOptions="Center" />

</ContentPage>
結果は次のとおりです。
VerticalOptions および HorizontalOptions プロパティが BoxView タグから削除されるか、または Fill に設定されている場合、BoxView はページのサイズによって制約され、ページ全体に展開されます。
BoxView を AbsoluteLayout の子にすることもできます。 その場合、BoxView の場所とサイズは、LayoutBounds に添付されたバインド可能なプロパティを使用して設定されます。 AbsoluteLayout については、AbsoluteLayout に関する記事で説明します。
以下のサンプル プログラムには、これらすべてのケースの例が表示されます。
テキスト装飾のレンダリング
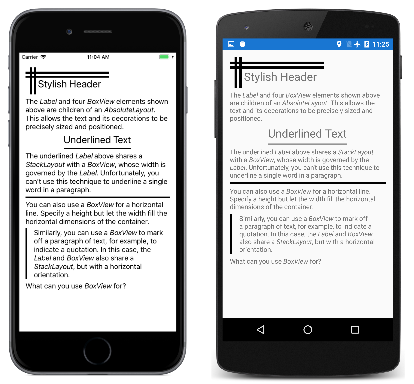
BoxView を使用すると、ページに水平方向と垂直方向の線の形で簡単な装飾を追加できます。 TextDecoration サンプルでこれを示します。 プログラムのすべてのビジュアルは MainPage.xaml ファイルで定義されています。これには、次に示すいくつかの Label と BoxViewStackLayout 要素が含まれています。
<ContentPage xmlns="http://xamarin.com/schemas/2014/forms"
             xmlns:x="http://schemas.microsoft.com/winfx/2009/xaml"
             xmlns:local="clr-namespace:TextDecoration"
             x:Class="TextDecoration.MainPage">
    <ContentPage.Padding>
        <OnPlatform x:TypeArguments="Thickness">
            <On Platform="iOS" Value="0, 20, 0, 0" />
        </OnPlatform>
    </ContentPage.Padding>

    <ContentPage.Resources>
        <ResourceDictionary>
            <Style TargetType="BoxView">
                <Setter Property="Color" Value="Black" />
            </Style>
        </ResourceDictionary>
    </ContentPage.Resources>

    <ScrollView Margin="15">
        <StackLayout>

            ···

        </StackLayout>
    </ScrollView>
</ContentPage>
次のマークアップはすべて、StackLayout の子です。 このマークアップは、Label 要素で使用されるいくつかの種類の装飾 BoxView 要素で構成されます。
ページの上部にあるスタイリッシュなヘッダーは、AbsoluteLayout によって実現されています。その子は 4 つの BoxView 要素と Label であり、すべての要素に特定の場所とサイズが割り当てられています。
<AbsoluteLayout>
    <BoxView AbsoluteLayout.LayoutBounds="0, 10, 200, 5" />
    <BoxView AbsoluteLayout.LayoutBounds="0, 20, 200, 5" />
    <BoxView AbsoluteLayout.LayoutBounds="10, 0, 5, 65" />
    <BoxView AbsoluteLayout.LayoutBounds="20, 0, 5, 65" />
    <Label Text="Stylish Header"
           FontSize="24"
           AbsoluteLayout.LayoutBounds="30, 25, AutoSize, AutoSize"/>
</AbsoluteLayout>
XAML ファイルでは、AbsoluteLayout の後に、AbsoluteLayout を説明する書式設定されたテキストとともに Label が続きます。
テキスト文字列に下線を引くには、Label と BoxView の両方を、その HorizontalOptions 値が Fill 以外に設定されている StackLayout で囲みます。 StackLayout の幅は、Label の幅 によって制御され、BoxView にその幅が適用されます。 BoxView には、明示的な高さのみが割り当てられます。
<StackLayout HorizontalOptions="Center">
    <Label Text="Underlined Text"
           FontSize="24" />
    <BoxView HeightRequest="2" />
</StackLayout>
この手法を使用して、長いテキスト文字列または段落内の個々の単語に下線を引くことはできません。
BoxView を使用して、HTML の hr (水平方向の罫線) 要素のようにすることもできます。 単純に、BoxView の幅を、その親コンテナーによって決定します。この場合は StackLayout になります。
<BoxView HeightRequest="3" />
最後に、テキストの段落の一方の側に垂直線を描画できます。これには、BoxView と Label の両方を水平方向の StackLayoutで囲みます。 この場合、BoxView の高さは StackLayout の高さと同じであり、これは Label の高さによって制御されます。
<StackLayout Orientation="Horizontal">
    <BoxView WidthRequest="4"
             Margin="0, 0, 10, 0" />
    <Label>

        ···

    </Label>
</StackLayout>
BoxView を使用して色を一覧表示する
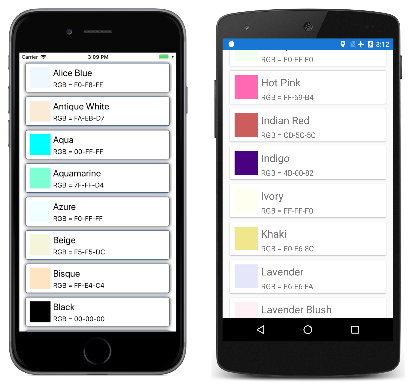
BoxView は色の表示に便利です。 このプログラムでは、ListView を使用して、Xamarin.FormsColor 構造体のすべてのパブリック静的読み取り専用フィールドを一覧表示します。
ListViewColors プログラムには、NamedColor という名前のクラスが含まれています。 静的コンストラクターはリフレクションを使用して Color 構造体のすべてのフィールドにアクセスし、それぞれに NamedColor オブジェクトを作成します。 これらは静的 All プロパティに格納されます。
public class NamedColor
{
    // Instance members.
    private NamedColor()
    {
    }

    public string Name { private set; get; }

    public string FriendlyName { private set; get; }

    public Color Color { private set; get; }

    public string RgbDisplay { private set; get; }

    // Static members.
    static NamedColor()
    {
        List<NamedColor> all = new List<NamedColor>();
        StringBuilder stringBuilder = new StringBuilder();

        // Loop through the public static fields of the Color structure.
        foreach (FieldInfo fieldInfo in typeof(Color).GetRuntimeFields ())
        {
            if (fieldInfo.IsPublic &&
                fieldInfo.IsStatic &&
                fieldInfo.FieldType == typeof (Color))
            {
                // Convert the name to a friendly name.
                string name = fieldInfo.Name;
                stringBuilder.Clear();
                int index = 0;

                foreach (char ch in name)
                {
                    if (index != 0 && Char.IsUpper(ch))
                    {
                        stringBuilder.Append(' ');
                    }
                    stringBuilder.Append(ch);
                    index++;
                }

                // Instantiate a NamedColor object.
                Color color = (Color)fieldInfo.GetValue(null);

                NamedColor namedColor = new NamedColor
                {
                    Name = name,
                    FriendlyName = stringBuilder.ToString(),
                    Color = color,
                    RgbDisplay = String.Format("{0:X2}-{1:X2}-{2:X2}",
                                               (int)(255 * color.R),
                                               (int)(255 * color.G),
                                               (int)(255 * color.B))
                };

                // Add it to the collection.
                all.Add(namedColor);
            }
        }
        all.TrimExcess();
        All = all;
    }

    public static IList<NamedColor> All { private set; get; }
}
プログラム ビジュアルは、XAML ファイルで説明されています。 ListView の ItemsSourceプロパティは静的 NamedColor.All プロパティに設定されます。つまり、個々のすべての NamedColor オブジェクトが ListView によって表示されます。
<ContentPage xmlns="http://xamarin.com/schemas/2014/forms"
             xmlns:x="http://schemas.microsoft.com/winfx/2009/xaml"
             xmlns:local="clr-namespace:ListViewColors"
             x:Class="ListViewColors.MainPage">
    <ContentPage.Padding>
        <OnPlatform x:TypeArguments="Thickness">
            <On Platform="iOS" Value="10, 20, 10, 0" />
            <On Platform="Android, UWP" Value="10, 0" />
        </OnPlatform>
    </ContentPage.Padding>

    <ListView SeparatorVisibility="None"
              ItemsSource="{x:Static local:NamedColor.All}">
        <ListView.RowHeight>
            <OnPlatform x:TypeArguments="x:Int32">
                <On Platform="iOS, Android" Value="80" />
                <On Platform="UWP" Value="90" />
            </OnPlatform>
        </ListView.RowHeight>

        <ListView.ItemTemplate>
            <DataTemplate>
                <ViewCell>
                    <ContentView Padding="5">
                        <Frame OutlineColor="Accent"
                               Padding="10">
                            <StackLayout Orientation="Horizontal">
                                <BoxView Color="{Binding Color}"
                                         WidthRequest="50"
                                         HeightRequest="50" />
                                <StackLayout>
                                    <Label Text="{Binding FriendlyName}"
                                           FontSize="22"
                                           VerticalOptions="StartAndExpand" />
                                    <Label Text="{Binding RgbDisplay, StringFormat='RGB = {0}'}"
                                           FontSize="16"
                                           VerticalOptions="CenterAndExpand" />
                                </StackLayout>
                            </StackLayout>
                        </Frame>
                    </ContentView>
                </ViewCell>
            </DataTemplate>
        </ListView.ItemTemplate>
    </ListView>
</ContentPage>
NamedColor オブジェクトは、ListView のデータ テンプレートとして設定されている ViewCell オブジェクトによって書式設定されます。 このテンプレートには BoxView が含まれており、その Color プロパティは NamedColor オブジェクトの Color プロパティにバインドされています。
BoxView をサブクラス化してライフ ゲームをプレイする
ライフ ゲームは数学者ジョン・コンウェイによって発明され、1970 年代に『サイエンティフィック・アメリカン』のページで広まったセル オートマトンです。 詳しい紹介は、ウィキペディアの記事「コンウェイのライフ ゲーム」で説明されています。
Xamarin.FormsGameOfLife プログラムは、BoxView から派生する LifeCell という名前のクラスを定義します。 このクラスは、ライフ ゲーム内の個々のセルのロジックをカプセル化します。
class LifeCell : BoxView
{
    bool isAlive;

    public event EventHandler Tapped;

    public LifeCell()
    {
        BackgroundColor = Color.White;

        TapGestureRecognizer tapGesture = new TapGestureRecognizer();
        tapGesture.Tapped += (sender, args) =>
        {
            Tapped?.Invoke(this, EventArgs.Empty);
        };
        GestureRecognizers.Add(tapGesture);
    }

    public int Col { set; get; }

    public int Row { set; get; }

    public bool IsAlive
    {
        set
        {
            if (isAlive != value)
            {
                isAlive = value;
                BackgroundColor = isAlive ? Color.Black : Color.White;
            }
        }
        get
        {
            return isAlive;
        }
    }
}
LifeCell は、さらに 3 つのプロパティを BoxView に追加します。Col および Row プロパティはグリッド内のセルの位置を格納し、IsAlive プロパティはその状態を示します。 また、IsAlive プロパティは、セルがアクティブな場合に BoxView の Color プロパティを黒に設定し、セルがアクティブでない場合は白に設定します。
また、LifeCell はユーザーがセルをタップしてセルの状態を切り替えることができるように、TapGestureRecognizer をインストールします。 このクラスは、ジェスチャ認識エンジンからの Tapped イベントを独自の Tapped イベントに変換します。
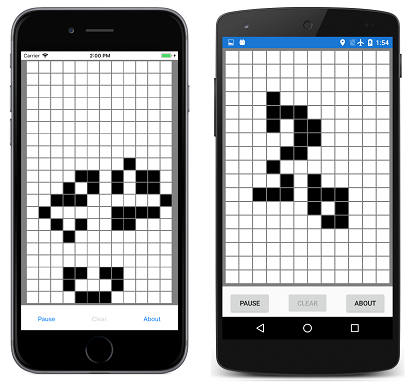
GameOfLife プログラムには、ゲームのロジックの多くをカプセル化する LifeGrid クラスと、プログラムのビジュアルを処理する MainPage クラスも含まれています。 これらには、ゲームのルールを説明するオーバーレイが含まれます。 ページ上の数百の LifeCell オブジェクトを示す、動作中のプログラムを次に示します。
デジタル クロックの作成
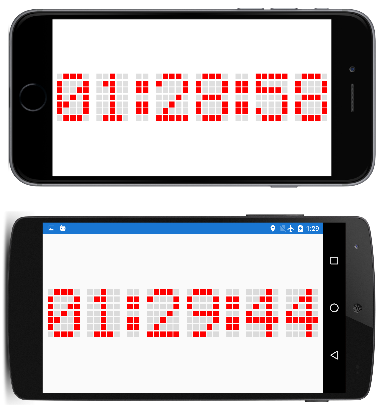
DotMatrixClock プログラムは、210 個のBoxView 要素を作成して、昔ながらの 5 x 7 ドット マトリックス表示のドットをシミュレートします。 縦モードまたは横モードで時刻を読み取ることができますが、横モードでは大きくなります。
XAML ファイルは、クロックに使用される AbsoluteLayout をインスタンス化するだけです。
<ContentPage xmlns="http://xamarin.com/schemas/2014/forms"
             xmlns:x="http://schemas.microsoft.com/winfx/2009/xaml"
             xmlns:local="clr-namespace:DotMatrixClock"
             x:Class="DotMatrixClock.MainPage"
             Padding="10"
             SizeChanged="OnPageSizeChanged">

    <AbsoluteLayout x:Name="absoluteLayout"
                    VerticalOptions="Center" />
</ContentPage>
それ以外はすべて分離コード ファイルで行われます。 ドット マトリックス表示ロジックは、10 桁の各数字とコロンに対応するドットを記述する複数の配列の定義によって大幅に簡略化されています。
public partial class MainPage : ContentPage
{
    // Total dots horizontally and vertically.
    const int horzDots = 41;
    const int vertDots = 7;

    // 5 x 7 dot matrix patterns for 0 through 9.
    static readonly int[, ,] numberPatterns = new int[10, 7, 5]
    {
        {
            { 0, 1, 1, 1, 0}, { 1, 0, 0, 0, 1}, { 1, 0, 0, 1, 1}, { 1, 0, 1, 0, 1},
            { 1, 1, 0, 0, 1}, { 1, 0, 0, 0, 1}, { 0, 1, 1, 1, 0}
        },
        {
            { 0, 0, 1, 0, 0}, { 0, 1, 1, 0, 0}, { 0, 0, 1, 0, 0}, { 0, 0, 1, 0, 0},
            { 0, 0, 1, 0, 0}, { 0, 0, 1, 0, 0}, { 0, 1, 1, 1, 0}
        },
        {
            { 0, 1, 1, 1, 0}, { 1, 0, 0, 0, 1}, { 0, 0, 0, 0, 1}, { 0, 0, 0, 1, 0},
            { 0, 0, 1, 0, 0}, { 0, 1, 0, 0, 0}, { 1, 1, 1, 1, 1}
        },
        {
            { 1, 1, 1, 1, 1}, { 0, 0, 0, 1, 0}, { 0, 0, 1, 0, 0}, { 0, 0, 0, 1, 0},
            { 0, 0, 0, 0, 1}, { 1, 0, 0, 0, 1}, { 0, 1, 1, 1, 0}
        },
        {
            { 0, 0, 0, 1, 0}, { 0, 0, 1, 1, 0}, { 0, 1, 0, 1, 0}, { 1, 0, 0, 1, 0},
            { 1, 1, 1, 1, 1}, { 0, 0, 0, 1, 0}, { 0, 0, 0, 1, 0}
        },
        {
            { 1, 1, 1, 1, 1}, { 1, 0, 0, 0, 0}, { 1, 1, 1, 1, 0}, { 0, 0, 0, 0, 1},
            { 0, 0, 0, 0, 1}, { 1, 0, 0, 0, 1}, { 0, 1, 1, 1, 0}
        },
        {
            { 0, 0, 1, 1, 0}, { 0, 1, 0, 0, 0}, { 1, 0, 0, 0, 0}, { 1, 1, 1, 1, 0},
            { 1, 0, 0, 0, 1}, { 1, 0, 0, 0, 1}, { 0, 1, 1, 1, 0}
        },
        {
            { 1, 1, 1, 1, 1}, { 0, 0, 0, 0, 1}, { 0, 0, 0, 1, 0}, { 0, 0, 1, 0, 0},
            { 0, 1, 0, 0, 0}, { 0, 1, 0, 0, 0}, { 0, 1, 0, 0, 0}
        },
        {
            { 0, 1, 1, 1, 0}, { 1, 0, 0, 0, 1}, { 1, 0, 0, 0, 1}, { 0, 1, 1, 1, 0},
            { 1, 0, 0, 0, 1}, { 1, 0, 0, 0, 1}, { 0, 1, 1, 1, 0}
        },
        {
            { 0, 1, 1, 1, 0}, { 1, 0, 0, 0, 1}, { 1, 0, 0, 0, 1}, { 0, 1, 1, 1, 1},
            { 0, 0, 0, 0, 1}, { 0, 0, 0, 1, 0}, { 0, 1, 1, 0, 0}
        },
    };

    // Dot matrix pattern for a colon.
    static readonly int[,] colonPattern = new int[7, 2]
    {
        { 0, 0 }, { 1, 1 }, { 1, 1 }, { 0, 0 }, { 1, 1 }, { 1, 1 }, { 0, 0 }
    };

    // BoxView colors for on and off.
    static readonly Color colorOn = Color.Red;
    static readonly Color colorOff = new Color(0.5, 0.5, 0.5, 0.25);

    // Box views for 6 digits, 7 rows, 5 columns.
    BoxView[, ,] digitBoxViews = new BoxView[6, 7, 5];

    ···

}
これらのフィールドは、6 桁の数字のドット パターンを格納するための BoxView 要素の 3 次元配列で終わります。
コンストラクターは、数字とコロンのすべての BoxView 要素を作成し、コロンの BoxView 要素の Color プロパティも初期化します。
public partial class MainPage : ContentPage
{

    ···

    public MainPage()
    {
        InitializeComponent();

        // BoxView dot dimensions.
        double height = 0.85 / vertDots;
        double width = 0.85 / horzDots;

        // Create and assemble the BoxViews.
        double xIncrement = 1.0 / (horzDots - 1);
        double yIncrement = 1.0 / (vertDots - 1);
        double x = 0;

        for (int digit = 0; digit < 6; digit++)
        {
            for (int col = 0; col < 5; col++)
            {
                double y = 0;

                for (int row = 0; row < 7; row++)
                {
                    // Create the digit BoxView and add to layout.
                    BoxView boxView = new BoxView();
                    digitBoxViews[digit, row, col] = boxView;
                    absoluteLayout.Children.Add(boxView,
                                                new Rectangle(x, y, width, height),
                                                AbsoluteLayoutFlags.All);
                    y += yIncrement;
                }
                x += xIncrement;
            }
            x += xIncrement;

            // Colons between the hours, minutes, and seconds.
            if (digit == 1 || digit == 3)
            {
                int colon = digit / 2;

                for (int col = 0; col < 2; col++)
                {
                    double y = 0;

                    for (int row = 0; row < 7; row++)
                    {
                        // Create the BoxView and set the color.
                        BoxView boxView = new BoxView
                            {
                                Color = colonPattern[row, col] == 1 ?
                                            colorOn : colorOff
                            };
                        absoluteLayout.Children.Add(boxView,
                                                    new Rectangle(x, y, width, height),
                                                    AbsoluteLayoutFlags.All);
                        y += yIncrement;
                    }
                    x += xIncrement;
                }
                x += xIncrement;
            }
        }

        // Set the timer and initialize with a manual call.
        Device.StartTimer(TimeSpan.FromSeconds(1), OnTimer);
        OnTimer();
    }

    ···

}
このプログラムでは、AbsoluteLayout の相対的な配置とサイズ設定機能を使用します。 それぞれの BoxView の幅と高さは小数値に設定されます。具体的には、1 の 85% を水平方向と垂直方向のドットの数で割ります。 位置も小数値に設定されます。
すべての位置とサイズは AbsoluteLayout の合計サイズに対して相対的であるため、ページの SizeChanged ハンドラーは AbsoluteLayout の HeightRequest 値のみを設定する必要があります。
public partial class MainPage : ContentPage
{

    ···

    void OnPageSizeChanged(object sender, EventArgs args)
    {
        // No chance a display will have an aspect ratio > 41:7
        absoluteLayout.HeightRequest = vertDots * Width / horzDots;
    }

    ···

}
AbsoluteLayout ページの幅は、ページの横幅全体まで広がるため、幅が自動的に設定されます。
MainPage クラスの最後のコードではタイマー コールバックを処理し、各桁のドットに色を付けます。 分離コード ファイルの先頭にある多次元配列の定義は、このロジックをプログラムの最も簡単な部分にするのに役立ちます。
public partial class MainPage : ContentPage
{

    ···

    bool OnTimer()
    {
        DateTime dateTime = DateTime.Now;

        // Convert 24-hour clock to 12-hour clock.
        int hour = (dateTime.Hour + 11) % 12 + 1;

        // Set the dot colors for each digit separately.
        SetDotMatrix(0, hour / 10);
        SetDotMatrix(1, hour % 10);
        SetDotMatrix(2, dateTime.Minute / 10);
        SetDotMatrix(3, dateTime.Minute % 10);
        SetDotMatrix(4, dateTime.Second / 10);
        SetDotMatrix(5, dateTime.Second % 10);
        return true;
    }

    void SetDotMatrix(int index, int digit)
    {
        for (int row = 0; row < 7; row++)
            for (int col = 0; col < 5; col++)
            {
                bool isOn = numberPatterns[digit, row, col] == 1;
                Color color = isOn ? colorOn : colorOff;
                digitBoxViews[index, row, col].Color = color;
            }
    }
}
アナログ クロックの作成
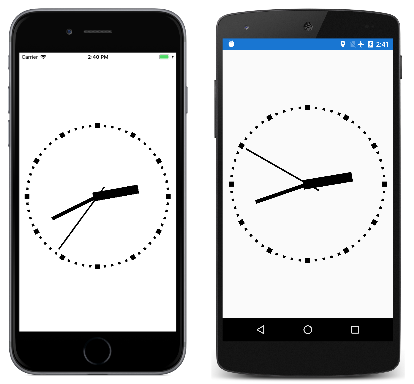
ドット行列クロックは、BoxView の明白なアプリケーションのように見えるかもしれませんが、BoxView 要素ではアナログ クロックを実現することもできます。
BoxViewClock. プログラム内のすべてのビジュアルは、AbsoluteLayout の子です。 これらの要素は、LayoutBounds 添付プロパティを使用してサイズ設定され、Rotation プロパティを使用して回転されます。
クロックの針の 3 つの BoxView 要素は XAML ファイルでインスタンス化されますが、配置やサイズ設定は行われません。
<ContentPage xmlns="http://xamarin.com/schemas/2014/forms"
             xmlns:x="http://schemas.microsoft.com/winfx/2009/xaml"
             xmlns:local="clr-namespace:BoxViewClock"
             x:Class="BoxViewClock.MainPage">
    <ContentPage.Padding>
        <OnPlatform x:TypeArguments="Thickness">
            <On Platform="iOS" Value="0, 20, 0, 0" />
        </OnPlatform>
    </ContentPage.Padding>

    <AbsoluteLayout x:Name="absoluteLayout"
                    SizeChanged="OnAbsoluteLayoutSizeChanged">

        <BoxView x:Name="hourHand"
                 Color="Black" />

        <BoxView x:Name="minuteHand"
                 Color="Black" />

        <BoxView x:Name="secondHand"
                 Color="Black" />
    </AbsoluteLayout>
</ContentPage>
分離コード ファイルのコンストラクターは、クロックの周りの目盛りの 60 個の BoxView 要素をインスタンス化します。
public partial class MainPage : ContentPage
{

    ···

    BoxView[] tickMarks = new BoxView[60];

    public MainPage()
    {
        InitializeComponent();

        // Create the tick marks (to be sized and positioned later).
        for (int i = 0; i < tickMarks.Length; i++)
        {
            tickMarks[i] = new BoxView { Color = Color.Black };
            absoluteLayout.Children.Add(tickMarks[i]);
        }

        Device.StartTimer(TimeSpan.FromSeconds(1.0 / 60), OnTimerTick);
    }

    ···

}
すべての BoxView 要素のサイズ設定と配置は、AbsoluteLayout の SizeChanged ハンドラーで行われます。 HandParams と呼ばれるクラスの内部にある小さな構造は、クロックの合計サイズに対する 3 つの各針のサイズを表します。
public partial class MainPage : ContentPage
{
    // Structure for storing information about the three hands.
    struct HandParams
    {
        public HandParams(double width, double height, double offset) : this()
        {
            Width = width;
            Height = height;
            Offset = offset;
        }

        public double Width { private set; get; }   // fraction of radius
        public double Height { private set; get; }  // ditto
        public double Offset { private set; get; }  // relative to center pivot
    }

    static readonly HandParams secondParams = new HandParams(0.02, 1.1, 0.85);
    static readonly HandParams minuteParams = new HandParams(0.05, 0.8, 0.9);
    static readonly HandParams hourParams = new HandParams(0.125, 0.65, 0.9);

    ···

 }
SizeChanged ハンドラーは、AbsoluteLayout の中心と半径を決定し、目盛りとして使用される 60 個の BoxView 要素のサイズと位置を決定します。 for ループは、これらの各 BoxView 要素の Rotation プロパティを設定することによって終了します。 SizeChanged ハンドラーの最後で、LayoutHand メソッドが呼び出され、クロックの 3 つの針のサイズと位置が設定されます。
public partial class MainPage : ContentPage
{

    ···

    void OnAbsoluteLayoutSizeChanged(object sender, EventArgs args)
    {
        // Get the center and radius of the AbsoluteLayout.
        Point center = new Point(absoluteLayout.Width / 2, absoluteLayout.Height / 2);
        double radius = 0.45 * Math.Min(absoluteLayout.Width, absoluteLayout.Height);

        // Position, size, and rotate the 60 tick marks.
        for (int index = 0; index < tickMarks.Length; index++)
        {
            double size = radius / (index % 5 == 0 ? 15 : 30);
            double radians = index * 2 * Math.PI / tickMarks.Length;
            double x = center.X + radius * Math.Sin(radians) - size / 2;
            double y = center.Y - radius * Math.Cos(radians) - size / 2;
            AbsoluteLayout.SetLayoutBounds(tickMarks[index], new Rectangle(x, y, size, size));
            tickMarks[index].Rotation = 180 * radians / Math.PI;
        }

        // Position and size the three hands.
        LayoutHand(secondHand, secondParams, center, radius);
        LayoutHand(minuteHand, minuteParams, center, radius);
        LayoutHand(hourHand, hourParams, center, radius);
    }

    void LayoutHand(BoxView boxView, HandParams handParams, Point center, double radius)
    {
        double width = handParams.Width * radius;
        double height = handParams.Height * radius;
        double offset = handParams.Offset;

        AbsoluteLayout.SetLayoutBounds(boxView,
            new Rectangle(center.X - 0.5 * width,
                          center.Y - offset * height,
                          width, height));

        // Set the AnchorY property for rotations.
        boxView.AnchorY = handParams.Offset;
    }

    ···

}
この LayoutHand メソッドは、各針を 12:00 の位置をまっすぐ指すようにサイズと位置を設定します。 メソッドの最後で、AnchorY プロパティはクロックの中心に対応する位置に設定されます。 これは回転の中心を示します。
針はタイマー コールバック関数で回転されます。
public partial class MainPage : ContentPage
{

    ···

    bool OnTimerTick()
    {
        // Set rotation angles for hour and minute hands.
        DateTime dateTime = DateTime.Now;
        hourHand.Rotation = 30 * (dateTime.Hour % 12) + 0.5 * dateTime.Minute;
        minuteHand.Rotation = 6 * dateTime.Minute + 0.1 * dateTime.Second;

        // Do an animation for the second hand.
        double t = dateTime.Millisecond / 1000.0;

        if (t < 0.5)
        {
            t = 0.5 * Easing.SpringIn.Ease(t / 0.5);
        }
        else
        {
            t = 0.5 * (1 + Easing.SpringOut.Ease((t - 0.5) / 0.5));
        }

        secondHand.Rotation = 6 * (dateTime.Second + t);
        return true;
    }
}
秒針は少し異なる方法で扱われます。アニメーション イージング機能を適用して、動きが滑らかではなく機械的に見えるようにします。 各ティックで、秒針が少し戻ってから、その目的地を通り過ぎます。 この少しのコードは、動きのリアリズムに多くを追加します。
 サンプルのダウンロード