Xamarin.Forms CarouselView のデータ
CarouselView には、表示されるデータとその外観を定義する次のプロパティが含まれます。
IEnumerable型のItemsSourceは、表示される項目のコレクションを指定します。既定値はnullです。DataTemplate型のItemTemplateは、表示される項目のコレクション内の、各項目に適用するテンプレートを指定します。
これらのプロパティはすべて、BindableProperty オブジェクトを基盤としています。つまり、プロパティをデータ バインディングの対象にすることができます。
Note
CarouselView には、新しい項目が追加されたときの CarouselView のスクロール動作を表す ItemsUpdatingScrollMode プロパティが定義されています。 このプロパティの詳細については、「新しい項目が追加されたときのスクロール位置の制御」を参照してください。
CarouselView では、ユーザーによるスクロール時の増分データ仮想化をサポートしています。 詳細については、「増分データ読み込み」を参照してください。
CarouselView にデータを設定する
CarouselView にデータを設定するには、ItemsSource プロパティに IEnumerable を実装するコレクションを設定します。 既定では、CarouselView は項目を水平方向に表示します。
重要
基になるコレクションで項目が追加、削除、または変更されたときに CarouselView を更新する必要がある場合、基になるコレクションは、ObservableCollection などのプロパティ変更通知を送信する IEnumerable コレクションである必要があります。
CarouselView には、データ バインディングを使用して ItemsSource プロパティを IEnumerable コレクションにバインドすることでデータを設定できます。 XAML でこれを実行するには、Binding マークアップ拡張を使用します。
<CarouselView ItemsSource="{Binding Monkeys}" />
同等の C# コードを次に示します。
CarouselView carouselView = new CarouselView();
carouselView.SetBinding(ItemsView.ItemsSourceProperty, "Monkeys");
この例では、ItemsSource プロパティ データは、接続されたビューモデルの Monkeys プロパティにバインドされます。
Note
コンパイル済みのバインドを有効にして、Xamarin.Forms アプリケーションでのデータ バインディングのパフォーマンスを改善できます。 詳しくは、「コンパイル済みのバインディング」を参照してください。
CarouselView の方向を変更する方法については、「Xamarin.Forms CarouselView のレイアウト」を参照してください。 CarouselView 内の各項目の外観を定義する方法については、「項目の外観を定義する」をご覧ください。 データ バインディングの詳細については、「Xamarin.Forms のデータ バインディング」を参照してください。
項目の外観を定義
CarouselView 内の各項目の外観は、CarouselView.ItemTemplate プロパティを DataTemplate に設定して定義できます。
<CarouselView ItemsSource="{Binding Monkeys}">
    <CarouselView.ItemTemplate>
        <DataTemplate>
            <StackLayout>
                <Frame HasShadow="True"
                       BorderColor="DarkGray"
                       CornerRadius="5"
                       Margin="20"
                       HeightRequest="300"
                       HorizontalOptions="Center"
                       VerticalOptions="CenterAndExpand">
                    <StackLayout>
                        <Label Text="{Binding Name}"
                               FontAttributes="Bold"
                               FontSize="Large"
                               HorizontalOptions="Center"
                               VerticalOptions="Center" />
                        <Image Source="{Binding ImageUrl}"
                               Aspect="AspectFill"
                               HeightRequest="150"
                               WidthRequest="150"
                               HorizontalOptions="Center" />
                        <Label Text="{Binding Location}"
                               HorizontalOptions="Center" />
                        <Label Text="{Binding Details}"
                               FontAttributes="Italic"
                               HorizontalOptions="Center"
                               MaxLines="5"
                               LineBreakMode="TailTruncation" />
                    </StackLayout>
                </Frame>
            </StackLayout>
        </DataTemplate>
    </CarouselView.ItemTemplate>
</CarouselView>
同等の C# コードを次に示します。
CarouselView carouselView = new CarouselView();
carouselView.SetBinding(ItemsView.ItemsSourceProperty, "Monkeys");

carouselView.ItemTemplate = new DataTemplate(() =>
{
    Label nameLabel = new Label { ... };
    nameLabel.SetBinding(Label.TextProperty, "Name");

    Image image = new Image { ... };
    image.SetBinding(Image.SourceProperty, "ImageUrl");

    Label locationLabel = new Label { ... };
    locationLabel.SetBinding(Label.TextProperty, "Location");

    Label detailsLabel = new Label { ... };
    detailsLabel.SetBinding(Label.TextProperty, "Details");

    StackLayout stackLayout = new StackLayout
    {
        Children = { nameLabel, image, locationLabel, detailsLabel }
    };

    Frame frame = new Frame { ... };
    StackLayout rootStackLayout = new StackLayout
    {
        Children = { frame }
    };

    return rootStackLayout;
});
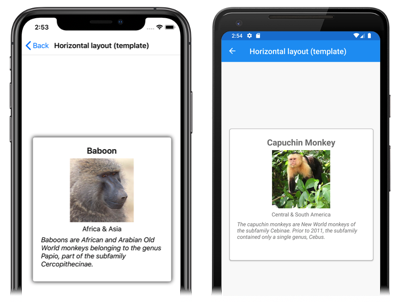
DataTemplate で指定された要素は、CarouselView の各項目の外観を定義します。 この例では、DataTemplate 内のレイアウトは StackLayout によって管理され、データは Image オブジェクトと 3 つの Label オブジェクトで表示されます。これらはすべて Monkey クラスのプロパティにバインドされています。
public class Monkey
{
    public string Name { get; set; }
    public string Location { get; set; }
    public string Details { get; set; }
    public string ImageUrl { get; set; }
}
次のスクリーンショットは、各項目をテンプレート化した結果を示しています。
データ テンプレートの詳細については、「Xamarin.Forms のデータ テンプレート」を参照してください。
実行時にアイテムの外観を選択
CarouselView.ItemTemplate プロパティを DataTemplateSelector オブジェクトに設定することで、CarouselView 内の各項目の外観を、項目の値に基づいて実行時に選択できます。
<ContentPage ...
             xmlns:controls="clr-namespace:CarouselViewDemos.Controls"
             x:Class="CarouselViewDemos.Views.HorizontalLayoutDataTemplateSelectorPage">
    <ContentPage.Resources>
        <DataTemplate x:Key="AmericanMonkeyTemplate">
            ...
        </DataTemplate>

        <DataTemplate x:Key="OtherMonkeyTemplate">
            ...
        </DataTemplate>

        <controls:MonkeyDataTemplateSelector x:Key="MonkeySelector"
                                             AmericanMonkey="{StaticResource AmericanMonkeyTemplate}"
                                             OtherMonkey="{StaticResource OtherMonkeyTemplate}" />
    </ContentPage.Resources>

    <CarouselView ItemsSource="{Binding Monkeys}"
                  ItemTemplate="{StaticResource MonkeySelector}" />
</ContentPage>
同等の C# コードを次に示します。
CarouselView carouselView = new CarouselView
{
    ItemTemplate = new MonkeyDataTemplateSelector { ... }
};
carouselView.SetBinding(ItemsView.ItemsSourceProperty, "Monkeys");
ItemTemplate プロパティは、 MonkeyDataTemplateSelector オブジェクトに設定されます。 次の例は、MonkeyDataTemplateSelector クラスを示しています。
public class MonkeyDataTemplateSelector : DataTemplateSelector
{
    public DataTemplate AmericanMonkey { get; set; }
    public DataTemplate OtherMonkey { get; set; }

    protected override DataTemplate OnSelectTemplate(object item, BindableObject container)
    {
        return ((Monkey)item).Location.Contains("America") ? AmericanMonkey : OtherMonkey;
    }
}
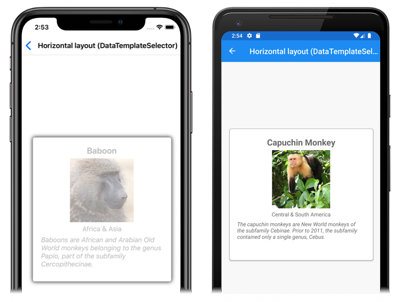
MonkeyDataTemplateSelector クラスは、さまざまなデータ テンプレートに設定される AmericanMonkey プロパティと OtherMonkeyDataTemplate プロパティを定義します。 サルの名前に「America」が含まれている場合、OnSelectTemplate オーバーライドは AmericanMonkey テンプレートを返します。 サルの名前に「America」が含まれていない場合、OnSelectTemplate オーバーライドは OtherMonkey テンプレートを返し、そのデータはグレー表示されます。
データ テンプレート セレクターの詳細については、「Xamarin.Forms DataTemplateSelector の作成」を参照してください。
重要
CarouselView を使用する場合は、DataTemplate オブジェクトのルート要素を ViewCell に設定しないでください。 CarouselView にはセルの概念がないため、これにより例外がスローされます。
インジケーターの表示
CarouselView 内のアイテムの数と現在の位置を表すインジケーターは、CarouselView の隣に表示できます。 これは IndicatorView コントロールを使用して実行できます。
<StackLayout>
    <CarouselView ItemsSource="{Binding Monkeys}"
                  IndicatorView="indicatorView">
        <CarouselView.ItemTemplate>
            <!-- DataTemplate that defines item appearance -->
        </CarouselView.ItemTemplate>
    </CarouselView>
    <IndicatorView x:Name="indicatorView"
                   IndicatorColor="LightGray"
                   SelectedIndicatorColor="DarkGray"
                   HorizontalOptions="Center" />
</StackLayout>
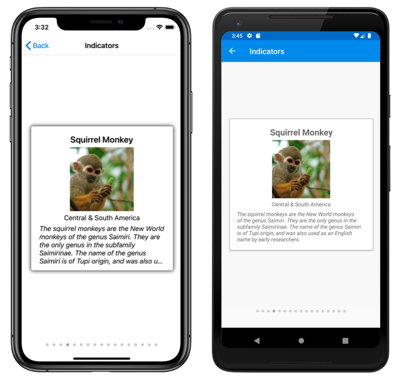
この例では、IndicatorView は CarouselView の下にレンダリングされ、CarouselView 内の各項目のインジケーターが表示されます。 IndicatorView は CarouselView.IndicatorView プロパティを IndicatorView オブジェクトに設定することで、データが設定されます。 各インジケーターは薄い灰色の円ですが、CarouselView の現在の項目を表すインジケーターは濃い灰色です。
重要
CarouselView.IndicatorView プロパティを設定すると、IndicatorView.Position プロパティが CarouselView.Position プロパティにバインドされ、IndicatorView.ItemsSource プロパティが CarouselView.ItemsSource プロパティにバインドされます。
インジケーターの詳細については、「Xamarin.Forms IndicatorView」を参照してください。
コンテキスト メニュー
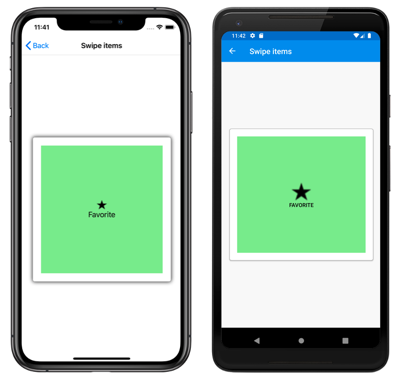
CarouselView では、スワイプ ジェスチャでコンテキスト メニューを表示する SwipeView を通じて、データ項目のコンテキスト メニューをサポートしています。 SwipeView は、コンテンツ項目をラップし、そのコンテンツ項目のコンテキスト メニュー項目を提供するコンテナー コントロールです。 したがって、CarouselView のコンテキスト メニューは、SwipeView がラップするコンテンツと、スワイプ ジェスチャによって表示されるコンテキスト メニュー項目を定義する SwipeView を作成することによって実装されます。 これは、CarouselView の中のデータの各項目の外観を定義する SwipeView を DataTemplate に追加することによって実現されます。
<CarouselView x:Name="carouselView"
              ItemsSource="{Binding Monkeys}">
    <CarouselView.ItemTemplate>
        <DataTemplate>
            <StackLayout>
                    <Frame HasShadow="True"
                           BorderColor="DarkGray"
                           CornerRadius="5"
                           Margin="20"
                           HeightRequest="300"
                           HorizontalOptions="Center"
                           VerticalOptions="CenterAndExpand">
                        <SwipeView>
                            <SwipeView.TopItems>
                                <SwipeItems>
                                    <SwipeItem Text="Favorite"
                                               IconImageSource="favorite.png"
                                               BackgroundColor="LightGreen"
                                               Command="{Binding Source={x:Reference carouselView}, Path=BindingContext.FavoriteCommand}"
                                               CommandParameter="{Binding}" />
                                </SwipeItems>
                            </SwipeView.TopItems>
                            <SwipeView.BottomItems>
                                <SwipeItems>
                                    <SwipeItem Text="Delete"
                                               IconImageSource="delete.png"
                                               BackgroundColor="LightPink"
                                               Command="{Binding Source={x:Reference carouselView}, Path=BindingContext.DeleteCommand}"
                                               CommandParameter="{Binding}" />
                                </SwipeItems>
                            </SwipeView.BottomItems>
                            <StackLayout>
                                <!-- Define item appearance -->
                            </StackLayout>
                        </SwipeView>
                    </Frame>
            </StackLayout>
        </DataTemplate>
    </CarouselView.ItemTemplate>
</CarouselView>
同等の C# コードを次に示します。
CarouselView carouselView = new CarouselView();
carouselView.SetBinding(ItemsView.ItemsSourceProperty, "Monkeys");

carouselView.ItemTemplate = new DataTemplate(() =>
{
    StackLayout stackLayout = new StackLayout();
    Frame frame = new Frame { ... };

    SwipeView swipeView = new SwipeView();
    SwipeItem favoriteSwipeItem = new SwipeItem
    {
        Text = "Favorite",
        IconImageSource = "favorite.png",
        BackgroundColor = Color.LightGreen
    };
    favoriteSwipeItem.SetBinding(MenuItem.CommandProperty, new Binding("BindingContext.FavoriteCommand", source: carouselView));
    favoriteSwipeItem.SetBinding(MenuItem.CommandParameterProperty, ".");

    SwipeItem deleteSwipeItem = new SwipeItem
    {
        Text = "Delete",
        IconImageSource = "delete.png",
        BackgroundColor = Color.LightPink
    };
    deleteSwipeItem.SetBinding(MenuItem.CommandProperty, new Binding("BindingContext.DeleteCommand", source: carouselView));
    deleteSwipeItem.SetBinding(MenuItem.CommandParameterProperty, ".");

    swipeView.TopItems = new SwipeItems { favoriteSwipeItem };
    swipeView.BottomItems = new SwipeItems { deleteSwipeItem };

    StackLayout swipeViewStackLayout = new StackLayout { ... };
    swipeView.Content = swipeViewStackLayout;
    frame.Content = swipeView;
    stackLayout.Children.Add(frame);

    return stackLayout;
});
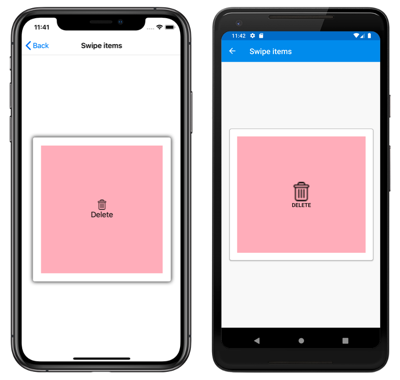
この例では、SwipeView のコンテンツは StackLayout で、CarouselView の Frame で囲まれた各項目の外観を定義します。 スワイプ項目は、SwipeView コンテンツ上でアクションを実行するために使われ、コントロールが上から、および下からスワイプされると表示されます。
SwipeView では、4 つの異なるスワイプ方向がサポートされ、スワイプ方向は、SwipeItems オブジェクトが追加される方向 SwipeItems コレクションによって定義されます。 既定では、ユーザーにタップされるとスワイプ項目が実行されます。 さらに、スワイプ項目が実行されると、スワイプ項目は非表示になり、SwipeView コンテンツが再表示されます。 ただし、これらの動作は変更できます。
SwipeView コントロールの詳細については、「Xamarin.FormsSwipeView」を参照してください。
引っ張って更新
CarouselView では RefreshView を通じて、引っ張って更新する機能がサポートされています。これにより、アイテムをプルダウンして表示されるデータを更新できます。 RefreshView は、子がスクロール可能なコンテンツをサポートしている場合に、その子に引っ張って更新する機能を提供するコンテナー コントロールです。 したがって、"引っ張って更新" を CarouselView に実装するには、そのオブジェクトを RefreshView の子として設定します。
<RefreshView IsRefreshing="{Binding IsRefreshing}"
             Command="{Binding RefreshCommand}">
    <CarouselView ItemsSource="{Binding Animals}">
        ...
    </CarouselView>
</RefreshView>
同等の C# コードを次に示します。
RefreshView refreshView = new RefreshView();
ICommand refreshCommand = new Command(() =>
{
    // IsRefreshing is true
    // Refresh data here
    refreshView.IsRefreshing = false;
});
refreshView.Command = refreshCommand;

CarouselView carouselView = new CarouselView();
carouselView.SetBinding(ItemsView.ItemsSourceProperty, "Animals");
refreshView.Content = carouselView;
// ...
ユーザーが更新を開始すると、Command プロパティで定義されている ICommand が実行され、表示中の項目が更新されます。 更新が行われている間、更新の視覚化が進行状況円のアニメーションとして表示されます。
RefreshView.IsRefreshing プロパティの値は、RefreshView の現在の状態を示します。 ユーザーによって更新がトリガーされると、このプロパティは自動的に true に切り替わります。 更新が完了したら、プロパティを false にリセットする必要があります。
RefreshView の詳細については、「Xamarin.Forms RefreshView」を参照してください。
データを増分読み込みする
CarouselView では、ユーザーによるスクロール時の増分データ仮想化をサポートしています。 これにより、ユーザーがスクロールするにつれて、Web サービスからデータのページを非同期的に読み込むなどのシナリオが可能になります。 さらに、ユーザーに空白が表示されないように、またはユーザーがスクロールする気にならないように、より多くのデータが読み込まれる時点を構成できます。
CarouselView には、データの増分読み込みを制御するための次のプロパティが定義されています。
RemainingItemsThreshold(int型):RemainingItemsThresholdReachedイベントの発生時にリストにまだ表示されていない項目のしきい値。RemainingItemsThresholdReachedCommand(ICommand型):RemainingItemsThresholdに達したときに実行されます。RemainingItemsThresholdReachedCommandParameter:object型、RemainingItemsThresholdReachedCommandに渡されるパラメーター。
また、CarouselView には、RemainingItemsThresholdReached 個の項目がまだ表示されないほど CarouselView がスクロールされると発生する RemainingItemsThreshold イベントも定義されています。 このイベントを処理して、さらに多くの項目を読み込むことができます。 さらに、RemainingItemsThresholdReached イベントが 発生すると、RemainingItemsThresholdReachedCommand が実行され、ビューモデルで増分データ読み込みを行えるようになります。
RemainingItemsThreshold プロパティの 既定値は -1 です。これは、RemainingItemsThresholdReached イベントが発生しないことを示します。 このプロパティ値が 0 の場合、RemainingItemsThresholdReached イベントは、ItemsSource 内の最後の項目が表示されたときに発生します。 0 より大きい値の場合は、まだそこまでスクロールされていない項目が ItemsSource にその数だけ含まれていると RemainingItemsThresholdReached イベントが発生します。
Note
CarouselView は、RemainingItemsThreshold プロパティの値が常に -1 以上になるようにプロパティを検証します。
次の XAML の例は、データを増分読み込みする CarouselView オブジェクトを示しています。
<CarouselView ItemsSource="{Binding Animals}"
              RemainingItemsThreshold="2"
              RemainingItemsThresholdReached="OnCarouselViewRemainingItemsThresholdReached"
              RemainingItemsThresholdReachedCommand="{Binding LoadMoreDataCommand}">
    ...
</CarouselView>
同等の C# コードを次に示します。
CarouselView carouselView = new CarouselView
{
    RemainingItemsThreshold = 2
};
carouselView.RemainingItemsThresholdReached += OnCollectionViewRemainingItemsThresholdReached;
carouselView.SetBinding(ItemsView.ItemsSourceProperty, "Animals");
このコード例では、2 つの項目がまだスクロールされていないときに RemainingItemsThresholdReached イベントが発生し、応答で OnCollectionViewRemainingItemsThresholdReached イベント ハンドラーが実行されます。
void OnCollectionViewRemainingItemsThresholdReached(object sender, EventArgs e)
{
    // Retrieve more data here and add it to the CollectionView's ItemsSource collection.
}
Note
RemainingItemsThresholdReachedCommand をビューモデルの ICommand 実装にバインドすれば、データを増分読み込みすることもできます。
 サンプルのダウンロード