Azure Cloud Services(classic)에서 Azure 진단 사용
Important
신규 고객에게는 Cloud Services(클래식)가 사용되지 않으며 모든 고객에 대해 2024년 8월 31일에 사용 중지됩니다. 새 배포에서는 새로운 Azure Resource Manager 기반 배포 모델인 Azure Cloud Services(추가 지원)를 사용해야 합니다.
Azure Diagnostics의 배경은 Azure Diagnostics 개요를 참조하세요.
작업자 역할에서 진단을 사용하는 방법
이 연습에서는 .NET EventSource 클래스를 사용하여 원격 분석 데이터를 내보내는 Azure 작업자 역할을 구현하는 방법에 대해 설명합니다. Azure Diagnostics는 원격 분석 데이터를 수집하고 이를 Azure 스토리지 계정에 저장하는 데 사용됩니다. Visual Studio 작업자 역할을 만드는 경우 Azure .NET SDK 2.4 이상 버전에서 진단 1.0을 솔루션의 일부로 자동으로 사용하도록 설정합니다. 다음 지침에서는 작업자 역할을 만들고, 솔루션에서 진단 1.0을 사용하지 않도록 설정하고, 진단 1.2 또는 1.3을 작업자 역할에 배포하기 위한 프로세스에 대해 설명합니다.
필수 조건
이 문서에서는 Azure 구독이 있으며 Visual Studio와 Azure SDK를 함께 사용 중인 것으로 가정합니다. Azure 구독이 없는 경우 무료 평가판에 등록할 수 있습니다. Azure PowerShell 버전 0.8.7 이상을 설치 및 구성해야 합니다.
1단계: 작업자 역할 만들기
- Visual Studio를 시작합니다.
- .NET Framework 4.5를 대상으로 하는 Cloud 템플릿에서 Azure Cloud Service 프로젝트를 만듭니다. 프로젝트의 이름을 "WadExample"로 지정하고 확인을 클릭합니다.
- 작업자 역할을 선택하고 확인을 클릭합니다. 프로젝트가 만들어집니다.
- 솔루션 탐색기에서 WorkerRole1 속성 파일을 두 번 클릭합니다.
- 구성 탭에서 진단 사용을 선택 취소하여 진단 1.0을 사용하지 않도록 설정합니다(Azure SDK 2.4 이전 버전).
- 솔루션을 빌드하여 오류가 없는지 확인합니다.
2단계: 코드 계측
WorkerRole.cs 내용을 다음 코드로 바꿉니다. EventSource 클래스로부터 상속되는 SampleEventSourceWriter 클래스는 다음 4개의 로깅 메서드를 구현합니다. SendEnums, MessageMethod, SetOther 및 HighFreq. WriteEvent 메서드에 대한 첫 번째 매개 변수는 각 이벤트의 ID를 저장합니다. Run 메서드는 SampleEventSourceWriter 클래스에 구현된 각각의 로깅 메서드를 10초마다 호출하는 무한 루프를 구현합니다.
using Microsoft.WindowsAzure.ServiceRuntime;
using System;
using System.Diagnostics;
using System.Diagnostics.Tracing;
using System.Net;
using System.Threading;

namespace WorkerRole1
{
    sealed class SampleEventSourceWriter : EventSource
    {
        public static SampleEventSourceWriter Log = new SampleEventSourceWriter();
        public void SendEnums(MyColor color, MyFlags flags) { if (IsEnabled())  WriteEvent(1, (int)color, (int)flags); }// Cast enums to int for efficient logging.
        public void MessageMethod(string Message) { if (IsEnabled())  WriteEvent(2, Message); }
        public void SetOther(bool flag, int myInt) { if (IsEnabled())  WriteEvent(3, flag, myInt); }
        public void HighFreq(int value) { if (IsEnabled()) WriteEvent(4, value); }

    }

    enum MyColor
    {
        Red,
        Blue,
        Green
    }

    [Flags]
    enum MyFlags
    {
        Flag1 = 1,
        Flag2 = 2,
        Flag3 = 4
    }

    public class WorkerRole : RoleEntryPoint
    {
        public override void Run()
        {
            // This is a sample worker implementation. Replace with your logic.
            Trace.TraceInformation("WorkerRole1 entry point called");

            int value = 0;

            while (true)
            {
                Thread.Sleep(10000);
                Trace.TraceInformation("Working");

                // Emit several events every time we go through the loop
                for (int i = 0; i < 6; i++)
                {
                    SampleEventSourceWriter.Log.SendEnums(MyColor.Blue, MyFlags.Flag2 | MyFlags.Flag3);
                }

                for (int i = 0; i < 3; i++)
                {
                    SampleEventSourceWriter.Log.MessageMethod("This is a message.");
                    SampleEventSourceWriter.Log.SetOther(true, 123456789);
                }

                if (value == int.MaxValue) value = 0;
                SampleEventSourceWriter.Log.HighFreq(value++);
            }
        }

        public override bool OnStart()
        {
            // Set the maximum number of concurrent connections
            ServicePointManager.DefaultConnectionLimit = 12;

            // For information on handling configuration changes
            // see the MSDN topic at https://go.microsoft.com/fwlink/?LinkId=166357.

            return base.OnStart();
        }
    }
}
3단계: 작업자 역할 배포
Warning
기존 역할에서 진단을 사용하도록 설정한 경우 패키지를 배포하면 이미 설정한 모든 확장이 비활성화됩니다. 여기에는 다음이 포함됩니다.
- Microsoft Monitoring Agent 진단
- Microsoft Azure 보안 모니터링
- Microsoft Antimalware
- Microsoft Monitoring Agent
- Microsoft Service Profiler Agent
- Windows Azure 도메인 확장
- Windows Azure Diagnostics 확장
- Windows Azure 원격 데스크톱 확장
- Windows Azure 로그 수집기
업데이트 된 역할을 배포한 후에 Azure Portal 또는 PowerShell을 통해 확장을 재설정할 수 있습니다.
- 솔루션 Explorer에서 WadExample 프로젝트를 선택한 후 빌드 메뉴에서 게시를 선택하여 Visual Studio 내에서 Azure에 작업자 역할을 배포합니다.
- 구독을 선택합니다.
- Microsoft Azure 게시 설정 대화 상자에서 새로 만들기를 선택합니다.
- 클라우드 서비스 및 Storage 계정 만들기 대화 상자에서 이름(예: "WadExample")을 입력하고 지역 또는 선호도 그룹을 선택합니다.
- 환경을 스테이징으로 설정합니다.
- 다른 설정을 적절히 수정하고 게시를 클릭합니다.
- 배포가 완료되면 Azure Portal에서 클라우드 서비스가 실행 중 상태인지 확인합니다.
4단계: 진단 구성 파일 만들기 및 확장 설치
다음 PowerShell 명령을 실행하여 공용 구성 파일 스키마 정의를 다운로드합니다.
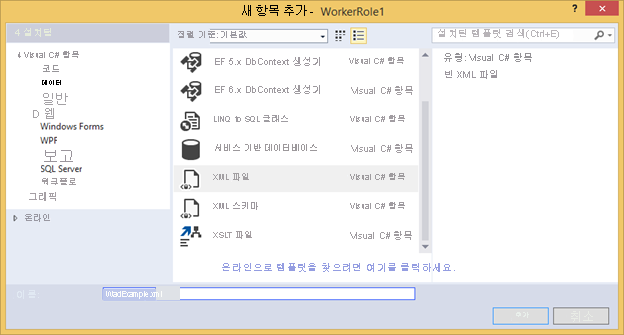
(Get-AzureServiceAvailableExtension -ExtensionName 'PaaSDiagnostics' -ProviderNamespace 'Microsoft.Azure.Diagnostics').PublicConfigurationSchema | Out-File -Encoding utf8 -FilePath 'WadConfig.xsd'WorkerRole1 프로젝트를 마우스 오른쪽 단추로 클릭하고 추가 ->새 항목… ->Visual C# 항목 ->데이터 ->XML 파일을 선택하여 WorkerRole1 프로젝트에 XML 파일을 추가합니다. 파일 이름을 “WadExample.xml”로 지정합니다.
WadConfig.xsd를 구성 파일과 연결합니다. WadExample.xml 편집기 창이 활성 창인지 확인합니다. F4를 눌러 속성 창을 엽니다. 속성 창에서 Schemas 속성을 클릭합니다. Schemas 속성에서 …를 클릭합니다. 추가 단추를 클릭하고 XSD 파일을 저장한 위치로 이동한 후 WadConfig.xsd 파일을 선택하고 확인을 클릭합니다.
WadExample.xml 구성 파일의 내용을 다음 XML로 바꾸고 파일을 저장합니다. 이 구성 파일은 각각 CPU 사용률 및 메모리 사용률을 수집할 두 가지 성능 카운터를 정의합니다. 그런 다음 이 구성에서는 SampleEventSourceWriter 클래스의 메서드에 해당하는 네 개의 이벤트를 정의합니다.
<?xml version="1.0" encoding="utf-8"?>
<PublicConfig xmlns="http://schemas.microsoft.com/ServiceHosting/2010/10/DiagnosticsConfiguration">
  <WadCfg>
    <DiagnosticMonitorConfiguration overallQuotaInMB="25000">
      <PerformanceCounters scheduledTransferPeriod="PT1M">
        <PerformanceCounterConfiguration counterSpecifier="\Processor(_Total)\% Processor Time" sampleRate="PT1M" unit="percent" />
        <PerformanceCounterConfiguration counterSpecifier="\Memory\Committed Bytes" sampleRate="PT1M" unit="bytes"/>
      </PerformanceCounters>
      <EtwProviders>
        <EtwEventSourceProviderConfiguration provider="SampleEventSourceWriter" scheduledTransferPeriod="PT5M">
          <Event id="1" eventDestination="EnumsTable"/>
          <Event id="2" eventDestination="MessageTable"/>
          <Event id="3" eventDestination="SetOtherTable"/>
          <Event id="4" eventDestination="HighFreqTable"/>
          <DefaultEvents eventDestination="DefaultTable" />
        </EtwEventSourceProviderConfiguration>
      </EtwProviders>
    </DiagnosticMonitorConfiguration>
  </WadCfg>
</PublicConfig>
5단계: 작업자 역할에 진단 설치
웹 또는 작업자 역할에서 진단을 관리하는 데 사용되는 PowerShell cmdlet은 Set-AzureServiceDiagnosticsExtension, Get-AzureServiceDiagnosticsExtension 및 Remove-AzureServiceDiagnosticsExtension입니다.
- Azure PowerShell을 엽니다.
- 작업자 역할에 진단을 설치하기 위한 스크립트를 실행합니다(StorageAccountKey를 wadexample 스토리지 계정의 스토리지 계정 키로 바꾸고 config_path를 WadExample.xml 파일에 대한 경로로 바꿈).
$storage_name = "wadexample"
$key = "<StorageAccountKey>"
$config_path="c:\users\<user>\documents\visual studio 2013\Projects\WadExample\WorkerRole1\WadExample.xml"
$service_name="wadexample"
$storageContext = New-AzureStorageContext -StorageAccountName $storage_name -StorageAccountKey $key
Set-AzureServiceDiagnosticsExtension -StorageContext $storageContext -DiagnosticsConfigurationPath $config_path -ServiceName $service_name -Slot Staging -Role WorkerRole1
6단계: 원격 분석 데이터 확인
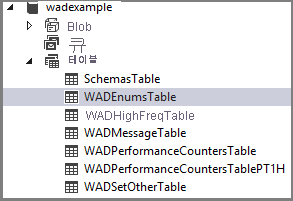
Visual Studio 서버 탐색기에서 wadexample 스토리지 계정으로 이동합니다. 클라우드 서비스가 5분 정도 실행된 후에는 WADEnumsTable, WADHighFreqTable, WADMessageTable, WADPerformanceCountersTable 및 WADSetOtherTable 테이블이 표시됩니다. 수집된 원격 분석을 보려는 테이블 중 하나를 두 번 클릭합니다.
구성 파일 스키마
진단 구성 파일에서는 진단 에이전트가 시작될 때 진단 구성 설정을 초기화하는 데 사용되는 값을 정의합니다. 유효한 값 및 예제는 최신 스키마 참조를 참조하세요.
문제 해결
문제가 있는 경우 일반적인 문제에 대한 도움말인 Azure Diagnostics 문제 해결을 참조하세요.
다음 단계
수집한 데이터를 변경하거나 문제를 해결하거나 일반적인 진단에 대해 자세히 알아보려면 관련된 Azure Virtual Machine 진단 문서 목록을 참조하세요.