DevTest Labs VM에 아티팩트 추가
이 문서에서는 Azure DevTest Labs VM(가상 머신)에 아티팩트를 추가하는 방법을 설명합니다. 아티팩트는 Windows PowerShell 스크립트 실행, Bash 명령 실행 또는 소프트웨어 설치와 같이 VM을 프로비전하기 위해 수행할 작업을 지정합니다. 매개 변수를 사용하여 사용자 고유의 요구 사항에 맞게 아티팩트 사용자 지정할 수 있습니다.
DevTest Labs 아티팩트는 공용 DevTest Labs Git 리포지토리나 프라이빗 Git 리포지토리에서 제공됩니다. 사용자 지정 아티팩트를 만들고 리포지토리에 저장하려면 사용자 지정 아티팩트 만들기를 참조하세요. 랩 사용자가 사용자 지정 아티팩트에 액세스할 수 있도록 아티팩트 리포지토리를 랩에 추가하려면 랩에 아티팩트 리포지토리 추가를 참조하세요.
DevTest Labs 랩 소유자는 만들 때 모든 랩 VM에 설치할 필수 아티팩트를 지정할 수 있습니다. 자세한 내용은 DevTest Labs VM에 대한 필수 아티팩트 지정을 참조하세요.
VM을 만들 때 필수 아티팩트 변경하거나 제거할 수는 없지만 사용 가능한 개별 아티팩트를 추가할 수는 있습니다. 이 문서에서는 Azure Portal 또는 Azure PowerShell을 사용하여 VM에 사용 가능한 아티팩트를 추가하는 방법을 설명합니다.
Azure Portal에서 VM에 아티팩트 추가
VM을 만드는 동안 아티팩트를 추가하거나 기존 랩 VM에 아티팩트를 추가할 수 있습니다.
VM을 만드는 동안 아티팩트를 추가하려면 다음을 수행합니다.
랩의 홈페이지에서 추가를 선택합니다.
기본 선택 페이지에서 원하는 VM 유형을 선택합니다.
랩 리소스 만들기 화면에서 아티팩트 추가 또는 제거를 선택합니다.
아티팩트 추가 페이지에서 VM에 추가할 각 아티팩트 옆에 있는 화살표를 선택합니다.
각 아티팩트 추가 창에서 필수 및 선택적 매개 변수 값을 입력한 다음, 확인을 선택합니다. 아티팩트가 선택한 아티팩트 아래에 나타나고 구성된 아티팩트 업데이트 수가 표시됩니다.
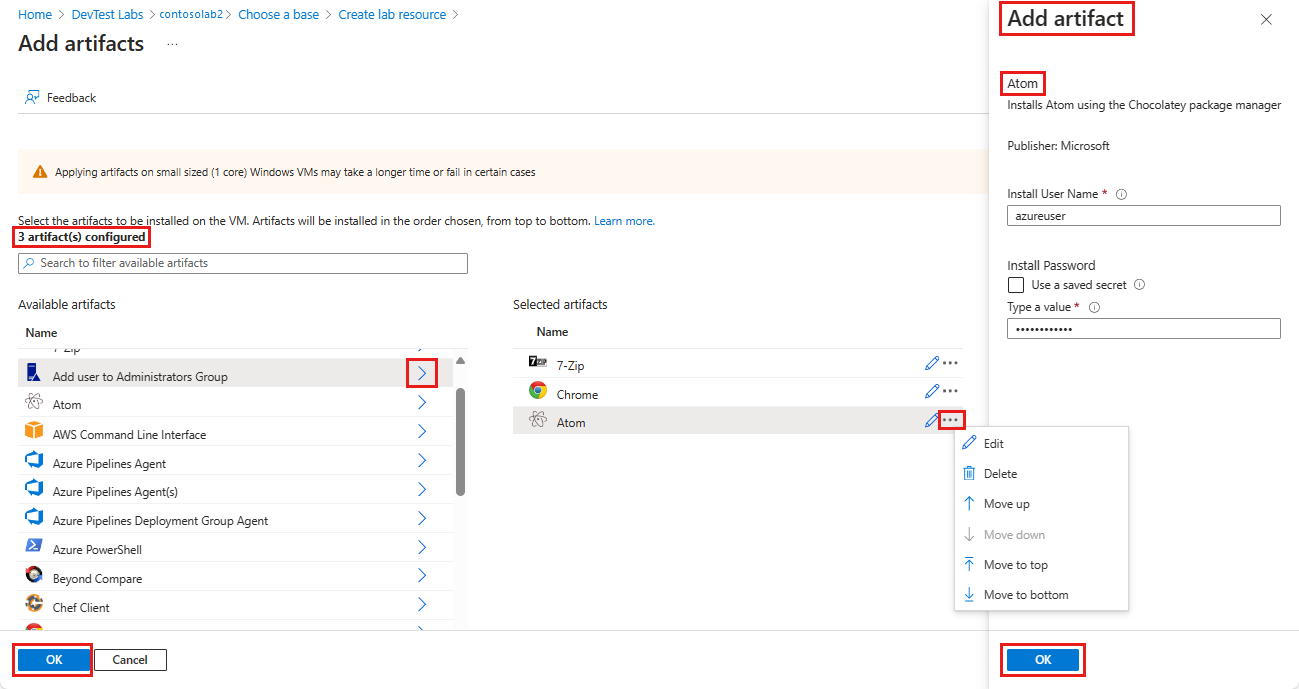
아티팩트를 추가하면 변경할 수 있습니다.
- 기본적으로 아티팩트는 추가한 순서대로 설치됩니다. 순서를 다시 정렬하려면 선택한 아티팩트 목록에서 아티팩트 옆에 있는 줄임표 ...를 선택하고 위로 이동, 아래로 이동, 맨 위로 이동 또는 맨 아래로 이동을 선택합니다.
- 아티팩트 매개 변수를 편집하려면 편집을 선택하여 아티팩트 추가 창을 다시 엽니다.
- 선택한 아티팩트 목록에서 아티팩트를 삭제하려면 삭제를 선택합니다.
아티팩트 추가 및 정렬이 완료되면 확인을 선택합니다.
랩 리소스 만들기 화면에 추가된 아티팩트 수가 표시됩니다. VM을 만들기 전에 아티팩트를 추가, 편집, 다시 정렬 또는 삭제하려면 Artifacts 추가 또는 제거를 다시 선택합니다.
VM을 만든 후 설치된 아티팩트는 VM의 아티팩트 페이지에 표시됩니다. 각 아티팩트 설치에 대한 세부 정보를 확인하려면 아티팩트 이름을 선택합니다.
기존 VM에 아티팩트를 설치하려면 다음을 수행합니다.
랩 홈페이지의 내 가상 머신 목록에서 VM을 선택합니다.
VM 페이지의 상단 메뉴 모음이나 왼쪽 탐색 창에서 아티팩트를 선택합니다.
아티팩트 페이지에서 아티팩트 적용을 선택합니다.
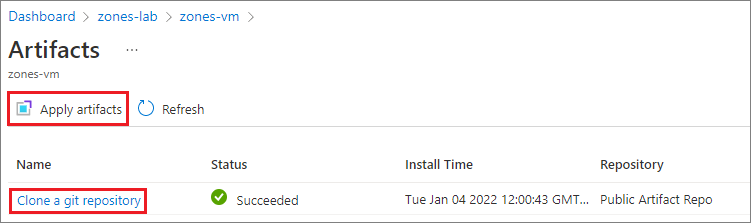
아티팩트 추가 페이지에서 새 VM과 동일한 아티팩트를 선택하고 구성합니다.
아티팩트 추가를 완료하면 설치를 선택합니다. 아티팩트가 VM에 즉시 설치됩니다.
Azure PowerShell 사용하여 VM에 아티팩트 추가
참고 항목
Azure Az PowerShell 모듈을 사용하여 Azure와 상호 작용하는 것이 좋습니다. 시작하려면 Azure PowerShell 설치를 참조하세요. Az PowerShell 모듈로 마이그레이션하는 방법에 대한 자세한 내용은 Azure PowerShell을 AzureRM에서 Azure로 마이그레이션을 참조하세요.
다음 PowerShell 스크립트는 Invoke-AzResourceAction cmdlet를 사용하여 아티팩트를 VM에 적용합니다.
#Requires -Module Az.Resources

param
(
[Parameter(Mandatory=$true, HelpMessage="The ID of the subscription that contains the lab")]
   [string] $SubscriptionId,
[Parameter(Mandatory=$true, HelpMessage="The name of the lab that has the VM")]
   [string] $DevTestLabName,
[Parameter(Mandatory=$true, HelpMessage="The name of the VM")]
   [string] $VirtualMachineName,
[Parameter(Mandatory=$true, HelpMessage="The repository where the artifact is stored")]
   [string] $RepositoryName,
[Parameter(Mandatory=$true, HelpMessage="The artifact to apply to the VM")]
   [string] $ArtifactName,
[Parameter(ValueFromRemainingArguments=$true)]
   $Params
)

# Set the appropriate subscription
Set-AzContext -SubscriptionId $SubscriptionId | Out-Null

# Get the lab resource group name
$resourceGroupName = (Get-AzResource -ResourceType 'Microsoft.DevTestLab/labs' | Where-Object { $_.Name -eq $DevTestLabName}).ResourceGroupName
if ($resourceGroupName -eq $null) { throw "Unable to find lab $DevTestLabName in subscription $SubscriptionId." }

# Get the internal repository name
$repository = Get-AzResource -ResourceGroupName $resourceGroupName `
                    -ResourceType 'Microsoft.DevTestLab/labs/artifactsources' `
                    -ResourceName $DevTestLabName `
                    -ApiVersion 2016-05-15 `
                    | Where-Object { $RepositoryName -in ($_.Name, $_.Properties.displayName) } `
                    | Select-Object -First 1

if ($repository -eq $null) { "Unable to find repository $RepositoryName in lab $DevTestLabName." }

# Get the internal artifact name
$template = Get-AzResource -ResourceGroupName $resourceGroupName `
                -ResourceType "Microsoft.DevTestLab/labs/artifactSources/artifacts" `
                -ResourceName "$DevTestLabName/$($repository.Name)" `
                -ApiVersion 2016-05-15 `
                | Where-Object { $ArtifactName -in ($_.Name, $_.Properties.title) } `
                | Select-Object -First 1

if ($template -eq $null) { throw "Unable to find template $ArtifactName in lab $DevTestLabName." }

# Find the VM in Azure
$FullVMId = "/subscriptions/$SubscriptionId/resourceGroups/$resourceGroupName`
                /providers/Microsoft.DevTestLab/labs/$DevTestLabName/virtualmachines/$virtualMachineName"

$virtualMachine = Get-AzResource -ResourceId $FullVMId

# Generate the artifact id
$FullArtifactId = "/subscriptions/$SubscriptionId/resourceGroups/$resourceGroupName`
                        /providers/Microsoft.DevTestLab/labs/$DevTestLabName/artifactSources/$($repository.Name)`
                        /artifacts/$($template.Name)"

# Handle the input parameters to pass through
$artifactParameters = @()

# Fill the artifact parameter with the additional -param_ data and strip off the -param_
$Params | ForEach-Object {
   if ($_ -match '^-param_(.*)') {
      $name = $_ -replace '^-param_'
   } elseif ( $name ) {
      $artifactParameters += @{ "name" = "$name"; "value" = "$_" }
      $name = $null #reset name variable
   }
}

# Create a structure to pass the artifact data to the action

$prop = @{
artifacts = @(
    @{
        artifactId = $FullArtifactId
        parameters = $artifactParameters
    }
    )
}

# Apply the artifact
if ($virtualMachine -ne $null) {
   # Apply the artifact by name to the virtual machine
   $status = Invoke-AzResourceAction -Parameters $prop -ResourceId $virtualMachine.ResourceId -Action "applyArtifacts" -ApiVersion 2016-05-15 -Force
   if ($status.Status -eq 'Succeeded') {
      Write-Output "##[section] Successfully applied artifact: $ArtifactName to $VirtualMachineName"
   } else {
      Write-Error "##[error]Failed to apply artifact: $ArtifactName to $VirtualMachineName"
   }
} else {
   Write-Error "##[error]$VirtualMachine was not found in the DevTest Lab, unable to apply the artifact"
}
다음 단계
피드백
출시 예정: 2024년 내내 콘텐츠에 대한 피드백 메커니즘으로 GitHub 문제를 단계적으로 폐지하고 이를 새로운 피드백 시스템으로 바꿀 예정입니다. 자세한 내용은 다음을 참조하세요. https://aka.ms/ContentUserFeedback
다음에 대한 사용자 의견 제출 및 보기