Baidu를 사용하여 Notification Hubs 시작
Baidu 클라우드 푸시는 모바일 디바이스로 푸시 알림을 보내는 데 사용할 수 있는 중국어 클라우드 서비스입니다.
Google Play 및 FCM(Firebase Cloud Messaging)은 중국에서 사용할 수 없으므로 다른 앱 스토어를 사용하고 서비스를 푸시해야 합니다. Baidu는 그 중 하나이며 현재 Notification Hub에서 사용하고 있습니다.
필수 조건
이 자습서에는 다음이 필요합니다.
- Android 사이트에서 다운로드할 수 있는 Android SDK(Android Studio를 사용한다고 가정)
- Baidu 푸시 Android SDK
참고 항목
이 자습서를 완료하려면 활성 Azure 계정이 있어야 합니다. 계정이 없는 경우 몇 분 만에 평가판 계정을 만들 수 있습니다. 자세한 내용은 Azure 평가판을 참조하세요.
시작하려면 다음을 수행합니다.
- Baidu 계정을 만듭니다.
- Baidu 클라우드 푸시 프로젝트를 만들고 API 키 및 비밀 키를 기록해 둡니다.
새 알림 허브 구성
Azure Portal에 로그인합니다.
왼쪽 메뉴에서 모든 서비스를 선택합니다.
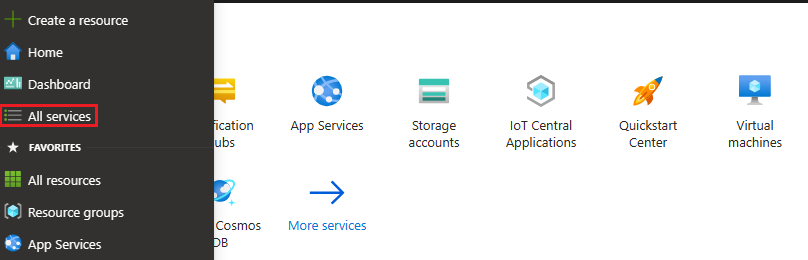
필터 서비스 텍스트 상자에 Notification Hubs 를 입력합니다. 서비스 이름 옆의 별표 아이콘을 선택하여 서비스를 왼쪽 메뉴의 즐겨찾기 섹션에 추가합니다. Notification Hubs를 선택합니다.
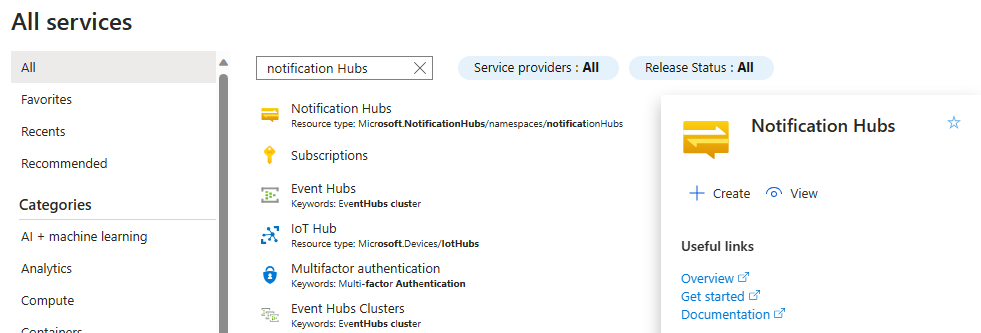
Notification Hubs 페이지의 도구 모음에서 만들기를 선택합니다.

알림 허브 페이지의 기본 사항 탭에서 다음 단계를 수행합니다.
구독에서 사용하려는 Azure 구독 이름을 선택한 다음, 기존 리소스 그룹을 선택하거나 새 리소스 그룹을 만듭니다.
네임스페이스 세부 정보에 새 네임스페이스의 고유한 이름을 입력합니다.
네임스페이스에 알림 허브가 하나 이상 포함되어 있으므로 Notification Hub 세부 정보에 허브 이름을 입력합니다.
위치 드롭다운 목록 상자에서 값을 선택합니다. 이 값은 허브를 만들려는 위치를 지정합니다.

가용성 영역 옵션을 검토합니다. 가용성 영역이 있는 지역을 선택한 경우 기본적으로 검사 상자가 선택됩니다. 가용성 영역 유료 기능이므로 계층에 추가 요금이 추가됩니다.
재해 복구 옵션( 없음, 쌍을 이루는 복구 지역 또는 유연한 복구 지역)을 선택합니다. 쌍을 이루는 복구 지역을 선택하면 장애 조치(failover) 지역이 표시됩니다. 유연한 복구 지역을 선택한 경우 드롭다운을 사용하여 복구 지역 목록에서 선택합니다.
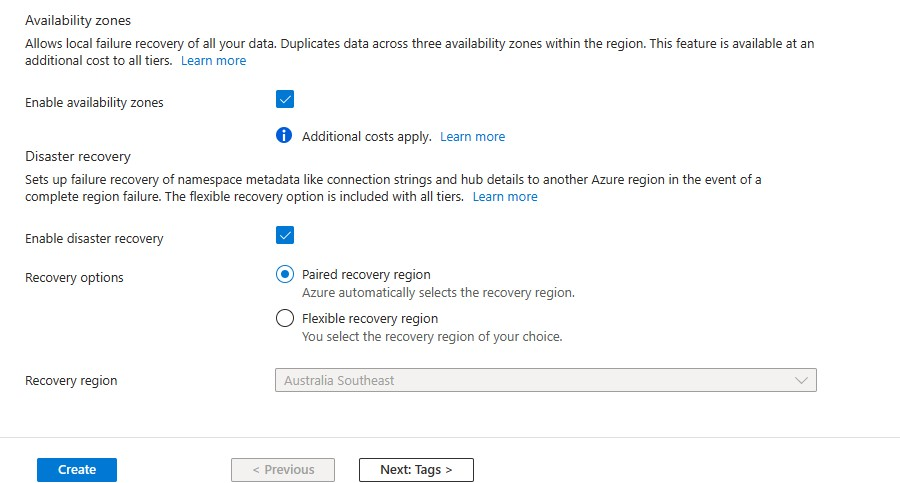
만들기를 실행합니다.
배포가 완료되면 리소스로 이동을 선택합니다.


6. 알림 허브에서 Notification Services와 Baidu(Android China)를 차례로 선택합니다.
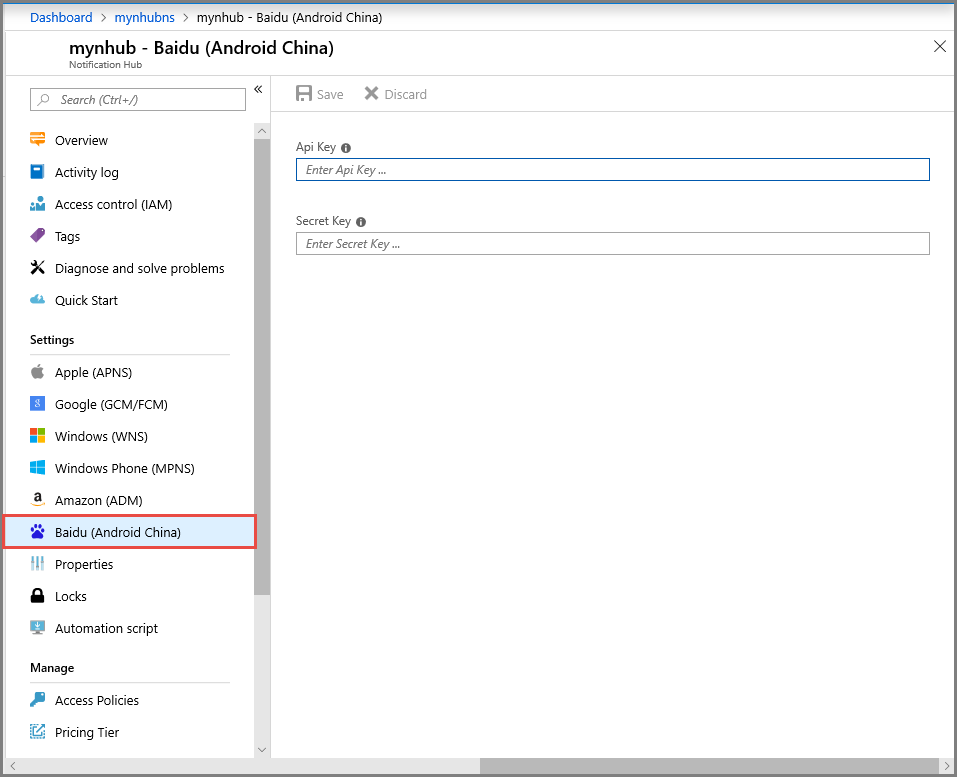
7. Baidu 알림 설정 섹션까지 아래로 스크롤합니다. Baidu 콘솔에서 얻은 API 키와 비밀 키를 Baidu 클라우드 푸시 프로젝트에 입력합니다. 그런 다음 Save를 클릭합니다.

이제 알림 허브가 Baidu와 작동하도록 구성됩니다. 또한 푸시 알림을 보내고 받을 수 있도록 앱을 등록하는 연결 문자열 있습니다.
액세스 연결 정보 창과 DefaultListenSharedAccessSignatureDefaultFullSharedAccessSignature 액세스 정보를 기록해 둡다.
알림 허브에 앱 연결
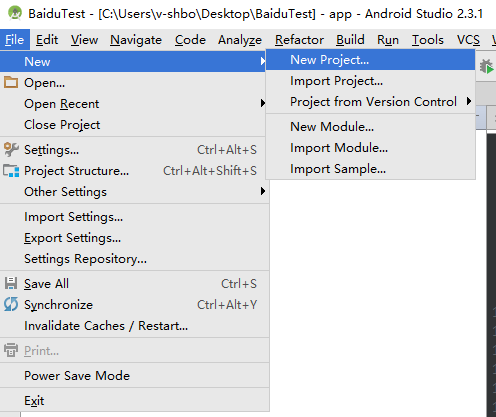
Android Studio에서 새 Android 프로젝트를 만듭니다(파일 > 새로 만들기 > 새 프로젝트).
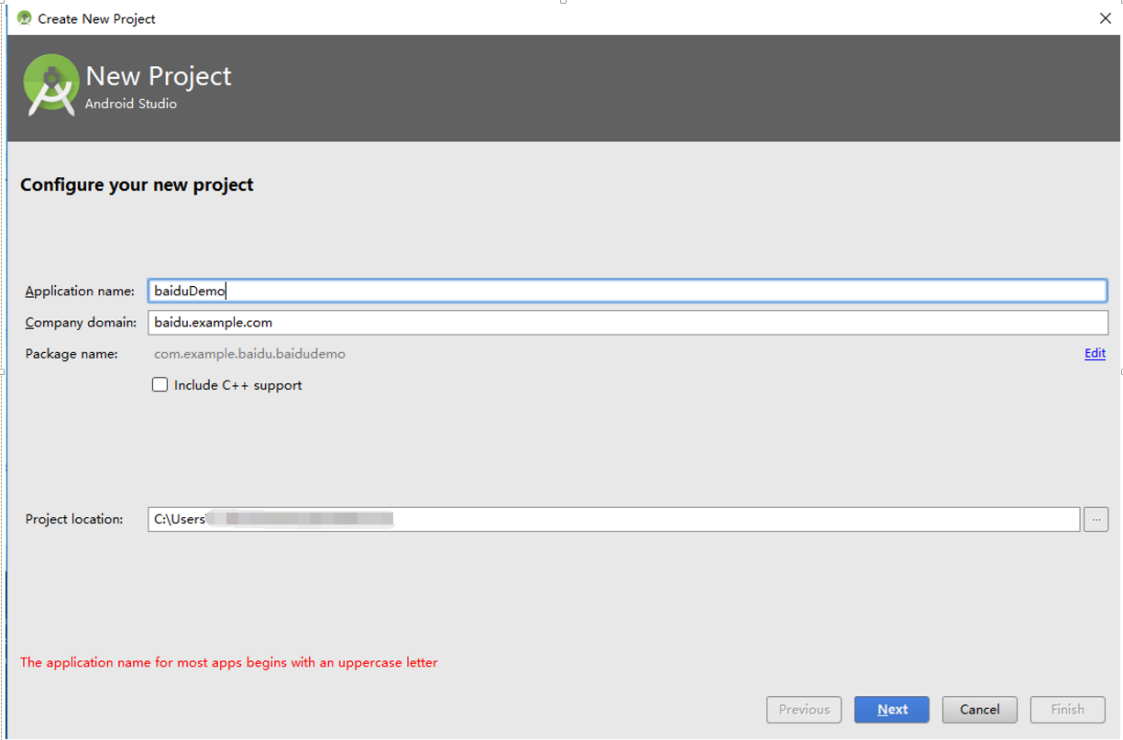
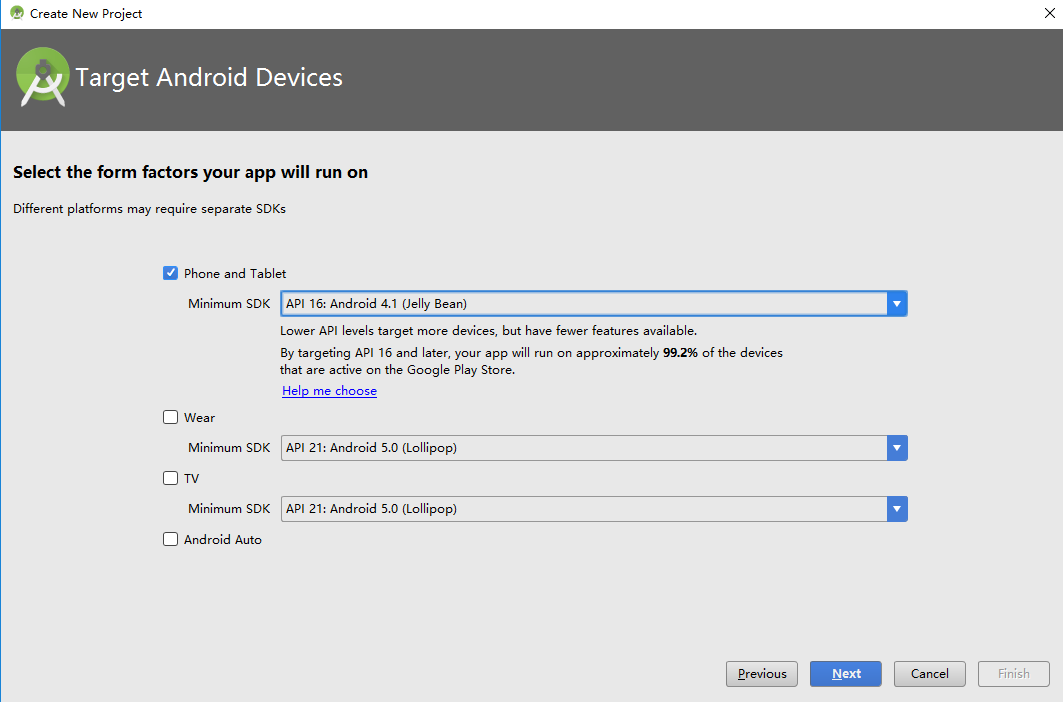
애플리케이션 이름을 입력하고 Minimum Required SDK 버전이 API 16: Android 4.1인지 확인합니다. 또한 패키지 이름(应用包名)이 Baidu 클라우드 푸시 포털과 동일한지 확인하세요.
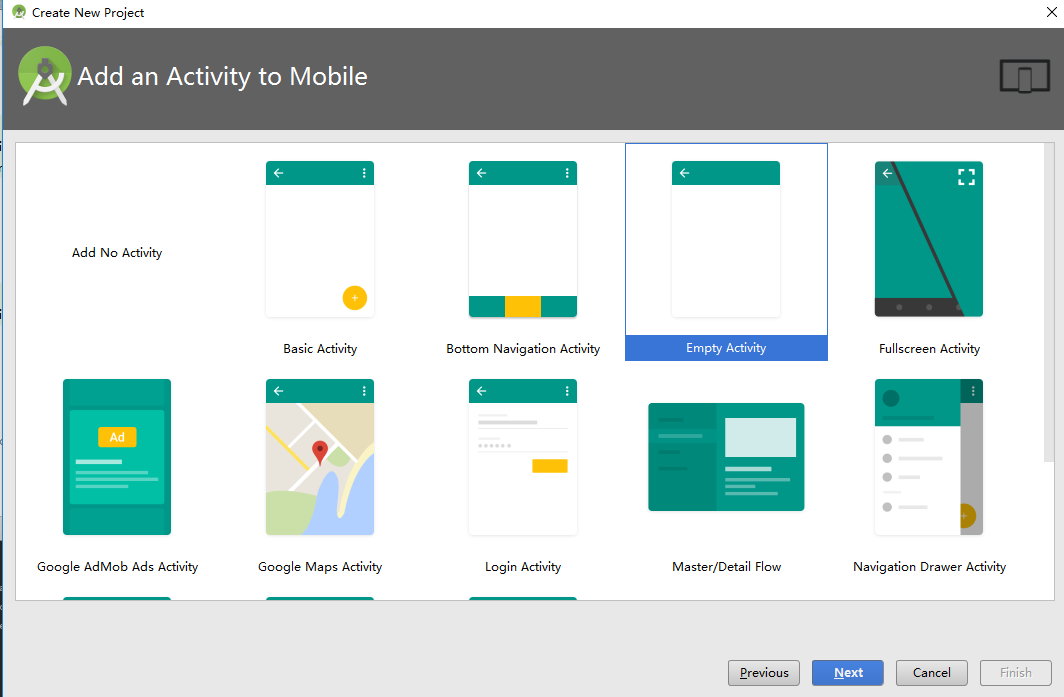
[다음]을 클릭하고 [작업 만들기] 창이 나타날 때까지 마법사를 계속 진행합니다. 빈 작업이 선택되어 있는지 확인하고 마지막으로 마침을 선택하여 새 Android 애플리케이션을 만듭니다.
프로젝트 빌드 대상 이 올바르게 설정되었는지 확인합니다.
그런 다음, Azure Notification Hubs 라이브러리를 추가합니다. 앱의
Build.Gradle파일에서 종속성 섹션에 다음 줄을 추가합니다.implementation 'com.microsoft.azure:notification-hubs-android-sdk:0.6@aar' implementation 'com.microsoft.azure:azure-notifications-handler:1.0.1@aar'종속성 섹션 다음에 다음 리포지토리를 추가합니다.
repositories {
    maven {
        url "https://dl.bintray.com/microsoftazuremobile/SDK"
    }
}
목록 충돌을 방지하려면 프로젝트
Manifest.xml파일에 다음 코드를 추가합니다.<manifest package="YOUR.PACKAGE.NAME" xmlns:tools="http://schemas.android.com/tools" xmlns:android="http://schemas.android.com/apk/res/android">태그에서 다음을 수행
<application/>합니다.<application tools:replace="android:allowBackup,icon,theme,label">Baidu Push Android SDK를 다운로드하고 압축을 풉
pushservice-x.y.z jarlibs 폴더에 파일을 복사합니다. 그런 다음 Android 애플리케이션의src/main/jniLibs(새 폴더 만들기) 폴더에 있는 파일을 복사.so합니다.
프로젝트의
libs폴더에서 파일을 마우스 오른쪽 단추로 클릭하고pushervice-x.y.z.jar프로젝트에 이 라이브러리를 포함할 라이브러리로 추가를 선택합니다.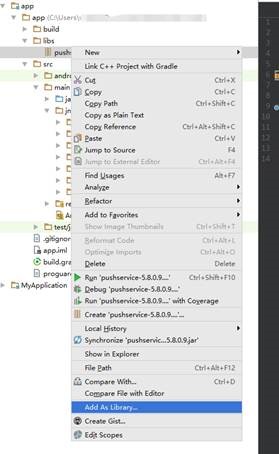
Android 프로젝트의
AndroidManifest.xml파일을 열고 Baidu SDK에 필요한 사용 권한을 추가합니다. 패키지 이름으로 대체YOURPACKAGENAME합니다.<uses-permission android:name="android.permission.INTERNET" /> <uses-permission android:name="android.permission.READ_PHONE_STATE" /> <uses-permission android:name="android.permission.ACCESS_NETWORK_STATE" /> <uses-permission android:name="android.permission.RECEIVE_BOOT_COMPLETED" /> <uses-permission android:name="android.permission.WRITE_SETTINGS" /> <uses-permission android:name="android.permission.VIBRATE" /> <uses-permission android:name="android.permission.WRITE_EXTERNAL_STORAGE" /> <uses-permission android:name="android.permission.DISABLE_KEYGUARD" /> <uses-permission android:name="android.permission.ACCESS_COARSE_LOCATION" /> <uses-permission android:name="android.permission.ACCESS_WIFI_STATE" /> <uses-permission android:name="android.permission.ACCESS_DOWNLOAD_MANAGER" /> <uses-permission android:name="android.permission.DOWNLOAD_WITHOUT_NOTIFICATION" /> <uses-permission android:name="android.permission.EXPAND_STATUS_BAR" /> !! <uses-permission android:name="baidu.push.permission.WRITE_PUSHINFOPROVIDER.YOURPACKAGENAME" /> !!<permission android:name="baidu.push.permission.WRITE_PUSHINFOPROVIDER.YOURPACKAGENAME" android:protectionLevel="normal" />작업 요소 다음에 애플리케이션 요소 내에 다음 구성을
.MainActivity추가하여 yourprojectname을 바꿉니다(예:com.example.BaiduTest).<activity android:name="com.baidu.android.pushservice.richmedia.MediaViewActivity" android:configChanges="orientation|keyboardHidden" android:label="MediaViewActivity" /> <activity android:name="com.baidu.android.pushservice.richmedia.MediaListActivity" android:configChanges="orientation|keyboardHidden" android:label="MediaListActivity" android:launchMode="singleTask" /> <!-- Push application definition message --> <receiver android:name=".MyPushMessageReceiver"> <intent-filter> <!-- receive push message--> <action android:name="com.baidu.android.pushservice.action.MESSAGE" /> <!-- receive bind,unbind,fetch,delete.. message--> <action android:name="com.baidu.android.pushservice.action.RECEIVE" /> <action android:name="com.baidu.android.pushservice.action.notification.CLICK" /> </intent-filter> </receiver> <receiver android:name="com.baidu.android.pushservice.PushServiceReceiver" android:process=":bdservice_v1"> <intent-filter> <action android:name="android.intent.action.BOOT_COMPLETED" /> <action android:name="android.net.conn.CONNECTIVITY_CHANGE" /> <action android:name="com.baidu.android.pushservice.action.notification.SHOW" /> <action android:name="com.baidu.android.pushservice.action.media.CLICK" /> <action android:name="android.intent.action.MEDIA_MOUNTED" /> <action android:name="android.intent.action.USER_PRESENT" /> <action android:name="android.intent.action.ACTION_POWER_CONNECTED" /> <action android:name="android.intent.action.ACTION_POWER_DISCONNECTED" /> </intent-filter> </receiver> <receiver android:name="com.baidu.android.pushservice.RegistrationReceiver" android:process=":bdservice_v1"> <intent-filter> <action android:name="com.baidu.android.pushservice.action.METHOD" /> <action android:name="com.baidu.android.pushservice.action.BIND_SYNC" /> </intent-filter> <intent-filter> <action android:name="android.intent.action.PACKAGE_REMOVED" /> <data android:scheme="package" /> </intent-filter> </receiver> <service android:name="com.baidu.android.pushservice.PushService" android:exported="true" android:process=":bdservice_v1"> <intent-filter> <action android:name="com.baidu.android.pushservice.action.PUSH_SERVICE" /> </intent-filter> </service> <service android:name="com.baidu.android.pushservice.CommandService" android:exported="true" /> <!-- Adapt the ContentProvider declaration required for the Android N system, and the write permissions include the application package name--> <provider android:name="com.baidu.android.pushservice.PushInfoProvider" android:authorities="com.baidu.push.example.bdpush" android:exported="true" android:protectionLevel="signature" android:writePermission="baidu.push.permission.WRITE_PUSHINFOPROVIDER. yourprojectname " /> <!-- API Key of the Baidu application --> <meta-data android:name="api_key" !! android:value="api_key" /> </application>프로젝트에 호출
ConfigurationSettings.java된 새 클래스를 추가합니다.public class ConfigurationSettings { public static String API_KEY = "..."; public static String NotificationHubName = "..."; public static String NotificationHubConnectionString = "..."; }Baidu 클라우드 프로젝트의 API_KEY 사용하여 문자열 값을
API_KEY설정합니다.Azure Portal에서 알림 허브 이름으로 문자열의 값을
NotificationHubName설정한 다음DefaultListenSharedAccessSignatureNotificationHubConnectionStringAzure Portal에서 설정합니다.MainActivity.java를 열고 onCreate 메서드에 다음 코드를 추가합니다.
PushManager.startWork(this, PushConstants.LOGIN_TYPE_API_KEY, API_KEY );라는
MyPushMessageReceiver.java새 클래스를 추가하고 다음 코드를 추가합니다. Baidu 푸시 서버에서 수신되는 푸시 알림을 처리하는 클래스입니다.package your.package.name; import android.content.Context; import android.content.Intent; import android.os.AsyncTask; import android.text.TextUtils; import android.util.Log; import com.baidu.android.pushservice.PushMessageReceiver; import com.microsoft.windowsazure.messaging.NotificationHub; import org.json.JSONException; import org.json.JSONObject; import java.util.List; public class MyPushMessageReceiver extends PushMessageReceiver { public static final String TAG = MyPushMessageReceiver.class .getSimpleName(); public static NotificationHub hub = null; public static String mChannelId, mUserId; @Override public void onBind(Context context, int errorCode, String appid, String userId, String channelId, String requestId) { String responseString = "onBind errorCode=" + errorCode + " appid=" + appid + " userId=" + userId + " channelId=" + channelId + " requestId=" + requestId; Log.d(TAG, responseString); if (errorCode == 0) { // Binding successful Log.d(TAG, " Binding successful"); } try { if (hub == null) { hub = new NotificationHub( ConfigurationSettings.NotificationHubName, ConfigurationSettings.NotificationHubConnectionString, context); Log.i(TAG, "Notification hub initialized"); } } catch (Exception e) { Log.e(TAG, e.getMessage()); } mChannelId = channelId; mUserId = userId; registerWithNotificationHubs(); } private void registerWithNotificationHubs() { new AsyncTask<Void, Void, Void>() { @Override protected Void doInBackground(Void... params) { try { hub.registerBaidu(mUserId, mChannelId); Log.i(TAG, "Registered with Notification Hub - '" + ConfigurationSettings.NotificationHubName + "'" + " with UserId - '" + mUserId + "' and Channel Id - '" + mChannelId + "'"); } catch (Exception e) { Log.e(TAG, e.getMessage()); } return null; } }.execute(null, null, null); } @Override public void onMessage(Context context, String message, String customContentString) { String messageString = " onMessage=\"" + message + "\" customContentString=" + customContentString; Log.d(TAG, messageString); if (!TextUtils.isEmpty(customContentString)) { JSONObject customJson = null; try { customJson = new JSONObject(customContentString); String myvalue = null; if (!customJson.isNull("mykey")) { myvalue = customJson.getString("mykey"); } } catch (JSONException e) { e.printStackTrace(); } } } @Override public void onNotificationArrived(Context context, String title, String description, String customContentString) { String notifyString = " Notice Arrives onNotificationArrived title=\"" + title + "\" description=\"" + description + "\" customContent=" + customContentString; Log.d(TAG, notifyString); if (!TextUtils.isEmpty(customContentString)) { JSONObject customJson = null; try { customJson = new JSONObject(customContentString); String myvalue = null; if (!customJson.isNull("mykey")) { myvalue = customJson.getString("mykey"); } } catch (JSONException e) { // TODO Auto-generated catch block e.printStackTrace(); } } } @Override public void onNotificationClicked(Context context, String title, String description, String customContentString) { String notifyString = " onNotificationClicked title=\"" + title + "\" description=\"" + description + "\" customContent=" + customContentString; Log.d(TAG, notifyString); Intent intent = new Intent(context.getApplicationContext(),MainActivity.class); intent.putExtra("title",title); intent.putExtra("description",description); intent.putExtra("isFromNotify",true); intent.addFlags(Intent.FLAG_ACTIVITY_NEW_TASK); context.getApplicationContext().startActivity(intent); } @Override public void onSetTags(Context context, int errorCode, List<String> successTags, List<String> failTags, String requestId) { String responseString = "onSetTags errorCode=" + errorCode + " successTags=" + successTags + " failTags=" + failTags + " requestId=" + requestId; Log.d(TAG, responseString); } @Override public void onDelTags(Context context, int errorCode, List<String> successTags, List<String> failTags, String requestId) { String responseString = "onDelTags errorCode=" + errorCode + " successTags=" + successTags + " failTags=" + failTags + " requestId=" + requestId; Log.d(TAG, responseString); } @Override public void onListTags(Context context, int errorCode, List<String> tags, String requestId) { String responseString = "onListTags errorCode=" + errorCode + " tags=" + tags; Log.d(TAG, responseString); } @Override public void onUnbind(Context context, int errorCode, String requestId) { String responseString = "onUnbind errorCode=" + errorCode + " requestId = " + requestId; Log.d(TAG, responseString); if (errorCode == 0) { // Unbinding is successful Log.d(TAG, " Unbinding is successful "); } } }
앱에 알림 보내기
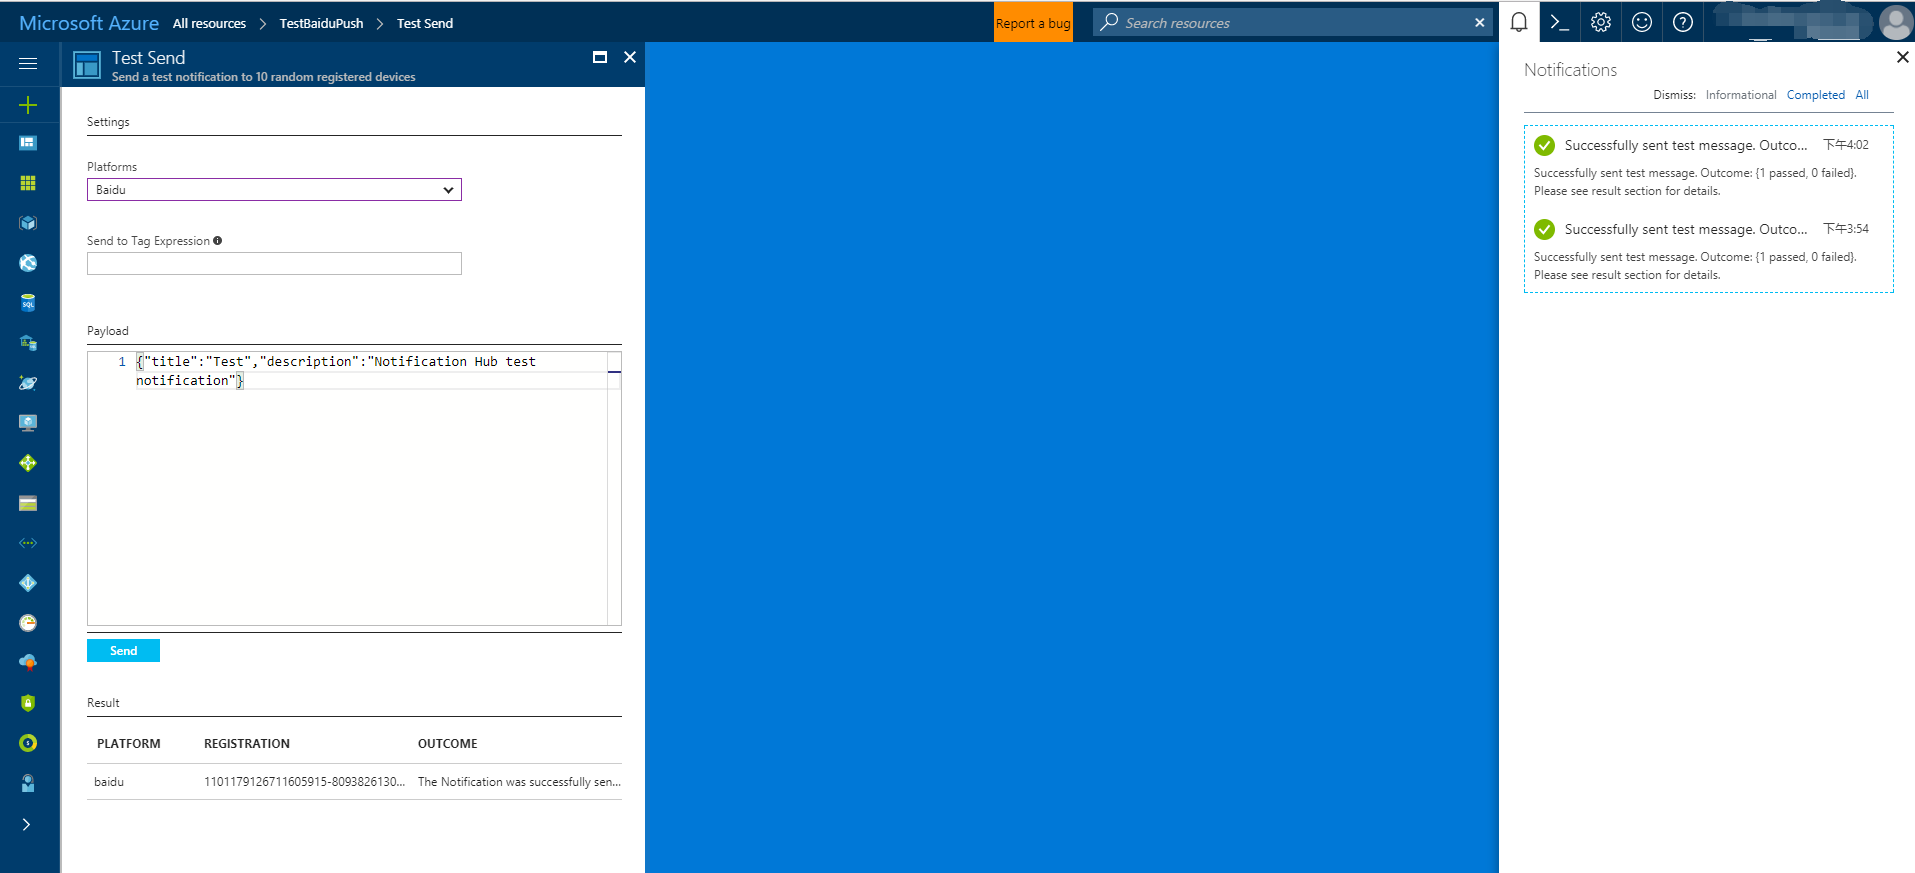
다음 화면에 표시된 것처럼 알림 허브 구성 화면의 보내기 단추를 통해 Azure Portal에서 알림 수신을 빠르게 테스트할 수 있습니다.

푸시 알림은 일반적으로 Mobile Services와 같은 백 엔드 서비스 또는 호환되는 라이브러리를 사용하여 ASP.NET 전송됩니다. 백 엔드에 라이브러리를 사용할 수 없는 경우 직접 REST API를 사용하여 알림 메시지를 보낼 수도 있습니다.
간단히 하기 위해 이 자습서에서는 .NET SDK를 사용하여 알림을 보내는 방법에 대한 데모로 콘솔 앱을 사용합니다. 그러나 Notification Hubs를 사용하여 ASP.NET 백 엔드에서 알림을 보내기 위한 다음 단계로 사용자에게 알림을 푸시하는 것이 좋습니다.
다음은 알림을 보내기 위한 다양한 접근 방법입니다.
- REST 인터페이스: REST 인터페이스를 사용하여 모든 백 엔드 플랫폼에서 알림을 지원할 수 있습니다.
- Microsoft Azure Notification Hubs .NET SDK: Visual Studio용 Nuget 패키지 관리자에서 Install-Package Microsoft.Azure.NotificationHubs를 실행합니다.
- Node.js: Node.js에서 Notification Hubs 사용 방법
- Mobile Apps: Notification Hubs와 통합된 Azure 앱 Service Mobile Apps 백 엔드에서 알림을 보내는 방법의 예는 모바일 앱에 푸시 알림 추가를 참조하세요.
- Java / PHP: REST API를 사용하여 알림을 보내는 방법에 대한 예는 "Java/PHP에서 Notification Hubs를 사용하는 방법"(Java | PHP)을 참조하세요.
(선택 사항) .NET 콘솔 앱에서 알림을 보냅니다.
이 섹션에서는 .NET 콘솔 앱을 사용하여 알림을 보내는 것을 보여 드립니다.
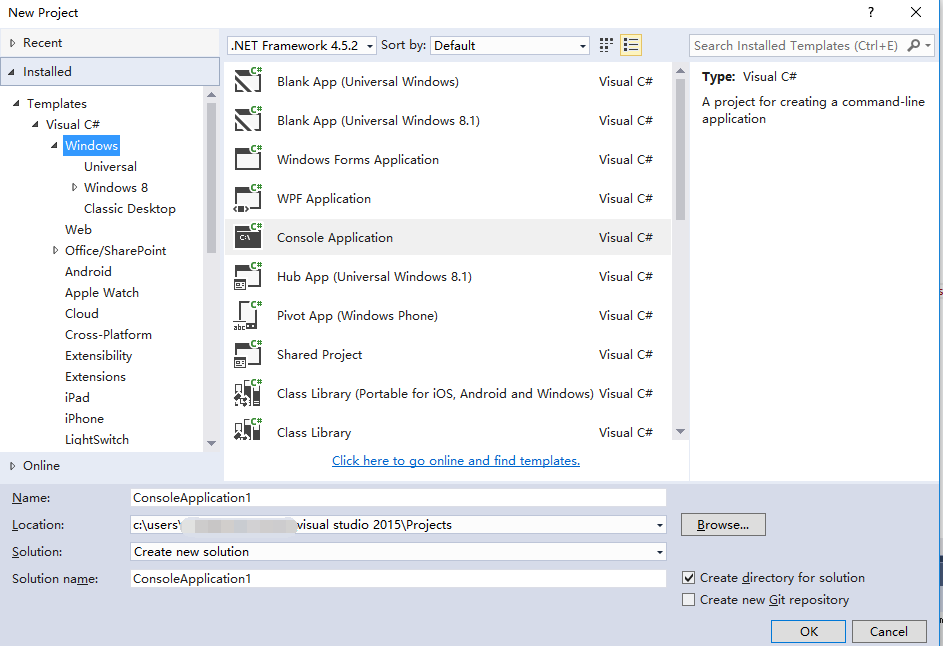
새 Visual C# 콘솔 애플리케이션을 만듭니다.
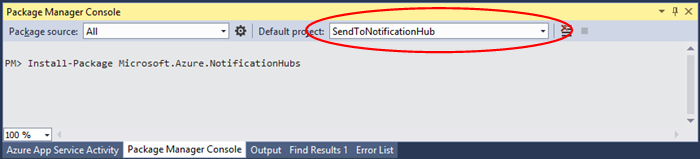
패키지 관리자 콘솔 창에서 기본 프로젝트를 새 콘솔 애플리케이션 프로젝트로 설정한 다음 콘솔 창에서 다음 명령을 실행합니다.
Install-Package Microsoft.Azure.NotificationHubs이 명령은 Microsoft.Azure.Notification Hubs NuGet 패키지를 사용하는 Azure Notification Hubs SDK에 대한 참조를 추가합니다.
파일을
Program.cs열고 다음 using 문을 추가합니다.using Microsoft.Azure.NotificationHubs;Program클래스에서 다음 메서드를 추가하고 사용자가 가진 값으로 바꿉DefaultFullSharedAccessSignatureSASConnectionStringNotificationHubName다.private static async void SendNotificationAsync() { NotificationHubClient hub = NotificationHubClient.CreateClientFromConnectionString("DefaultFullSharedAccessSignatureSASConnectionString", "NotificationHubName"); string message = "{\"title\":\"((Notification title))\",\"description\":\"Hello from Azure\"}"; var result = await hub.SendBaiduNativeNotificationAsync(message); }Main메서드에 다음 줄을 추가합니다.SendNotificationAsync(); Console.ReadLine();
앱 테스트
실제 휴대폰에서 이 앱을 테스트하려면 USB 케이블을 사용하여 휴대폰을 컴퓨터에 연결하면 됩니다. 이 작업은 연결된 휴대폰에 앱을 로드합니다.
에뮬레이터를 사용하여 이 앱을 테스트하려면 Android Studio 위쪽 도구 모음에서 실행을 클릭한 다음 앱을 선택합니다. 에뮬레이터를 시작하고, 앱을 로드하고, 실행합니다.
앱은 Baidu 푸시 알림 서비스를 검색 userId 하고 channelId 알림 허브에 등록합니다.
테스트 알림을 보내려면 Azure Portal의 디버그 탭을 사용할 수 있습니다. Visual Studio에 대해 .NET 콘솔 애플리케이션을 빌드한 경우 Visual Studio에서 F5 키를 눌러 애플리케이션을 실행합니다. 애플리케이션은 디바이스 또는 에뮬레이터의 위쪽 알림 영역에 표시되는 알림을 보냅니다.