자습서: Azure Spatial Anchors를 사용하여 새 Android 앱을 만드는 단계별 지침
이 자습서에서는 ARCore 기능을 Azure Spatial Anchors와 통합하는 새 Android 앱을 만드는 방법을 보여 줍니다.
필수 조건
이 자습서를 완료하려면 다음이 설치되어 있어야 합니다.
- Android Studio 3.4+가 설치된 Windows 또는 macOS 머신.
- 개발자 사용 및 ARCore 지원 Android 디바이스.
시작하기
Android Studio를 시작합니다. Android Studio 시작 창에서 새 Android Studio 프로젝트 시작을 클릭합니다.
- 파일->새 프로젝트를 선택합니다.
- 새 프로젝트 만들기 창의 휴대폰 및 태블릿 섹션 아래에서 빈 활동을 선택하고 다음을 클릭합니다.
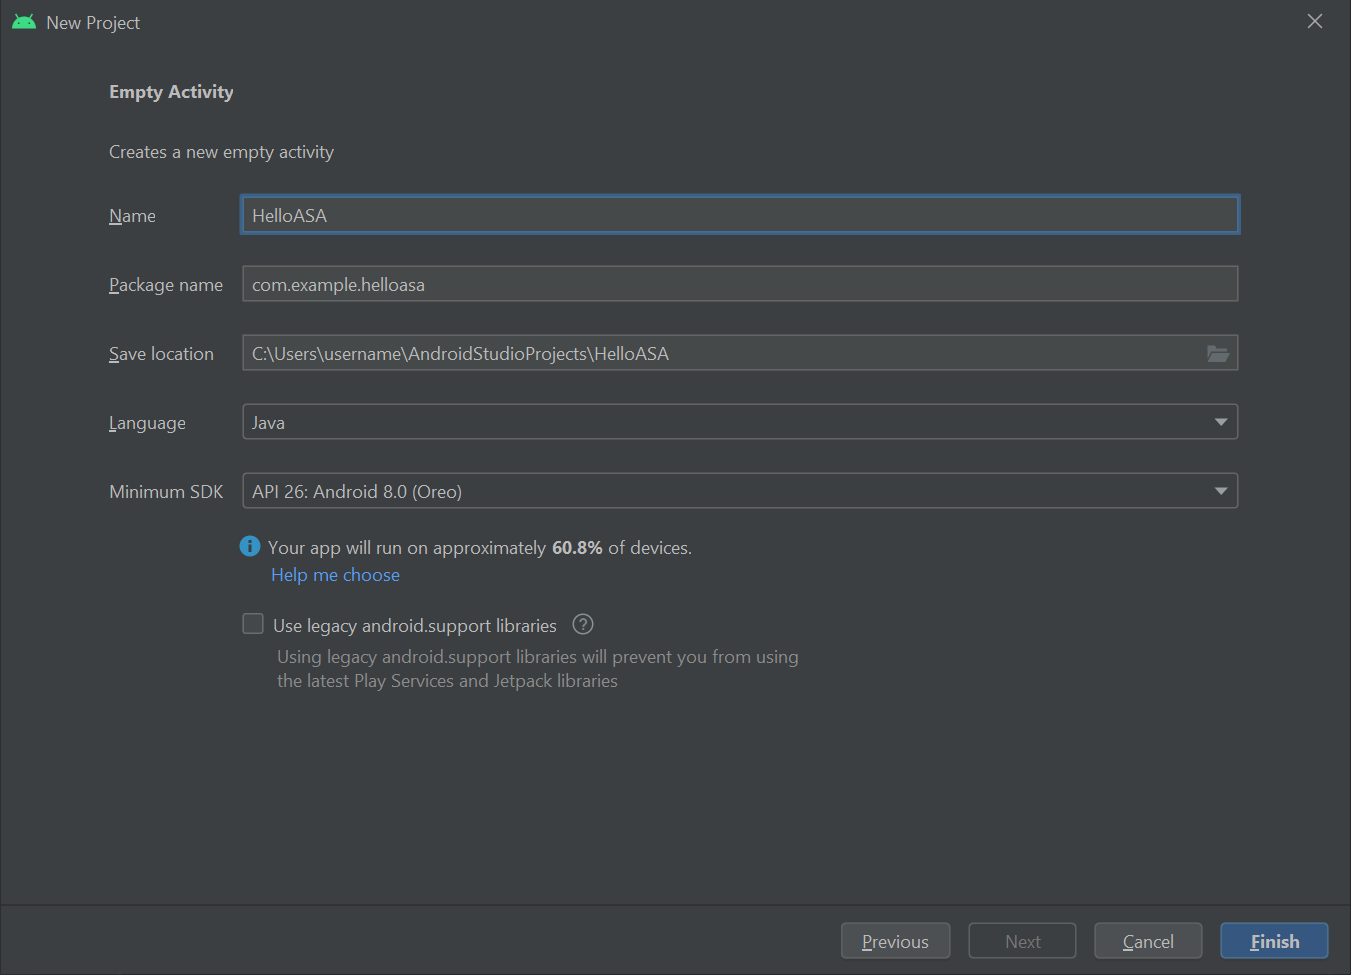
- 새 프로젝트 - 빈 작업 창에서 다음 값을 변경합니다.
- 이름, 패키지 이름 및 저장 위치를 원하는 값으로 변경합니다.
- 설정된 언어는
Java입니다. - 최소 API 수준은
API 26: Android 8.0 (Oreo)으로 설정합니다. - 다른 옵션은 있는 그대로 둡니다.
- Finish를 클릭합니다.
- 구성 요소 설치 관리자가 실행됩니다. 일부가 처리되면 Android Studio에서 IDE를 엽니다.
사용해 보기
새 앱을 테스트하려면 USB 케이블을 사용하여 개발자가 사용하는 디바이스를 개발 머신에 연결합니다. Android Studio 오른쪽 위에서 연결된 디바이스를 선택하고 '앱' 실행 아이콘을 클릭합니다. Android Studio에서 앱을 연결된 디바이스에 설치하고 시작합니다. 이제 디바이스에서 실행되는 앱에 'Hello World!'가 표시됩니다. 실행->'앱' 중지를 클릭합니다.

ARCore 통합
ARCore는 증강 현실 환경을 구축하는 Google의 플랫폼으로, 디바이스가 이동하고 실제 환경에 대한 자체 인식을 구축하면서 해당 위치를 추적할 수 있도록 합니다.
다음 항목이 <manifest> 루트 노드 내에 포함되도록 app\manifests\AndroidManifest.xml을 수정합니다. 이 코드 조각에서 수행하는 몇 가지 작업은 다음과 같습니다.
- 앱에서 디바이스 카메라에 액세스할 수 있도록 합니다.
- Google Play 스토어에서 앱이 ARCore를 지원하는 디바이스에만 표시되도록 합니다.
- 앱이 설치될 때 ARCore를 아직 설치하지 않은 경우 Google Play 스토어에서 이를 다운로드하여 설치하도록 구성합니다.
<manifest ...>

    <uses-permission android:name="android.permission.CAMERA" />
    <uses-feature android:name="android.hardware.camera.ar" />

    <application>
        ...
        <meta-data android:name="com.google.ar.core" android:value="required" />
        ...
    </application>

</manifest>
다음 항목이 포함되도록 Gradle Scripts\build.gradle (Module: app)을 수정합니다. 이 코드에서는 앱이 ARCore 버전 1.25를 대상으로 하는지 확인합니다. 이렇게 변경되면 Gradle에서 동기화를 요청하는 알림이 표시될 수 있습니다. 그러면 지금 동기화를 클릭합니다.
dependencies {
    ...
    implementation 'com.google.ar:core:1.25.0'
    ...
}
Sceneform 통합
Sceneform을 사용하면 OpenGL을 익히지 않고도 증강 현실 앱에서 사실적인 3D 장면을 간단하게 렌더링할 수 있습니다.
다음 항목이 포함되도록 Gradle Scripts\build.gradle (Module: app)을 수정합니다. 이 코드를 사용하면 앱에서 Sceneform에 필요한 Java 8의 언어 구문을 사용할 수 있습니다. 또한 앱이 Sceneform 버전 1.15를 대상으로 하는지도 확인합니다. 이렇게 변경되면 Gradle에서 동기화를 요청하는 알림이 표시될 수 있습니다. 그러면 지금 동기화를 클릭합니다.
android {
    ...

    compileOptions {
        sourceCompatibility JavaVersion.VERSION_1_8
        targetCompatibility JavaVersion.VERSION_1_8
    }
}

dependencies {
    ...
    implementation 'com.google.ar.sceneform.ux:sceneform-ux:1.15.0'
    ...
}
app\res\layout\activity_main.xml을 열고, 기존 Hello Wolrd <TextView ... /> 요소를 다음 ArFragment로 바꿉니다. 이 코드는 카메라 피드를 화면에 표시하여 디바이스가 이동함에 따라 ARCore에서 해당 위치를 추적할 수 있도록 합니다.
<fragment android:name="com.google.ar.sceneform.ux.ArFragment"
    android:id="@+id/ux_fragment"
    android:layout_width="match_parent"
    android:layout_height="match_parent" />
참고 항목
기본 활동의 원시 xml을 보려면 Android Studio 오른쪽 위에 있는 "코드" 또는 "분할" 단추를 클릭합니다.
앱을 디바이스에 다시 배포하여 유효성을 한 번 더 검사합니다. 이번에는 카메라 권한을 묻는 메시지가 표시됩니다. 승인되면 화면에 카메라 피드 렌더링이 표시됩니다.
실제 환경에 개체 배치
앱을 사용하여 개체를 만들고 배치해 보겠습니다. 먼저, 다음 가져오기를 app\java\<PackageName>\MainActivity에 추가합니다.
import com.google.ar.core.HitResult;
import com.google.ar.core.Plane;
import com.google.ar.sceneform.AnchorNode;
import com.google.ar.sceneform.math.Vector3;
import com.google.ar.sceneform.rendering.Color;
import com.google.ar.sceneform.rendering.MaterialFactory;
import com.google.ar.sceneform.rendering.Renderable;
import com.google.ar.sceneform.rendering.ShapeFactory;
import com.google.ar.sceneform.ux.ArFragment;

import android.view.MotionEvent;
다음으로, 다음 멤버 변수를 MainActivity 클래스에 추가합니다.
private boolean tapExecuted = false;
private final Object syncTaps = new Object();
private ArFragment arFragment;
private AnchorNode anchorNode;
private Renderable nodeRenderable = null;
private float recommendedSessionProgress = 0f;
다음으로, 다음 코드를 app\java\<PackageName>\MainActivityonCreate() 메서드에 추가합니다. 이 코드에서는 사용자가 디바이스에서 화면을 탭할 때 감지하는 handleTap()이라는 수신기를 후크합니다. ARCore의 추적에서 이미 인식된 실제 화면에 탭이 있으면 수신기가 실행됩니다.
@Override
protected void onCreate(Bundle savedInstanceState) {
    super.onCreate(savedInstanceState);
    setContentView(R.layout.activity_main);

    this.arFragment = (ArFragment) getSupportFragmentManager().findFragmentById(R.id.ux_fragment);
    this.arFragment.setOnTapArPlaneListener(this::handleTap);
}
마지막으로, 모든 것을 하나로 묶을 수 있는 다음 handleTap() 메서드를 추가합니다. 그러면 구가 만들어져 탭된 위치에 배치됩니다. 지금 this.recommendedSessionProgress가 0으로 설정되어 있으므로 구가 처음에는 검은색입니다. 이 값은 나중에 조정됩니다.
protected void handleTap(HitResult hitResult, Plane plane, MotionEvent motionEvent) {
    synchronized (this.syncTaps) {
        if (this.tapExecuted) {
            return;
        }

        this.tapExecuted = true;
    }

    this.anchorNode = new AnchorNode();
    this.anchorNode.setAnchor(hitResult.createAnchor());

    MaterialFactory.makeOpaqueWithColor(this, new Color(
            this.recommendedSessionProgress,
            this.recommendedSessionProgress,
            this.recommendedSessionProgress))
            .thenAccept(material -> {
                this.nodeRenderable = ShapeFactory.makeSphere(0.1f, new Vector3(0.0f, 0.15f, 0.0f), material);
                this.anchorNode.setRenderable(nodeRenderable);
                this.anchorNode.setParent(arFragment.getArSceneView().getScene());
            });
}
앱을 디바이스에 다시 배포하여 유효성을 한 번 더 검사합니다. 이번에는 디바이스 주위를 이동하여 ARCore에서 환경 인식을 시작하도록 할 수 있습니다. 그러면 화면을 탭하여 원하는 표면에 검은색 구를 만들고 배치합니다.
로컬 Azure Spatial Anchor 연결
다음 항목이 포함되도록 Gradle Scripts\build.gradle (Module: app)을 수정합니다. 이 샘플 코드 조각은 Azure Spatial Anchors SDK 버전 2.10.2를 대상으로 합니다. SDK 버전 2.7.0은 현재 지원되는 최소 버전이며 최신 버전의 Azure Spatial Anchors를 참조하는 것도 작동합니다. 최신 버전의 Azure Spatial Anchors SDK를 사용하는 것이 좋습니다. 여기에서 SDK 릴리스 정보를 찾을 수 있습니다.
dependencies {
    ...
    implementation 'com.microsoft.azure.spatialanchors:spatialanchors_jni:[2.10.2]'
    implementation 'com.microsoft.azure.spatialanchors:spatialanchors_java:[2.10.2]'
    ...
}
Azure Spatial Anchors SDK 2.10.0 이상을 대상으로 하는 경우 프로젝트 settings.gradle 파일의 리포지토리 섹션에 다음 항목을 포함합니다. 여기에는 SDK 2.10.0 이상에 대한 Azure Spatial Anchors Android 패키지를 호스트하는 Maven 패키지 피드에 대한 URL이 포함됩니다.
dependencyResolutionManagement {
    ...
    repositories {
        ...
        maven {
            url 'https://pkgs.dev.azure.com/aipmr/MixedReality-Unity-Packages/_packaging/Maven-packages/maven/v1'
        }
        ...
    }
}
마우스 오른쪽 단추로 app\java\<PackageName>->새로 만들기->Java 클래스를 클릭합니다. 이름을 MyFirstApp으로 설정하고 클래스를 선택합니다. MyFirstApp.java라는 파일이 만들어집니다. 다음 가져오기를 여기에 추가합니다.
import com.microsoft.CloudServices;
android.app.Application을 슈퍼클래스로 정의합니다.
public class MyFirstApp extends android.app.Application {...
그런 다음, 다음 코드를 새 MyFirstApp 클래스 내에 추가합니다. 그러면 애플리케이션의 컨텍스트에 따라 Azure Spatial Anchors가 초기화됩니다.
    @Override
    public void onCreate() {
        super.onCreate();
        CloudServices.initialize(this);
    }
이제 다음 항목이 <application> 루트 노드 내에 포함되도록 app\manifests\AndroidManifest.xml을 수정합니다. 이 코드에서는 만든 Application 클래스를 앱에 후크합니다.
    <application
        android:name=".MyFirstApp"
        ...
    </application>
app\java\<PackageName>\MainActivity로 돌아가서 다음 가져오기를 여기에 추가합니다.
import android.view.MotionEvent;
import android.util.Log;

import com.google.ar.sceneform.ArSceneView;
import com.google.ar.sceneform.Scene;
import com.microsoft.azure.spatialanchors.CloudSpatialAnchor;
import com.microsoft.azure.spatialanchors.CloudSpatialAnchorSession;
import com.microsoft.azure.spatialanchors.SessionLogLevel;
다음으로, 다음 멤버 변수를 MainActivity 클래스에 추가합니다.
private float recommendedSessionProgress = 0f;

private ArSceneView sceneView;
private CloudSpatialAnchorSession cloudSession;
private boolean sessionInitialized = false;
다음으로, 다음 initializeSession() 메서드를 mainActivity 클래스 내에 추가해 보겠습니다. 호출되면 앱을 시작하는 동안 Azure Spatial Anchors 세션이 만들어지고 제대로 초기화됩니다. 이 코드는 cloudSession.setSession 호출을 통해 ASA 세션에 전달된 sceneview 세션이 초기 반환을 통해 null이 아닌지 확인합니다.
private void initializeSession() {
    if (sceneView.getSession() == null) {
        //Early return if the ARCore Session is still being set up
        return;
    }

    if (this.cloudSession != null) {
        this.cloudSession.close();
    }
    this.cloudSession = new CloudSpatialAnchorSession();
    this.cloudSession.setSession(sceneView.getSession());
    this.cloudSession.setLogLevel(SessionLogLevel.Information);
    this.cloudSession.addOnLogDebugListener(args -> Log.d("ASAInfo", args.getMessage()));
    this.cloudSession.addErrorListener(args -> Log.e("ASAError", String.format("%s: %s", args.getErrorCode().name(), args.getErrorMessage())));

    sessionInitialized = true;
}
sceneView 세션이 아직 설정되지 않은 경우(즉, sceneView.getSession()가 null인 경우) initializeSession()가 초기 반환을 수행할 수 있으므로, sceneView 세션이 만들어지면 ASA 세션이 초기화되도록 onUpdate 호출을 추가합니다.
private void scene_OnUpdate(FrameTime frameTime) {
    if (!sessionInitialized) {
        //retry if initializeSession did an early return due to ARCore Session not yet available (i.e. sceneView.getSession() == null)
        initializeSession();
    }
}
이제 onCreate() 메서드에 initializeSession() 및 scene_OnUpdate(...) 메서드를 후크하겠습니다. 또한 처리를 위해 카메라 피드의 프레임을 Azure Spatial Anchors SDK로 보내도록 합니다.
@Override
protected void onCreate(Bundle savedInstanceState) {
    super.onCreate(savedInstanceState);
    setContentView(R.layout.activity_main);

    this.arFragment = (ArFragment) getSupportFragmentManager().findFragmentById(R.id.ux_fragment);
    this.arFragment.setOnTapArPlaneListener(this::handleTap);

    this.sceneView = arFragment.getArSceneView();
    Scene scene = sceneView.getScene();
    scene.addOnUpdateListener(frameTime -> {
        if (this.cloudSession != null) {
            this.cloudSession.processFrame(sceneView.getArFrame());
        }
    });
    scene.addOnUpdateListener(this::scene_OnUpdate);
    initializeSession();
}
마지막으로, 다음 코드를 handleTap() 메서드에 추가합니다. 이렇게 하면 로컬 Azure Spatial Anchor가 실제 환경에 배치하는 검은색 구에 연결됩니다.
protected void handleTap(HitResult hitResult, Plane plane, MotionEvent motionEvent) {
    synchronized (this.syncTaps) {
        if (this.tapExecuted) {
            return;
        }

        this.tapExecuted = true;
    }

    this.anchorNode = new AnchorNode();
    this.anchorNode.setAnchor(hitResult.createAnchor());
    CloudSpatialAnchor cloudAnchor = new CloudSpatialAnchor();
    cloudAnchor.setLocalAnchor(this.anchorNode.getAnchor());

    MaterialFactory.makeOpaqueWithColor(this, new Color(
            this.recommendedSessionProgress,
            this.recommendedSessionProgress,
            this.recommendedSessionProgress))
            .thenAccept(material -> {
                this.nodeRenderable = ShapeFactory.makeSphere(0.1f, new Vector3(0.0f, 0.15f, 0.0f), material);
                this.anchorNode.setRenderable(nodeRenderable);
                this.anchorNode.setParent(arFragment.getArSceneView().getScene());
            });
}
앱을 한 번 더 다시 배포합니다. 디바이스 주위를 이동하고, 화면을 탭한 다음, 검은색 구를 배치합니다. 하지만 이번에는 코드에서 로컬 Azure Spatial Anchor를 만들고 구에 연결합니다.
계속 진행하기 전에 Azure Spatial Anchors 계정을 만들어 계정 식별자, 키 및 도메인을 가져와야 합니다(아직 없는 경우). 다음 섹션에 따라 이러한 항목을 얻습니다.
Spatial Anchors 리소스 만들기
Azure Portal로 이동합니다.
왼쪽 창에서 리소스 만들기를 선택합니다.
검색 상자를 사용하여 Spatial Anchors를 검색합니다.
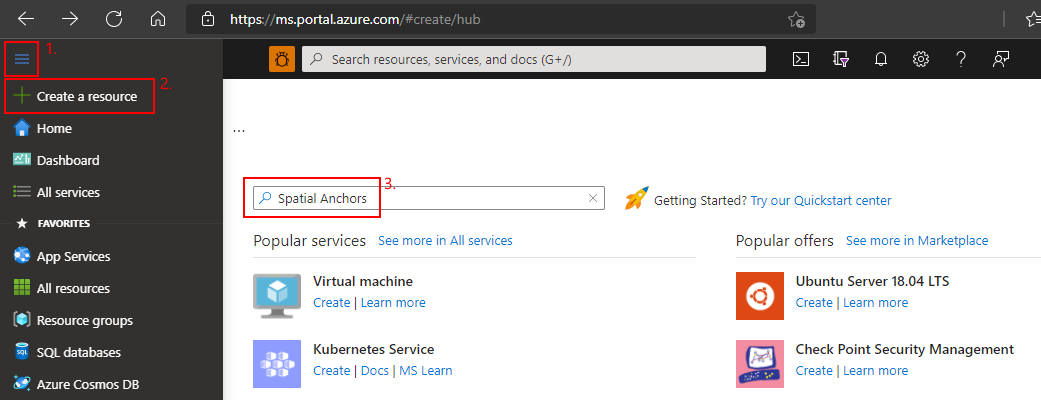
Spatial Anchors를 선택한 다음, 만들기를 선택합니다.
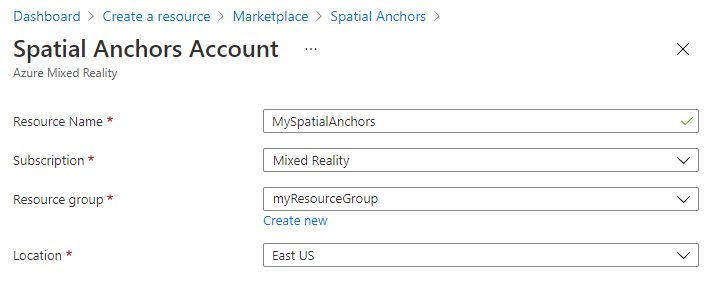
Spatial Anchors 계정 창에서 다음을 수행합니다.
일반 영숫자 문자를 사용하여 고유한 리소스 이름을 입력합니다.
리소스를 연결할 구독을 선택합니다.
새로 만들기를 선택하여 리소스 그룹을 만듭니다. 이름을 myResourceGroup으로 지정한 다음, 확인을 선택합니다.
리소스 그룹은 웹앱, 데이터베이스, 스토리지 계정과 같은 Azure 리소스가 배포되고 관리되는 논리적 컨테이너입니다. 예를 들어 나중에 간단한 단계 하나만으로 전체 리소스 그룹을 삭제하도록 선택할 수 있습니다.
리소스를 배치할 위치(Azure 지역)를 선택합니다.
리소스 만들기를 시작하려면 만들기를 선택합니다.
리소스를 만든 후 Azure Portal은 배포가 완료되었음을 표시합니다.
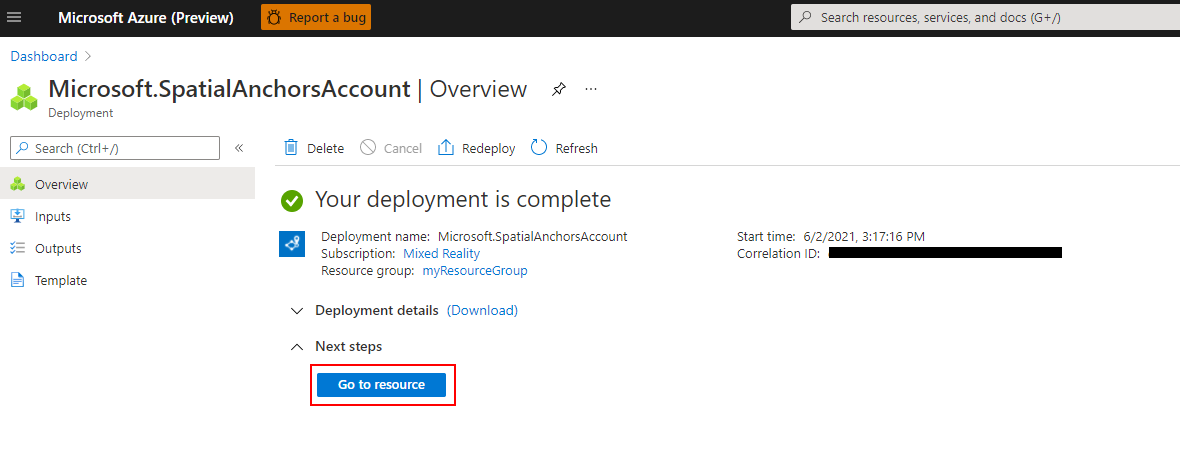
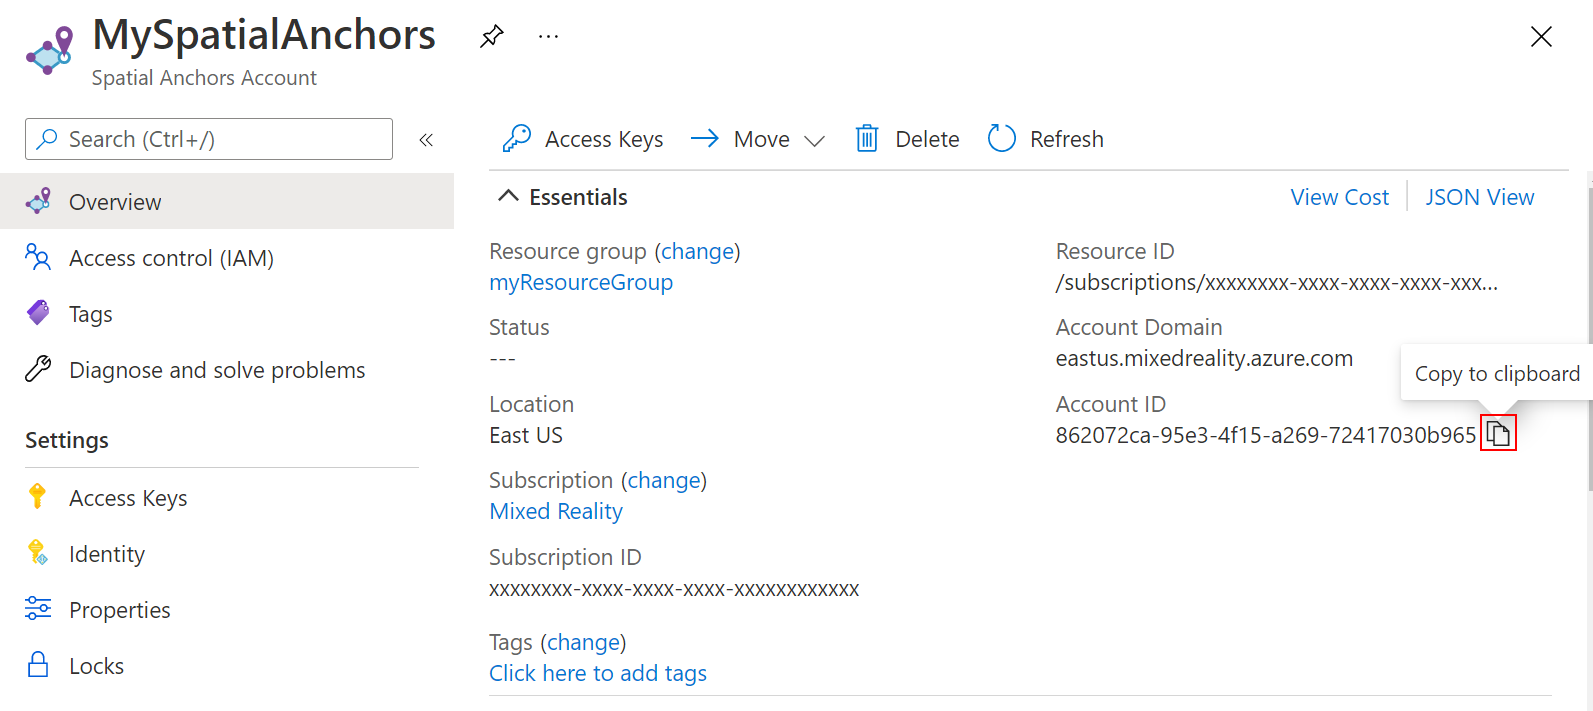
리소스로 이동을 선택합니다. 이제 리소스 속성을 볼 수 있습니다.
나중에 사용하기 위해 리소스의 계정 ID 값을 텍스트 편집기에 복사합니다.
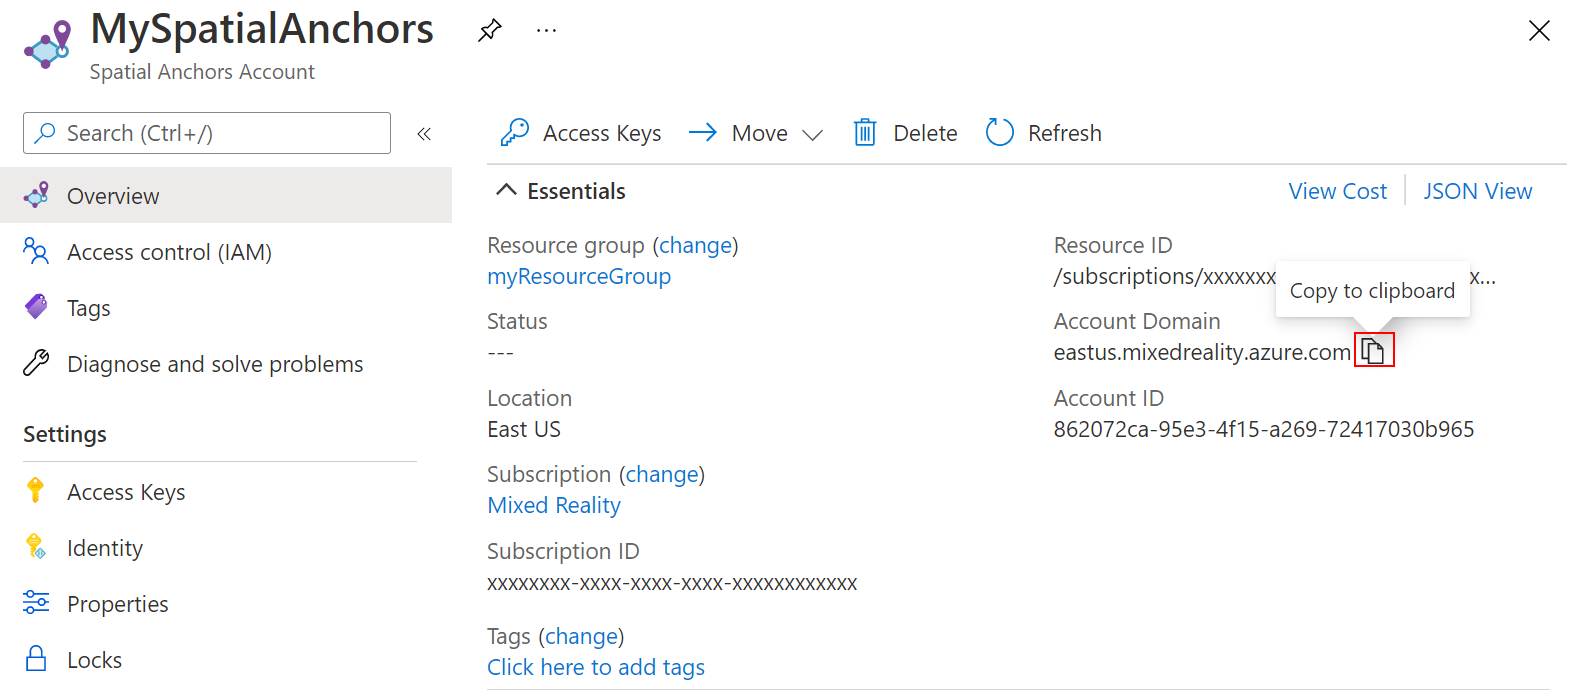
또한 리소스의 계정 도메인 값을 텍스트 편집기에 복사합니다.
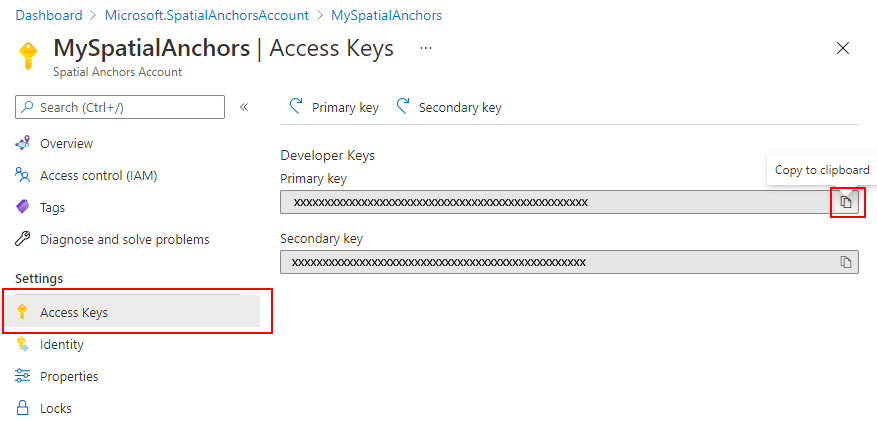
설정 아래에서 액세스 키를 선택합니다. 나중에 사용하기 위해 기본 키 값, 계정 키를 텍스트 편집기에 복사합니다.

클라우드에 로컬 앵커 업로드
Azure Spatial Anchors 계정 식별자, 키 및 도메인이 있으면 app\java\<PackageName>\MainActivity로 돌아가서 다음 가져오기를 추가할 수 있습니다.
import com.microsoft.azure.spatialanchors.SessionLogLevel;

import java.util.concurrent.CompletableFuture;
import java.util.concurrent.ExecutionException;
import java.util.concurrent.ExecutorService;
import java.util.concurrent.Executors;
다음으로, 다음 멤버 변수를 MainActivity 클래스에 추가합니다.
private boolean sessionInitialized = false;

private String anchorId = null;
private boolean scanningForUpload = false;
private final Object syncSessionProgress = new Object();
private ExecutorService executorService = Executors.newSingleThreadExecutor();
이제 다음 코드를 initializeSession() 메서드에 추가합니다. 첫째, 이 코드를 사용하면 앱이 카메라 피드에서 프레임을 수집할 때 Azure Spatial Anchors SDK에서 수행하는 진행 상황을 모니터링할 수 있습니다. 마찬가지로, 구의 색이 원래의 검은색에서 회색으로 변하기 시작합니다. 그런 다음, 앵커를 클라우드에 제출할 수 있을 만큼 충분한 프레임이 수집되면 흰색으로 변합니다. 둘째, 이 코드에서는 클라우드 백 엔드와 통신하는 데 필요한 자격 증명을 제공합니다. 여기서 계정 식별자, 키 및 도메인을 사용하도록 앱을 구성합니다. Spatial Anchors 리소스 설정 시 텍스트 편집기에 복사했습니다.
private void initializeSession() {
    if (sceneView.getSession() == null) {
        //Early return if the ARCore Session is still being set up
        return;
    }

    if (this.cloudSession != null) {
        this.cloudSession.close();
    }
    this.cloudSession = new CloudSpatialAnchorSession();
    this.cloudSession.setSession(sceneView.getSession());
    this.cloudSession.setLogLevel(SessionLogLevel.Information);
    this.cloudSession.addOnLogDebugListener(args -> Log.d("ASAInfo", args.getMessage()));
    this.cloudSession.addErrorListener(args -> Log.e("ASAError", String.format("%s: %s", args.getErrorCode().name(), args.getErrorMessage())));

    sessionInitialized = true;

    this.cloudSession.addSessionUpdatedListener(args -> {
        synchronized (this.syncSessionProgress) {
            this.recommendedSessionProgress = args.getStatus().getRecommendedForCreateProgress();
            Log.i("ASAInfo", String.format("Session progress: %f", this.recommendedSessionProgress));
            if (!this.scanningForUpload) {
                return;
            }
        }

        runOnUiThread(() -> {
            synchronized (this.syncSessionProgress) {
                MaterialFactory.makeOpaqueWithColor(this, new Color(
                        this.recommendedSessionProgress,
                        this.recommendedSessionProgress,
                        this.recommendedSessionProgress))
                        .thenAccept(material -> {
                            this.nodeRenderable.setMaterial(material);
                        });
            }
        });
    });

    this.cloudSession.getConfiguration().setAccountId(/* Copy your account Identifier in here */);
    this.cloudSession.getConfiguration().setAccountKey(/* Copy your account Key in here */);
    this.cloudSession.getConfiguration().setAccountDomain(/* Copy your account Domain in here */);
    this.cloudSession.start();
}
다음으로, 다음 uploadCloudAnchorAsync() 메서드를 mainActivity 클래스에 추가합니다. 호출되면 이 메서드는 디바이스에서 충분한 프레임이 수집될 때까지 비동기적으로 기다립니다. 이렇게 되는 즉시 구의 색이 노란색으로 변한 다음, 로컬 Azure Spatial Anchor를 클라우드에 업로드하기 시작합니다. 업로드가 완료되면 코드에서 앵커 식별자를 반환합니다.
private CompletableFuture<String> uploadCloudAnchorAsync(CloudSpatialAnchor anchor) {
    synchronized (this.syncSessionProgress) {
        this.scanningForUpload = true;
    }


    return CompletableFuture.runAsync(() -> {
        try {
            float currentSessionProgress;
            do {
                synchronized (this.syncSessionProgress) {
                    currentSessionProgress = this.recommendedSessionProgress;
                }
                if (currentSessionProgress < 1.0) {
                    Thread.sleep(500);
                }
            }
            while (currentSessionProgress < 1.0);

            synchronized (this.syncSessionProgress) {
                this.scanningForUpload = false;
            }
            runOnUiThread(() -> {
                MaterialFactory.makeOpaqueWithColor(this, new Color(android.graphics.Color.YELLOW))
                        .thenAccept(yellowMaterial -> {
                            this.nodeRenderable.setMaterial(yellowMaterial);
                        });
            });

            this.cloudSession.createAnchorAsync(anchor).get();
        } catch (InterruptedException | ExecutionException e) {
            Log.e("ASAError", e.toString());
            throw new RuntimeException(e);
        }
    }, executorService).thenApply(ignore -> anchor.getIdentifier());
}
마지막으로, 모든 것을 함께 후크해 보겠습니다. handleTap() 메서드에서 다음 코드를 추가합니다. 구가 만들어지는 즉시 uploadCloudAnchorAsync() 메서드를 호출합니다. 메서드가 반환되면 아래 코드에서 구에 대한 최종 업데이트를 수행하며 구의 색이 파란색으로 변합니다.
protected void handleTap(HitResult hitResult, Plane plane, MotionEvent motionEvent) {
    synchronized (this.syncTaps) {
        if (this.tapExecuted) {
            return;
        }

        this.tapExecuted = true;
    }

    this.anchorNode = new AnchorNode();
    this.anchorNode.setAnchor(hitResult.createAnchor());
    CloudSpatialAnchor cloudAnchor = new CloudSpatialAnchor();
    cloudAnchor.setLocalAnchor(this.anchorNode.getAnchor());

    MaterialFactory.makeOpaqueWithColor(this, new Color(
            this.recommendedSessionProgress,
            this.recommendedSessionProgress,
            this.recommendedSessionProgress))
            .thenAccept(material -> {
                this.nodeRenderable = ShapeFactory.makeSphere(0.1f, new Vector3(0.0f, 0.15f, 0.0f), material);
                this.anchorNode.setRenderable(nodeRenderable);
                this.anchorNode.setParent(arFragment.getArSceneView().getScene());
            });


    uploadCloudAnchorAsync(cloudAnchor)
            .thenAccept(id -> {
                this.anchorId = id;
                Log.i("ASAInfo", String.format("Cloud Anchor created: %s", this.anchorId));
                runOnUiThread(() -> {
                    MaterialFactory.makeOpaqueWithColor(this, new Color(android.graphics.Color.BLUE))
                            .thenAccept(blueMaterial -> {
                                this.nodeRenderable.setMaterial(blueMaterial);
                                synchronized (this.syncTaps) {
                                    this.tapExecuted = false;
                                }
                            });
                });
            });
}
앱을 한 번 더 다시 배포합니다. 디바이스 주위를 이동하고, 화면을 탭한 다음, 구를 배치합니다. 하지만 이번에는 카메라 프레임이 수집됨에 따라 구의 색이 검은색에서 흰색으로 변합니다. 충분한 프레임이 있으면 구의 색이 노란색으로 변하고 클라우드 업로드가 시작됩니다. 전화가 인터넷에 연결되어 있는지 확인합니다. 업로드가 완료되면 구의 색이 파란색으로 변합니다. 필요에 따라 Android Studio 내에서 Logcat 창을 사용하여 앱이 보내는 로그 메시지를 볼 수도 있습니다. 기록되는 메시지의 예로는 프레임 캡처 중의 세션 진행률과, 업로드가 완료되면 클라우드가 반환하는 앵커 식별자가 있습니다.
참고 항목
recommendedSessionProgress 값이 (Session progress라고 하는 디버그 로그에) 나타나지 않으면 변경한 다음, 배치한 구 주변으로 전화를 움직이며 회전시키고 있는지 확인합니다.
클라우드 공간 앵커 찾기
하나의 앵커가 클라우드에 업로드되면 다시 찾을 준비가 되었습니다. 먼저 다음 가져오기를 코드에 추가해 보겠습니다.
import java.util.concurrent.Executors;

import com.microsoft.azure.spatialanchors.AnchorLocateCriteria;
import com.microsoft.azure.spatialanchors.LocateAnchorStatus;
그런 다음, 다음 코드를 handleTap() 메서드에 추가해 보겠습니다. 이 코드는 다음 작업을 수행합니다.
- 화면에서 기존 파란색 구를 제거합니다.
- Azure Spatial Anchors 세션을 다시 초기화합니다. 이 작업을 통해 찾고 있는 앵커가 만든 로컬 앵커 대신 클라우드에서 제공될 수 있습니다.
- 클라우드에 업로드한 앵커에 대한 쿼리를 실행합니다.
protected void handleTap(HitResult hitResult, Plane plane, MotionEvent motionEvent) {
    synchronized (this.syncTaps) {
        if (this.tapExecuted) {
            return;
        }

        this.tapExecuted = true;
    }

    if (this.anchorId != null) {
        this.anchorNode.getAnchor().detach();
        this.anchorNode.setParent(null);
        this.anchorNode = null;
        initializeSession();
        AnchorLocateCriteria criteria = new AnchorLocateCriteria();
        criteria.setIdentifiers(new String[]{this.anchorId});
        cloudSession.createWatcher(criteria);
        return;
    }

    this.anchorNode = new AnchorNode();
    this.anchorNode.setAnchor(hitResult.createAnchor());
    CloudSpatialAnchor cloudAnchor = new CloudSpatialAnchor();
    cloudAnchor.setLocalAnchor(this.anchorNode.getAnchor());

    MaterialFactory.makeOpaqueWithColor(this, new Color(
            this.recommendedSessionProgress,
            this.recommendedSessionProgress,
            this.recommendedSessionProgress))
            .thenAccept(material -> {
                this.nodeRenderable = ShapeFactory.makeSphere(0.1f, new Vector3(0.0f, 0.15f, 0.0f), material);
                this.anchorNode.setRenderable(nodeRenderable);
                this.anchorNode.setParent(arFragment.getArSceneView().getScene());
            });


    uploadCloudAnchorAsync(cloudAnchor)
            .thenAccept(id -> {
                this.anchorId = id;
                Log.i("ASAInfo", String.format("Cloud Anchor created: %s", this.anchorId));
                runOnUiThread(() -> {
                    MaterialFactory.makeOpaqueWithColor(this, new Color(android.graphics.Color.BLUE))
                            .thenAccept(blueMaterial -> {
                                this.nodeRenderable.setMaterial(blueMaterial);
                                synchronized (this.syncTaps) {
                                    this.tapExecuted = false;
                                }
                            });
                });
            });
}
이제 쿼리하는 앵커를 찾을 때 호출될 코드를 후크해 보겠습니다. 다음 코드를 initializeSession() 메서드 내에 추가합니다. 이 코드 조각에서는 클라우드 공간 앵커를 찾으면 녹색 구를 만들고 배치합니다. 또한 화면 태핑을 다시 활성화할 수 있으므로 전체 시나리오를 다시 한 번 반복할 수 있습니다. 즉, 다른 로컬 앵커를 만들고, 업로드하고, 다시 찾을 수 있습니다.
private void initializeSession() {
    if (sceneView.getSession() == null) {
        //Early return if the ARCore Session is still being set up
        return;
    }

    if (this.cloudSession != null) {
        this.cloudSession.close();
    }
    this.cloudSession = new CloudSpatialAnchorSession();
    this.cloudSession.setSession(sceneView.getSession());
    this.cloudSession.setLogLevel(SessionLogLevel.Information);
    this.cloudSession.addOnLogDebugListener(args -> Log.d("ASAInfo", args.getMessage()));
    this.cloudSession.addErrorListener(args -> Log.e("ASAError", String.format("%s: %s", args.getErrorCode().name(), args.getErrorMessage())));

    sessionInitialized = true;

    this.cloudSession.addSessionUpdatedListener(args -> {
        synchronized (this.syncSessionProgress) {
            this.recommendedSessionProgress = args.getStatus().getRecommendedForCreateProgress();
            Log.i("ASAInfo", String.format("Session progress: %f", this.recommendedSessionProgress));
            if (!this.scanningForUpload) {
                return;
            }
        }

        runOnUiThread(() -> {
            synchronized (this.syncSessionProgress) {
                MaterialFactory.makeOpaqueWithColor(this, new Color(
                        this.recommendedSessionProgress,
                        this.recommendedSessionProgress,
                        this.recommendedSessionProgress))
                        .thenAccept(material -> {
                            this.nodeRenderable.setMaterial(material);
                        });
            }
        });
    });

    this.cloudSession.addAnchorLocatedListener(args -> {
        if (args.getStatus() == LocateAnchorStatus.Located) {
            runOnUiThread(() -> {
                this.anchorNode = new AnchorNode();
                this.anchorNode.setAnchor(args.getAnchor().getLocalAnchor());
                MaterialFactory.makeOpaqueWithColor(this, new Color(android.graphics.Color.GREEN))
                        .thenAccept(greenMaterial -> {
                            this.nodeRenderable = ShapeFactory.makeSphere(0.1f, new Vector3(0.0f, 0.15f, 0.0f), greenMaterial);
                            this.anchorNode.setRenderable(nodeRenderable);
                            this.anchorNode.setParent(arFragment.getArSceneView().getScene());

                            this.anchorId = null;
                            synchronized (this.syncTaps) {
                                this.tapExecuted = false;
                            }
                        });
            });
        }
    });

    this.cloudSession.getConfiguration().setAccountId(/* Copy your account Identifier in here */);
    this.cloudSession.getConfiguration().setAccountKey(/* Copy your account Key in here */);
    this.cloudSession.getConfiguration().setAccountDomain(/* Copy your account Domain in here */);
    this.cloudSession.start();
}
정말 간단하죠. 앱을 마지막으로 다시 배포하여 엔드투엔드 시나리오 전체를 시도합니다. 디바이스 주위를 이동하고 검은색 구를 배치합니다. 그런 다음, 구가 노란색으로 변할 때까지 카메라 프레임을 캡처하도록 디바이스를 계속 이동합니다. 로컬 앵커가 업로드되고 구가 파란색으로 변합니다. 마지막으로, 화면을 한 번 더 탭하면 로컬 앵커가 제거된 다음, 해당 클라우드에 대한 쿼리가 수행됩니다. 클라우드 공간 앵커를 찾을 때까지 디바이스 주위를 계속 이동합니다. 녹색 구가 올바른 위치에 나타나야 하며 전체 시나리오를 다시 초기화하고 반복할 수 있습니다.
모두 통합
모든 요소를 하나로 합치고 나면 다음과 같은 MainActivity 클래스 파일이 완성됩니다. 이 클래스를 참조로 사용하여 여러분의 파일과 비교하고, 남은 차이점이 있으면 발견할 수 있습니다.
package com.example.myfirstapp;

import android.os.Bundle;
import android.util.Log;
import android.view.MotionEvent;

import androidx.appcompat.app.AppCompatActivity;

import com.google.ar.core.HitResult;
import com.google.ar.core.Plane;
import com.google.ar.sceneform.AnchorNode;
import com.google.ar.sceneform.ArSceneView;
import com.google.ar.sceneform.FrameTime;
import com.google.ar.sceneform.Scene;
import com.google.ar.sceneform.math.Vector3;
import com.google.ar.sceneform.rendering.Color;
import com.google.ar.sceneform.rendering.MaterialFactory;
import com.google.ar.sceneform.rendering.Renderable;
import com.google.ar.sceneform.rendering.ShapeFactory;
import com.google.ar.sceneform.ux.ArFragment;

import com.microsoft.azure.spatialanchors.AnchorLocateCriteria;
import com.microsoft.azure.spatialanchors.CloudSpatialAnchor;
import com.microsoft.azure.spatialanchors.CloudSpatialAnchorSession;
import com.microsoft.azure.spatialanchors.LocateAnchorStatus;
import com.microsoft.azure.spatialanchors.SessionLogLevel;

import java.util.concurrent.CompletableFuture;
import java.util.concurrent.ExecutionException;
import java.util.concurrent.ExecutorService;
import java.util.concurrent.Executors;

public class MainActivity extends AppCompatActivity {

    private boolean tapExecuted = false;
    private final Object syncTaps = new Object();
    private ArFragment arFragment;
    private AnchorNode anchorNode;
    private Renderable nodeRenderable = null;
    private float recommendedSessionProgress = 0f;

    private ArSceneView sceneView;
    private CloudSpatialAnchorSession cloudSession;
    private boolean sessionInitialized = false;

    private String anchorId = null;
    private boolean scanningForUpload = false;
    private final Object syncSessionProgress = new Object();
    private ExecutorService executorService = Executors.newSingleThreadExecutor();

    @Override
    protected void onCreate(Bundle savedInstanceState) {
        super.onCreate(savedInstanceState);
        setContentView(R.layout.activity_main);

        this.arFragment = (ArFragment) getSupportFragmentManager().findFragmentById(R.id.ux_fragment);
        this.arFragment.setOnTapArPlaneListener(this::handleTap);

        this.sceneView = arFragment.getArSceneView();
        Scene scene = sceneView.getScene();
        scene.addOnUpdateListener(frameTime -> {
            if (this.cloudSession != null) {
                this.cloudSession.processFrame(sceneView.getArFrame());
            }
        });
        scene.addOnUpdateListener(this::scene_OnUpdate);
        initializeSession();
    }

    // <scene_OnUpdate>
    private void scene_OnUpdate(FrameTime frameTime) {
        if (!sessionInitialized) {
            //retry if initializeSession did an early return due to ARCore Session not yet available (i.e. sceneView.getSession() == null)
            initializeSession();
        }
    }
    // </scene_OnUpdate>

    // <initializeSession>
    private void initializeSession() {
        if (sceneView.getSession() == null) {
            //Early return if the ARCore Session is still being set up
            return;
        }

        if (this.cloudSession != null) {
            this.cloudSession.close();
        }
        this.cloudSession = new CloudSpatialAnchorSession();
        this.cloudSession.setSession(sceneView.getSession());
        this.cloudSession.setLogLevel(SessionLogLevel.Information);
        this.cloudSession.addOnLogDebugListener(args -> Log.d("ASAInfo", args.getMessage()));
        this.cloudSession.addErrorListener(args -> Log.e("ASAError", String.format("%s: %s", args.getErrorCode().name(), args.getErrorMessage())));

        sessionInitialized = true;

        this.cloudSession.addSessionUpdatedListener(args -> {
            synchronized (this.syncSessionProgress) {
                this.recommendedSessionProgress = args.getStatus().getRecommendedForCreateProgress();
                Log.i("ASAInfo", String.format("Session progress: %f", this.recommendedSessionProgress));
                if (!this.scanningForUpload) {
                    return;
                }
            }

            runOnUiThread(() -> {
                synchronized (this.syncSessionProgress) {
                    MaterialFactory.makeOpaqueWithColor(this, new Color(
                            this.recommendedSessionProgress,
                            this.recommendedSessionProgress,
                            this.recommendedSessionProgress))
                            .thenAccept(material -> {
                                this.nodeRenderable.setMaterial(material);
                            });
                }
            });
        });

        this.cloudSession.addAnchorLocatedListener(args -> {
            if (args.getStatus() == LocateAnchorStatus.Located) {
                runOnUiThread(() -> {
                    this.anchorNode = new AnchorNode();
                    this.anchorNode.setAnchor(args.getAnchor().getLocalAnchor());
                    MaterialFactory.makeOpaqueWithColor(this, new Color(android.graphics.Color.GREEN))
                            .thenAccept(greenMaterial -> {
                                this.nodeRenderable = ShapeFactory.makeSphere(0.1f, new Vector3(0.0f, 0.15f, 0.0f), greenMaterial);
                                this.anchorNode.setRenderable(nodeRenderable);
                                this.anchorNode.setParent(arFragment.getArSceneView().getScene());

                                this.anchorId = null;
                                synchronized (this.syncTaps) {
                                    this.tapExecuted = false;
                                }
                            });
                });
            }
        });

        this.cloudSession.getConfiguration().setAccountId(/* Copy your account Identifier in here */);
        this.cloudSession.getConfiguration().setAccountKey(/* Copy your account Key in here */);
        this.cloudSession.getConfiguration().setAccountDomain(/* Copy your account Domain in here */);
        this.cloudSession.start();
    }
    // </initializeSession>

    // <handleTap>
    protected void handleTap(HitResult hitResult, Plane plane, MotionEvent motionEvent) {
        synchronized (this.syncTaps) {
            if (this.tapExecuted) {
                return;
            }

            this.tapExecuted = true;
        }

        if (this.anchorId != null) {
            this.anchorNode.getAnchor().detach();
            this.anchorNode.setParent(null);
            this.anchorNode = null;
            initializeSession();
            AnchorLocateCriteria criteria = new AnchorLocateCriteria();
            criteria.setIdentifiers(new String[]{this.anchorId});
            cloudSession.createWatcher(criteria);
            return;
        }

        this.anchorNode = new AnchorNode();
        this.anchorNode.setAnchor(hitResult.createAnchor());
        CloudSpatialAnchor cloudAnchor = new CloudSpatialAnchor();
        cloudAnchor.setLocalAnchor(this.anchorNode.getAnchor());

        MaterialFactory.makeOpaqueWithColor(this, new Color(
                this.recommendedSessionProgress,
                this.recommendedSessionProgress,
                this.recommendedSessionProgress))
                .thenAccept(material -> {
                    this.nodeRenderable = ShapeFactory.makeSphere(0.1f, new Vector3(0.0f, 0.15f, 0.0f), material);
                    this.anchorNode.setRenderable(nodeRenderable);
                    this.anchorNode.setParent(arFragment.getArSceneView().getScene());
                });


        uploadCloudAnchorAsync(cloudAnchor)
                .thenAccept(id -> {
                    this.anchorId = id;
                    Log.i("ASAInfo", String.format("Cloud Anchor created: %s", this.anchorId));
                    runOnUiThread(() -> {
                        MaterialFactory.makeOpaqueWithColor(this, new Color(android.graphics.Color.BLUE))
                                .thenAccept(blueMaterial -> {
                                    this.nodeRenderable.setMaterial(blueMaterial);
                                    synchronized (this.syncTaps) {
                                        this.tapExecuted = false;
                                    }
                                });
                    });
                });
    }
    // </handleTap>

    // <uploadCloudAnchorAsync>
    private CompletableFuture<String> uploadCloudAnchorAsync(CloudSpatialAnchor anchor) {
        synchronized (this.syncSessionProgress) {
            this.scanningForUpload = true;
        }


        return CompletableFuture.runAsync(() -> {
            try {
                float currentSessionProgress;
                do {
                    synchronized (this.syncSessionProgress) {
                        currentSessionProgress = this.recommendedSessionProgress;
                    }
                    if (currentSessionProgress < 1.0) {
                        Thread.sleep(500);
                    }
                }
                while (currentSessionProgress < 1.0);

                synchronized (this.syncSessionProgress) {
                    this.scanningForUpload = false;
                }
                runOnUiThread(() -> {
                    MaterialFactory.makeOpaqueWithColor(this, new Color(android.graphics.Color.YELLOW))
                            .thenAccept(yellowMaterial -> {
                                this.nodeRenderable.setMaterial(yellowMaterial);
                            });
                });

                this.cloudSession.createAnchorAsync(anchor).get();
            } catch (InterruptedException | ExecutionException e) {
                Log.e("ASAError", e.toString());
                throw new RuntimeException(e);
            }
        }, executorService).thenApply(ignore -> anchor.getIdentifier());
    }
    // </uploadCloudAnchorAsync>

}
다음 단계
이 자습서에서는 ARCore 기능을 Azure Spatial Anchors와 통합하는 새 Android 앱을 만드는 방법을 살펴보았습니다. Azure Spatial Anchors 라이브러리에 대한 자세한 내용을 알아보려면 앵커를 만들고 찾는 방법에 대한 가이드를 계속 참조하세요.