Office Space
From VBA Macro to Word Add-in
Robert Bogue
Code download available at:OfficeSpace2008_05.exe(166 KB)
Contents
Book Learning
Macro Basics
Moving Macros to VSTO
Writing New Add-In Code
More Buttons
Document automation isn't a new functionality by any means. It has been going on since the invention of macros, and there has been a full-fledged programming model within Microsoft® Office applications since the early 1990s. For many years, the Office tools have featured macro recorders that weren't limited to simply replaying keystrokes but have been capable of writing code on the fly as well. Macros have even demonstrated that they are functional enough to write viruses. And while writing a virus using a Word macro may be a dubious feat, it is a feat nonetheless.
However, even with all of the capabilities of Visual Basic® for Applications (VBA), there are some things it just doesn't do very well. In the early days of VBA, XML hadn't yet been invented, the Internet was in its infancy, and the first HTML pages were just beginning to appear. As such, it's no wonder that making a Web service call isn't well handled in the context of Visual Basic for Applications.
The Microsoft .NET Framework CLR, on the other hand, understands these technologies quite well. The ability to call Web services is just one among a number of reasons for wanting to write .NET-targeted code rather than VBA—and doing so means using Visual Studio® Tools for Office (VSTO). But switching from VBA to VSTO doesn't have to be a case of throwing the baby out with the bath water; rather, it can be just a natural way to extend how you are already developing solutions in Office.
In this column you'll see how to use Word to capture some VBA code that solves a basic problem. Then I will use the latest version of VSTO included with Visual Studio 2008 to wrap this code into a deployable Word add-in. I'll also write some simple code for some of the tasks that the macro recorder either just can't record or doesn't record in an optimal way.
Book Learning
Recently, I found myself in a situation where this kind of VBA-to-VSTO conversion was perfect for the problem at hand. I was finishing my latest book, The SharePoint Shepherd's Guide for End Users. The book is self-published, and I needed to output the manuscript from Word into a PDF that the printer could use. For that to work, there were several steps I first needed to complete to get the manuscript ready.
First, I had to assemble multiple files into one large document. With more than 140 individual files representing 13 sections and 116 tasks, munging them together wasn't something I wanted to do by hand. Having so many individual files was great when working with Microsoft SharePoint® because it allowed for individual tracking of each task through the editorial workflow, but the sheer number made assembly a task best handled by automation.
Second, I wanted to make sure that all of the tracked changes in all of the documents had been accepted. During the editing process, I used revision marks (via the Track Changes feature in Word) to keep track of editing and other changes to the manuscript. The revision marks are supposed to all be accepted as part of the final checkout of the content, but if I missed some, the formatting of the revision marks would stand out in the final book, which wouldn't be very professional looking.
Third, I needed to remove any remaining comments in the documents. There were comments between the various editors about how things worked and how to standardize some of the terminology. Again, these should all have been removed during an earlier review, but a bit of automation to verify that is prudent. Like the revision marks, the comments were not something I wanted to see in the final product.
I am going to illuminate the process of creating each of these pieces and the relative ability of the macro recorder to capture the code needed for each function. I'll start by using the recorder to generate the basic automation code. From there I'll take a closer look at workable but sub-optimal generated code. Finally, I'll look at the recorder not generating code at all. I'll convert the VBA code into VSTO code and put it into a Word add-in that I can use to assemble the final book. Just to make the process more challenging, I'll convert the code from VBA to C# in the course of bringing it into VSTO.
Macro Basics
The first step in this process is to make sure the Developer tab is visible in Word so I am able to record the macros. Click the Office button, then click the Word Options button at the bottom of the menu. In the Word Options dialog box, check the box next to Show Developer tab in the Ribbon (see Figure 1) and click OK. The developer tab will appear in the Ribbon.
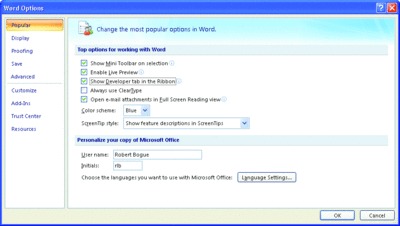
Figure 1** Enabling the Developer Tab in the Ribbon **
Let's record opening a file and adding the contents of that document into a new file. To do this, click the Record Macro button on the Developer tab (see Figure 2). In the dialog that appears (as shown in Figure 3), enter the name AddFiles and click OK. The cursor icon changes to a pointer with a little cassette tape next to it.
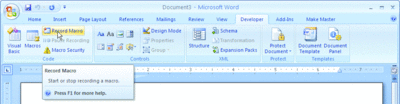
Figure 2** Record a Macro from the Developer Tab **
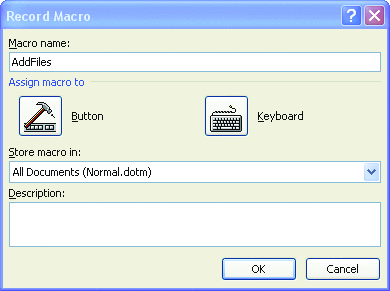
Figure 3** Naming the Macro **
Now, just open a file as you normally would and copy the contents of the document. Then create a new blank document and paste the copied text into the new document. Click the Stop Recording button that appears where the Record Macro button was on the Developer tab. When you're finished you can click the Visual Basic button on the far left of the Developer tab to launch the Visual Basic (for Applications) editor. What you should see is a new AddFiles function that looks similar to Figure 4.
Figure 4 AddFiles VBA Macro
Sub AddFiles()
'
' AddFiles Macro
'
'
ChangeFileOpenDirectory _
  "https://sharepoint.contoso.com/sites/sharepoint/" & _
    "Shared%20Documents/SharePoint%20Tasks/"

  Documents.Open fileName:= _
    "https://sharepoint.contoso.com/sites/SharePoint/" & _
      "Shared%20Documents/SharePoint%20Tasks/" & _
      "Task001%20-%20Create%20a%20Team%20Web%20Site.docx", _
    ConfirmConversions:=False, _
    ReadOnly:=False, _
    AddToRecentFiles:=False, _
    PasswordDocument:="", _
    PasswordTemplate:="", _
    Revert:=False, _
    WritePasswordDocument:="", _
    WritePasswordTemplate:="", _
    Format:= wdOpenFormatAuto, _
    XMLTransform:=""

    Selection.WholeStory
    Selection.Copy
    Documents.Add Template:="Normal", NewTemplate:=False, DocumentType:=0
    Selection.PasteAndFormat (wdPasteDefault)
End Sub
Notice that there is an extraneous line that resets the next File Open directory. After that you see the Open command, and then there's the series of commands to copy the text, create a new document, and paste the text into the new document. The code that the macro recording produced isn't perfect, but it isn't bad either. So I'll take that, enhance it, and put it into VSTO.
Moving Macros to VSTO
To get started with VSTO, I first create a Word 2007 Add-in project. I open Visual Studio, start a new project, use the Word 2007 Add-in template for the project, and name the project PublishPrep. Upon successful creation of the new VSTO project, your Visual Studio 2008 environment should look similar to Figure 5.
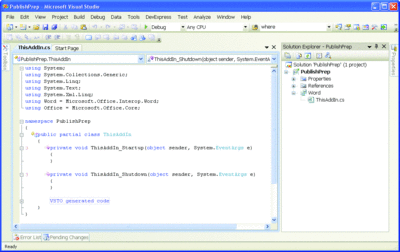
Figure 5** New Word Add-In Project **
With the project created, I need to create a way for users to access the functionality in the add-in. For 2007 Office system applications, that means creating a Ribbon tab and buttons. First, add a new item to your project and select the Ribbon (Visual Designer) template from the Add New Item dialog. Name your new ribbon PublishPrep.
The next step is to customize the Ribbon. In this case, I'm just going to create a group that will live on the Add-ins tab instead of adding my own tab to the Ribbon. My group will contain three buttons.
Click on the group1 group in the ribbon, then right-click and select properties. In the properties pane, change the name of the group to grpPublishPrep, and change the label to Publishing Preparation, as shown in Figure 6.

Figure 6** Configuring the PublishPrep Ribbon **
Open the toolbox, scroll down to the Office Ribbon Controls group, and drag three button controls over onto the Publishing Preparation group. Note that the buttons will stack vertically by default.
Right-click the first button and select Properties. Set the name property to btnCreateMaster and the label to Create Master. For the second button, set the name to btnAcceptRevisions and the label to Accept Revisions. Finally, for the third button, set the name property to btnRemoveComments and the label to Remove Comments. The group should look like what's shown in Figure 7.
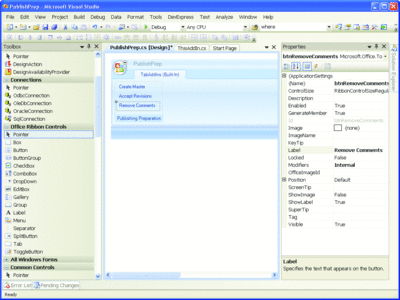
Figure 7** Buttons and Group Configured for the Add-In **
Writing New Add-In Code
The macro recorder did a pretty good job of recording the steps necessary to assemble the book from its individual files. However, it didn't include the code necessary to select individual files. For that, I'll take advantage of the standard File Open dialog box. I'll allow the users to select a single file that is a text file containing the names of all of the files to be assembled. There are two major parts to the code. The first part actually appends the file. The second part gets the list of files to append.
The first part of the code, a function called AppendFile (see Figure 8), takes a single parameter, the file name. At a quick glance the code doesn't resemble the code the macro recorder wrote for me, but that's mostly an illusion.
Figure 8 AppendFile
void AppendFile(string file)
{
    if (string.IsNullOrEmpty(file)) return;

    Application app = Globals.ThisAddIn.Application;
    Document activeDoc = app.ActiveDocument;
    if (activeDoc == null) return;

    object fileObj = file;
    object confirmConversions = false;
    object readOnly = true;
    object addToRecentFiles = false;
    object passwordDocument = Missing.Value;
    object passwordTemplate = Missing.Value;
    object revert = true;
    object writePasswordDocument = Missing.Value;
    object writePasswordTemplate = Missing.Value;
    object format = Missing.Value;
    object encoding = Missing.Value;
    object visible = false;
    object openAndRepair = false;
    object documentDirection = Missing.Value;
    object noEncodingDialog = Missing.Value;
    object xMLTransform = Missing.Value;

    Document newDoc = app.Documents.Open(ref fileObj,
        ref confirmConversions, ref readOnly,
        ref addToRecentFiles, ref passwordDocument,
        ref passwordTemplate, ref revert,
        ref writePasswordDocument, ref writePasswordTemplate,
        ref format, ref encoding, ref visible,
        ref openAndRepair, ref documentDirection,
        ref noEncodingDialog, ref xMLTransform);

    app.Selection.WholeStory();
    app.Selection.Copy();
    activeDoc.Select();
    object collapseEnd = WdCollapseDirection.wdCollapseEnd;
    app.Selection.Collapse(ref collapseEnd);
    app.Selection.Paste();

    object saveChanges = WdSaveOptions.wdDoNotSaveChanges;
    object originalFormat = WdOpenFormat.wdOpenFormatAuto;
    object routeDocument = Missing.Value;
    newDoc.Close(ref saveChanges, ref originalFormat,
        ref routeDocument);
    object breakType = WdBreakType.wdPageBreak;
    app.Selection.InsertBreak(ref breakType);
}
The first four lines just get the active document and perform error checking. If there's no active document, you can't exactly append to it, and if you don't have a file name to append, there's not much more you can do. The other thing that these lines are doing is getting references to the application—which is assumed in VBA—and the active document when the button method was called, something the recorded version of the macro didn't need to do.
The next set of lines—the object variable declarations—are necessary because of the way C# makes the call to the COM components that Word exposes. I need to specify missing values, and since the values are all passed by reference, I need a variable to hold them.
The code then performs the same copy operation that the macro recorder generated. The real difference here is that my add-in code is responsible for the management of the active document, including making sure that the cursor position is set to the end of the active document.
The final block of code closes the document I opened, making sure not to save any changes. It also adds a page break after the inserted content because I want to make sure that the contents of the individual files don't run together.
The second part of the code actually gets the list of files to assemble and calls AppendFile (see Figure 9). This isn't code that the macro recorder captured, but it is where you see the power of VSTO because it allows you to leverage all of the .NET constructs. In this case, I'll leverage the OpenFileDialog control, the ability to open and read from a text file, the use of generics to create a list of files, and calling another smaller method that iterates through the list.
Figure 9 VSTO Power Behind the Button
private void btnCreateMaster_Click(object sender,
    RibbonControlEventArgs e)
{
    Document activeDoc = Globals.ThisAddIn.Application.ActiveDocument;
    if ((activeDoc == null)) return;
    didSelect = false;
    dlgOpenFile.DefaultExt = ".TXT";
    dlgOpenFile.FileOk +=
        new System.ComponentModel.CancelEventHandler(
        dlgOpenFile_FileOk);
    dlgOpenFile.ShowDialog();
    if ((didSelect))
    {
        string selectedFile = dlgOpenFile.FileName;
        List<string> files = new List<string>();
        using (StreamReader inFile = File.OpenText(selectedFile))
        {
            string fileLine = inFile.ReadLine();
            while (fileLine != null && !inFile.EndOfStream)
            {
                if ((fileLine.Length > 0))
                {
                    // Process non-blank lines
                    files.Add(fileLine);
                }
                fileLine = inFile.ReadLine();
            }
        }

        if ((files.Count > 0))
        {
            AppendFiles(files);
        }
    }
}

private bool didSelect = false;
void dlgOpenFile_FileOk(object sender,
    System.ComponentModel.CancelEventArgs e)
{
    didSelect = true;
}

void AppendFiles(List<string> files)
{
    foreach (string file in files)
    {
        AppendFile(file);
    }
}
One fairly obvious question about the structure of this code is: why do I bother to create a list of files when they're listed sequentially in the file and it would be nearly as easy to call AppendFile directly from the loop reading the file? I do this to provide future flexibility. One easy-to-see enhancement to this tool would be to allow the user to select the files to append, rather than having a control file that lists the files to append. This is one way that VSTO excels over VBA—because VSTO is built upon the full .NET Framework, you can take advantage of features like generics and create strongly typed parameters.
There are a few more steps needed to take advantage of the code you've just seen: adding the OpenFileDialog and adding the using statements for all of the various namespaces the solution requires. In design mode for the PublishPrep.cs file, go to the Toolbox and, from the Dialogs group, drag the OpenFileDialog onto the Ribbon. Visual Studio will move the OpenFileDialog to a dock at the bottom. Change the name of the dialog to dlgOpenFile, then clear the FileName. Double-click the Create Master button you created earlier. At the top of the file, add using statements, as follows:
using Microsoft.Office.Interop.Word;
using System.IO;
using System.Reflection;
Finally, replace the method stub created by Visual Studio with the code in Figure 9.
At this point I can press F5 and Visual Studio will fire up a copy of Word with the add-in installed. I can click the Create Master button and select a text file from which the code will get the files to add. Once I'm finished testing, I can either exit Word or go into Visual Studio and press Shift-F5 to stop debugging.
More Buttons
With most of the heavy lifting complete, it's time to quickly add the code for the Accept Revisions button. I can go back to the Developer tab in the Word Ribbon and start the macro recorder again to record the step of accepting all revisions. The actual task is accomplished by going to the Review tab, clicking the Accept button menu, and clicking Accept All Changes in Document (see Figure 10). This will result in a recorded macro that looks something like this:
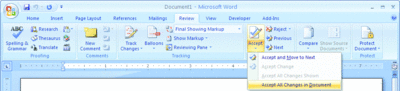
Figure 10** Enabling the Developer Tab in the Ribbon **
Sub AcceptAllChanges()
'
' AcceptAllChanges Macro
'
    WordBasic.AcceptAllChangesInDoc
End Sub
The macro recorder recorded this action to use the WordBasic object. The WordBasic object is a holdover from before Word macros were modified to use VBA. It's not the best way to approach the problem. It's much better to use ActiveDocument. You can either employ the AcceptAllRevisions method or the Revision property's AcceptAll method. I slightly prefer the Revisions.AcceptAll nomenclature, but either method works.
Here is the code necessary to accept revisions from within VSTO code:
private void btnAcceptRevisions_Click(
    object sender, RibbonControlEventArgs e)
{
    Application app = Globals.ThisAddIn.Application;
    Document activeDoc = app.ActiveDocument;
    if (activeDoc == null) return;

    // Accept all Changes
    activeDoc.Revisions.AcceptAll();
}
The method could consist of one line, but it's a good idea to check for an active document and to provide intervening variables should you need to debug. To plug in this code, simply open Publish Prep.cs in Design mode in Visual Studio. Double-click the Accept Revisions button, then replace the btnAcceptRevisions_Click method prototype that Visual Studio added for you with this new code. Press F5 to start debugging and navigate to the Add-ins tab. You should be able to click the button and have all of the revisions in the document accepted.
The Remove Comments button is a bit trickier because it's not something that the macro recorder will record for you. If I start the macro recorder and then try to right-click on a comment to select the delete option for it—well, it just doesn't work. That means I can't select a comment to remove it, so I've got to write my own code from scratch for VSTO. Luckily the code isn't that difficult.
I already have a reference to the active document in Word. That object has a comments collection property. From that collection, I can keep deleting the first comment until I have no more comments left:
private void btnRemoveComments_Click(
    object sender, RibbonControlEventArgs e)
{
    Application app = Globals.ThisAddIn.Application;
    Document activeDoc = app.ActiveDocument;
    if ((activeDoc == null)) return;
    // Clear Comments
    while ((activeDoc.Comments.Count > 0))
    {
        app.Selection.Comments[1].Delete();
    }
}
One interesting thing to note is that the indexer here is 1-based, not zero-based as you would expect in C#.
Adding this feature to the solution is as simple as double-clicking the Remove Comments button and replacing the btnRemoveComments_Click method prototype that Visual Studio added with the code just shown.
At this point I can press F5 again and complete all of the tasks that I set out to do—compiling files, accepting revisions, and removing comments. This isn't world-shaking functionality, but the completed add-in demonstrates handily how the macro recorder can quickly generate some prototype VBA code that can put you on the right track for writing more complete and sophisticated solutions in Visual Basic or C# with VSTO. The macro recorder wasn't able to handle every scenario, but it sure makes the tasks it does support a lot easier to tackle.
Send your questions and comments to mmoffice@microsoft.com.
Robert Bogue, Microsoft MVP for Microsoft Office Sharepoint Server, MCSE, and MCSA:Security, has contributed to more than 100 book projects and numerous other publishing projects. Robert blogs at www.thorprojects.com/blog; you can reach him at Rob.Bogue@thorprojects.com. Find out more about his latest book project, The SharePoint Shepherd's Guide for End Users, at sharepointshepherd.com.