ASP.NET Core 미들웨어로 HTTP 처리기와 모듈 마이그레이션
이 문서에서는 기존 ASP.NET HTTP 모듈과 처리기를 시스템 웹 서버에서 ASP.NET Core 미들웨어로 마이그레이션하는 방법을 보여 줍니다.
모듈 및 처리기
ASP.NET Core 미들웨어로 넘어가기 전에 먼저 HTTP 모듈과 처리기가 작동하는 방식을 다시 한번 살펴보겠습니다.

핸들:
IHttpHandler을 구현하는 클래스
지정된 파일 이름 또는 확장명(예: .report)을 사용하여 요청을 처리하는 데 사용됩니다.
Web.config에서 구성됩니다.
모듈:
IHttpModule을 구현하는 클래스
모든 요청에 대해 호출됩니다.
요청을 단락(요청의 추가 처리 중지)할 수 있습니다.
HTTP 응답에 추가하거나 자체 HTTP 응답을 만들 수 있습니다.
Web.config에서 구성됩니다.
모듈이 수신 요청을 처리하는 순서는 다음에 의해 결정됩니다.
ASP.NET에 의해 발생하는 일련의 이벤트(예: BeginRequest, AuthenticateRequest). 전체 목록은 다음을 참조하세요 System.Web.HttpApplication. 각 모듈은 하나 이상의 이벤트에 대해 처리기를 만들 수 있습니다.
일부 이벤트의 경우 Web.config에서 이벤트가 구성된 순서.
모듈 외에도 수명 주기 이벤트에 대한 처리기를 파일에 추가할 수 있습니다 Global.asax.cs . 이러한 처리기는 구성된 모듈의 처리기 뒤에 실행됩니다.
처리기와 모듈에서 미들웨어로
미들웨어는 HTTP 모듈 및 처리기보다 단순합니다.
모듈, 처리기,
Global.asax.csWeb.config(IIS 구성 제외) 및 애플리케이션 수명 주기가 사라집니다.미들웨어가 모듈 및 처리기의 역할을 모두 담당합니다.
미들웨어는 Web.config에서 구성되지 않고 코드를 사용하여 구성됩니다.
- 파이프라인 분기 를 사용하여 URL뿐 아니라 요청 헤더, 쿼리 문자열 등에 따라 특정 미들웨어로 요청을 전송할 수 있습니다.
- 파이프라인 분기 를 사용하여 URL뿐 아니라 요청 헤더, 쿼리 문자열 등에 따라 특정 미들웨어로 요청을 전송할 수 있습니다.
미들웨어는 모듈과 매우 비슷합니다.
원칙적으로 모든 요청에 대해 호출됩니다.
다음 미들웨어로 요청을 전달하지 않음으로써 요청을 단락할 수 있습니다.
자체 HTTP 응답을 만들 수 있습니다.
미들웨어와 모듈은 서로 다른 순서로 처리됩니다.
미들웨어의 순서는 미들웨어가 요청 파이프라인에 삽입된 순서를 기반으로 하고, 모듈의 순서는 주로 System.Web.HttpApplication 이벤트를 기반으로 합니다.
응답에 대한 미들웨어의 순서는 요청에 대한 순서와 반대이고, 모듈의 경우 요청과 응답의 순서가 동일합니다.
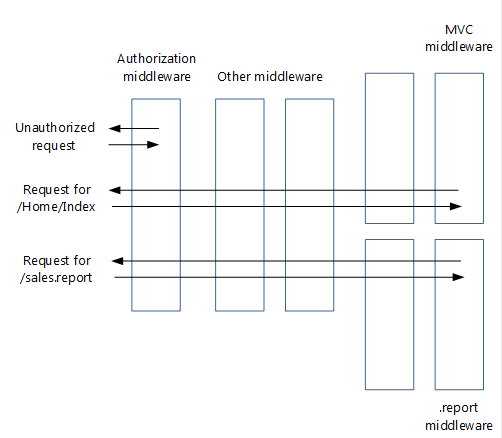
위 이미지에서 인증 미들웨어가 요청을 단락하는 것을 볼 수 있습니다.
미들웨어로 모듈 코드 마이그레이션
기존 HTTP 모듈은 다음과 같은 코드를 같습니다.
// ASP.NET 4 module

using System;
using System.Web;

namespace MyApp.Modules
{
    public class MyModule : IHttpModule
    {
        public void Dispose()
        {
        }

        public void Init(HttpApplication application)
        {
            application.BeginRequest += (new EventHandler(this.Application_BeginRequest));
            application.EndRequest += (new EventHandler(this.Application_EndRequest));
        }

        private void Application_BeginRequest(Object source, EventArgs e)
        {
            HttpContext context = ((HttpApplication)source).Context;

            // Do something with context near the beginning of request processing.
        }

        private void Application_EndRequest(Object source, EventArgs e)
        {
            HttpContext context = ((HttpApplication)source).Context;

            // Do something with context near the end of request processing.
        }
    }
}
미들웨어 페이지에서 설명하듯이, ASP.NET Core 미들웨어는HttpContext를 받고 Task를 반환하는 Invoke 메서드를 노출하는 클래스입니다. 새 미들웨어는 다음과 같습니다.
// ASP.NET Core middleware

using Microsoft.AspNetCore.Builder;
using Microsoft.AspNetCore.Http;
using System.Threading.Tasks;

namespace MyApp.Middleware
{
    public class MyMiddleware
    {
        private readonly RequestDelegate _next;

        public MyMiddleware(RequestDelegate next)
        {
            _next = next;
        }

        public async Task Invoke(HttpContext context)
        {
            // Do something with context near the beginning of request processing.

            await _next.Invoke(context);

            // Clean up.
        }
    }

    public static class MyMiddlewareExtensions
    {
        public static IApplicationBuilder UseMyMiddleware(this IApplicationBuilder builder)
        {
            return builder.UseMiddleware<MyMiddleware>();
        }
    }
}
위의 미들웨어 템플릿은 미들웨어 작성에서 가져온 것입니다.
MyMiddlewareExtensions 도우미 클래스는 Startup 클래스에서 미들웨어를 쉽게 구성할 수 있도록 해 줍니다. UseMyMiddleware 메서드는 미들웨어 클래스를 요청 파이프라인에 추가합니다. 미들웨어에 필요한 서비스는 미들웨어 생성자에 삽입됩니다.
모듈은 요청을 종료할 수 있습니다(예: 사용자에게 권한이 없는 경우).
// ASP.NET 4 module that may terminate the request

private void Application_BeginRequest(Object source, EventArgs e)
{
    HttpContext context = ((HttpApplication)source).Context;

    // Do something with context near the beginning of request processing.

    if (TerminateRequest())
    {
        context.Response.End();
        return;
    }
}
미들웨어는 파이프라인에 있는 다음 미들웨어에서 Invoke를 호출하지 않음으로써 이를 처리합니다. 이렇게 한다고 해서 요청이 완전히 종료되는 것은 아닙니다. 요청이 파이프라인을 통과하면 이전 미들웨어들이 여전히 호출되기 때문입니다.
// ASP.NET Core middleware that may terminate the request

public async Task Invoke(HttpContext context)
{
    // Do something with context near the beginning of request processing.

    if (!TerminateRequest())
        await _next.Invoke(context);

    // Clean up.
}
모듈의 기능을 새 미들웨어로 마이그레이션하는 경우, ASP.NET Core에서 HttpContext 클래스가 크게 변경되어 코드가 컴파일되지 않는 경우가 있을 수 있습니다. 뒤에서 새 ASP.NET Core HttpContext로 마이그레이션하는 방법을 살펴보겠습니다.
요청 파이프라인으로 모듈 삽입 마이그레이션
HTTP 모듈은 보통 Web.config를 사용하여 요청 파이프라인에 추가됩니다.
<?xml version="1.0" encoding="utf-8"?>
<!--ASP.NET 4 web.config-->
<configuration>
  <system.webServer>
    <modules>
      <add name="MyModule" type="MyApp.Modules.MyModule"/>
    </modules>
  </system.webServer>
</configuration>
Startup 클래스에서 요청 파이프라인에 새 미들웨어를 추가하여 모듈을 변환합니다.
public void Configure(IApplicationBuilder app, IHostingEnvironment env, ILoggerFactory loggerFactory)
{
    loggerFactory.AddConsole(Configuration.GetSection("Logging"));
    loggerFactory.AddDebug();

    if (env.IsDevelopment())
    {
        app.UseDeveloperExceptionPage();
        app.UseBrowserLink();
    }
    else
    {
        app.UseExceptionHandler("/Home/Error");
    }

    app.UseMyMiddleware();

    app.UseMyMiddlewareWithParams();

    var myMiddlewareOptions = Configuration.GetSection("MyMiddlewareOptionsSection").Get<MyMiddlewareOptions>();
    var myMiddlewareOptions2 = Configuration.GetSection("MyMiddlewareOptionsSection2").Get<MyMiddlewareOptions>();
    app.UseMyMiddlewareWithParams(myMiddlewareOptions);
    app.UseMyMiddlewareWithParams(myMiddlewareOptions2);

    app.UseMyTerminatingMiddleware();

    // Create branch to the MyHandlerMiddleware.
    // All requests ending in .report will follow this branch.
    app.MapWhen(
        context => context.Request.Path.ToString().EndsWith(".report"),
        appBranch => {
            // ... optionally add more middleware to this branch
            appBranch.UseMyHandler();
        });

    app.MapWhen(
        context => context.Request.Path.ToString().EndsWith(".context"),
        appBranch => {
            appBranch.UseHttpContextDemoMiddleware();
        });

    app.UseStaticFiles();

    app.UseMvc(routes =>
    {
        routes.MapRoute(
            name: "default",
            template: "{controller=Home}/{action=Index}/{id?}");
    });
}
파이프라인에서 새 미들웨어를 삽입할 정확한 지점은 미들웨어가 모듈로서 처리한 이벤트(BeginRequest, EndRequest 등)와 Web.config의 모듈 목록의 순서에 따라 정해집니다.
위에서 설명했듯이, ASP.NET Core에는 애플리케이션 수명 주기가 없으며 미들웨어가 응답을 처리하는 순서는 모듈의 순서와 다릅니다. 이로 인해 순서 결정이 까다로워질 수 있습니다.
순서가 문제가 되는 경우 모듈을 각각 독립적으로 순서를 지정할 수 있는 여러 개의 미들웨어 구성 요소로 분할할 수 있습니다.
미들웨어로 처리기 코드 마이그레이션
HTTP 처리기는 다음과 같은 코드를 갖습니다.
// ASP.NET 4 handler

using System.Web;

namespace MyApp.HttpHandlers
{
    public class MyHandler : IHttpHandler
    {
        public bool IsReusable { get { return true; } }

        public void ProcessRequest(HttpContext context)
        {
            string response = GenerateResponse(context);

            context.Response.ContentType = GetContentType();
            context.Response.Output.Write(response);
        }

        // ...

        private string GenerateResponse(HttpContext context)
        {
            string title = context.Request.QueryString["title"];
            return string.Format("Title of the report: {0}", title);
        }

        private string GetContentType()
        {
            return "text/plain";
        }
    }
}
ASP.NET Core 프로젝트에서 이를 다음과 같은 미들웨어로 변환하게 됩니다.
// ASP.NET Core middleware migrated from a handler

using Microsoft.AspNetCore.Builder;
using Microsoft.AspNetCore.Http;
using System.Threading.Tasks;

namespace MyApp.Middleware
{
    public class MyHandlerMiddleware
    {

        // Must have constructor with this signature, otherwise exception at run time
        public MyHandlerMiddleware(RequestDelegate next)
        {
            // This is an HTTP Handler, so no need to store next
        }

        public async Task Invoke(HttpContext context)
        {
            string response = GenerateResponse(context);

            context.Response.ContentType = GetContentType();
            await context.Response.WriteAsync(response);
        }

        // ...

        private string GenerateResponse(HttpContext context)
        {
            string title = context.Request.Query["title"];
            return string.Format("Title of the report: {0}", title);
        }

        private string GetContentType()
        {
            return "text/plain";
        }
    }

    public static class MyHandlerExtensions
    {
        public static IApplicationBuilder UseMyHandler(this IApplicationBuilder builder)
        {
            return builder.UseMiddleware<MyHandlerMiddleware>();
        }
    }
}
이 미들웨어는 모듈에 해당하는 미들웨어와 매우 비슷합니다. 유일한 차이는 _next.Invoke(context)에 대한 호출이 없다는 것입니다. 처리기는 요청 파이프라인의 끝에 있으므로 호출할 다음 미들웨어가 없기 때문입니다.
요청 파이프라인으로 처리기 삽입 마이그레이션
HTTP 처리기 구성은 Web.config에서 이루어지며 다음과 같습니다.
<?xml version="1.0" encoding="utf-8"?>
<!--ASP.NET 4 web.config-->
<configuration>
  <system.webServer>
    <handlers>
      <add name="MyHandler" verb="*" path="*.report" type="MyApp.HttpHandlers.MyHandler" resourceType="Unspecified" preCondition="integratedMode"/>
    </handlers>
  </system.webServer>
</configuration>
모듈에서 변환된 미들웨어의 경우와 마찬가지로, Startup 클래스에서 요청 파이프라인에 새 처리기 미들웨어를 추가하여 처리기를 변환할 수 있습니다. 이 방법의 문제는 이렇게 하면 모든 요청이 새 처리기 미들웨어로 전송된다는 것입니다. 하지만 지정된 확장명을 갖는 요청만 미들웨어로 도달하도록 하여 HTTP 처리기와 동일한 기능을 갖도록 하는 것이 목표입니다.
한 가지 해결 방법은 MapWhen 확장명 메서드를 사용하여 지정된 확장명을 갖는 요청에 대해 파이프라인을 분기하는 것입니다. 이 작업은 다른 미들웨어를 추가할 때 동일한 Configure 메서드에서 수행합니다.
public void Configure(IApplicationBuilder app, IHostingEnvironment env, ILoggerFactory loggerFactory)
{
    loggerFactory.AddConsole(Configuration.GetSection("Logging"));
    loggerFactory.AddDebug();

    if (env.IsDevelopment())
    {
        app.UseDeveloperExceptionPage();
        app.UseBrowserLink();
    }
    else
    {
        app.UseExceptionHandler("/Home/Error");
    }

    app.UseMyMiddleware();

    app.UseMyMiddlewareWithParams();

    var myMiddlewareOptions = Configuration.GetSection("MyMiddlewareOptionsSection").Get<MyMiddlewareOptions>();
    var myMiddlewareOptions2 = Configuration.GetSection("MyMiddlewareOptionsSection2").Get<MyMiddlewareOptions>();
    app.UseMyMiddlewareWithParams(myMiddlewareOptions);
    app.UseMyMiddlewareWithParams(myMiddlewareOptions2);

    app.UseMyTerminatingMiddleware();

    // Create branch to the MyHandlerMiddleware.
    // All requests ending in .report will follow this branch.
    app.MapWhen(
        context => context.Request.Path.ToString().EndsWith(".report"),
        appBranch => {
            // ... optionally add more middleware to this branch
            appBranch.UseMyHandler();
        });

    app.MapWhen(
        context => context.Request.Path.ToString().EndsWith(".context"),
        appBranch => {
            appBranch.UseHttpContextDemoMiddleware();
        });

    app.UseStaticFiles();

    app.UseMvc(routes =>
    {
        routes.MapRoute(
            name: "default",
            template: "{controller=Home}/{action=Index}/{id?}");
    });
}
MapWhen은 다음과 같은 매개 변수를 받습니다.
HttpContext를 받고 요청이 분기를 통과하면true를 반환하는 람다. 따라서 확장명뿐 아니라 요청 헤더, 쿼리 문자열 매개 변수 등을 기반으로 요청을 분기할 수 있습니다.IApplicationBuilder를 받고 분기에 대한 모든 미들웨어를 추가하는 람다. 따라서 분기에 처리기 미들웨어 앞에 추가 미들웨어를 추가할 수 있습니다.
분기 앞에서 파이프라인에 추가된 미들웨어는 모든 요청에서 호출되고, 분기의 영향을 받지 않습니다.
옵션 패턴을 사용하여 미들웨어 옵션 로드
일부 모듈과 처리기에는 Web.config에 저장되는 구성 옵션이 있습니다. 그러나 ASP.NET Core에서는 Web.config 대신 새 구성 모델이 사용됩니다.
새 구성 시스템은 이 문제를 해결할 수 있도록 다음과 같은 옵션을 제공합니다.
미들웨어 옵션을 포함할 클래스를 만듭니다. 예:
public class MyMiddlewareOptions
{
    public string Param1 { get; set; }
    public string Param2 { get; set; }
}
옵션 값을 저장합니다.
구성 시스템은 원하는 곳 어디에나 옵션 값을 저장할 수 있도록 허용합니다. 그러나 대부분의 사이트에서는
appsettings.json을 사용하므로 여기서도 이 방법을 사용하겠습니다.{ "MyMiddlewareOptionsSection": { "Param1": "Param1Value", "Param2": "Param2Value" } }여기서 MyMiddlewareOptionsSection은 섹션 이름입니다. 이 이름은 옵션 클래스의 이름과 동일하지 않아도 됩니다.
옵션 값을 옵션 클래스에 연결합니다.
옵션 패턴은 ASP.NET Core의 종속성 삽입 프레임워크를 사용하여 옵션 유형(예:
MyMiddlewareOptions)을 실제 옵션을 갖는MyMiddlewareOptions개체에 연결합니다.Startup클래스를 업데이트합니다.appsettings.json을 사용하는 경우 이를Startup생성자의 구성 작성기에 추가합니다.public Startup(IHostingEnvironment env) { var builder = new ConfigurationBuilder() .SetBasePath(env.ContentRootPath) .AddJsonFile("appsettings.json", optional: true, reloadOnChange: true) .AddJsonFile($"appsettings.{env.EnvironmentName}.json", optional: true) .AddEnvironmentVariables(); Configuration = builder.Build(); }옵션 서비스를 구성합니다.
public void ConfigureServices(IServiceCollection services)
{
    // Setup options service
    services.AddOptions();

    // Load options from section "MyMiddlewareOptionsSection"
    services.Configure<MyMiddlewareOptions>(
        Configuration.GetSection("MyMiddlewareOptionsSection"));

    // Add framework services.
    services.AddMvc();
}
옵션을 옵션 클래스에 연결합니다.
public void ConfigureServices(IServiceCollection services)
{
    // Setup options service
    services.AddOptions();

    // Load options from section "MyMiddlewareOptionsSection"
    services.Configure<MyMiddlewareOptions>(
        Configuration.GetSection("MyMiddlewareOptionsSection"));

    // Add framework services.
    services.AddMvc();
}
옵션을 미들웨어 생성자에 삽입합니다. 이 작업은 옵션을 컨트롤러에 삽입하는 것과 비슷합니다.
public class MyMiddlewareWithParams { private readonly RequestDelegate _next; private readonly MyMiddlewareOptions _myMiddlewareOptions; public MyMiddlewareWithParams(RequestDelegate next, IOptions<MyMiddlewareOptions> optionsAccessor) { _next = next; _myMiddlewareOptions = optionsAccessor.Value; } public async Task Invoke(HttpContext context) { // Do something with context near the beginning of request processing // using configuration in _myMiddlewareOptions await _next.Invoke(context); // Do something with context near the end of request processing // using configuration in _myMiddlewareOptions } }IApplicationBuilder에 미들웨어를 추가하는 UseMiddleware 확장 메서드가 종속성 삽입을 처리합니다.이는
IOptions개체로만 제한되지 않으며, 미들웨어에 필요한 다른 어떤 개체도 이 방법으로 삽입할 수 있습니다.
직접 삽입을 통해 미들웨어 옵션 로드
옵션 패턴에는 옵션 값과 소비자 간에 느슨한 결합을 만든다는 이점이 있습니다. 옵션 클래스를 실제 옵션 값에 연결하면 다른 모든 클래스가 종속성 삽입 프레임워크를 통해 옵션에 액세스할 수 있습니다. 따라서 옵션 값을 이리저리 전달할 필요가 없습니다.
그러나 동일한 미들웨어를 서로 다른 옵션으로 두 번 사용하려면 문제가 발생합니다. 예를 들어, 여러 분기에서 사용되어 여러 역할을 허용하는 권한 부여 미들웨어의 경우 서로 다른 두 개의 옵션 개체를 하나의 옵션 클래스에 연결할 수 없습니다.
해결 방법은 Startup 클래스의 실제 옵션 값으로 옵션 개체를 가져와서 미들웨어의 각 인스턴스로 직접 전달하는 것입니다.
appsettings.json에 두 번째 키를 추가합니다.appsettings.json파일에 두 번째 옵션 세트를 추가하려면 새 키를 사용하여 고유하게 식별해야 합니다.{ "MyMiddlewareOptionsSection2": { "Param1": "Param1Value2", "Param2": "Param2Value2" }, "MyMiddlewareOptionsSection": { "Param1": "Param1Value", "Param2": "Param2Value" } }옵션 값을 가져와서 미들웨어로 전달합니다. (파이프라인에 미들웨어를 추가하는)
Use...확장 메서드는 옵션 값을 전달하기 위한 논리적 공간이 됩니다.public void Configure(IApplicationBuilder app, IHostingEnvironment env, ILoggerFactory loggerFactory) { loggerFactory.AddConsole(Configuration.GetSection("Logging")); loggerFactory.AddDebug(); if (env.IsDevelopment()) { app.UseDeveloperExceptionPage(); app.UseBrowserLink(); } else { app.UseExceptionHandler("/Home/Error"); } app.UseMyMiddleware(); app.UseMyMiddlewareWithParams(); var myMiddlewareOptions = Configuration.GetSection("MyMiddlewareOptionsSection").Get<MyMiddlewareOptions>(); var myMiddlewareOptions2 = Configuration.GetSection("MyMiddlewareOptionsSection2").Get<MyMiddlewareOptions>(); app.UseMyMiddlewareWithParams(myMiddlewareOptions); app.UseMyMiddlewareWithParams(myMiddlewareOptions2); app.UseMyTerminatingMiddleware(); // Create branch to the MyHandlerMiddleware. // All requests ending in .report will follow this branch. app.MapWhen( context => context.Request.Path.ToString().EndsWith(".report"), appBranch => { // ... optionally add more middleware to this branch appBranch.UseMyHandler(); }); app.MapWhen( context => context.Request.Path.ToString().EndsWith(".context"), appBranch => { appBranch.UseHttpContextDemoMiddleware(); }); app.UseStaticFiles(); app.UseMvc(routes => { routes.MapRoute( name: "default", template: "{controller=Home}/{action=Index}/{id?}"); }); }미들웨어가 옵션 매개 변수를 받을 수 있도록 합니다. (옵션 매개 변수를 받아서
UseMiddleware로 전달하는)Use...확장 메서드의 오버로드를 제공합니다.UseMiddleware가 매개 변수와 함께 호출되면, 미들웨어 생성기가 미들웨어 개체를 인스턴스화할 때 생성기에 매개 변수를 전달합니다.public static class MyMiddlewareWithParamsExtensions { public static IApplicationBuilder UseMyMiddlewareWithParams( this IApplicationBuilder builder) { return builder.UseMiddleware<MyMiddlewareWithParams>(); } public static IApplicationBuilder UseMyMiddlewareWithParams( this IApplicationBuilder builder, MyMiddlewareOptions myMiddlewareOptions) { return builder.UseMiddleware<MyMiddlewareWithParams>( new OptionsWrapper<MyMiddlewareOptions>(myMiddlewareOptions)); } }옵션 개체가
OptionsWrapper개체로 래핑되는 것을 볼 수 있습니다. 이에 따라 미들웨어 생성자에서 예상하는 바와 같이IOptions가 구현됩니다.
새 HttpContext로 마이그레이션
앞에서 미들웨어의 Invoke 메서드가 HttpContext 유형의 매개 변수를 받는 것을 볼 수 있었습니다.
public async Task Invoke(HttpContext context)
HttpContext는 ASP.NET Core에서 크게 변경되었습니다. 이 섹션에서는 가장 일반적으로 사용되는 속성을 새 Microsoft.AspNetCore.Http.HttpContext속성 System.Web.HttpContext 으로 변환하는 방법을 보여줍니다.
HttpContext
HttpContext.Items는 다음으로 변환됩니다.
IDictionary<object, object> items = httpContext.Items;
고유한 요청 ID(System.Web.HttpContext에 대응하는 항목 없음)
각 요청에 대해 고유한 ID를 제공해 주므로 로그에 포함하면 매우 유용합니다.
string requestId = httpContext.TraceIdentifier;
HttpContext.Request
HttpContext.Request.HttpMethod는 다음으로 변환됩니다.
string httpMethod = httpContext.Request.Method;
HttpContext.Request.QueryString은 다음으로 변환됩니다.
IQueryCollection queryParameters = httpContext.Request.Query;

// If no query parameter "key" used, values will have 0 items
// If single value used for a key (...?key=v1), values will have 1 item ("v1")
// If key has multiple values (...?key=v1&key=v2), values will have 2 items ("v1" and "v2")
IList<string> values = queryParameters["key"];

// If no query parameter "key" used, value will be ""
// If single value used for a key (...?key=v1), value will be "v1"
// If key has multiple values (...?key=v1&key=v2), value will be "v1,v2"
string value = queryParameters["key"].ToString();
HttpContext.Request.Url 및 HttpContext.Request.RawUrl은 다음으로 변환됩니다.
// using Microsoft.AspNetCore.Http.Extensions;
var url = httpContext.Request.GetDisplayUrl();
HttpContext.Request.IsSecureConnection은 다음으로 변환됩니다.
var isSecureConnection = httpContext.Request.IsHttps;
HttpContext.Request.UserHostAddress는 다음으로 변환됩니다.
var userHostAddress = httpContext.Connection.RemoteIpAddress?.ToString();
HttpContext.Request.Cookies는 다음으로 변환됩니다.
IRequestCookieCollection cookies = httpContext.Request.Cookies;
string unknownCookieValue = cookies["unknownCookie"]; // will be null (no exception)
string knownCookieValue = cookies["cookie1name"];     // will be actual value
HttpContext.Request.RequestContext.RouteData는 다음으로 변환됩니다.
var routeValue = httpContext.GetRouteValue("key");
HttpContext.Request.Headers는 다음으로 변환됩니다.
// using Microsoft.AspNetCore.Http.Headers;
// using Microsoft.Net.Http.Headers;

IHeaderDictionary headersDictionary = httpContext.Request.Headers;

// GetTypedHeaders extension method provides strongly typed access to many headers
var requestHeaders = httpContext.Request.GetTypedHeaders();
CacheControlHeaderValue cacheControlHeaderValue = requestHeaders.CacheControl;

// For unknown header, unknownheaderValues has zero items and unknownheaderValue is ""
IList<string> unknownheaderValues = headersDictionary["unknownheader"];
string unknownheaderValue = headersDictionary["unknownheader"].ToString();

// For known header, knownheaderValues has 1 item and knownheaderValue is the value
IList<string> knownheaderValues = headersDictionary[HeaderNames.AcceptLanguage];
string knownheaderValue = headersDictionary[HeaderNames.AcceptLanguage].ToString();
HttpContext.Request.UserAgent는 다음으로 변환됩니다.
string userAgent = headersDictionary[HeaderNames.UserAgent].ToString();
HttpContext.Request.UrlReferrer는 다음으로 변환됩니다.
string urlReferrer = headersDictionary[HeaderNames.Referer].ToString();
HttpContext.Request.ContentType은 다음으로 변환됩니다.
// using Microsoft.Net.Http.Headers;

MediaTypeHeaderValue mediaHeaderValue = requestHeaders.ContentType;
string contentType = mediaHeaderValue?.MediaType.ToString();   // ex. application/x-www-form-urlencoded
string contentMainType = mediaHeaderValue?.Type.ToString();    // ex. application
string contentSubType = mediaHeaderValue?.SubType.ToString();  // ex. x-www-form-urlencoded

System.Text.Encoding requestEncoding = mediaHeaderValue?.Encoding;
HttpContext.Request.Form은 다음으로 변환됩니다.
if (httpContext.Request.HasFormContentType)
{
    IFormCollection form;

    form = httpContext.Request.Form; // sync
    // Or
    form = await httpContext.Request.ReadFormAsync(); // async

    string firstName = form["firstname"];
    string lastName = form["lastname"];
}
Warning
콘텐츠 하위 유형이 x-www-form-urlencoded 또는 form-data인 경우에만 양식 값을 읽어야 합니다.
HttpContext.Request.InputStream은 다음으로 변환됩니다.
string inputBody;
using (var reader = new System.IO.StreamReader(
    httpContext.Request.Body, System.Text.Encoding.UTF8))
{
    inputBody = reader.ReadToEnd();
}
Warning
이 코드는 처리기 유형 미들웨어에서만, 파이프라인 끝에서 사용해야 합니다.
위에 나와 있는 대로 원시 본문을 읽는 것은 요청당 한 번만 가능합니다. 첫 번째 읽기 후에 본문을 읽으려고 시도하는 미들웨어는 빈 본문을 읽게 됩니다.
양식의 경우 버퍼에서 읽어 들이기 때문에 앞에서 보았듯이 양식을 읽을 때는 이 제한이 적용되지 않습니다.
HttpContext.Response
HttpContext.Response.Status 및 HttpContext.Response.StatusDescription은 다음으로 변환됩니다.
// using Microsoft.AspNetCore.Http;
httpContext.Response.StatusCode = StatusCodes.Status200OK;
HttpContext.Response.ContentEncoding 및 HttpContext.Response.ContentType은 다음으로 변환됩니다.
// using Microsoft.Net.Http.Headers;
var mediaType = new MediaTypeHeaderValue("application/json");
mediaType.Encoding = System.Text.Encoding.UTF8;
httpContext.Response.ContentType = mediaType.ToString();
HttpContext.Response.ContentType은 자체적으로 다음으로도 변환됩니다.
httpContext.Response.ContentType = "text/html";
HttpContext.Response.Output은 다음으로 변환됩니다.
string responseContent = GetResponseContent();
await httpContext.Response.WriteAsync(responseContent);
HttpContext.Response.TransmitFile
파일 제공은 ASP.NET Core 기능 요청에서 설명합니다.
HttpContext.Response.Headers
응답 본문에 무언가가 쓰여진 후에 응답 헤더를 설정하면 응답 헤더가 전송되지 않습니다. 따라서 응답 헤더를 보내는 것은 쉽지 않습니다.
해결 방법은 응답에 대한 쓰기가 시작되기 직전에 호출되는 콜백 메서드를 설정하는 것입니다. 이 작업은 미들웨어에서 Invoke 메서드의 시작 부분에서 하는 것이 좋습니다. 이 콜백 메서드가 응답 헤더를 설정합니다.
다음 코드는 SetHeaders라는 콜백 메서드를 설정합니다.
public async Task Invoke(HttpContext httpContext)
{
    // ...
    httpContext.Response.OnStarting(SetHeaders, state: httpContext);
SetHeaders 콜백 메서드는 다음과 같습니다.
// using Microsoft.AspNet.Http.Headers;
// using Microsoft.Net.Http.Headers;

private Task SetHeaders(object context)
{
    var httpContext = (HttpContext)context;

    // Set header with single value
    httpContext.Response.Headers["ResponseHeaderName"] = "headerValue";

    // Set header with multiple values
    string[] responseHeaderValues = new string[] { "headerValue1", "headerValue1" };
    httpContext.Response.Headers["ResponseHeaderName"] = responseHeaderValues;

    // Translating ASP.NET 4's HttpContext.Response.RedirectLocation
    httpContext.Response.Headers[HeaderNames.Location] = "http://www.example.com";
    // Or
    httpContext.Response.Redirect("http://www.example.com");

    // GetTypedHeaders extension method provides strongly typed access to many headers
    var responseHeaders = httpContext.Response.GetTypedHeaders();

    // Translating ASP.NET 4's HttpContext.Response.CacheControl
    responseHeaders.CacheControl = new CacheControlHeaderValue
    {
        MaxAge = new System.TimeSpan(365, 0, 0, 0)
        // Many more properties available
    };

    // If you use .NET Framework 4.6+, Task.CompletedTask will be a bit faster
    return Task.FromResult(0);
}
HttpContext.Response.Cookies
Cookies는 Set-Cookie 응답 헤더에 포함되어 브라우저로 전송됩니다. 그 결과 cookies를 전송하려면 응답 헤더를 전송할 때 사용되는 것과 동일한 콜백이 필요합니다.
public async Task Invoke(HttpContext httpContext)
{
    // ...
    httpContext.Response.OnStarting(SetCookies, state: httpContext);
    httpContext.Response.OnStarting(SetHeaders, state: httpContext);
SetCookies 콜백 메서드는 다음과 같습니다.
private Task SetCookies(object context)
{
    var httpContext = (HttpContext)context;

    IResponseCookies responseCookies = httpContext.Response.Cookies;

    responseCookies.Append("cookie1name", "cookie1value");
    responseCookies.Append("cookie2name", "cookie2value",
        new CookieOptions { Expires = System.DateTime.Now.AddDays(5), HttpOnly = true });

    // If you use .NET Framework 4.6+, Task.CompletedTask will be a bit faster
    return Task.FromResult(0);
}
추가 리소스
ASP.NET Core
피드백
출시 예정: 2024년 내내 콘텐츠에 대한 피드백 메커니즘으로 GitHub 문제를 단계적으로 폐지하고 이를 새로운 피드백 시스템으로 바꿀 예정입니다. 자세한 내용은 다음을 참조하세요. https://aka.ms/ContentUserFeedback
다음에 대한 사용자 의견 제출 및 보기