ASP.NET MVC 애플리케이션에서 Entity Framework를 사용하여 기본 CRUD 기능 구현(2/10)
작성자: Tom Dykstra
Contoso University 샘플 웹 애플리케이션은 Entity Framework 5 Code First 및 Visual Studio 2012를 사용하여 ASP.NET MVC 4 애플리케이션을 만드는 방법을 보여 줍니다. 자습서 시리즈에 대한 정보는 시리즈의 첫 번째 자습서를 참조하세요.
참고
resolve 수 없는 문제가 발생하면 완료된 장을 다운로드하고 문제를 재현해 보세요. 일반적으로 코드를 완료된 코드와 비교하여 문제에 대한 솔루션을 찾을 수 있습니다. 몇 가지 일반적인 오류 및 해결 방법은 오류 및 해결 방법을 참조하세요.
이전 자습서에서는 Entity Framework 및 SQL Server LocalDB를 사용하여 데이터를 저장하고 표시하는 MVC 애플리케이션을 만들었습니다. 이 자습서에서는 MVC 스캐폴딩이 컨트롤러 및 뷰에서 자동으로 만드는 CRUD(만들기, 읽기, 업데이트, 삭제) 코드를 검토하고 사용자 지정합니다.
참고
컨트롤러와 데이터 액세스 계층 간에 추상화 계층을 만들기 위해 리포지토리 패턴을 구현하는 일반적인 사례입니다. 이러한 자습서를 간단하게 유지하기 위해 이 시리즈의 이후 자습서까지 리포지토리를 구현하지 않습니다.
이 자습서에서는 다음 웹 페이지를 만듭니다.


세부 정보 페이지 만들기
학생 Index 페이지에 대한 스캐폴드된 코드는 해당 속성이 Enrollments 컬렉션을 보유하기 때문에 속성을 제외했습니다. 페이지에서 Details HTML 테이블에 컬렉션의 내용을 표시합니다.
Controllers\StudentController.cs에서 뷰의 Details 작업 메서드는 메서드를 사용하여 Find 단일 Student 엔터티를 검색합니다.
public ActionResult Details(int id = 0)
{
    Student student = db.Students.Find(id);
    if (student == null)
    {
        return HttpNotFound();
    }
    return View(student);
}
키 값은 매개 변수로 id 메서드에 전달되며 인덱스 페이지의 세부 정보 하이퍼링크에 있는 경로 데이터에서 가져옵니다.
Views\Student\Details.cshtml을 엽니다. 다음 예제와 같이 각 필드는 도우미를
DisplayFor사용하여 표시됩니다.<div class="display-label"> @Html.DisplayNameFor(model => model.LastName) </div> <div class="display-field"> @Html.DisplayFor(model => model.LastName) </div>EnrollmentDate다음 예제와 같이 필드 뒤와 닫는fieldset태그 바로 앞에 코드를 추가하여 등록 목록을 표시합니다.<div class="display-label"> @Html.LabelFor(model => model.Enrollments) </div> <div class="display-field"> <table> <tr> <th>Course Title</th> <th>Grade</th> </tr> @foreach (var item in Model.Enrollments) { <tr> <td> @Html.DisplayFor(modelItem => item.Course.Title) </td> <td> @Html.DisplayFor(modelItem => item.Grade) </td> </tr> } </table> </div> </fieldset> <p> @Html.ActionLink("Edit", "Edit", new { id=Model.StudentID }) | @Html.ActionLink("Back to List", "Index") </p>이 코드는
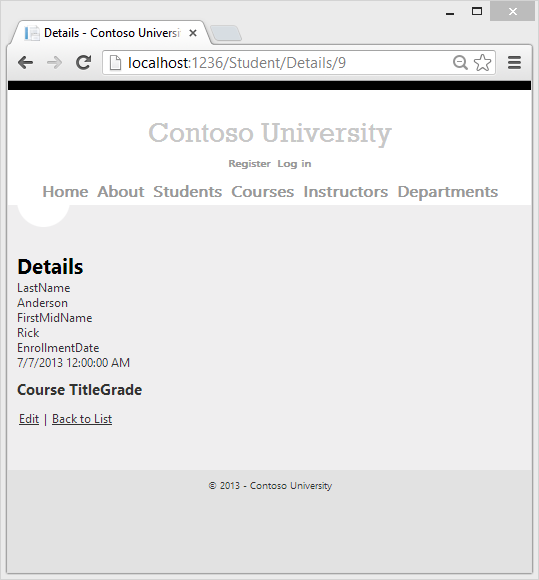
Enrollments탐색 속성의 엔터티를 통해 반복됩니다. 속성의 각Enrollment엔터티에 대해 과정 제목과 성적을 표시합니다. 과정 제목은 엔터티의Course탐색 속성Enrollments에Course저장된 엔터티에서 검색됩니다. 이 모든 데이터는 필요할 때 데이터베이스에서 자동으로 검색됩니다. 즉, 여기서 지연 로드를 사용하고 있습니다. 탐색 속성에 대한Courses즉시 로드를 지정하지 않았으므로 처음으로 해당 속성에 액세스하려고 하면 데이터를 검색하기 위해 쿼리가 데이터베이스로 전송됩니다. 지연 로드 및 즉시 로드에 대한 자세한 내용은 이 시리즈의 뒷부분에 있는 관련 데이터 읽기 자습서에서 확인할 수 있습니다.)학생 탭을 선택하고 Alexander Carson에 대한 세부 정보 링크를 클릭하여 페이지를 실행합니다. 선택한 학생에 대한 강좌 및 등급의 목록이 표시됩니다.

페이지 만들기 업데이트
Controllers\StudentController.cs에서 작업 메서드를 다음 코드로 바꿔
HttpPost``Create블록을 추가하고 Bind 특성을 스캐폴드된 메서드에 추가try-catch합니다.[HttpPost] [ValidateAntiForgeryToken] public ActionResult Create( [Bind(Include = "LastName, FirstMidName, EnrollmentDate")] Student student) { try { if (ModelState.IsValid) { db.Students.Add(student); db.SaveChanges(); return RedirectToAction("Index"); } } catch (DataException /* dex */) { //Log the error (uncomment dex variable name after DataException and add a line here to write a log. ModelState.AddModelError("", "Unable to save changes. Try again, and if the problem persists see your system administrator."); } return View(student); }이 코드는
StudentASP.NET MVC 모델 바인더에서 만든 엔터티를Students엔터티 집합에 추가한 다음 변경 내용을 데이터베이스에 저장합니다. (모델 바인더는 양식에서 제출한 데이터를 더 쉽게 사용할 수 있는 ASP.NET MVC 기능을 나타냅니다. 모델 바인더는 게시된 양식 값을 CLR 형식으로 변환하고 매개 변수의 작업 메서드에 전달합니다. 이 경우 모델 바인더는 컬렉션의 속성 값을 사용하여 엔터티를Form인스턴스화Student합니다.)특성은
ValidateAntiForgeryToken사이트 간 요청 위조 공격을 방지하는 데 도움이 됩니다.
> [!WARNING]
> Security - The `Bind` attribute is added to protect against *over-posting*. For example, suppose the `Student` entity includes a `Secret` property that you don't want this web page to update.
>
> [!code-csharp[Main](implementing-basic-crud-functionality-with-the-entity-framework-in-asp-net-mvc-application/samples/sample5.cs?highlight=7)]
>
> Even if you don't have a `Secret` field on the web page, a hacker could use a tool such as [fiddler](http://fiddler2.com/home), or write some JavaScript, to post a `Secret` form value. Without the [Bind](https://msdn.microsoft.com/library/system.web.mvc.bindattribute(v=vs.108).aspx) attribute limiting the fields that the model binder uses when it creates a `Student` instance*,* the model binder would pick up that `Secret` form value and use it to update the `Student` entity instance. Then whatever value the hacker specified for the `Secret` form field would be updated in your database. The following image shows the fiddler tool adding the `Secret` field (with the value "OverPost") to the posted form values.
>
> 
>
> The value "OverPost" would then be successfully added to the `Secret` property of the inserted row, although you never intended that the web page be able to update that property.
>
> It's a security best practice to use the `Include` parameter with the `Bind` attribute to *allowed attributes* fields. It's also possible to use the `Exclude` parameter to *blocked attributes* fields you want to exclude. The reason `Include` is more secure is that when you add a new property to the entity, the new field is not automatically protected by an `Exclude` list.
>
> Another alternative approach, and one preferred by many, is to use only view models with model binding. The view model contains only the properties you want to bind. Once the MVC model binder has finished, you copy the view model properties to the entity instance.
Other than the `Bind` attribute, the `try-catch` block is the only change you've made to the scaffolded code. If an exception that derives from [DataException](https://msdn.microsoft.com/library/system.data.dataexception.aspx) is caught while the changes are being saved, a generic error message is displayed. [DataException](https://msdn.microsoft.com/library/system.data.dataexception.aspx) exceptions are sometimes caused by something external to the application rather than a programming error, so the user is advised to try again. Although not implemented in this sample, a production quality application would log the exception (and non-null inner exceptions ) with a logging mechanism such as [ELMAH](https://code.google.com/p/elmah/).
The code in *Views\Student\Create.cshtml* is similar to what you saw in *Details.cshtml*, except that `EditorFor` and `ValidationMessageFor` helpers are used for each field instead of `DisplayFor`. The following example shows the relevant code:
[!code-cshtml[Main](implementing-basic-crud-functionality-with-the-entity-framework-in-asp-net-mvc-application/samples/sample6.cshtml)]
*Create.cshtml* also includes `@Html.AntiForgeryToken()`, which works with the `ValidateAntiForgeryToken` attribute in the controller to help prevent [cross-site request forgery](../../security/xsrfcsrf-prevention-in-aspnet-mvc-and-web-pages.md) attacks.
No changes are required in *Create.cshtml*.
학생 탭을 선택하고 새로 만들기를 클릭하여 페이지를 실행합니다.

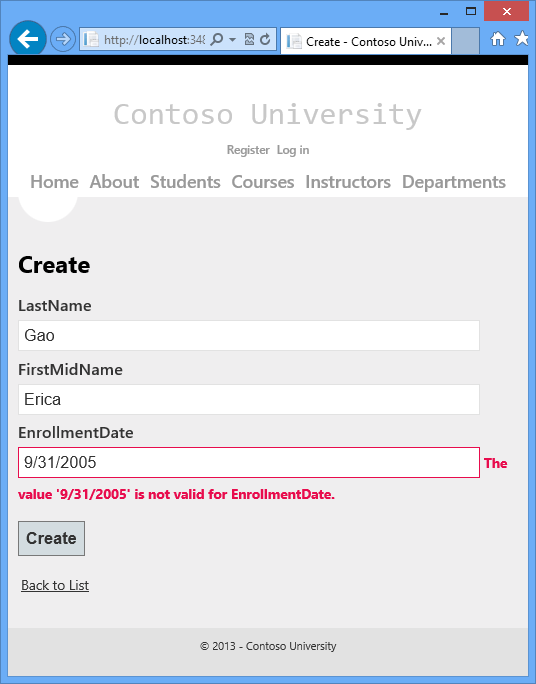
일부 데이터 유효성 검사는 기본적으로 작동합니다. 이름과 잘못된 날짜를 입력하고 만들기 를 클릭하여 오류 메시지를 확인합니다.
다음 강조 표시된 코드는 모델 유효성 검사 검사 보여줍니다.
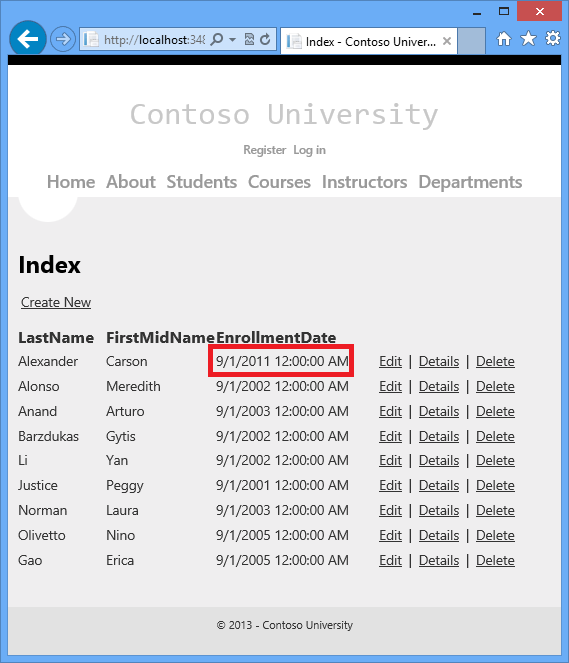
[HttpPost]
[ValidateAntiForgeryToken]
public ActionResult Create(Student student)
{
    if (ModelState.IsValid)
    {
        db.Students.Add(student);
        db.SaveChanges();
        return RedirectToAction("Index");
    }

    return View(student);
}
날짜를 2005년 9월 1일과 같은 유효한 값으로 변경하고 만들기 를 클릭하여 인덱스 페이지에 새 학생이 표시되는지 확인합니다.

POST 편집 페이지 업데이트
Controllers\StudentController.csHttpGetEdit에서 메서드(특성이 없는 HttpPost 메서드)는 메서드에서 확인한 것처럼 메서드를 사용하여 Find 선택한 Student 엔터티를 Details 검색합니다. 이 메서드를 변경할 필요가 없습니다.
그러나 action 메서드를 HttpPostEdit 다음 코드로 바꿔 블록과 Bind 특성을 추가 try-catch 합니다.
[HttpPost]
[ValidateAntiForgeryToken]
public ActionResult Edit(
   [Bind(Include = "StudentID, LastName, FirstMidName, EnrollmentDate")]
   Student student)
{
   try
   {
      if (ModelState.IsValid)
      {
         db.Entry(student).State = EntityState.Modified;
         db.SaveChanges();
         return RedirectToAction("Index");
      }
   }
   catch (DataException /* dex */)
   {
      //Log the error (uncomment dex variable name after DataException and add a line here to write a log.
      ModelState.AddModelError("", "Unable to save changes. Try again, and if the problem persists see your system administrator.");
   }
   return View(student);
}
이 코드는 메서드에서 본 코드와 HttpPostCreate 비슷합니다. 그러나 모델 바인더에서 만든 엔터티를 엔터티 집합에 추가하는 대신 이 코드는 변경되었음을 나타내는 엔터티에 플래그를 설정합니다. SaveChanges 메서드가 호출되면 Modified 플래그로 인해 Entity Framework에서 데이터베이스 행을 업데이트하는 SQL 문을 만듭니다. 사용자가 변경하지 않은 열을 포함하여 데이터베이스 행의 모든 열이 업데이트되고 동시성 충돌은 무시됩니다. (이 시리즈의 이후 자습서에서 동시성을 처리하는 방법을 알아봅니다.)
엔터티 상태 및 Attach 및 SaveChanges 메서드
데이터베이스 컨텍스트는 메모리의 엔터티가 데이터베이스의 해당 열과 동기화 상태인지 여부의 추적을 유지하고 이 정보는 SaveChanges 메서드를 호출할 때 발생하는 작업을 결정합니다. 예를 들어 새 엔터티를 Add 메서드에 전달하면 해당 엔터티의 상태가 로 Added설정됩니다. 그런 다음 SaveChanges 메서드를 호출하면 데이터베이스 컨텍스트에서 SQL INSERT 명령을 실행합니다.
엔터티는다음 상태 중 하나일 수 있습니다.
Added. 엔터티가 데이터베이스에 아직 존재하지 않습니다. 메서드는SaveChanges문을 실행INSERT해야 합니다.Unchanged.SaveChanges메서드에서 이 엔터티로 아무 작업도 수행할 필요가 없습니다. 데이터베이스에서 엔터티를 읽을 때 엔터티는 이 상태로 시작합니다.Modified. 일부 또는 모든 엔터티의 속성 값이 수정되었습니다. 메서드는SaveChanges문을 실행UPDATE해야 합니다.Deleted. 엔터티가 삭제되도록 표시되었습니다. 메서드는SaveChanges문을 실행DELETE해야 합니다.Detached. 엔터티가 데이터베이스 컨텍스트에 의해 추적되지 않습니다.
데스크톱 애플리케이션에서는 일반적으로 상태 변경 내용이 자동으로 설정됩니다. 데스크톱 유형의 애플리케이션에서는 엔터티를 읽고 일부 속성 값을 변경합니다. 이렇게 하면 해당 엔터티 상태가 자동으로 Modified로 변경됩니다. 그런 다음, 를 호출 SaveChanges하면 Entity Framework는 변경한 실제 속성만 업데이트하는 SQL UPDATE 문을 생성합니다.
웹앱의 연결이 끊긴 특성은 이 연속 시퀀스를 허용하지 않습니다. 엔터티를 읽는 DbContext 는 페이지가 렌더링된 후 삭제됩니다. HttpPostEdit 작업 메서드가 호출되면 새 요청이 수행되고 DbContext의 새 instance 있으므로 엔터티 상태를 Modified. 수동으로 로 설정해야 합니다. 를 호출SaveChanges할 때 Entity Framework는 변경한 속성을 알 수 없기 때문에 데이터베이스 행의 모든 열을 업데이트합니다.
SQL Update 문에서 사용자가 실제로 변경한 필드만 업데이트하려면 메서드를 호출할 때 사용할 수 있도록 원래 값(예: 숨겨진 필드)을 HttpPostEdit 저장할 수 있습니다. 그런 다음 원래 값을 사용하여 엔터티를 Student 만들고, 엔터티의 원래 버전으로 메서드를 호출 Attach 하고, 엔터티의 값을 새 값으로 업데이트한 다음 SaveChanges. , 자세한 내용은 MSDN 데이터 개발자 센터의 엔터티 상태 및 SaveChanges 및로컬 데이터를 참조하세요.
Views\Student\Edit.cshtml의 코드는 Create.cshtml에서 본 코드와 유사하며 변경이 필요하지 않습니다.
학생 탭을 선택한 다음 편집 하이퍼링크를 클릭하여 페이지를 실행합니다.

데이터의 일부를 변경하고 저장을 클릭합니다. 인덱스 페이지에 변경된 데이터가 표시됩니다.
삭제 페이지 업데이트
Controllers\StudentController.cs에서 메서드의 HttpGetDelete 템플릿 코드는 및 Edit 메서드에서 확인한 것처럼 메서드를 사용하여 Find 선택한 Student 엔터티를 Details 검색합니다. 그러나 SaveChanges에 대한 호출이 실패하는 경우 사용자 지정 오류 메시지를 구현하려면 이 메서드 및 해당 보기에 일부 기능을 추가합니다.
업데이트 및 만들기 작업에 대해 본 것과 같이 삭제 작업에는 두 개의 작업 메서드가 필요합니다. GET 요청에 대한 응답으로 호출되는 메서드는 사용자에게 삭제 작업을 승인하거나 취소할 수 있는 보기를 표시합니다. 사용자가 승인하는 경우 POST 요청이 생성됩니다. 이 경우 메서드가 HttpPostDelete 호출되고 해당 메서드가 실제로 삭제 작업을 수행합니다.
데이터베이스가 try-catch 업데이트될 때 발생할 수 있는 오류를 처리하기 위해 메서드에 블록을 HttpPostDelete 추가합니다. 오류가 발생하면 메서드는 HttpPostDelete 메서드를 HttpGetDelete 호출하여 오류가 발생했음을 나타내는 매개 변수를 전달합니다. 그런 다음 메서드는 HttpGet Delete 오류 메시지와 함께 확인 페이지를 다시 표시하여 사용자에게 취소하거나 다시 시도할 수 있는 기회를 제공합니다.
작업 메서드를
HttpGetDelete오류 보고를 관리하는 다음 코드로 바꿉니다.public ActionResult Delete(bool? saveChangesError=false, int id = 0) { if (saveChangesError.GetValueOrDefault()) { ViewBag.ErrorMessage = "Delete failed. Try again, and if the problem persists see your system administrator."; } Student student = db.Students.Find(id); if (student == null) { return HttpNotFound(); } return View(student); }이 코드는 변경 내용을 저장하지 못한 후 호출되었는지 여부를 나타내는 선택적 부울 매개 변수를 허용합니다. 이 매개 변수는
false메서드가HttpGetDelete이전 실패 없이 호출되는 경우입니다. 데이터베이스 업데이트 오류에 대한 응답으로 메서드에 의해HttpPostDelete호출되면 매개 변수가 이true고 오류 메시지가 뷰에 전달됩니다.HttpPostDelete작업 메서드(라는 )를DeleteConfirmed실제 삭제 작업을 수행하고 데이터베이스 업데이트 오류를 catch하는 다음 코드로 바꿉니다.[HttpPost] [ValidateAntiForgeryToken] public ActionResult Delete(int id) { try { Student student = db.Students.Find(id); db.Students.Remove(student); db.SaveChanges(); } catch (DataException/* dex */) { // uncomment dex and log error. return RedirectToAction("Delete", new { id = id, saveChangesError = true }); } return RedirectToAction("Index"); }이 코드는 선택한 엔터티를 검색한 다음 Remove 메서드를 호출하여 엔터티의 상태
Deleted로 설정합니다.SaveChanges가 호출되면 SQLDELETE명령이 생성됩니다. 또한DeleteConfirmed에서Delete로 작업 메서드 이름을 변경했습니다. 메서드라는 스캐폴드된 코드는HttpPostDelete메서드DeleteConfirmed에HttpPost고유한 서명을 제공합니다. ( CLR을 사용하려면 오버로드된 메서드에 다른 메서드 매개 변수가 있어야 합니다.) 이제 서명이 고유하므로 MVC 규칙을 고수하고 및HttpGet삭제 메서드에HttpPost동일한 이름을 사용할 수 있습니다.대용량 애플리케이션의 성능 향상이 우선 순위인 경우 및 메서드를 호출
FindRemove하는 코드 줄을 노란색 강조 표시와 같이 다음 코드로 바꿔서 불필요한 SQL 쿼리를 방지하여 행을 검색할 수 있습니다.Student studentToDelete = new Student() { StudentID = id }; db.Entry(studentToDelete).State = EntityState.Deleted;이 코드는
Student기본 키 값만 사용하여 엔터티를 인스턴스화한 다음 엔터티 상태를 로Deleted설정합니다. Entity Framework에서 엔터티를 삭제하기 위해 필요한 모든 것입니다.언급했듯이 메서드는
HttpGetDelete데이터를 삭제하지 않습니다. GET 요청에 대한 응답으로 삭제 작업을 수행하면(또는 해당 문제에 대해 편집 작업, 만들기 작업 또는 데이터를 변경하는 기타 작업 수행) 보안 위험이 발생합니다. 자세한 내용은 ASP.NET MVC 팁 #46 - Stephen Walther의 블로그에 보안 허점을 만들기 때문에 링크 삭제를 사용하지 않음 을 참조하세요.Views\Student\Delete.cshtml에서 다음 예제와 같이 제목과
h3제목 사이에h2오류 메시지를 추가합니다.<h2>Delete</h2> <p class="error">@ViewBag.ErrorMessage</p> <h3>Are you sure you want to delete this?</h3>학생 탭을 선택하고 삭제 하이퍼링크를 클릭하여 페이지를 실행합니다.
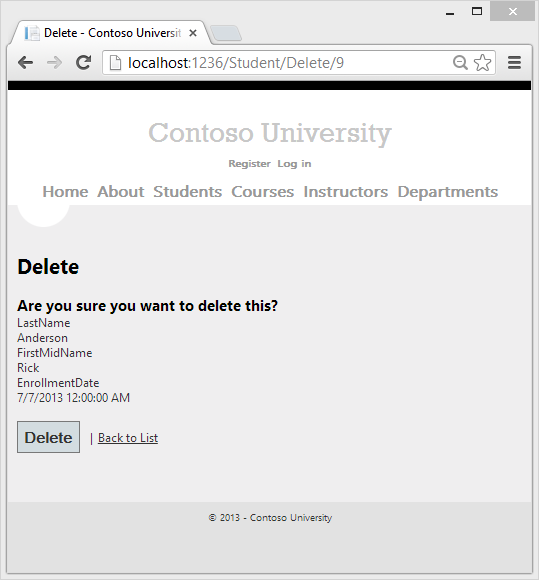
삭제를 클릭합니다. 삭제된 학생 없이 인덱스 페이지가 표시됩니다. (이 시리즈의 뒷부분에 나오는 동시성 처리 자습서에서 작동하는 오류 처리 코드의 예제가 표시됩니다.)
데이터베이스 연결이 열려 있지 않은지 확인
데이터베이스 연결 제대로 닫혀 있고 해당 리소스가 확보되었는지 확인하려면 컨텍스트 instance 삭제된 것을 확인해야 합니다. 따라서 스캐폴드된 코드는 다음 예제와 같이 StudentController.cs의 StudentController 클래스 끝에 Dispose 메서드를 제공합니다.
protected override void Dispose(bool disposing)
{
    db.Dispose();
    base.Dispose(disposing);
}
기본 Controller 클래스는 이미 인터페이스를 IDisposable 구현하므로 이 코드는 메서드에 재정의 Dispose(bool) 를 추가하여 컨텍스트 instance 명시적으로 삭제합니다.
요약
이제 엔터티에 대해 Student 간단한 CRUD 작업을 수행하는 전체 페이지 집합이 있습니다. MVC 도우미를 사용하여 데이터 필드에 대한 UI 요소를 생성했습니다. MVC 도우미에 대한 자세한 내용은 HTML 도우미를 사용하여 양식 렌더링 (페이지는 MVC 3용이지만 MVC 4와 여전히 관련됨)을 참조하세요.
다음 자습서에서는 정렬 및 페이징을 추가하여 인덱스 페이지의 기능을 확장합니다.
다른 Entity Framework 리소스에 대한 링크는 ASP.NET 데이터 액세스 콘텐츠 맵에서 찾을 수 있습니다.
피드백
출시 예정: 2024년 내내 콘텐츠에 대한 피드백 메커니즘으로 GitHub 문제를 단계적으로 폐지하고 이를 새로운 피드백 시스템으로 바꿀 예정입니다. 자세한 내용은 다음을 참조하세요. https://aka.ms/ContentUserFeedback
다음에 대한 사용자 의견 제출 및 보기