삽입, 업데이트 및 삭제와 연결된 이벤트 검사(VB)
작성자 : Scott Mitchell
이 자습서에서는 ASP.NET 데이터 웹 컨트롤의 삽입, 업데이트 또는 삭제 작업 전, 도중 및 후에 발생하는 이벤트를 사용하여 검사합니다. 제품 필드의 하위 집합만 업데이트하도록 편집 인터페이스를 사용자 지정하는 방법도 살펴보겠습니다.
소개
GridView, DetailsView 또는 FormView 컨트롤의 기본 제공 삽입, 편집 또는 삭제 기능을 사용하는 경우 최종 사용자가 새 레코드를 추가하거나 기존 레코드를 업데이트하거나 삭제하는 프로세스를 완료할 때 다양한 단계가 발생합니다. 이전 자습서에서 설명한 것처럼 GridView에서 행을 편집할 때 편집 단추가 업데이트 및 취소 단추로 바뀌고 BoundFields가 TextBoxes로 바뀝니다. 최종 사용자가 데이터를 업데이트하고 업데이트를 클릭하면 포스트백 시 다음 단계가 수행됩니다.
- GridView는 사용자가 입력한 값과 함께 편집된 레코드의 고유 식별 필드(속성을 통해
DataKeyNames)로 ObjectDataSourceUpdateParameters를 채웁니다. - GridView는 ObjectDataSource의
Update()메서드를 호출합니다. 이 메서드는 기본 개체에서 적절한 메서드를 호출합니다(ProductsDAL.UpdateProduct이전 자습서에서는). - 이제 업데이트된 변경 내용이 포함된 기본 데이터가 GridView로 다시 설정됩니다.
이 단계 시퀀스 동안 많은 이벤트가 발생하므로 필요한 경우 사용자 지정 논리를 추가할 이벤트 처리기를 만들 수 있습니다. 예를 들어 1단계 이전에 GridView의 RowUpdating 이벤트가 발생합니다. 이 시점에서 유효성 검사 오류가 있는 경우 업데이트 요청을 취소할 수 있습니다. 메서드가 Update() 호출되면 ObjectDataSource의 Updating 이벤트가 발생하여 의 UpdateParameters값을 추가하거나 사용자 지정할 수 있습니다. ObjectDataSource의 기본 개체의 메서드 실행이 완료되면 ObjectDataSource의 Updated 이벤트가 발생합니다. 이벤트에 대한 Updated 이벤트 처리기는 영향을 받은 행 수 및 예외가 발생했는지 여부와 같은 업데이트 작업에 대한 세부 정보를 검사할 수 있습니다. 마지막으로 2단계 후에 GridView의 RowUpdated 이벤트가 발생합니다. 이 이벤트에 대한 이벤트 처리기는 방금 수행된 업데이트 작업에 대한 추가 정보를 검사할 수 있습니다.
그림 1에서는 GridView를 업데이트할 때 이 일련의 이벤트 및 단계를 보여 줍니다. 그림 1의 이벤트 패턴은 GridView로 업데이트하는 고유하지 않습니다. GridView, DetailsView 또는 FormView에서 데이터를 삽입, 업데이트 또는 삭제하면 데이터 웹 컨트롤과 ObjectDataSource 모두에 대해 동일한 사전 및 사후 수준 이벤트 시퀀스가 발생합니다.

그림 1: GridView에서 데이터를 업데이트할 때 일련의 사전 및 사후 이벤트 발생(전체 크기 이미지를 보려면 클릭)
이 자습서에서는 이러한 이벤트를 사용하여 ASP.NET 데이터 웹 컨트롤의 기본 제공 삽입, 업데이트 및 삭제 기능을 확장하는 방법을 살펴봅니다. 제품 필드의 하위 집합만 업데이트하도록 편집 인터페이스를 사용자 지정하는 방법도 살펴보겠습니다.
1단계: 제품ProductName및UnitPrice필드 업데이트
이전 자습서의 편집 인터페이스에서 읽기 전용이 아닌 모든 제품 필드를 포함해야 했습니다. GridView에서 필드를 제거하려는 경우(예 QuantityPerUnit : ) 데이터를 업데이트할 때 데이터 웹 컨트롤이 ObjectDataSource의 QuantityPerUnitUpdateParameters 값을 설정하지 않습니다. 그런 다음 ObjectDataSource는 의 값을 Nothing BLL(비즈니스 논리 계층) 메서드에 UpdateProduct 전달하여 편집된 데이터베이스 레코드의 QuantityPerUnit 열을 값으로 NULL 변경합니다. 마찬가지로 와 같은 ProductName필수 필드가 편집 인터페이스에서 제거되면 "열 'ProductName'에서 null을 허용하지 않음" 예외로 업데이트가 실패합니다. 이 동작의 이유는 ObjectDataSource가 각 제품 필드에 대한 입력 매개 변수가 필요한 클래스의 메서드를 호출 ProductsBLL 하도록 구성되었기 때문입니다 UpdateProduct . 따라서 ObjectDataSource의 UpdateParameters 컬렉션에는 각 메서드의 입력 매개 변수에 대한 매개 변수가 포함되어 있습니다.
최종 사용자가 필드의 하위 집합만 업데이트할 수 있는 데이터 웹 컨트롤을 제공하려는 경우 ObjectDataSource의 Updating 이벤트 처리기에서 누락된 UpdateParameters 값을 프로그래밍 방식으로 설정하거나 필드의 하위 집합만 필요한 BLL 메서드를 만들고 호출해야 합니다. 이 후자의 접근 방식을 살펴보겠습니다.
특히 편집 가능한 GridView에서 및 UnitPrice 필드만 ProductName 표시하는 페이지를 만들어 보겠습니다. 이 GridView의 편집 인터페이스는 사용자가 표시된 두 필드 ProductName 및 UnitPrice만 업데이트할 수 있도록 합니다. 이 편집 인터페이스는 제품 필드의 하위 집합만 제공하므로 기존 BLL의 UpdateProduct 메서드를 사용하고 누락된 제품 필드 값이 이벤트 처리기에서 프로그래밍 방식으로 설정된 ObjectDataSource를 만들거나 GridView에 Updating 정의된 필드의 하위 집합만 필요한 새 BLL 메서드를 만들어야 합니다. 이 자습서에서는 후자 옵션을 사용하고 세 개의 입력 매개 변수productName인 , unitPrice및 productID를 사용하는 메서드의 UpdateProduct 오버로드를 만들어 보겠습니다.
<System.ComponentModel.DataObjectMethodAttribute _
    (System.ComponentModel.DataObjectMethodType.Update, False)> _
    Public Function UpdateProduct(productName As String, _
        unitPrice As Nullable(Of Decimal), productID As Integer) _
        As Boolean

    Dim products As Northwind.ProductsDataTable = _
        Adapter.GetProductByProductID(productID)

    If products.Count = 0 Then
        Return False
    End If

    Dim product As Northwind.ProductsRow = products(0)

    product.ProductName = productName
    If Not unitPrice.HasValue Then
        product.SetUnitPriceNull()
    Else
        product.UnitPrice = unitPrice.Value
    End If

    Dim rowsAffected As Integer = Adapter.Update(product)

    Return rowsAffected = 1
End Function
원래 UpdateProduct 메서드와 마찬가지로 이 오버로드는 데이터베이스에 지정된 가 있는 제품이 있는지 확인하는 것으로 시작합니다 ProductID. 그렇지 않은 경우 제품 정보 업데이트 요청이 실패했음을 나타내는 를 반환 False합니다. 그렇지 않으면 기존 제품 레코드 ProductName 및 UnitPrice 필드를 적절하게 업데이트하고 TableAdapter의 Update() 메서드를 호출하고 instance 전달 ProductsRow 하여 업데이트를 커밋합니다.
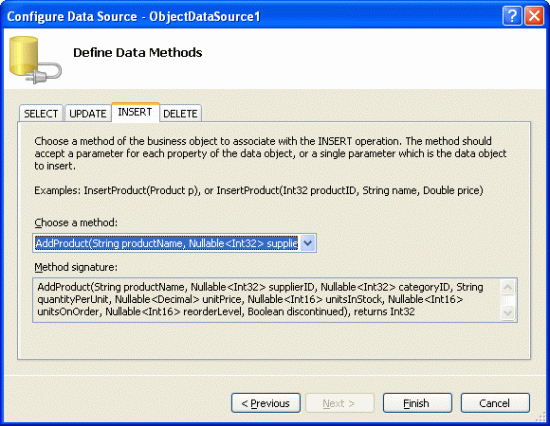
이 클래스를 ProductsBLL 추가하면 간소화된 GridView 인터페이스를 만들 준비가 된 것입니다. DataModificationEvents.aspx 폴더에서 을 EditInsertDelete 열고 페이지에 GridView를 추가합니다. 새 ObjectDataSource를 만들고 , 및 입력 매개 변수만 사용하는 오버로드에 대한 메서드 매핑 GetProducts 및 Update() 메서드 매핑 UpdateProduct 과 productID 함께 Select() 클래스를 productNameunitPrice사용하도록 ProductsBLL 구성합니다. 그림 2에서는 ObjectDataSource의 메서드를 클래스의 Update() 새 UpdateProduct 메서드 오버로드에 매핑할 ProductsBLL 때 데이터 원본 만들기 마법사를 보여 줍니다.

그림 2: ObjectDataSource의 Update() 메서드를 새 UpdateProduct 오버로드에 매핑(전체 크기 이미지를 보려면 클릭)
이 예제에서는 처음에는 데이터를 편집하는 기능만 필요하지만 레코드를 삽입하거나 삭제하는 기능은 필요하므로 잠시 시간을 내어 Insert 및 Delete() DELETE 탭으로 이동하고 드롭다운 목록에서 (없음)을 선택하여 ObjectDataSource Insert() 및 메서드를 클래스의 메서드에 매핑 ProductsBLL 해서는 안 됨을 명시적으로 나타냅니다.

그림 3: INSERT 및 DELETE 탭의 Drop-Down 목록에서 선택(없음)(전체 크기 이미지를 보려면 클릭)
이 마법사를 완료한 후 GridView의 스마트 태그에서 편집 사용 확인란을 검사.
데이터 원본 만들기 마법사가 완료되고 GridView에 바인딩되면 Visual Studio에서 두 컨트롤에 대한 선언적 구문을 만들었습니다. 원본 보기로 이동하여 아래 표시된 ObjectDataSource의 선언적 태그를 검사합니다.
<asp:ObjectDataSource ID="ObjectDataSource1" runat="server"
    OldValuesParameterFormatString="original_{0}" SelectMethod="GetProducts"
    TypeName="ProductsBLL" UpdateMethod="UpdateProduct">
    <UpdateParameters>
        <asp:Parameter Name="productName" Type="String" />
        <asp:Parameter Name="unitPrice" Type="Decimal" />
        <asp:Parameter Name="productID" Type="Int32" />
    </UpdateParameters>
</asp:ObjectDataSource>
ObjectDataSource Insert() 및 Delete() 메서드에 대한 매핑이 없으므로 또는 DeleteParameters 섹션이 없습니다InsertParameters. 또한 메서드는 Update() 세 개의 입력 매개 변수 UpdateParameters 만 허용하는 메서드 오버로드에 매핑 UpdateProduct 되므로 섹션에는 인스턴스가 3 Parameter 개뿐입니다.
ObjectDataSource의 OldValuesParameterFormatString 속성은 로 original_{0}설정됩니다. 이 속성은 데이터 원본 구성 마법사를 사용할 때 Visual Studio에서 자동으로 설정됩니다. 그러나 BLL 메서드는 원래 ProductID 값이 전달될 것으로 예상하지 않으므로 ObjectDataSource의 선언적 구문에서 이 속성 할당을 모두 제거합니다.
참고
디자인 뷰의 OldValuesParameterFormatString 속성 창 속성 값을 지우면 선언적 구문에 속성이 계속 존재하지만 빈 문자열로 설정됩니다. 선언적 구문에서 속성을 모두 제거하거나 속성 창 값을 기본값{0}으로 설정합니다.
ObjectDataSource는 제품의 이름, 가격 및 ID에 대해서만 있지만 UpdateParameters Visual Studio는 각 제품의 필드에 대해 GridView에 BoundField 또는 CheckBoxField를 추가했습니다.
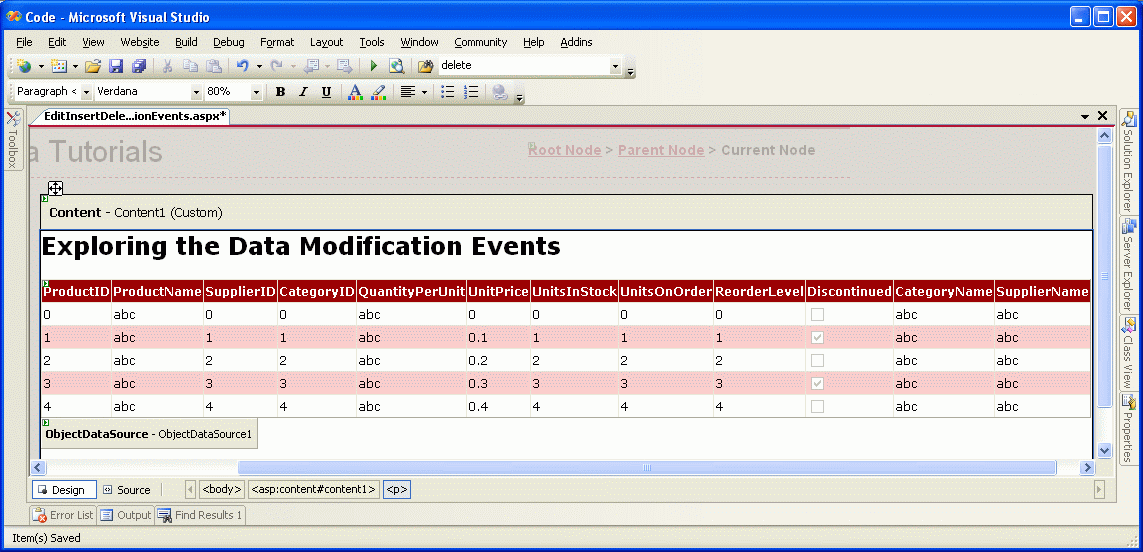
그림 4: GridView에는 각 제품의 필드에 대한 BoundField 또는 CheckBoxField가 포함되어 있습니다(전체 크기 이미지를 보려면 클릭).
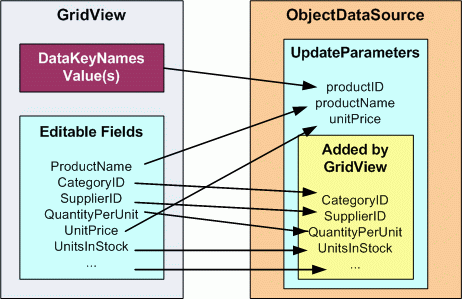
최종 사용자가 제품을 편집하고 업데이트 단추를 클릭하면 GridView는 읽기 전용이 아닌 필드를 열거합니다. 그런 다음 ObjectDataSource 컬렉션에 있는 해당 매개 변수의 UpdateParameters 값을 사용자가 입력한 값으로 설정합니다. 해당 매개 변수가 없는 경우 GridView는 컬렉션에 매개 변수를 추가합니다. 따라서 GridView에 제품의 모든 필드에 대한 BoundFields 및 CheckBoxFields가 포함된 경우 ObjectDataSource는 ObjectDataSource의 선언적 태그가 세 개의 입력 매개 변수만 지정한다는 사실에도 불구하고 이러한 모든 매개 변수를 사용하는 오버로드를 호출 UpdateProduct 하게 됩니다(그림 5 참조). 마찬가지로 GridView에 오버로드의 입력 매개 변수 UpdateProduct 에 해당하지 않는 읽기 전용이 아닌 제품 필드의 일부 조합이 있는 경우 업데이트를 시도할 때 예외가 발생합니다.

그림 5: GridView가 ObjectDataSource의 UpdateParameters 컬렉션에 매개 변수를 추가합니다(전체 크기 이미지를 보려면 클릭).
ObjectDataSource가 제품의 이름, 가격 및 ID만 사용하는 오버로드를 호출 UpdateProduct 하도록 하려면 GridView를 및 UnitPrice에 대한 편집 가능한 필드로 ProductName 제한해야 합니다. 다른 BoundFields 및 CheckBoxFields를 제거하거나, 다른 필드의 ReadOnly 속성을 True로 설정하거나, 두 필드의 일부 조합을 통해 이 작업을 수행할 수 있습니다. 이 자습서에서는 및 UnitPrice BoundFields를 ProductName 제외한 모든 GridView 필드를 제거하면 GridView의 선언적 태그가 다음과 같이 표시됩니다.
<asp:GridView ID="GridView1" runat="server" AutoGenerateColumns="False"
    DataKeyNames="ProductID" DataSourceID="ObjectDataSource1">
    <Columns>
        <asp:CommandField ShowEditButton="True" />
        <asp:BoundField DataField="ProductName"
          HeaderText="ProductName" SortExpression="ProductName" />
        <asp:BoundField DataField="UnitPrice" HeaderText="UnitPrice"
          SortExpression="UnitPrice" />
    </Columns>
</asp:GridView>
오버로드에 UpdateProduct 세 개의 입력 매개 변수가 필요한 경우에도 GridView에는 두 개의 BoundFields만 있습니다. productID 입력 매개 변수가 기본 키 값이고 편집된 행에 대한 속성 값을 DataKeyNames 통해 전달되기 때문입니다.
GridView는 오버로드와 함께 UpdateProduct 사용자가 다른 제품 필드를 잃지 않고 제품의 이름과 가격만 편집할 수 있도록 합니다.
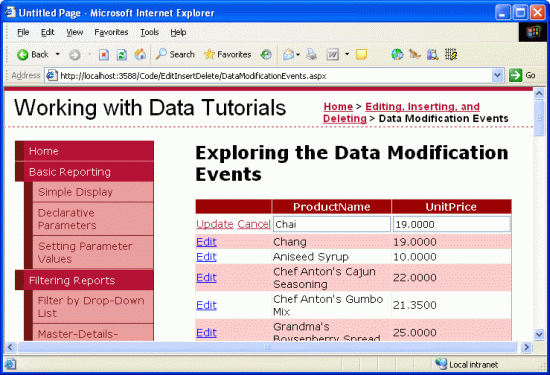
그림 6: 인터페이스를 사용하면 제품 이름 및 가격만 편집할 수 있습니다(전체 크기 이미지를 보려면 클릭).
참고
이전 자습서에서 설명한 것처럼 GridView의 뷰 상태를 사용하도록 설정하는 것이 매우 중요합니다(기본 동작). GridView의 EnableViewState 속성을 false로 설정하면 동시 사용자가 의도치 않게 레코드를 삭제하거나 편집할 위험이 있습니다.
서식 개선UnitPrice
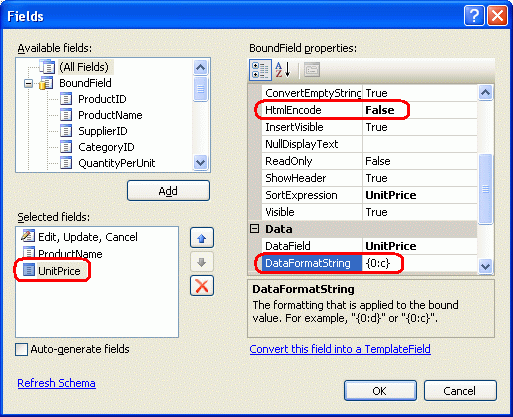
그림 6에 표시된 GridView 예제는 작동 UnitPrice 하지만 필드의 형식이 전혀 지정되지 않아 통화 기호가 부족하고 소수 자릿수가 4개인 가격 표시가 발생합니다. 편집할 수 없는 행에 통화 서식을 적용하려면 BoundField의 DataFormatString 속성을 로 설정하고 해당 HtmlEncode 속성을 {0:c} 로 False설정 UnitPrice 하면 됩니다.

그림 7: 에 DataFormatString 따라 UnitPrice및 HtmlEncode 속성 설정(전체 크기 이미지를 보려면 클릭)
이 변경으로 편집할 수 없는 행은 가격 형식을 통화로 지정합니다. 그러나 편집된 행은 여전히 통화 기호가 없고 소수 자릿수가 4개인 값을 표시합니다.

그림 8: 편집할 수 없는 행이 이제 통화 값으로 서식 지정됨(전체 크기 이미지를 보려면 클릭)
속성에 DataFormatString 지정된 서식 지정 지침은 BoundField의 ApplyFormatInEditMode 속성을 True 로 설정하여 편집 인터페이스에 적용할 수 있습니다(기본값은 False). 잠시 시간을 내어 이 속성을 로 True설정합니다.
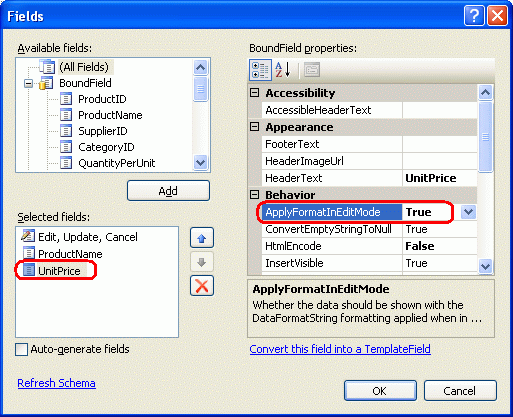
그림 9: BoundField의 ApplyFormatInEditMode 속성을 로 True 설정합니다UnitPrice(전체 크기 이미지를 보려면 클릭).
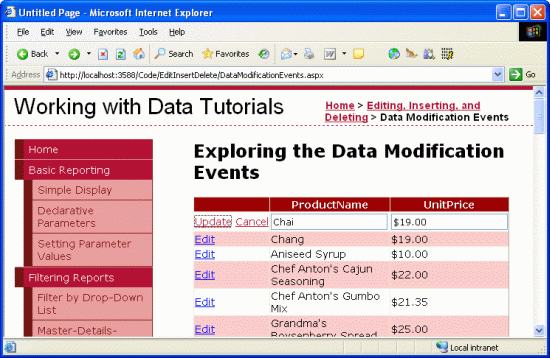
이 변경으로 편집된 행에 표시되는 의 값 UnitPrice 도 통화 형식으로 지정됩니다.

그림 10: 편집된 행의 UnitPrice 값이 이제 통화로 서식 지정됨(전체 크기 이미지를 보려면 클릭)
그러나 $19.00와 같은 텍스트 상자에서 통화 기호로 제품을 업데이트하면 이 throw됩니다 FormatException. GridView에서 사용자가 제공한 값을 ObjectDataSource의 UpdateParameters 컬렉션에 할당하려고 하면 문자열 "$19.00"Decimal을 매개 변수에 필요한 로 변환 UnitPrice 할 수 없습니다(그림 11 참조). 이를 해결하기 위해 GridView의 RowUpdating 이벤트에 대한 이벤트 처리기를 만들고 사용자가 제공한 UnitPrice 를 통화 형식 Decimal으로 구문 분석하도록 할 수 있습니다.
GridView의 RowUpdating 이벤트는 두 번째 매개 변수로 GridViewUpdateEventArgs 형식의 개체로 허용합니다. 여기에는 ObjectDataSource UpdateParameters 컬렉션에 할당할 준비가 된 사용자 제공 값을 보유하는 속성 중 하나로 사전이 포함 NewValues 됩니다. 이벤트 처리기에서 NewValues 다음 코드 RowUpdating 줄과 통화 형식을 사용하여 구문 분석된 10진수 값으로 컬렉션의 기존 UnitPrice 값을 덮어쓸 수 있습니다.
Protected Sub GridView1_RowUpdating(sender As Object, e As GridViewUpdateEventArgs) _
    Handles GridView1.RowUpdating
    If e.NewValues("UnitPrice") IsNot Nothing Then
        e.NewValues("UnitPrice") = _
            Decimal.Parse(e.NewValues("UnitPrice").ToString(), _
                System.Globalization.NumberStyles.Currency)
    End If
End Sub
사용자가 값(예: "$19.00")을 제공한 UnitPrice 경우 이 값은 Decimal.Parse에서 계산한 10진수 값으로 덮어쓰여 값을 통화로 구문 분석합니다. 이렇게 하면 통화 기호, 쉼표, 소수점 등의 경우 10진수를 올바르게 구문 분석하고 System.Globalization 네임스페이스에서 NumberStyles 열거형을 사용합니다.
그림 11은 사용자가 제공한 UnitPrice의 통화 기호로 인한 문제와 GridView의 RowUpdating 이벤트 처리기를 사용하여 이러한 입력을 올바르게 구문 분석하는 방법을 보여 줍니다.

그림 11: 편집된 행의 UnitPrice 값이 이제 통화로 서식 지정됨(전체 크기 이미지를 보려면 클릭)
2단계: 금지NULL UnitPrices
데이터베이스가 테이블의 UnitPrice 열에 값을 Products 허용 NULL 하도록 구성된 동안 이 특정 페이지를 방문하는 사용자가 값을 지정 NULLUnitPrice 하지 못하도록 방지할 수 있습니다. 즉, 사용자가 제품 행을 편집할 때 결과를 데이터베이스에 저장하지 않고 값을 입력 UnitPrice 하지 못하는 경우 이 페이지를 통해 편집된 제품에는 가격이 지정되어 있어야 한다는 메시지를 표시하려고 합니다.
GridView의 RowUpdating 이벤트 처리기에 전달된 개체에는 GridViewUpdateEventArgs 로 설정된 True경우 업데이트 프로세스를 종료하는 속성이 포함 Cancel 됩니다. 를 로 설정 e.CancelTrue 하도록 이벤트 처리기를 확장하고 RowUpdating 컬렉션Nothing의 값에 값이 UnitPrice 있는 NewValues 이유를 설명하는 메시지를 표시해 보겠습니다.
먼저 라는 MustProvideUnitPriceMessage페이지에 레이블 웹 컨트롤을 추가합니다. 사용자가 제품을 업데이트할 때 값을 지정 UnitPrice 하지 못하면 이 레이블 컨트롤이 표시됩니다. Label의 Text 속성을 "제품에 대한 가격을 제공해야 합니다"로 설정합니다. 또한 다음 정의를 사용하여 라는 Warning 새 CSS 클래스 Styles.css 를 만들었습니다.
.Warning
{
    color: Red;
    font-style: italic;
    font-weight: bold;
    font-size: x-large;
}
마지막으로 Label의 CssClass 속성을 Warning로 설정합니다. 이 시점에서 Designer 그림 12와 같이 GridView 위에 빨간색, 굵게, 기울임꼴, 매우 큰 글꼴 크기로 경고 메시지를 표시해야 합니다.
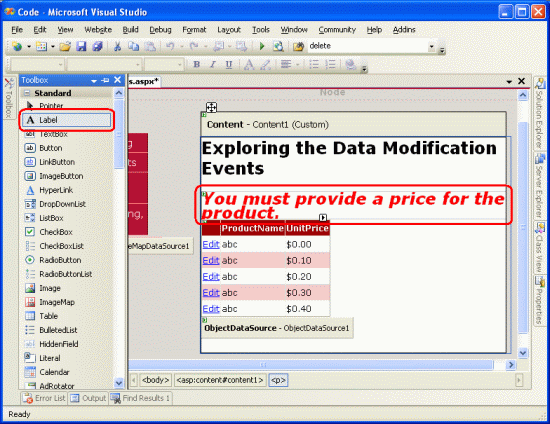
그림 12: GridView 위에 레이블이 추가되었습니다(전체 크기 이미지를 보려면 클릭).
기본적으로 이 레이블은 숨겨야 하므로 이벤트 처리기에서 해당 Visible 속성을 False 로 Page_Load 설정합니다.
Protected Sub Page_Load(sender As Object, e As System.EventArgs) Handles Me.Load
    MustProvideUnitPriceMessage.Visible = False
End Sub
사용자가 를 지정 UnitPrice하지 않고 제품을 업데이트하려고 하면 업데이트를 취소하고 경고 레이블을 표시하려고 합니다. 다음과 같이 GridView의 RowUpdating 이벤트 처리기를 보강합니다.
Protected Sub GridView1_RowUpdating(sender As Object, e As GridViewUpdateEventArgs) _
    Handles GridView1.RowUpdating

    If e.NewValues("UnitPrice") IsNot Nothing Then
        e.NewValues("UnitPrice") = _
            Decimal.Parse(e.NewValues("UnitPrice").ToString(), _
                System.Globalization.NumberStyles.Currency)
    Else
        MustProvideUnitPriceMessage.Visible = True

        e.Cancel = True
    End If
End Sub
사용자가 가격을 지정하지 않고 제품을 저장하려고 하면 업데이트가 취소되고 유용한 메시지가 표시됩니다. 데이터베이스(및 비즈니스 논리)는 를 허용하지만 이 특정 ASP.NET 페이지는 허용하지 NULLUnitPrice 않습니다.
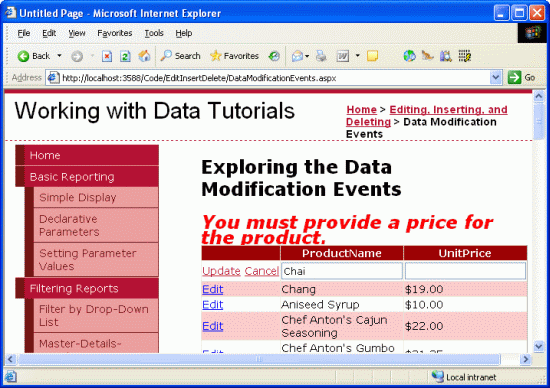
그림 13: 사용자가 비워 둘 UnitPrice 수 없음(전체 크기 이미지를 보려면 클릭)
지금까지 GridView의 이벤트를 사용하여 ObjectDataSource UpdateParameters 컬렉션 RowUpdating 에 할당된 매개 변수 값을 프로그래밍 방식으로 변경하는 방법과 업데이트 프로세스를 완전히 취소하는 방법을 알아보았습니다. 이러한 개념은 DetailsView 및 FormView 컨트롤로 이월되며 삽입 및 삭제에도 적용됩니다.
이러한 작업은 , Updating및 Deleting 이벤트에 대한 Inserting이벤트 처리기를 통해 ObjectDataSource 수준에서 수행할 수도 있습니다. 이러한 이벤트는 기본 개체의 연결된 메서드가 호출되기 전에 발생하며 입력 매개 변수 컬렉션을 수정하거나 작업을 완전히 취소할 수 있는 마지막 기회를 제공합니다. 이러한 세 이벤트에 대한 이벤트 처리기는 관심 있는 두 가지 속성이 있는 ObjectDataSourceMethodEventArgs 형식의 개체로 전달됩니다.
- 취소- 로
True설정하면 수행 중인 작업이 취소됩니다. - 이벤트 처리기가 , 또는 이벤트에 대한
InsertingUpdating것인지 여부에 따라 ,UpdateParameters또는DeletingDeleteParameters의InsertParameters컬렉션인 InputParameters
ObjectDataSource 수준에서 매개 변수 값으로 작업하는 방법을 설명하기 위해 사용자가 새 제품을 추가할 수 있는 DetailsView를 페이지에 포함해 보겠습니다. 이 DetailsView는 데이터베이스에 새 제품을 빠르게 추가하기 위한 인터페이스를 제공하는 데 사용됩니다. 새 제품을 추가할 때 일관된 사용자 인터페이스를 유지하려면 사용자가 및 UnitPrice 필드에 대한 ProductName 값만 입력하도록 허용합니다. 기본적으로 DetailsView의 삽입 인터페이스에 제공되지 않은 값은 데이터베이스 값으로 NULL 설정됩니다. 그러나 ObjectDataSource의 Inserting 이벤트를 사용하여 곧 볼 수 있듯이 다른 기본값을 삽입할 수 있습니다.
3단계: 새 제품 추가를 위한 인터페이스 제공
Toolbox에서 DetailsView를 GridView 위의 Designer 끌어서 해당 및 Width 속성을 지우 Height 고 페이지에 이미 있는 ObjectDataSource에 바인딩합니다. 그러면 각 제품 필드에 대한 BoundField 또는 CheckBoxField가 추가됩니다. 이 DetailsView를 사용하여 새 제품을 추가하려면 스마트 태그에서 삽입 사용 옵션을 검사 합니다. 그러나 ObjectDataSource의 메서드가 클래스의 Insert() 메서드에 ProductsBLL 매핑되지 않기 때문에 이러한 옵션은 없습니다(데이터 원본을 구성할 때 이 매핑을 (없음)으로 설정한 경우 그림 3 참조).
ObjectDataSource를 구성하려면 스마트 태그에서 데이터 원본 구성 링크를 선택하고 마법사를 시작합니다. 첫 번째 화면에서는 ObjectDataSource가 바인딩된 기본 개체를 변경할 수 있습니다. 로 설정된 상태로 둡 ProductsBLL니다. 다음 화면에는 ObjectDataSource의 메서드에서 기본 개체의 매핑이 나열됩니다. 및 Delete() 메서드를 메서드에 Insert() 매핑해서는 안 됨을 명시적으로 표시했지만 INSERT 및 DELETE 탭으로 이동하면 매핑이 있는 것을 볼 수 있습니다. 의 및 메서드는 ProductsBLLAddProduct 특성을 사용하여 DataObjectMethodAttribute 각각 및 DeleteProductDelete()의 기본 메서드임을 나타내기 때문 Insert() 입니다. 따라서 ObjectDataSource 마법사는 명시적으로 지정된 다른 값이 없는 한 마법사를 실행할 때마다 이러한 값을 선택합니다.
메서드를 Insert() 가리키는 AddProduct 상태로 두지만 DELETE 탭의 드롭다운 목록을 다시 (없음)으로 설정합니다.

그림 14: INSERT 탭의 Drop-Down 목록을 메서드로 AddProduct 설정합니다(전체 크기 이미지를 보려면 클릭).
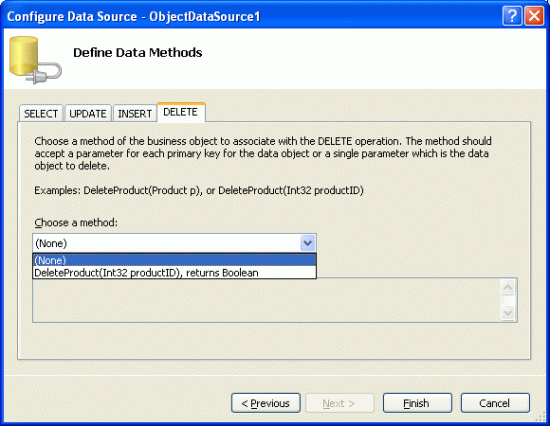
그림 15: DELETE 탭의 Drop-Down 목록을 (없음)으로 설정합니다(전체 크기 이미지를 보려면 클릭).
이러한 변경 후 ObjectDataSource의 선언적 구문은 아래와 같이 컬렉션을 포함 InsertParameters 하도록 확장됩니다.
<asp:ObjectDataSource ID="ObjectDataSource1" runat="server"
    SelectMethod="GetProducts" TypeName="ProductsBLL"
    UpdateMethod="UpdateProduct" OnUpdating="ObjectDataSource1_Updating"
    InsertMethod="AddProduct" OldValuesParameterFormatString="original_{0}">
    <UpdateParameters>
        <asp:Parameter Name="productName" Type="String" />
        <asp:Parameter Name="unitPrice" Type="Decimal" />
        <asp:Parameter Name="productID" Type="Int32" />
    </UpdateParameters>
    <InsertParameters>
        <asp:Parameter Name="productName" Type="String" />
        <asp:Parameter Name="supplierID" Type="Int32" />
        <asp:Parameter Name="categoryID" Type="Int32" />
        <asp:Parameter Name="quantityPerUnit" Type="String" />
        <asp:Parameter Name="unitPrice" Type="Decimal" />
        <asp:Parameter Name="unitsInStock" Type="Int16" />
        <asp:Parameter Name="unitsOnOrder" Type="Int16" />
        <asp:Parameter Name="reorderLevel" Type="Int16" />
        <asp:Parameter Name="discontinued" Type="Boolean" />
    </InsertParameters>
</asp:ObjectDataSource>
마법사를 다시 실행하면 속성이 다시 추가되었습니다 OldValuesParameterFormatString . 이 속성을 기본값({0})으로 설정하거나 선언적 구문에서 완전히 제거하여 잠시 시간을 내어 이 속성을 지웁니다.
ObjectDataSource에서 삽입 기능을 제공하면 DetailsView의 스마트 태그에 삽입 사용 확인란이 포함됩니다. 을 Designer 반환하고 이 옵션을 검사. 다음으로, DetailsView를 구문 분석하여 두 개의 BoundFields ProductName (및 ) 및 UnitPrice CommandField만 되도록 합니다. 이 시점에서 DetailsView의 선언적 구문은 다음과 같습니다.
<asp:DetailsView ID="DetailsView1" runat="server" AutoGenerateRows="False"
    DataKeyNames="ProductID" DataSourceID="ObjectDataSource1">
    <Fields>
        <asp:BoundField DataField="ProductName"
          HeaderText="ProductName" SortExpression="ProductName" />
        <asp:BoundField DataField="UnitPrice" HeaderText="UnitPrice"
          SortExpression="UnitPrice" />
        <asp:CommandField ShowInsertButton="True" />
    </Fields>
</asp:DetailsView>
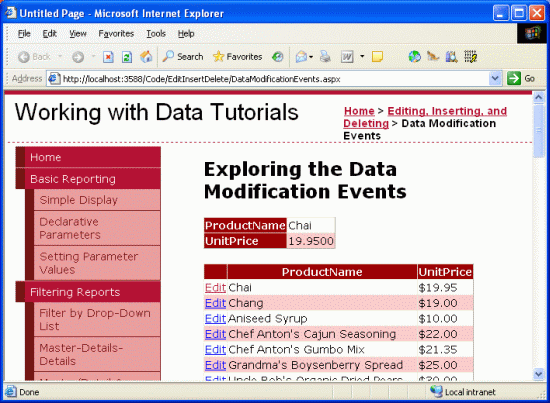
그림 16은 이 시점에서 브라우저를 통해 볼 때 이 페이지를 보여줍니다. 보시는 것처럼 DetailsView는 첫 번째 제품(Chai)의 이름과 가격을 나열합니다. 그러나 원하는 것은 사용자가 데이터베이스에 새 제품을 빠르게 추가할 수 있는 수단을 제공하는 삽입 인터페이스입니다.

그림 16: DetailsView가 현재 Read-Only 모드로 렌더링됨(전체 크기 이미지를 보려면 클릭)
삽입 모드에서 DetailsView를 표시하려면 속성을 Inserting로 설정 DefaultMode 해야 합니다. 이렇게 하면 처음 방문했을 때 DetailsView가 삽입 모드로 렌더링되고 새 레코드를 삽입한 후 해당 위치에 유지됩니다. 그림 17에서 알 수 있듯이 이러한 DetailsView는 새 레코드를 추가하기 위한 빠른 인터페이스를 제공합니다.
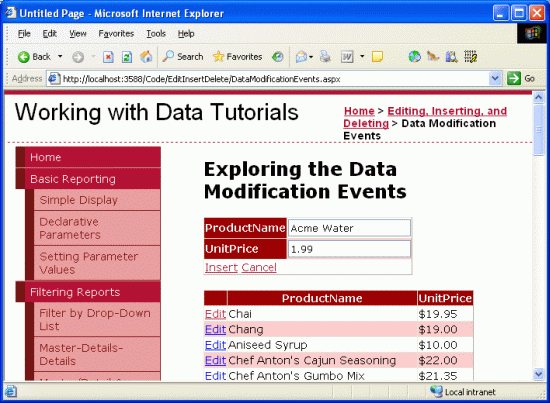
그림 17: DetailsView는 새 제품을 빠르게 추가하기 위한 인터페이스를 제공합니다(전체 크기 이미지를 보려면 클릭).
사용자가 제품 이름 및 가격(예: "Acme Water" 및 1.99)을 입력하고 삽입을 클릭하면 포스트백이 계속되고 삽입 워크플로가 시작되어 새 제품 레코드가 데이터베이스에 추가됩니다. DetailsView는 삽입 인터페이스를 유지 관리하며 GridView는 그림 18과 같이 새 제품을 포함하기 위해 자동으로 데이터 원본으로 다시 조정됩니다.

그림 18: 제품 "Acme Water"가 데이터베이스에 추가되었습니다.
그림 18의 GridView는 표시되지 않지만 DetailsView 인터페이스 CategoryID, , SupplierIDQuantityPerUnit등에서 부족한 제품 필드는 할당된 NULL 데이터베이스 값입니다. 다음 단계를 수행하여 이를 확인할 수 있습니다.
- Visual Studio에서 서버 Explorer 이동합니다.
NORTHWND.MDF데이터베이스 노드 확장- 데이터베이스 테이블 노드를 마우스 오른쪽 단추로
Products클릭합니다. - 테이블 데이터 표시를 선택합니다.
그러면 테이블의 모든 레코드가 Products 나열됩니다. 그림 19에서 알 수 있듯이 , 및 ProductNameUnitPrice 이외의 모든 새 제품의 열ProductID에는 값이 있습니다NULL.
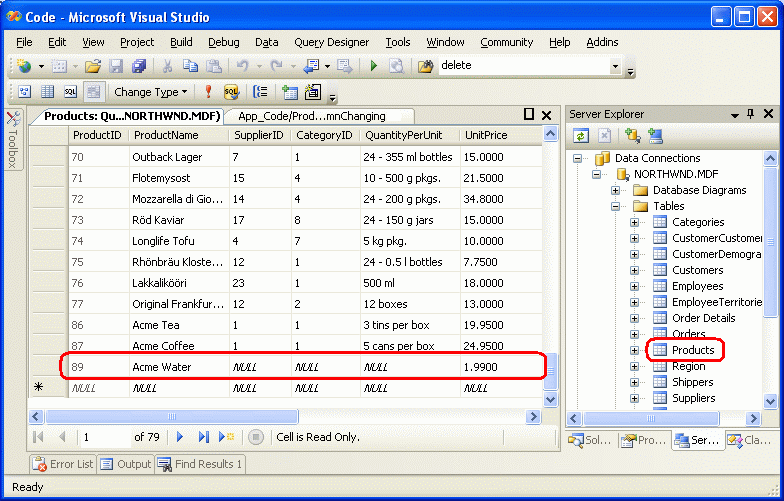
그림 19: DetailsView에 제공되지 않은 제품 필드가 할당된 NULL 값입니다(전체 크기 이미지를 보려면 클릭).
최상의 기본 옵션이 NULL 아니거나 데이터베이스 열 자체가 를 허용하지 않기 때문에 NULL 이러한 열 값 중 하나 이상에 대해 이외의 기본값을 제공할 수 NULL 있습니다. 이를 위해 DetailsView InputParameters 컬렉션의 매개 변수 값을 프로그래밍 방식으로 설정할 수 있습니다. 이 할당은 DetailsView의 ItemInserting 이벤트 또는 ObjectDataSource Inserting 의 이벤트에 대한 이벤트 처리기에서 수행할 수 있습니다. 데이터 웹 컨트롤 수준에서 사전 및 사후 수준 이벤트를 사용하는 것을 이미 살펴보았으므로 이번에는 ObjectDataSource의 이벤트를 사용하여 살펴보겠습니다.
4단계: 및SupplierID매개 변수에CategoryID값 할당
이 자습서에서는 이 인터페이스를 통해 새 제품을 추가할 때 애플리케이션에 및 SupplierID 값 1을 CategoryID 할당해야 한다고 상상해 보겠습니다. 앞에서 설명한 것처럼 ObjectDataSource에는 데이터 수정 프로세스 중에 발생하는 사전 및 사후 수준 이벤트 쌍이 있습니다. 메서드 Insert() 가 호출되면 ObjectDataSource는 먼저 해당 이벤트를 발생 Inserting 시킨 다음 메서드가 Insert() 매핑된 메서드를 호출하고 마지막으로 이벤트를 발생합니다 Inserted . Inserting 이벤트 처리기는 입력 매개 변수를 조정하거나 작업을 완전히 취소할 수 있는 마지막 기회를 제공합니다.
참고
실제 애플리케이션에서는 사용자가 범주 및 공급자를 지정하도록 하거나 일부 조건 또는 비즈니스 논리(맹목적으로 ID 1을 선택하지 않고)에 따라 이 값을 선택하려고 할 수 있습니다. 그럼에도 불구하고 이 예제에서는 ObjectDataSource의 사전 수준 이벤트에서 입력 매개 변수의 값을 프로그래밍 방식으로 설정하는 방법을 보여 줍니다.
잠시 시간을 내어 ObjectDataSource 이벤트에 Inserting 대한 이벤트 처리기를 만듭니다. 이벤트 처리기의 두 번째 입력 매개 변수는 형식 ObjectDataSourceMethodEventArgs의 개체이며 매개 변수 컬렉션(InputParameters)에 액세스할 속성과 작업을 취소할 속성(Cancel)이 있습니다.
Protected Sub ObjectDataSource1_Inserting _
    (sender As Object, e As ObjectDataSourceMethodEventArgs) _
    Handles ObjectDataSource1.Inserting

End Sub
이 시점에서 속성에는 InputParameters DetailsView에서 할당된 값이 있는 ObjectDataSource의 InsertParameters 컬렉션이 포함됩니다. 이러한 매개 변수 중 하나의 값을 변경하려면 를 사용합니다 e.InputParameters("paramName") = value. 따라서 및 SupplierID 를 CategoryID 1 값으로 설정하려면 이벤트 처리기를 다음과 같이 조정 Inserting 합니다.
Protected Sub ObjectDataSource1_Inserting _
    (sender As Object, e As ObjectDataSourceMethodEventArgs) _
    Handles ObjectDataSource1.Inserting

    e.InputParameters("CategoryID") = 1
    e.InputParameters("SupplierID") = 1
End Sub
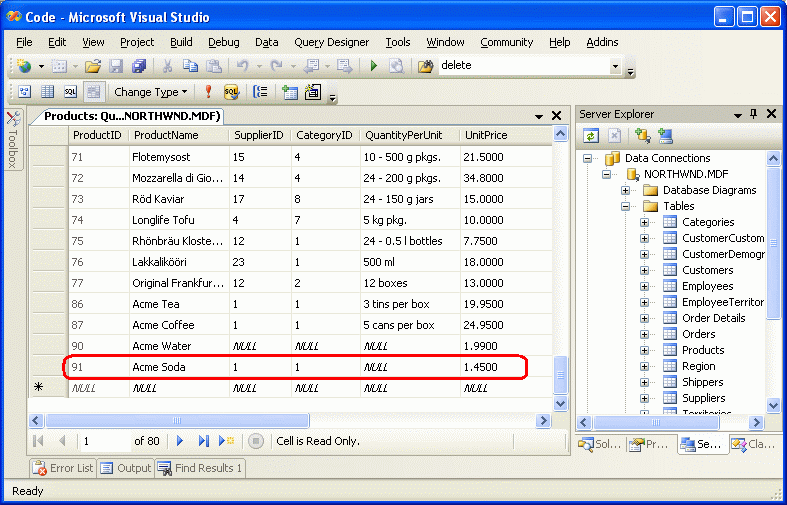
이번에는 새 제품(예: Acme Soda) CategoryID 을 추가할 때 새 제품의 및 SupplierID 열이 1로 설정됩니다(그림 20 참조).

그림 20: 이제 CategoryID 새 제품에 해당 제품 및 SupplierID 값이 1로 설정됨(전체 크기 이미지를 보려면 클릭)
요약
편집, 삽입 및 삭제 프로세스 중에는 데이터 웹 컨트롤과 ObjectDataSource가 모두 여러 사전 및 사후 수준 이벤트를 진행합니다. 이 자습서에서는 사전 수준 이벤트를 검사하고 이를 사용하여 입력 매개 변수를 사용자 지정하거나 데이터 웹 컨트롤과 ObjectDataSource의 이벤트 모두에서 데이터 수정 작업을 모두 취소하는 방법을 알아보았습니다. 다음 자습서에서는 사후 수준 이벤트에 대한 이벤트 처리기를 만들고 사용하는 방법에 대해 살펴보겠습니다.
행복한 프로그래밍!
저자 정보
7개의 ASP/ASP.NET 책의 저자이자 4GuysFromRolla.com 창립자인 Scott Mitchell은 1998년부터 Microsoft 웹 기술을 연구해 왔습니다. Scott은 독립 컨설턴트, 트레이너 및 작가로 일합니다. 그의 최신 책은 샘스 자신을 가르친다 ASP.NET 2.0 24 시간. 그는 에서 찾을 수있는 그의 블로그를 통해 또는 에 mitchell@4GuysFromRolla.comhttp://ScottOnWriting.NET도달 할 수 있습니다.
특별 감사
이 자습서 시리즈는 많은 유용한 검토자가 검토했습니다. 이 자습서의 수석 검토자는 재키 구어와 리즈 슐록이었습니다. 예정된 MSDN 문서를 검토하시겠습니까? 그렇다면 에 줄을 놓습니다 mitchell@4GuysFromRolla.com.
피드백
출시 예정: 2024년 내내 콘텐츠에 대한 피드백 메커니즘으로 GitHub 문제를 단계적으로 폐지하고 이를 새로운 피드백 시스템으로 바꿀 예정입니다. 자세한 내용은 다음을 참조하세요. https://aka.ms/ContentUserFeedback
다음에 대한 사용자 의견 제출 및 보기