파일 업로드(VB)
작성자 : Scott Mitchell
사용자가 서버의 파일 시스템 또는 데이터베이스에 저장될 수 있는 웹 사이트에 이진 파일(예: Word 또는 PDF 문서)을 업로드하도록 허용하는 방법을 알아봅니다.
소개
지금까지 살펴본 모든 자습서는 텍스트 데이터로만 작동했습니다. 그러나 많은 애플리케이션에는 텍스트 및 이진 데이터를 모두 캡처하는 데이터 모델이 있습니다. 온라인 데이트 사이트를 사용하면 사용자가 자신의 프로필과 연결할 사진을 업로드할 수 있습니다. 채용 웹 사이트를 사용하면 사용자가 이력서를 Microsoft Word 또는 PDF 문서로 업로드할 수 있습니다.
이진 데이터로 작업하면 새로운 챌린지 집합이 추가됩니다. 이진 데이터가 애플리케이션에 저장되는 방법을 결정해야 합니다. 사용자가 컴퓨터에서 파일을 업로드할 수 있도록 새 레코드를 삽입하는 데 사용되는 인터페이스를 업데이트해야 하며 레코드의 연결된 이진 데이터를 다운로드하는 방법을 표시하거나 제공하기 위해 추가 단계를 수행해야 합니다. 이 자습서와 다음 세 가지에서는 이러한 문제를 해결하는 방법을 살펴봅니다. 이 자습서의 끝부분에서는 사진 및 PDF 브로셔를 각 범주와 연결하는 완벽하게 작동하는 애플리케이션을 빌드했습니다. 이 특정 자습서에서는 이진 데이터를 저장하기 위한 다양한 기술을 살펴보고 사용자가 컴퓨터에서 파일을 업로드하고 웹 서버의 파일 시스템에 저장할 수 있도록 하는 방법을 살펴봅니다.
참고
애플리케이션 데이터 모델의 일부인 이진 데이터를 BLOB이라고도 하며, 이진 대형 OBject의 약어라고도 합니다. 이 자습서에서는 용어 BLOB이 동의어이지만 용어 이진 데이터를 사용하도록 선택했습니다.
1단계: 이진 데이터 웹 페이지 작업 만들기
이진 데이터에 대한 지원 추가와 관련된 문제를 살펴보기 전에 먼저 이 자습서와 다음 세 가지에 필요한 웹 사이트 프로젝트에서 ASP.NET 페이지를 만들어 보겠습니다. 먼저 라는 BinaryData새 폴더를 추가합니다. 다음으로, 해당 폴더에 다음 ASP.NET 페이지를 추가하여 각 페이지를 master 페이지와 Site.master 연결해야 합니다.
Default.aspxFileUpload.aspxDisplayOrDownloadData.aspxUploadInDetailsView.aspxUpdatingAndDeleting.aspx
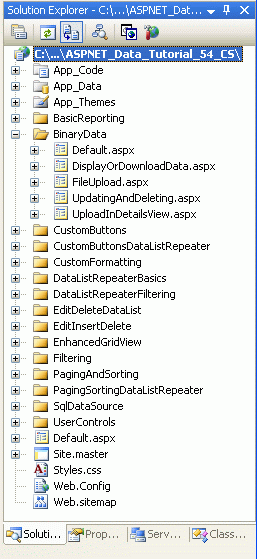
그림 1: 이진 Data-Related 자습서에 대한 ASP.NET 페이지 추가
다른 폴더와 Default.aspx 마찬가지로 폴더의 BinaryData 섹션에 자습서가 나열됩니다. 사용자 컨트롤은 SectionLevelTutorialListing.ascx 이 기능을 제공합니다. 따라서 솔루션 탐색기 페이지의 디자인 보기로 끌어 이 사용자 컨트롤 Default.aspx 을 에 추가합니다.
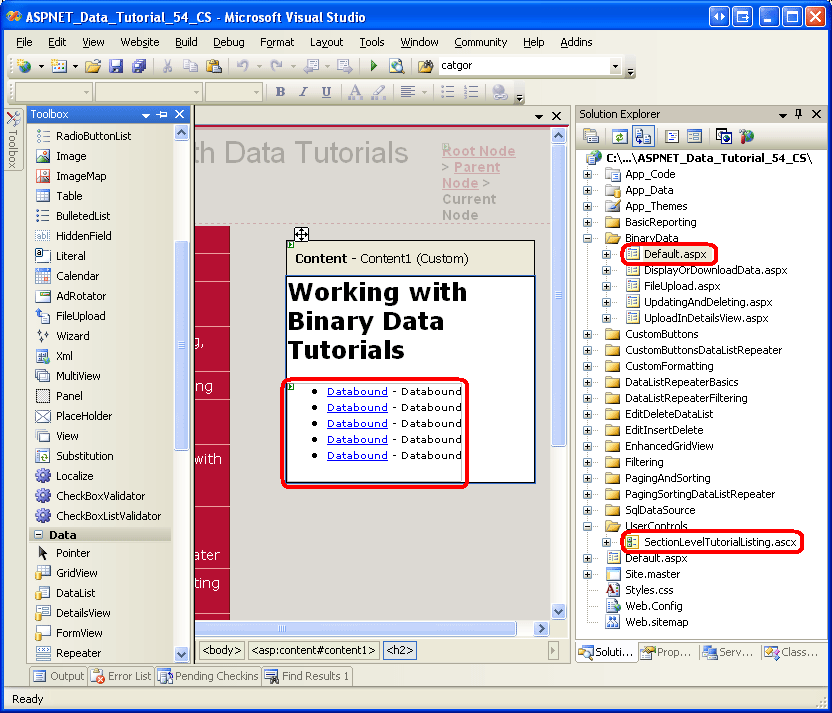
그림 2: 사용자 컨트롤을 SectionLevelTutorialListing.ascx 에 Default.aspx 추가합니다(전체 크기 이미지를 보려면 클릭).
마지막으로 이러한 페이지를 파일에 항목으로 추가합니다 Web.sitemap . 특히 GridView <siteMapNode>강화 다음에 다음 태그를 추가합니다.
<siteMapNode
    title="Working with Binary Data"
    url="~/BinaryData/Default.aspx"
    description="Extend the data model to include collecting binary data.">

    <siteMapNode
        title="Uploading Files"
        url="~/BinaryData/FileUpload.aspx"
        description="Examine the different ways to store binary data on the
                     web server and see how to accept uploaded files from users
                     with the FileUpload control." />
    <siteMapNode
        title="Display or Download Binary Data"
        url="~/BinaryData/DisplayOrDownloadData.aspx"
        description="Let users view or download the captured binary data." />
    <siteMapNode
        title="Adding New Binary Data"
        url="~/BinaryData/UploadInDetailsView.aspx"
        description="Learn how to augment the inserting interface to
                     include a FileUpload control." />
    <siteMapNode
        title="Updating and Deleting Existing Binary Data"
        url="~/BinaryData/UpdatingAndDeleting.aspx"
        description="Learn how to update and delete existing binary data." />
</siteMapNode>
를 업데이트 Web.sitemap한 후 잠시 시간을 내어 브라우저를 통해 자습서 웹 사이트를 봅니다. 이제 왼쪽 메뉴에는 이진 데이터 작업 자습서에 대한 항목이 포함됩니다.
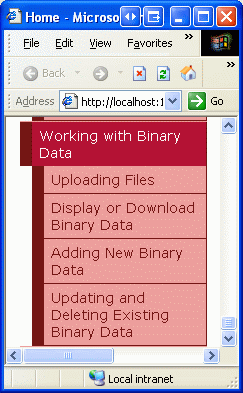
그림 3: 이제 사이트 맵에 이진 데이터 작업 자습서에 대한 항목이 포함됩니다.
2단계: 이진 데이터를 저장할 위치 결정
애플리케이션의 데이터 모델과 연결된 이진 데이터는 데이터베이스에 저장된 파일에 대한 참조가 있는 웹 서버 파일 시스템의 두 위치 중 하나에 저장할 수 있습니다. 또는 데이터베이스 자체 내에서 직접(그림 4 참조) 각 접근 방식에는 고유한 장단점 집합이 있으며 보다 자세한 논의가 있습니다.

그림 4: 이진 데이터를 파일 시스템에 저장하거나 데이터베이스에 직접 저장할 수 있습니다(전체 크기 이미지를 보려면 클릭).
각 제품과 그림을 연결하도록 Northwind 데이터베이스를 확장한다고 상상해 보십시오. 한 가지 옵션은 이러한 이미지 파일을 웹 서버의 파일 시스템에 저장하고 테이블에 경로를 Products 기록하는 것입니다. 이 방법을 사용하면 형식varchar(200)의 테이블에 열을 Products 추가할 ImagePath 수 있습니다. 사용자가 Chai에 대한 사진을 업로드할 때 해당 그림은 애플리케이션의 실제 경로를 나타내는 의 웹 서버 파일 시스템에 ~/Images/Tea.jpg~ 저장될 수 있습니다. 즉, 웹 사이트가 실제 경로 C:\Websites\Northwind\~/Images/Tea.jpg 에 루팅된 경우 는 와 동일합니다C:\Websites\Northwind\Images\Tea.jpg. 이미지 파일을 업로드한 후 해당 열이 새 이미지의 경로를 참조할 수 ImagePath 있도록 테이블의 Chai 레코드 Products 를 업데이트합니다. 모든 제품 이미지를 애플리케이션 폴더 Images 에 배치하기로 결정한 경우 또는 Tea.jpg 를 사용할 ~/Images/Tea.jpg 수 있습니다.
파일 시스템에 이진 데이터를 저장할 때의 기본 이점은 다음과 같습니다.
- 곧 보게 될 구현의 용이성, 데이터베이스 내에 직접 저장된 이진 데이터를 저장하고 검색하는 것은 파일 시스템을 통해 데이터로 작업할 때보다 조금 더 많은 코드가 수반됩니다. 또한 사용자가 이진 데이터를 보거나 다운로드하려면 해당 데이터에 대한 URL을 제공해야 합니다. 데이터가 웹 서버의 파일 시스템에 있는 경우 URL은 간단합니다. 그러나 데이터가 데이터베이스에 저장된 경우 데이터베이스에서 데이터를 검색하고 반환하는 웹 페이지를 만들어야 합니다.
- 이진 데이터에 더 광범위하게 액세스 하려면 데이터베이스에서 데이터를 끌어올 수 없는 다른 서비스 또는 애플리케이션에서 이진 데이터에 액세스할 수 있어야 할 수 있습니다. 예를 들어 각 제품과 연결된 이미지를 FTP를 통해 사용자가 사용할 수 있어야 할 수도 있습니다. 이 경우 파일 시스템에 이진 데이터를 저장하려고 합니다.
- 이진 데이터가 파일 시스템에 저장되면 데이터베이스 서버와 웹 서버 간의 수요 및 네트워크 정체가 이진 데이터가 데이터베이스 내에 직접 저장되는 경우보다 성능이 저하됩니다.
파일 시스템에 이진 데이터를 저장하는 기본 단점은 데이터베이스에서 데이터를 분리한다는 것입니다. 테이블에서 레코드가 삭제 Products 되면 웹 서버 파일 시스템의 연결된 파일이 자동으로 삭제되지 않습니다. 파일을 삭제하려면 추가 코드를 작성해야 합니다. 그렇지 않으면 파일 시스템이 사용되지 않고 분리된 파일로 복잡해집니다. 또한 데이터베이스를 백업할 때는 파일 시스템에서도 연결된 이진 데이터를 백업해야 합니다. 데이터베이스를 다른 사이트 또는 서버로 이동하면 비슷한 문제가 발생합니다.
또는 형식varbinary의 열을 만들어 이진 데이터를 Microsoft SQL Server 2005 데이터베이스에 직접 저장할 수 있습니다. 다른 가변 길이 데이터 형식과 마찬가지로 이 열에 저장할 수 있는 이진 데이터의 최대 길이를 지정할 수 있습니다. 예를 들어 최대 5,000바이트를 예약하려면 를 사용합니다 varbinary(5000). varbinary(MAX) 최대 스토리지 크기(약 2GB)를 허용합니다.
이진 데이터를 데이터베이스에 직접 저장하는 기본 장점은 이진 데이터와 데이터베이스 레코드 간의 긴밀한 결합입니다. 이렇게 하면 백업 또는 다른 사이트 또는 서버로 데이터베이스 이동과 같은 데이터베이스 관리 작업이 크게 간소화됩니다. 또한 레코드를 삭제하면 해당 이진 데이터가 자동으로 삭제됩니다. 또한 데이터베이스에 이진 데이터를 저장할 때 더 미묘한 이점이 있습니다.
참고
Microsoft SQL Server 2000 및 이전 버전 varbinary 에서 데이터 형식의 최대 제한은 8,000바이트입니다. 최대 2GB의 이진 데이터를 저장하려면 데이터 형식을image 대신 사용해야 합니다. MAX 그러나 image 2005년 SQL Server 추가된 데이터 형식은 더 이상 사용되지 않습니다. 이전 버전과의 호환성을 위해 계속 지원되지만 Microsoft는 향후 버전의 SQL Server 데이터 형식이 제거될 것이라고 발표 image 했습니다.
이전 데이터 모델로 작업하는 경우 데이터 형식이 image 표시 될 수 있습니다. Northwind 데이터베이스 Categories 테이블에는 범주에 Picture 대한 이미지 파일의 이진 데이터를 저장하는 데 사용할 수 있는 열이 있습니다. Northwind 데이터베이스의 루트는 Microsoft Access 및 이전 버전의 SQL Server 있으므로 이 열은 형식image입니다.
이 자습서와 다음 세 가지에서는 두 가지 방법을 모두 사용합니다. 테이블에는 CategoriesPicture 범주에 대한 이미지의 이진 콘텐츠를 저장하기 위한 열이 이미 있습니다. 범주의 인쇄 품질과 세련된 개요를 제공하는 데 사용할 수 있는 PDF 경로를 웹 서버 파일 시스템에 저장하기 위해 추가 열 BrochurePath인 를 추가합니다.
3단계: 테이블에 열Categories추가BrochurePath
현재 Categories 테이블에는 , , CategoryNameDescription및 Picture열이 4개만 있습니다CategoryID. 이러한 필드 외에도 범주의 브로셔(있는 경우)를 가리키는 새 필드를 추가해야 합니다. 이 열을 추가하려면 서버 Explorer 이동하여 테이블로 드릴다운하고 테이블을 마우스 오른쪽 단추로 클릭하고 Categories 테이블 정의 열기를 선택합니다(그림 5 참조). 서버 Explorer 표시되지 않으면 보기 메뉴에서 서버 Explorer 옵션을 선택하여 표시하거나 Ctrl+Alt+S를 누릅니다.
이름이 지정 BrochurePath 되고 가 허용 NULL 된 테이블에 새 varchar(200) 열을 Categories 추가하고 저장 아이콘을 클릭하거나 Ctrl+S를 누릅니다.
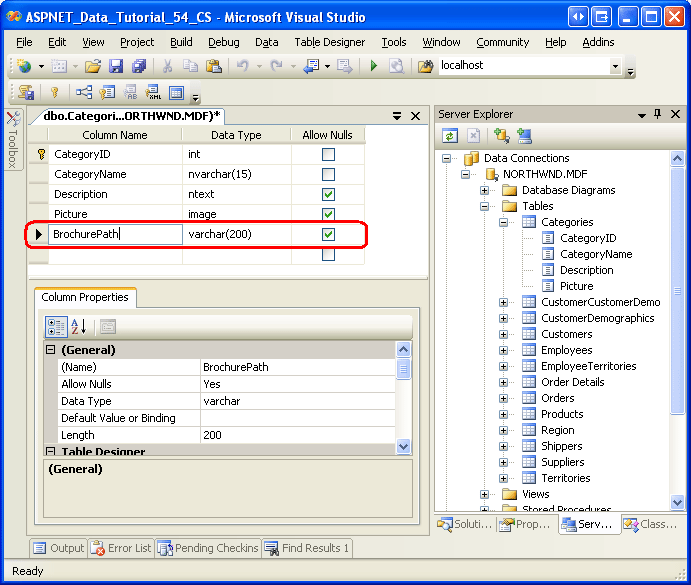
그림 5: 테이블에 열 Categories 추가BrochurePath(전체 크기 이미지를 보려면 클릭)
4단계: 및BrochurePath열을 사용하도록Picture아키텍처 업데이트
CategoriesDataTable DAL(데이터 액세스 계층)의 에는 현재 , , CategoryNameDescription및 NumberOfProducts의 네 DataColumn 가지 CategoryID정의가 있습니다. 원래 데이터 액세스 계층 만들기 자습서 CategoriesDataTable 에서 이 DataTable을 디자인했을 때 처음 세 개의 열만 있었습니다. 이 열 NumberOfProducts 은 Details DataList 자습서와 함께 마스터 레코드의 글머리 기호 목록을 사용하여 마스터/세부 정보에 추가되었습니다 .
데이터 액세스 계층 만들기에서 설명한 대로 형식화된 데이터 세트의 DataTable은 비즈니스 개체를 구성합니다. TableAdapters는 데이터베이스와 통신하고 비즈니스 개체를 쿼리 결과로 채우는 역할을 담당합니다. 는 CategoriesDataTable 세 가지 데이터 검색 메서드가 CategoriesTableAdapter있는 로 채워집니다.
GetCategories()는 TableAdapter의 기본 쿼리를 실행하고 테이블에 있는CategoryIDCategories모든 레코드의 ,CategoryName및Description필드를 반환합니다. 기본 쿼리는 자동 생성Insert및Update메서드에서 사용됩니다.GetCategoryByCategoryID(categoryID)는CategoryIDcategoryID와 같은 범주CategoryID의 ,CategoryName및Description필드를 반환합니다.GetCategoriesAndNumberOfProducts()- 테이블의CategoryID모든 레코드Categories에 대한 ,CategoryName및Description필드를 반환합니다. 또한 하위 쿼리를 사용하여 각 범주와 연결된 제품 수를 반환합니다.
이러한 쿼리 중 어느 것도 테이블 또는 PictureBrochurePath 열을 반환 Categories 하지 않으며 이 필드에 대해 를 제공하지 DataColumn 도 않습니다CategoriesDataTable. Picture 및 BrochurePath 속성을 사용하려면 먼저 에 추가 CategoriesDataTable 한 다음 클래스를 CategoriesTableAdapter 업데이트하여 이러한 열을 반환해야 합니다.
및BrochurePath``DataColumn sPicture추가
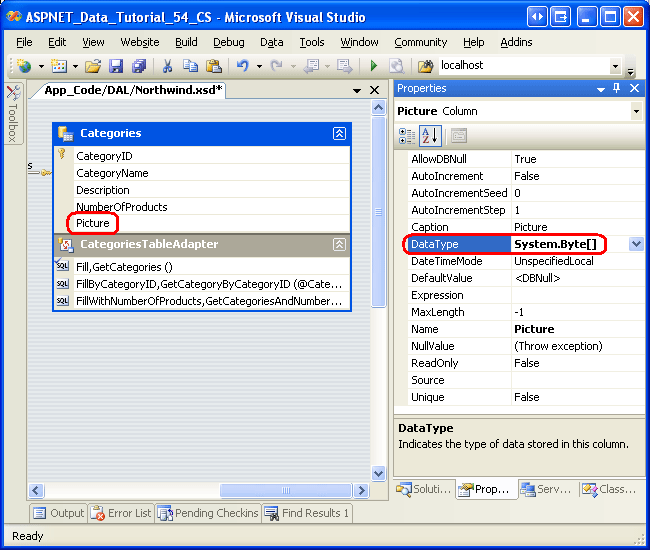
먼저 이 두 열을 에 추가합니다 CategoriesDataTable. 머리글을 마우스 오른쪽 단추로 CategoriesDataTable 클릭하고 상황에 맞는 메뉴에서 추가를 선택한 다음 열 옵션을 선택합니다. 그러면 라는 DataTable에 새 DataColumn 가 Column1생성됩니다. 이 열의 이름을 로 바꿉니다 Picture. 속성 창 의 DataType 속성을 System.Byte[] 로 설정합니다DataColumn(드롭다운 목록의 옵션은 아닙니다. 입력해야 합니다).
![DataType이 System.Byte인 DataColumn 명명된 그림 만들기[]](uploading-files-vb/_static/image7.png)
그림 6: 이름이 DataTypeSystem.Byte[] 인 명명됨 Picture 만들기DataColumn(전체 크기 이미지를 보려면 클릭)
DataTable에 다른 DataColumn 를 추가하여 기본값DataType(System.String)을 사용하여 이름을 지정 BrochurePath 합니다.
PictureTableAdapter에서 및BrochurePath값 반환
이 두 DataColumn 가 에 CategoriesDataTable추가되면 를 업데이트할 준비가 된 것입니다 CategoriesTableAdapter. 기본 TableAdapter 쿼리에서 이러한 열 값이 모두 반환될 수 있지만 메서드가 호출될 때마다 GetCategories() 이진 데이터가 다시 반환됩니다. 대신 기본 TableAdapter 쿼리를 업데이트하여 BrochurePath 특정 범주의 Picture 열을 반환하는 추가 데이터 검색 메서드를 만들어 보겠습니다.
기본 TableAdapter 쿼리를 업데이트하려면 헤더를 CategoriesTableAdapter 마우스 오른쪽 단추로 클릭하고 상황에 맞는 메뉴에서 구성 옵션을 선택합니다. 이렇게 하면 이전 자습서에서 살펴보았던 테이블 어댑터 구성 마법사가 나타납니다. 쿼리를 업데이트하여 를 다시 BrochurePath 가져오고 마침을 클릭합니다.
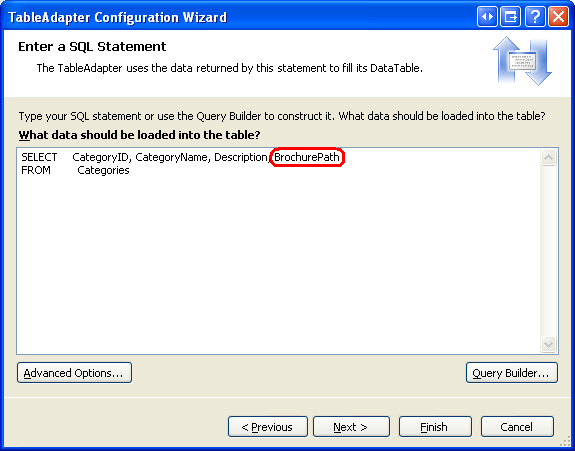
그림 7: 문에서 SELECT 열 목록을 반환 BrochurePath 으로 업데이트합니다(전체 크기 이미지를 보려면 클릭).
TableAdapter에 임시 SQL 문을 사용하는 경우 기본 쿼리에서 열 목록을 업데이트하면 TableAdapter의 SELECT 모든 쿼리 메서드에 대한 열 목록이 업데이트됩니다. 즉 GetCategoryByCategoryID(categoryID) , 의도한 것일 수 있는 열을 반환 BrochurePath 하도록 메서드가 업데이트되었습니다. 그러나 메서드의 열 목록 GetCategoriesAndNumberOfProducts() 도 업데이트하여 각 범주의 제품 수를 반환하는 하위 쿼리를 제거했습니다. 따라서 이 메서드의 SELECT 쿼리를 업데이트해야 합니다. 메서드를 GetCategoriesAndNumberOfProducts() 마우스 오른쪽 단추로 클릭하고 구성을 선택한 다음 쿼리를 SELECT 원래 값으로 다시 되돌리기.
SELECT CategoryID, CategoryName, Description,
       (SELECT COUNT(*)
            FROM Products p
            WHERE p.CategoryID = c.CategoryID)
       as NumberOfProducts
FROM Categories c
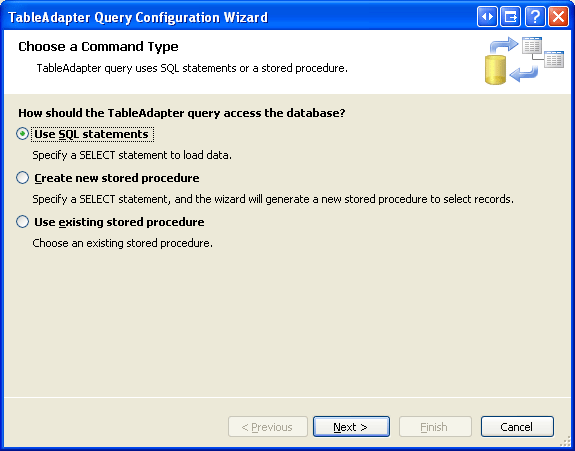
다음으로 특정 범주의 열 값을 반환하는 새 TableAdapter 메서드를 Picture 만듭니다. 머리글을 마우스 오른쪽 단추로 클릭하고 CategoriesTableAdapter 쿼리 추가 옵션을 선택하여 TableAdapter 쿼리 구성 마법사를 시작합니다. 이 마법사의 첫 번째 단계에서는 임시 SQL 문, 새 저장 프로시저 또는 기존 프로시저를 사용하여 데이터를 쿼리할 것인지 묻습니다. SQL 문 사용을 선택하고 다음을 클릭합니다. 행을 반환하므로 두 번째 단계에서 행을 반환하는 SELECT 옵션을 선택합니다.

그림 8: SQL 문 사용 옵션을 선택합니다(전체 크기 이미지를 보려면 클릭).

그림 9: 쿼리가 범주 테이블에서 레코드를 반환하므로 행을 반환하는 SELECT를 선택합니다(전체 크기 이미지를 보려면 클릭).
세 번째 단계에서 다음 SQL 쿼리를 입력하고 다음을 클릭합니다.
SELECT     CategoryID, CategoryName, Description, BrochurePath, Picture
FROM       Categories
WHERE      CategoryID = @CategoryID
마지막 단계는 새 메서드의 이름을 선택하는 것입니다. DataTable 채우기 및 DataTable 패턴 반환에 각각 및 GetCategoryWithBinaryDataByCategoryID 를 사용합니다FillCategoryWithBinaryDataByCategoryID. 마침을 클릭하여 마법사를 완료합니다.

그림 10: TableAdapter 메서드의 이름 선택(전체 크기 이미지를 보려면 클릭)
참고
테이블 어댑터 쿼리 구성 마법사를 완료하면 새 명령 텍스트가 기본 쿼리의 스키마와 다른 스키마로 데이터를 반환한다는 대화 상자가 표시 될 수 있습니다. 한마디로, 마법사는 TableAdapter의 기본 쿼리 GetCategories() 가 방금 만든 스키마와 다른 스키마를 반환한다는 것을 알 수 있습니다. 그러나 이것이 우리가 원하는 것이므로 이 메시지를 무시할 수 있습니다.
또한 임시 SQL 문을 사용하고 마법사를 사용하여 나중에 TableAdapter의 기본 쿼리를 변경하는 경우 메서드의 SELECT 문 열 목록을 수정 GetCategoryWithBinaryDataByCategoryID 하여 기본 쿼리에서 해당 열만 포함합니다(즉, 쿼리에서 열을 제거 Picture 함). 이 단계의 앞부분에서 메서드로 수행한 작업과 GetCategoriesAndNumberOfProducts() 유사하게 열을 반환 Picture 하려면 열 목록을 수동으로 업데이트해야 합니다.
및 GetCategoryWithBinaryDataByCategoryID 메서드CategoriesTableAdapter에 CategoriesDataTable 두 DataColumn 개의 를 추가한 후 형식화된 데이터 세트 Designer 이러한 클래스는 그림 11의 스크린샷과 같습니다.
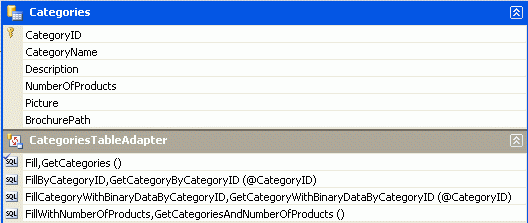
그림 11: DataSet Designer 새 열 및 메서드 포함
BLL(비즈니스 논리 계층) 업데이트
DAL이 업데이트되면 새 메서드에 대한 메서드를 포함하도록 BLL(비즈니스 논리 계층)을 보강하기만 CategoriesTableAdapter 하면 됩니다. CategoriesBLL 클래스에 다음 메서드를 추가합니다.
<System.ComponentModel.DataObjectMethodAttribute _
    (System.ComponentModel.DataObjectMethodType.Select, False)> _
Public Function GetCategoryWithBinaryDataByCategoryID(categoryID As Integer) _
    As Northwind.CategoriesDataTable

    Return Adapter.GetCategoryWithBinaryDataByCategoryID(categoryID)
End Function
5단계: 클라이언트에서 웹 서버로 파일 업로드
이진 데이터를 수집할 때 종종 최종 사용자가 이 데이터를 제공합니다. 이 정보를 캡처하려면 사용자가 컴퓨터에서 웹 서버로 파일을 업로드할 수 있어야 합니다. 그런 다음 업로드된 데이터를 데이터 모델과 통합해야 합니다. 즉, 파일을 웹 서버의 파일 시스템에 저장하고 데이터베이스의 파일에 경로를 추가하거나 이진 콘텐츠를 데이터베이스에 직접 쓰는 것을 의미할 수 있습니다. 이 단계에서는 사용자가 컴퓨터에서 서버로 파일을 업로드할 수 있도록 허용하는 방법을 살펴보겠습니다. 다음 자습서에서는 업로드된 파일을 데이터 모델과 통합하는 데 주의를 기울입니다.
ASP.NET 2.0의 새 FileUpload 웹 컨트롤 은 사용자가 컴퓨터에서 웹 서버로 파일을 보낼 수 있는 메커니즘을 제공합니다. FileUpload 컨트롤은 특성이 type 파일로 설정된 요소로 <input> 렌더링되며 브라우저는 찾아보기 단추가 있는 텍스트 상자로 표시됩니다. 찾아보기 단추를 클릭하면 사용자가 파일을 선택할 수 있는 대화 상자가 나타납니다. 양식이 다시 게시되면 선택한 파일의 내용이 포스트백과 함께 전송됩니다. 서버 쪽에서 업로드된 파일에 대한 정보는 FileUpload 컨트롤의 속성을 통해 액세스할 수 있습니다.
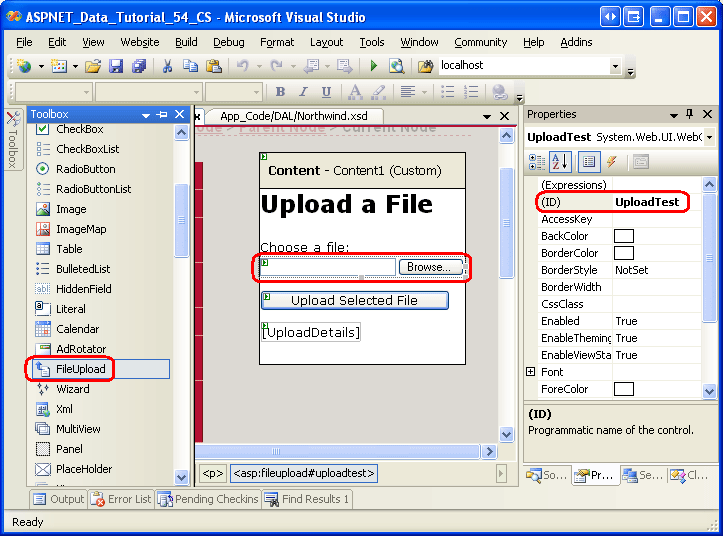
파일 업로드를 보여 주려면 폴더에서 페이지를 열고 FileUpload.aspx 도구 상자에서 Designer FileUpload 컨트롤을 끌어서 컨트롤의 ID 속성을 UploadTest로 BinaryData 설정합니다. 그런 다음 단추 웹 컨트롤 설정 및 ID 속성을 각각 및 Text 선택한 파일 업로드에 UploadButton 추가합니다. 마지막으로 Button 아래에 레이블 웹 컨트롤을 배치하고 해당 Text 속성을 지우고 속성을 ID 로 UploadDetails설정합니다.

그림 12: ASP.NET 페이지에 FileUpload 컨트롤 추가(전체 크기 이미지를 보려면 클릭)
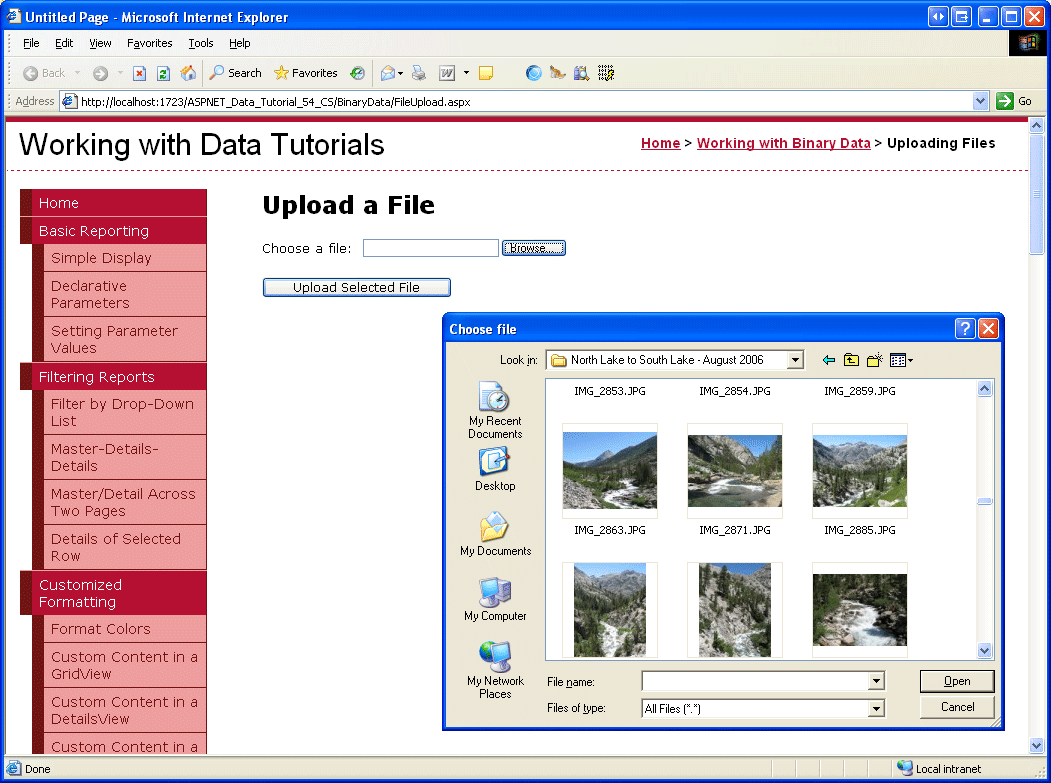
그림 13은 브라우저를 통해 볼 때 이 페이지를 보여줍니다. 찾아보기 단추를 클릭하면 파일 선택 대화 상자가 표시되므로 사용자가 컴퓨터에서 파일을 선택할 수 있습니다. 파일이 선택되면 선택한 파일 업로드 단추를 클릭하면 선택한 파일의 이진 콘텐츠를 웹 서버로 보내는 포스트백이 발생합니다.

그림 13: 사용자가 컴퓨터에서 서버로 업로드할 파일을 선택할 수 있습니다(전체 크기 이미지를 보려면 클릭).
포스트백 시 업로드된 파일을 파일 시스템에 저장할 수 있거나 이진 데이터를 Stream 통해 직접 작업할 수 있습니다. 이 예제에서는 폴더를 ~/Brochures 만들고 업로드된 파일을 저장해 보겠습니다. 먼저 사이트에 폴더를 Brochures 루트 디렉터리의 하위 폴더로 추가합니다. 다음으로, 이벤트에 Click 대한 UploadButton 이벤트 처리기를 만들고 다음 코드를 추가합니다.
Protected Sub UploadButton_Click(sender As Object, e As EventArgs) _
    Handles UploadButton.Click

    If UploadTest.HasFile = False Then
        ' No file uploaded!
        UploadDetails.Text = "Please first select a file to upload..."
    Else
        ' Display the uploaded file's details
        UploadDetails.Text = String.Format( _
                "Uploaded file: {0}<br />" & _
                "File size (in bytes): {1:N0}<br />" & _
                "Content-type: {2}", _
                UploadTest.FileName, _
                UploadTest.FileBytes.Length, _
                UploadTest.PostedFile.ContentType)
        ' Save the file
        Dim filePath As String = _
            Server.MapPath("~/Brochures/" & UploadTest.FileName)
        UploadTest.SaveAs(filePath)
    End If
End Sub
FileUpload 컨트롤은 업로드된 데이터 작업을 위한 다양한 속성을 제공합니다. instance HasFile 경우 속성은 사용자가 파일을 업로드했는지 여부를 나타내고 FileBytes 속성은 업로드된 이진 데이터에 바이트 배열로 액세스할 수 있도록 합니다. Click 이벤트 처리기는 파일이 업로드되었는지 확인하여 시작합니다. 파일이 업로드된 경우 레이블은 업로드된 파일의 이름, 파일의 크기(바이트) 및 콘텐츠 형식을 표시합니다.
참고
사용자가 파일을 업로드하도록 하려면 속성을 검사 HasFile 경고를 표시False하거나 RequiredFieldValidator 컨트롤을 대신 사용할 수 있습니다.
FileUpload s SaveAs(filePath) 는 업로드된 파일을 지정된 filePath에 저장합니다. filePath는 가상경로(C:\Websites\Brochures\SomeFile.pdf)가 아닌 실제 경로(/Brochures/SomeFile.pdf)여야 합니다. 메서드는 Server.MapPath(virtPath) 가상 경로를 사용하고 해당 실제 경로를 반환합니다. 여기서 가상 경로는 입니다 ~/Brochures/fileName. 여기서 fileName 은 업로드된 파일의 이름입니다. 가상 및 물리적 경로 및 사용에 Server.MapPath대한 자세한 내용은 Server.MapPath Methos를 참조하세요.
이벤트 처리기를 완료한 Click 후 잠시 시간을 내어 브라우저에서 페이지를 테스트합니다. 찾아보기 단추를 클릭하고 하드 드라이브에서 파일을 선택한 다음 선택한 파일 업로드 단추를 클릭합니다. 포스트백은 선택한 파일의 내용을 웹 서버로 보냅니다. 그러면 폴더에 저장 ~/Brochures 하기 전에 파일에 대한 정보가 표시됩니다. 파일을 업로드한 후 Visual Studio로 돌아가서 솔루션 탐색기 새로 고침 단추를 클릭합니다. 방금 업로드한 파일이 ~/Brochures 폴더에 표시됩니다.
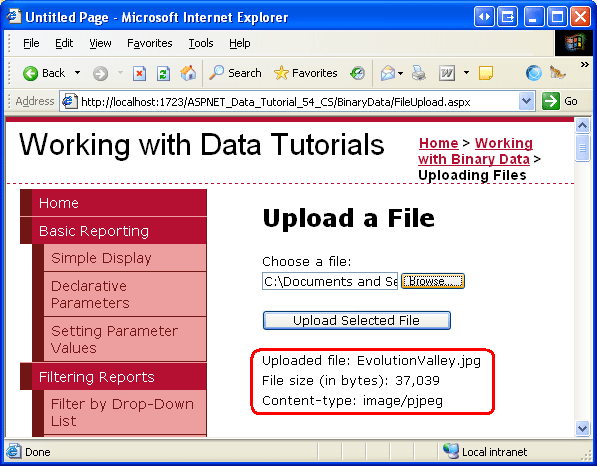
그림 14: 파일이 EvolutionValley.jpg 웹 서버에 업로드되었습니다(전체 크기 이미지를 보려면 클릭).
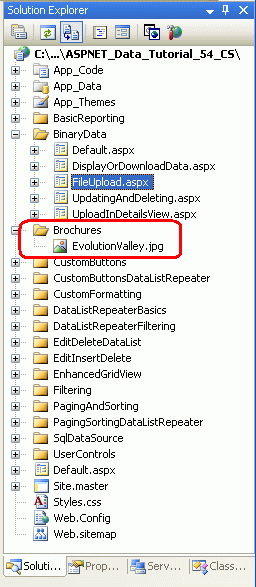
그림 15: EvolutionValley.jpg 폴더에 ~/Brochures 저장됨
파일 시스템에 업로드된 파일 저장의 미묘한 차이
웹 서버의 파일 시스템에 파일 업로드를 저장할 때 해결해야 하는 몇 가지 미묘한 사항이 있습니다. 첫째, 보안 문제가 있습니다. 파일을 파일 시스템에 저장하려면 ASP.NET 페이지가 실행되는 보안 컨텍스트에 쓰기 권한이 있어야 합니다. ASP.NET 개발 웹 서버는 현재 사용자 계정의 컨텍스트에서 실행됩니다. Microsoft의 IIS(인터넷 정보 서비스)를 웹 서버로 사용하는 경우 보안 컨텍스트는 IIS 버전 및 해당 구성에 따라 달라집니다.
파일 시스템에 파일을 저장하는 또 다른 과제는 파일 이름을 지정하는 것입니다. 현재 페이지에서는 업로드된 모든 파일을 클라이언트 컴퓨터의 ~/Brochures 파일과 동일한 이름을 사용하여 디렉터리에 저장합니다. 사용자 A가 이름이 Brochure.pdf인 브로셔를 업로드하면 파일이 로 ~/Brochure/Brochure.pdf저장됩니다. 하지만 나중에 사용자 B가 동일한 파일 이름(Brochure.pdf)을 갖는 다른 브로슈어 파일을 업로드하면 어떻게 될까요? 이제 가지고 있는 코드를 사용하여 사용자 A의 파일을 사용자 B의 업로드로 덮어씁니다.
파일 이름 충돌을 해결하기 위한 여러 가지 기술이 있습니다. 한 가지 옵션은 동일한 이름의 파일이 이미 있는 경우 파일 업로드를 금지하는 것입니다. 이 방법을 사용하면 사용자 B가 라는 Brochure.pdf파일을 업로드하려고 할 때 시스템은 파일을 저장하지 않고 대신 사용자 B에게 파일 이름을 바꾸고 다시 시도하라는 메시지를 표시합니다. 또 다른 방법은 GUID (Globally Unique Identifier) 또는 해당 데이터베이스 레코드의 기본 키 열 값(업로드가 데이터 모델의 특정 행과 연결되어 있다고 가정)의 값일 수 있는 고유한 파일 이름을 사용하여 파일을 저장하는 것입니다. 다음 자습서에서는 이러한 옵션을 자세히 살펴보겠습니다.
매우 많은 양의 이진 데이터와 관련된 문제
이 자습서에서는 캡처된 이진 데이터의 크기가 미미하다고 가정합니다. 여러 메가바이트 이상의 매우 많은 양의 이진 데이터 파일로 작업하면 이러한 자습서의 scope 넘어서는 새로운 과제가 발생합니다. 예를 들어 기본적으로 ASP.NET 의 요소를 Web.config통해 구성할 수 있지만 4MB 이상의 업로드를 <httpRuntime> 거부합니다. IIS는 자체 파일 업로드 크기 제한도 적용합니다. 또한 대용량 파일을 업로드하는 데 걸리는 시간이 기본값인 110초를 초과할 수 ASP.NET 요청을 기다립니다. 대용량 파일로 작업할 때 발생하는 메모리 및 성능 문제도 있습니다.
FileUpload 컨트롤은 대용량 파일 업로드에 대해 실용적이지 않습니다. 파일의 내용이 서버에 게시될 때 최종 사용자는 업로드가 진행 중이라는 확인 없이 인내심을 가지고 기다려야 합니다. 이 문제는 몇 초 안에 업로드할 수 있는 작은 파일을 처리할 때는 별로 문제가 되지 않지만 업로드하는 데 몇 분 정도 걸릴 수 있는 더 큰 파일을 처리할 때 문제가 될 수 있습니다. 대규모 업로드를 처리하는 데 더 적합한 다양한 타사 파일 업로드 컨트롤이 있으며, 이러한 공급업체 중 상당수는 훨씬 더 세련된 사용자 환경을 제공하는 진행률 표시기와 ActiveX 업로드 관리자를 제공합니다.
애플리케이션에서 대용량 파일을 처리해야 하는 경우 문제를 신중하게 조사하고 특정 요구 사항에 적합한 솔루션을 찾아야 합니다.
요약
이진 데이터를 캡처해야 하는 애플리케이션을 빌드하는 경우 여러 가지 문제가 발생합니다. 이 자습서에서는 처음 두 가지, 즉 이진 데이터를 저장할 위치를 결정하고 사용자가 웹 페이지를 통해 이진 콘텐츠를 업로드할 수 있도록 하는 방법을 살펴보게 했습니다. 다음 세 자습서에서는 업로드된 데이터를 데이터베이스의 레코드와 연결하는 방법과 텍스트 데이터 필드와 함께 이진 데이터를 표시하는 방법을 살펴보겠습니다.
행복한 프로그래밍!
추가 정보
이 자습서에서 설명하는 topics 대한 자세한 내용은 다음 리소스를 참조하세요.
저자 정보
7개의 ASP/ASP.NET 책의 저자이자 4GuysFromRolla.com 창립자인 Scott Mitchell은 1998년부터 Microsoft 웹 기술로 작업해 왔습니다. Scott은 독립 컨설턴트, 트레이너 및 작가로 일합니다. 그의 최신 책은 샘스 티치 유어셀프 ASP.NET 24시간 만에 2.0입니다. 그는 에서mitchell@4GuysFromRolla.com 또는 에서 찾을 http://ScottOnWriting.NET수있는 자신의 블로그를 통해 도달 할 수 있습니다.
특별 감사
이 자습서 시리즈는 많은 유용한 검토자가 검토했습니다. 이 자습서의 수석 검토자는 테레사 머피와 버나데트 리였습니다. 예정된 MSDN 문서를 검토하는 데 관심이 있으신가요? 그렇다면 에 줄을 놓습니다 mitchell@4GuysFromRolla.com.
피드백
출시 예정: 2024년 내내 콘텐츠에 대한 피드백 메커니즘으로 GitHub 문제를 단계적으로 폐지하고 이를 새로운 피드백 시스템으로 바꿀 예정입니다. 자세한 내용은 다음을 참조하세요. https://aka.ms/ContentUserFeedback
다음에 대한 사용자 의견 제출 및 보기