Azure Stack Hub에 안전하게 저장된 인증서를 사용하여 VM 배포
이 문서에서는 Key Vault 인증서가 설치된 Azure Stack Hub VM(가상 머신)을 배포하는 방법을 설명합니다.
개요
인증서는 Active Directory 인증 또는 웹 트래픽 암호화와 같은 많은 시나리오에서 사용됩니다. 인증서를 Azure Stack Hub 키 자격 증명 모음에 비밀로 안전하게 저장할 수 있습니다. Azure Stack Hub Key Vault 사용할 경우의 이점은 다음과 같습니다.
- 인증서는 스크립트, 명령줄 기록 또는 템플릿에 노출되지 않습니다.
- 인증서 관리 프로세스가 간소화되었습니다.
- 인증서에 액세스하는 키를 제어할 수 있습니다.
프로세스 설명
다음 단계에서는 VM에 인증서를 푸시하는 데 필요한 프로세스를 설명합니다.
- 키 자격 증명 모음 비밀을 만듭니다.
- azuredeploy.parameters.json 파일을 업데이트합니다.
- 템플릿을 배포합니다.
참고
VPN을 통해 연결된 경우 ASDK(Azure Stack Development Kit) 또는 외부 클라이언트에서 이러한 단계를 사용할 수 있습니다.
사전 요구 사항
- Key Vault 서비스를 포함하는 제품을 구독해야 합니다.
- Azure Stack Hub용 PowerShell을 설치합니다.
- Azure Stack Hub 사용자의 PowerShell 환경을 구성합니다.
키 자격 증명 모음 비밀 만들기
다음 스크립트는 .pfx 형식으로 인증서를 만들고, 키 자격 증명 모음을 만들고, 인증서를 키 자격 증명 모음에 비밀로 저장합니다. contentType 비밀의 을 로 설정pfx해야 합니다.
중요
키 자격 증명 모음을 -EnabledForDeployment 만들 때 매개 변수를 사용해야 합니다. 이 매개 변수를 사용하면 Azure Resource Manager 템플릿에서 키 자격 증명 모음을 참조할 수 있습니다.
# Create a certificate in the .pfx format
New-SelfSignedCertificate `
  -certstorelocation cert:\LocalMachine\My `
  -dnsname contoso.microsoft.com

$pwd = ConvertTo-SecureString `
  -String "<Password used to export the certificate>" `
  -Force `
  -AsPlainText

Export-PfxCertificate `
  -cert "cert:\localMachine\my\<certificate thumbprint that was created in the previous step>" `
  -FilePath "<Fully qualified path to where the exported certificate can be stored>" `
  -Password $pwd

# Create a key vault and upload the certificate into the key vault as a secret
$vaultName = "contosovault"
$resourceGroup = "contosovaultrg"
$location = "local"
$secretName = "servicecert"
$fileName = "<Fully qualified path to where the exported certificate can be stored>"
$certPassword = "<Password used to export the certificate>"

$fileContentBytes = get-content $fileName `
  -Encoding Byte

$fileContentEncoded = [System.Convert]::ToBase64String($fileContentBytes)
$jsonObject = @"
{
"data": "$filecontentencoded",
"dataType" :"pfx",
"password": "$certPassword"
}
"@
$jsonObjectBytes = [System.Text.Encoding]::UTF8.GetBytes($jsonObject)
$jsonEncoded = [System.Convert]::ToBase64String($jsonObjectBytes)

New-AzResourceGroup `
  -Name $resourceGroup `
  -Location $location

New-AzKeyVault `
  -VaultName $vaultName `
  -ResourceGroupName $resourceGroup `
  -Location $location `
  -sku standard `
  -EnabledForDeployment

$secret = ConvertTo-SecureString `
  -String $jsonEncoded `
  -AsPlainText -Force

Set-AzureKeyVaultSecret `
  -VaultName $vaultName `
  -Name $secretName `
   -SecretValue $secret
이 스크립트를 실행하면 출력에 비밀 URI가 포함됩니다. Windows에 인증서 푸시 템플릿에서 참조해야 하므로 이 URI를 기록해 Resource Manager. vm-push-certificate-windows 템플릿 폴더를 개발 컴퓨터에 다운로드합니다. 이 폴더에는 다음 단계에서 필요한 azuredeploy.json 및 azuredeploy.parameters.json 파일이 포함되어 있습니다.
환경 값에 따라 azuredeploy.parameters.json 파일을 수정합니다. 중요한 매개 변수는 자격 증명 모음 이름, 자격 증명 모음 리소스 그룹 및 비밀 URI입니다(이전 스크립트에서 생성된 대로). 다음 섹션에서는 매개 변수 파일의 예를 보여줍니다.
azuredeploy.parameters.json 파일 업데이트
환경에 따라 azuredeploy.parameters.json 파일을 vaultName, 비밀 URI 및 VmName기타 매개 변수로 업데이트합니다. 다음 JSON 파일은 템플릿 매개 변수 파일의 예를 보여줍니다.
{
  "$schema": "https://schema.management.azure.com/schemas/2015-01-01/deploymentParameters.json#",
  "contentVersion": "1.0.0.0",
  "parameters": {
    "newStorageAccountName": {
      "value": "kvstorage01"
    },
    "vmName": {
      "value": "VM1"
    },
    "vmSize": {
      "value": "Standard_D1_v2"
    },
    "adminUserName": {
      "value": "demouser"
    },
    "adminPassword": {
      "value": "demouser@123"
    },
    "vaultName": {
      "value": "contosovault"
    },
    "vaultResourceGroup": {
      "value": "contosovaultrg"
    },
    "secretUrlWithVersion": {
      "value": "https://testkv001.vault.local.azurestack.external/secrets/testcert002/82afeeb84f4442329ce06593502e7840"
    }
  }
}
템플릿 배포
다음 PowerShell 스크립트를 사용하여 템플릿을 배포합니다.
# Deploy a Resource Manager template to create a VM and push the secret to it
New-AzResourceGroupDeployment `
  -Name KVDeployment `
  -ResourceGroupName $resourceGroup `
  -TemplateFile "<Fully qualified path to the azuredeploy.json file>" `
  -TemplateParameterFile "<Fully qualified path to the azuredeploy.parameters.json file>"
템플릿이 성공적으로 배포되면 다음 출력이 표시됩니다.
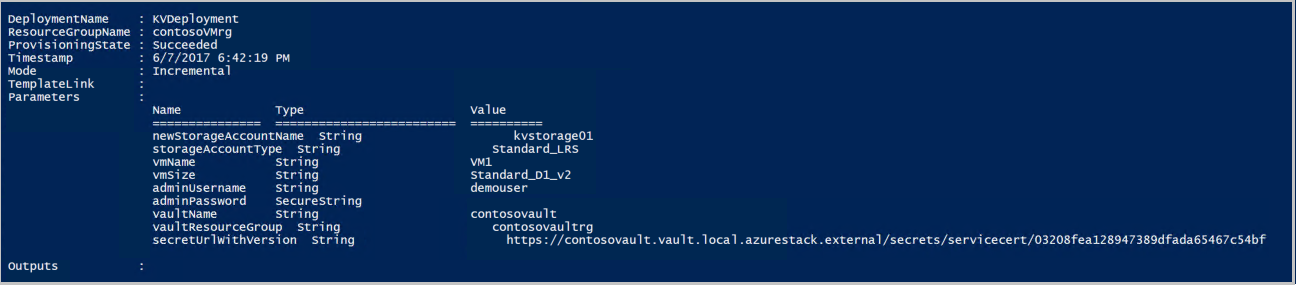
Azure Stack Hub는 배포하는 동안 VM에 인증서를 푸시합니다. 인증서 위치는 VM의 운영 체제에 따라 달라집니다.
- Windows에서 인증서는 사용자가 제공한 인증서 저장소를 사용하여 LocalMachine 인증서 위치에 추가됩니다.
- Linux에서 인증서는 /var/lib/waagent 디렉터리 아래에 배치되며, 파일 이름은 X509 인증서 파일의 경우 UppercaseThumbprint.crt 이고 프라이빗 키의 경우 UppercaseThumbprint.prv 입니다.
인증서 사용 중지
인증서 사용 중지는 인증서 관리 프로세스의 일부입니다. 이전 버전의 인증서는 삭제할 수 없지만 cmdlet을 사용하여 Set-AzureKeyVaultSecretAttribute 사용하지 않도록 설정할 수 있습니다.
다음 예제에서는 인증서를 사용하지 않도록 설정하는 방법을 보여줍니다. , Name및 Version 매개 변수에 VaultName고유한 값을 사용합니다.
Set-AzureKeyVaultSecretAttribute -VaultName contosovault -Name servicecert -Version e3391a126b65414f93f6f9806743a1f7 -Enable 0
다음 단계
피드백
출시 예정: 2024년 내내 콘텐츠에 대한 피드백 메커니즘으로 GitHub 문제를 단계적으로 폐지하고 이를 새로운 피드백 시스템으로 바꿀 예정입니다. 자세한 내용은 다음을 참조하세요. https://aka.ms/ContentUserFeedback
다음에 대한 사용자 의견 제출 및 보기