자습서: 인증 코드 흐름을 사용하여 Angular SPA(단일 페이지 애플리케이션)에서 사용자 로그인 및 Microsoft Graph API 호출
이 자습서에서는 PKCE와 함께 인증 코드 흐름을 사용하여 사용자를 로그인하고 Microsoft Graph API를 호출하는 Angular SPA(단일 페이지 애플리케이션)를 빌드합니다. 빌드된 SPA에서는 Angular v2용 MSAL(Microsoft 인증 라이브러리)을 사용합니다.
이 자습서에서:
- Microsoft Entra 관리 센터에 애플리케이션 등록
npm을 사용하여 Angular 프로젝트 만들기- 사용자 로그인 및 로그아웃을 지원하는 코드 추가
- Microsoft Graph API를 호출하는 코드 추가
- 앱 테스트
MSAL Angular v1에서 향상된 MSAL Angular v2는 브라우저에서 암시적 허용 흐름 대신 권한 부여 코드 흐름을 지원합니다. MSAL Angular v2에서는 암시적 흐름을 지원하지 않습니다.
필수 조건
- 로컬 앱 서버 실행을 위한 Node.js.
- 프로젝트 파일을 수정하기 위한 Visual Studio Code 또는 기타 편집기
샘플 앱의 작동 방식
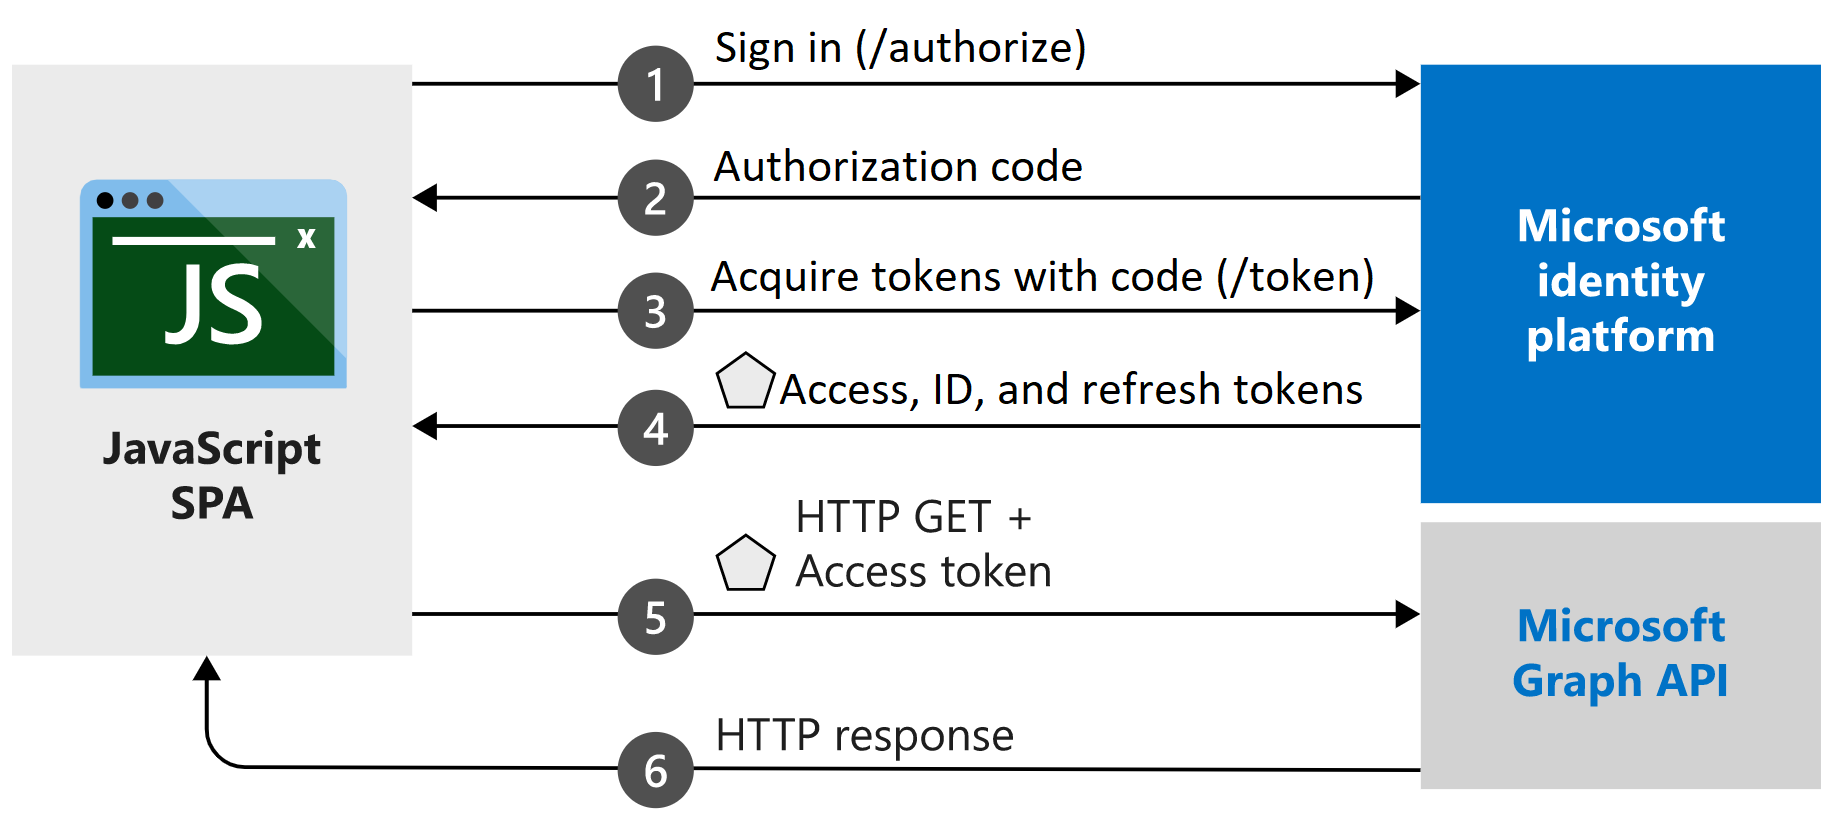
이 자습서에서 만드는 샘플 애플리케이션을 사용하면 Angular SPA에서 Microsoft ID 플랫폼에서 발급한 토큰을 수락하는 Microsoft Graph API 또는 웹 API를 쿼리할 수 있습니다. MSAL.js v2 라이브러리의 래퍼인 Angular v2용 MSAL(Microsoft 인증 라이브러리)을 사용합니다. MSAL Angular를 사용하면 Angular 9+ 애플리케이션이 Microsoft Entra ID를 사용하여 엔터프라이즈 사용자를 인증할 수 있을 뿐만 아니라 Microsoft 계정 및 Facebook, Google, LinkedIn과 같은 소셜 ID를 가진 사용자도 인증할 수 있습니다. 또한 이 라이브러리를 사용하면 애플리케이션에서 Microsoft 클라우드 서비스 및 Microsoft Graph에 액세스할 수 있습니다.
이 시나리오에서는 사용자가 로그인하면 권한 부여 헤더를 통해 액세스 토큰이 요청되고 HTTP 요청에 추가됩니다. 토큰 획득 및 갱신은 MSAL에서 처리합니다.
라이브러리
이 자습서에서는 다음 라이브러리를 사용합니다.
| 라이브러리 | 설명 |
|---|---|
| MSAL Angular | JavaScript Angular 래퍼용 Microsoft 인증 라이브러리 |
| MSAL Browser | JavaScript v2 브라우저 패키지용 Microsoft 인증 라이브러리 |
GitHub의 microsoft-authentication-library-for-js 리포지토리에서 모든 MSAL.js 라이브러리의 소스 코드를 찾을 수 있습니다.
완성된 코드 샘플 가져오기
대신 이 자습서의 완료된 샘플 프로젝트를 다운로드하려고 하나요? ms-identity-javascript-angular-spa를 복제합니다.
git clone https://github.com/Azure-Samples/ms-identity-javascript-angular-spa.git
자습서를 계속 진행하고 애플리케이션을 직접 빌드하려면 다음 섹션인 애플리케이션 및 레코드 식별자 등록으로 이동합니다.
애플리케이션 및 레코드 식별자를 등록합니다.
팁
이 문서의 단계는 시작하는 포털에 따라 약간 다를 수 있습니다.
등록을 완료하려면 애플리케이션에 이름을 제공하고, 지원되는 계정 유형을 지정하고, 리디렉션 URI를 추가합니다. 등록되면 애플리케이션 개요 창에 애플리케이션 소스 코드에 필요한 식별자가 표시됩니다.
- 최소한 애플리케이션 개발자 자격으로 Microsoft Entra 관리 센터에 로그인합니다.
- 여러 테넌트에 액세스할 수 있는 경우 위쪽 메뉴의 설정 아이콘
 을 사용하여 디렉터리 + 구독 메뉴에서 애플리케이션을 등록하려는 테넌트로 전환합니다.
 - ID>애플리케이션>앱 등록으로 이동합니다.
- 새 등록을 선택합니다.
- Angular-SPA-auth-code와 같은 애플리케이션의 이름을 입력합니다.
- 지원되는 계정 유형의 경우 이 조직 디렉터리 계정의 계정만을 선택합니다. 다양한 계정 유형에 대한 정보를 보려면 선택 도움말 옵션을 선택합니다.
- 리디렉션 URI(선택 사항)에서 드롭다운 메뉴를 사용하여 SPA(단일 페이지 애플리케이션)를 선택하고 텍스트 상자에
http://localhost:4200을 입력합니다. - 등록을 선택합니다.
- 등록이 완료되면 애플리케이션의 개요 창이 표시됩니다. 애플리케이션 소스 코드에 사용할 디렉터리(테넌트) ID와 애플리케이션(클라이언트) ID를 기록해 둡니다.
프로젝트 만들기
Visual Studio Code를 열고 파일>폴더 열기...를 선택합니다. 프로젝트를 만들 위치로 이동하여 선택합니다.
터미널 >새 터미널을 선택하여 새 터미널을 엽니다.
- 터미널 형식을 전환해야 할 수도 있습니다. 터미널에서 + 아이콘 옆에 있는 아래쪽 화살표를 선택하고 명령 프롬프트를 선택합니다.
다음 명령을 실행하여 이름이
msal-angular-tutorial인 새 Angular 프로젝트를 만들고 Angular Material 구성 요소 라이브러리, MSAL 브라우저, MSAL Angular를 설치하고 홈 및 프로필 구성 요소를 만듭니다.npm install -g @angular/cli ng new msal-angular-tutorial --routing=true --style=css --strict=false cd msal-angular-tutorial npm install @angular/material @angular/cdk npm install @azure/msal-browser @azure/msal-angular ng generate component home ng generate component profile
애플리케이션 구성 및 기본 UI 편집
src/app/app.module.ts를 엽니다.
MsalModule및MsalInterceptor는isIE상수와 함께imports에 추가되어야 합니다. 재질 모듈도 추가합니다. 파일의 전체 콘텐츠를 다음 코드 조각으로 바꿉니다.import { BrowserModule } from "@angular/platform-browser"; import { BrowserAnimationsModule } from "@angular/platform-browser/animations"; import { NgModule } from "@angular/core"; import { MatButtonModule } from "@angular/material/button"; import { MatToolbarModule } from "@angular/material/toolbar"; import { MatListModule } from "@angular/material/list"; import { AppRoutingModule } from "./app-routing.module"; import { AppComponent } from "./app.component"; import { HomeComponent } from "./home/home.component"; import { ProfileComponent } from "./profile/profile.component"; import { MsalModule, MsalRedirectComponent } from "@azure/msal-angular"; import { PublicClientApplication } from "@azure/msal-browser"; const isIE = window.navigator.userAgent.indexOf("MSIE ") > -1 || window.navigator.userAgent.indexOf("Trident/") > -1; @NgModule({ declarations: [AppComponent, HomeComponent, ProfileComponent], imports: [ BrowserModule, BrowserAnimationsModule, AppRoutingModule, MatButtonModule, MatToolbarModule, MatListModule, MsalModule.forRoot( new PublicClientApplication({ auth: { clientId: "Enter_the_Application_Id_here", // Application (client) ID from the app registration authority: "Enter_the_Cloud_Instance_Id_Here/Enter_the_Tenant_Info_Here", // The Azure cloud instance and the app's sign-in audience (tenant ID, common, organizations, or consumers) redirectUri: "Enter_the_Redirect_Uri_Here", // This is your redirect URI }, cache: { cacheLocation: "localStorage", storeAuthStateInCookie: isIE, // Set to true for Internet Explorer 11 }, }), null, null ), ], providers: [], bootstrap: [AppComponent, MsalRedirectComponent], }) export class AppModule {}다음 값을 Microsoft Entra 관리 센터에서 가져오는 값으로 바꿉니다. 사용할 수 있는 구성 가능한 옵션에 대한 자세한 내용은 클라이언트 애플리케이션 초기화를 참조하세요.
clientId- 클라이언트라고도 하는 애플리케이션의 식별자입니다.Enter_the_Application_Id_Here를 등록된 애플리케이션의 개요 페이지에서 앞서 기록한 애플리케이션(클라이언트) ID 값으로 바꿉니다.authority- 이 작업은 다음 두 부분으로 구성됩니다.- 인스턴스는 클라우드 공급자의 엔드포인트입니다. 기본 또는 글로벌 Azure 클라우드의 경우
https://login.microsoftonline.com을 입력합니다. 국가별 클라우드에서 사용 가능한 다양한 엔드포인트를 확인합니다. - 테넌트 ID는 애플리케이션이 등록된 테넌트 식별자입니다.
_Enter_the_Tenant_Info_Here를 등록된 애플리케이션의 개요 페이지에서 이전에 기록된 디렉터리(테넌트) ID 값으로 바꿉니다.
- 인스턴스는 클라우드 공급자의 엔드포인트입니다. 기본 또는 글로벌 Azure 클라우드의 경우
redirectUri- 앱이 성공적으로 권한 부여되고 인증 코드 또는 액세스 토큰이 부여되면 권한 부여 서버가 사용자에게 보내는 위치입니다.Enter_the_Redirect_Uri_Here를http://localhost:4200로 교체합니다.
src/app/app-routing.module.ts를 열고 홈 및 프로필 구성 요소에 경로를 추가합니다. 파일의 전체 콘텐츠를 다음 코드 조각으로 바꿉니다.
import { NgModule } from "@angular/core"; import { Routes, RouterModule } from "@angular/router"; import { BrowserUtils } from "@azure/msal-browser"; import { HomeComponent } from "./home/home.component"; import { ProfileComponent } from "./profile/profile.component"; const routes: Routes = [ { path: "profile", component: ProfileComponent, }, { path: "", component: HomeComponent, }, ]; const isIframe = window !== window.parent && !window.opener; @NgModule({ imports: [ RouterModule.forRoot(routes, { // Don't perform initial navigation in iframes or popups initialNavigation: !BrowserUtils.isInIframe() && !BrowserUtils.isInPopup() ? "enabledNonBlocking" : "disabled", // Set to enabledBlocking to use Angular Universal }), ], exports: [RouterModule], }) export class AppRoutingModule {}src/app/app.comComponent.html을 열고 기존 코드를 다음으로 바꿉니다.
<mat-toolbar color="primary">
  <a class="title" href="/">{{ title }}</a>

  <div class="toolbar-spacer"></div>

  <a mat-button [routerLink]="['profile']">Profile</a>

  <button mat-raised-button *ngIf="!loginDisplay" (click)="login()">Login</button>

</mat-toolbar>
<div class="container">
  <!--This is to avoid reload during acquireTokenSilent() because of hidden iframe -->
  <router-outlet *ngIf="!isIframe"></router-outlet>
</div>
CSS를 정의하려면 src/style.css를 엽니다.
@import "~@angular/material/prebuilt-themes/deeppurple-amber.css";

html,
body {
  height: 100%;
}
body {
  margin: 0;
  font-family: Roboto, "Helvetica Neue", sans-serif;
}
.container {
  margin: 1%;
}
애플리케이션에 CSS 스타일을 추가하려면 src/app/app.comComponent.css를 엽니다.
.toolbar-spacer {
  flex: 1 1 auto;
}

a.title {
  color: white;
}
팝업을 사용하여 로그인
팝업 창을 사용하여 사용자를 로그인하려면 src/app/app.comComponent.ts를 열고 파일 콘텐츠를 다음으로 바꿉니다.
import { MsalService } from '@azure/msal-angular';
import { Component, OnInit } from '@angular/core';

@Component({
  selector: 'app-root',
  templateUrl: './app.component.html',
  styleUrls: ['./app.component.css']
})
export class AppComponent implements OnInit {
  title = 'msal-angular-tutorial';
  isIframe = false;
  loginDisplay = false;

  constructor(private authService: MsalService) { }

  ngOnInit() {
    this.isIframe = window !== window.parent && !window.opener;
  }

  login() {
    this.authService.loginPopup()
      .subscribe({
        next: (result) => {
          console.log(result);
          this.setLoginDisplay();
        },
        error: (error) => console.log(error)
      });
  }

  setLoginDisplay() {
    this.loginDisplay = this.authService.instance.getAllAccounts().length > 0;
  }
}
리디렉션을 사용하여 로그인
src/app/app.module.ts를 업데이트하여
MsalRedirectComponent를 부트스트랩합니다. 이는 리디렉션을 처리하는 전용 리디렉션 구성 요소입니다.MsalModule가져오기 및AppComponent부트스트랩을 다음과 유사하게 변경합니다.... import { MsalModule, MsalRedirectComponent } from '@azure/msal-angular'; // Updated import ... bootstrap: [AppComponent, MsalRedirectComponent] // MsalRedirectComponent bootstrapped here ...src/index.html을 열고 파일의 전체 콘텐츠를
<app-redirect>선택기를 추가하는 다음 코드 조각으로 바꿉니다.<!doctype html> <html lang="en"> <head> <meta charset="utf-8"> <title>msal-angular-tutorial</title> <base href="/"> <meta name="viewport" content="width=device-width, initial-scale=1"> <link rel="icon" type="image/x-icon" href="favicon.ico"> </head> <body> <app-root></app-root> <app-redirect></app-redirect> </body> </html>전체 프레임 리디렉션을 사용하여 사용자를 로그인하려면 src/app/app.comComponent.ts를 열고 코드를 다음으로 바꿉니다.
import { MsalService } from '@azure/msal-angular'; import { Component, OnInit } from '@angular/core'; @Component({ selector: 'app-root', templateUrl: './app.component.html', styleUrls: ['./app.component.css'] }) export class AppComponent implements OnInit { title = 'msal-angular-tutorial'; isIframe = false; loginDisplay = false; constructor(private authService: MsalService) { } ngOnInit() { this.isIframe = window !== window.parent && !window.opener; } login() { this.authService.loginRedirect(); } setLoginDisplay() { this.loginDisplay = this.authService.instance.getAllAccounts().length > 0; } }src/app/home/home.comComponent.ts로 이동하여 파일의 전체 콘텐츠를 다음 코드 조각으로 바꿔
LOGIN_SUCCESS이벤트를 구독합니다.import { Component, OnInit } from '@angular/core'; import { MsalBroadcastService, MsalService } from '@azure/msal-angular'; import { EventMessage, EventType, InteractionStatus } from '@azure/msal-browser'; import { filter } from 'rxjs/operators'; @Component({ selector: 'app-home', templateUrl: './home.component.html', styleUrls: ['./home.component.css'] }) export class HomeComponent implements OnInit { constructor(private authService: MsalService, private msalBroadcastService: MsalBroadcastService) { } ngOnInit(): void { this.msalBroadcastService.msalSubject$ .pipe( filter((msg: EventMessage) => msg.eventType === EventType.LOGIN_SUCCESS), ) .subscribe((result: EventMessage) => { console.log(result); }); } }
조건부 렌더링
인증된 사용자에 대해서만 특정 UI(사용자 인터페이스)를 렌더링하려면 구성 요소가 MsalBroadcastService를 구독하여 사용자가 로그인했는지, 상호 작용이 완료되었는지 확인해야 합니다.
MsalBroadcastService를 src/app/app.component.ts에 추가하고 식별 가능한inProgress$를 구독하여 UI를 렌더링하기 전에 상호 작용이 완료되고 계정이 로그인되었는지 확인합니다. 이제 코드가 다음과 비슷할 것입니다.import { Component, OnInit, OnDestroy } from '@angular/core'; import { MsalService, MsalBroadcastService } from '@azure/msal-angular'; import { InteractionStatus } from '@azure/msal-browser'; import { Subject } from 'rxjs'; import { filter, takeUntil } from 'rxjs/operators'; @Component({ selector: 'app-root', templateUrl: './app.component.html', styleUrls: ['./app.component.css'] }) export class AppComponent implements OnInit, OnDestroy { title = 'msal-angular-tutorial'; isIframe = false; loginDisplay = false; private readonly _destroying$ = new Subject<void>(); constructor(private broadcastService: MsalBroadcastService, private authService: MsalService) { } ngOnInit() { this.isIframe = window !== window.parent && !window.opener; this.broadcastService.inProgress$ .pipe( filter((status: InteractionStatus) => status === InteractionStatus.None), takeUntil(this._destroying$) ) .subscribe(() => { this.setLoginDisplay(); }) } login() { this.authService.loginRedirect(); } setLoginDisplay() { this.loginDisplay = this.authService.instance.getAllAccounts().length > 0; } ngOnDestroy(): void { this._destroying$.next(undefined); this._destroying$.complete(); } }또한 src/app/home/home.component.ts에서 코드를 업데이트하여 UI를 업데이트하기 전에 완료할 상호 작용을 확인합니다. 이제 코드가 다음과 비슷할 것입니다.
import { Component, OnInit } from '@angular/core'; import { MsalBroadcastService, MsalService } from '@azure/msal-angular'; import { EventMessage, EventType, InteractionStatus } from '@azure/msal-browser'; import { filter } from 'rxjs/operators'; @Component({ selector: 'app-home', templateUrl: './home.component.html', styleUrls: ['./home.component.css'] }) export class HomeComponent implements OnInit { loginDisplay = false; constructor(private authService: MsalService, private msalBroadcastService: MsalBroadcastService) { } ngOnInit(): void { this.msalBroadcastService.msalSubject$ .pipe( filter((msg: EventMessage) => msg.eventType === EventType.LOGIN_SUCCESS), ) .subscribe((result: EventMessage) => { console.log(result); }); this.msalBroadcastService.inProgress$ .pipe( filter((status: InteractionStatus) => status === InteractionStatus.None) ) .subscribe(() => { this.setLoginDisplay(); }) } setLoginDisplay() { this.loginDisplay = this.authService.instance.getAllAccounts().length > 0; } }src/app/home/home.component.html에서 코드를 다음 조건부 표시로 바꿉니다.
<div *ngIf="!loginDisplay">
    <p>Please sign-in to see your profile information.</p>
</div>

<div *ngIf="loginDisplay">
    <p>Login successful!</p>
    <p>Request your profile information by clicking Profile above.</p>
</div>
Angular Guard 구현
MsalGuard 클래스는 경로를 보호하고 보호된 경로에 액세스하기 전에 인증을 요구하는 데 사용할 수 있는 클래스입니다. 다음 단계에서는 MsalGuard를 Profile 경로에 추가합니다. Profile 경로를 보호하면 사용자가 Login 단추를 사용하여 로그인하지 않더라도 Profile 경로에 액세스하거나 Profile 단추를 선택하려고 하는 경우 MsalGuard가 Profile 페이지를 표시하기 전에 팝업 또는 리디렉션을 통해 사용자에게 인증하라는 메시지가 표시됩니다.
MsalGuard는 사용자 환경을 향상시키는 데 사용할 수 있는 편리한 클래스이지만 보안에 사용해서는 안 됩니다. 공격자는 잠재적으로 클라이언트 쪽 가드를 돌아다닐 수 있으므로 서버에서 사용자가 액세스해서는 안 되는 데이터를 반환하지 않는지 확인해야 합니다.
MsalGuard클래스를 src/app/app.module.ts의 애플리케이션에 있는 공급자로 추가하고MsalGuard의 구성을 추가합니다. 나중에 토큰을 획득하는 데 필요한 범위를authRequest에서 제공할 수 있으며 Guard의 상호 작용 형식을Redirect또는Popup으로 설정할 수 있습니다. 코드는 다음과 같습니다.import { BrowserModule } from "@angular/platform-browser"; import { BrowserAnimationsModule } from "@angular/platform-browser/animations"; import { NgModule } from "@angular/core"; import { MatButtonModule } from "@angular/material/button"; import { MatToolbarModule } from "@angular/material/toolbar"; import { MatListModule } from "@angular/material/list"; import { AppRoutingModule } from "./app-routing.module"; import { AppComponent } from "./app.component"; import { HomeComponent } from "./home/home.component"; import { ProfileComponent } from "./profile/profile.component"; import { MsalModule, MsalRedirectComponent, MsalGuard, } from "@azure/msal-angular"; // MsalGuard added to imports import { PublicClientApplication, InteractionType, } from "@azure/msal-browser"; // InteractionType added to imports const isIE = window.navigator.userAgent.indexOf("MSIE ") > -1 || window.navigator.userAgent.indexOf("Trident/") > -1; @NgModule({ declarations: [AppComponent, HomeComponent, ProfileComponent], imports: [ BrowserModule, BrowserAnimationsModule, AppRoutingModule, MatButtonModule, MatToolbarModule, MatListModule, MsalModule.forRoot( new PublicClientApplication({ auth: { clientId: "Enter_the_Application_Id_here", authority: "Enter_the_Cloud_Instance_Id_Here/Enter_the_Tenant_Info_Here", redirectUri: "Enter_the_Redirect_Uri_Here", }, cache: { cacheLocation: "localStorage", storeAuthStateInCookie: isIE, }, }), { interactionType: InteractionType.Redirect, // MSAL Guard Configuration authRequest: { scopes: ["user.read"], }, }, null ), ], providers: [ MsalGuard, // MsalGuard added as provider here ], bootstrap: [AppComponent, MsalRedirectComponent], }) export class AppModule {}src/app/app-routing.module.ts에서 보호하려는 경로에
MsalGuard를 설정합니다.import { NgModule } from "@angular/core"; import { Routes, RouterModule } from "@angular/router"; import { BrowserUtils } from "@azure/msal-browser"; import { HomeComponent } from "./home/home.component"; import { ProfileComponent } from "./profile/profile.component"; import { MsalGuard } from "@azure/msal-angular"; const routes: Routes = [ { path: "profile", component: ProfileComponent, canActivate: [MsalGuard], }, { path: "", component: HomeComponent, }, ]; const isIframe = window !== window.parent && !window.opener; @NgModule({ imports: [ RouterModule.forRoot(routes, { // Don't perform initial navigation in iframes or popups initialNavigation: !BrowserUtils.isInIframe() && !BrowserUtils.isInPopup() ? "enabledNonBlocking" : "disabled", // Set to enabledBlocking to use Angular Universal }), ], exports: [RouterModule], }) export class AppRoutingModule {}src/app/app.component.ts에서 로그인 호출을 조정하여 가드 구성에 있는
authRequest세트를 고려합니다. 지금 코드는 다음과 같습니다.import { Component, OnInit, OnDestroy, Inject } from '@angular/core'; import { MsalService, MsalBroadcastService, MSAL_GUARD_CONFIG, MsalGuardConfiguration } from '@azure/msal-angular'; import { InteractionStatus, RedirectRequest } from '@azure/msal-browser'; import { Subject } from 'rxjs'; import { filter, takeUntil } from 'rxjs/operators'; @Component({ selector: 'app-root', templateUrl: './app.component.html', styleUrls: ['./app.component.css'] }) export class AppComponent implements OnInit, OnDestroy { title = 'msal-angular-tutorial'; isIframe = false; loginDisplay = false; private readonly _destroying$ = new Subject<void>(); constructor(@Inject(MSAL_GUARD_CONFIG) private msalGuardConfig: MsalGuardConfiguration, private broadcastService: MsalBroadcastService, private authService: MsalService) { } ngOnInit() { this.isIframe = window !== window.parent && !window.opener; this.broadcastService.inProgress$ .pipe( filter((status: InteractionStatus) => status === InteractionStatus.None), takeUntil(this._destroying$) ) .subscribe(() => { this.setLoginDisplay(); }) } login() { if (this.msalGuardConfig.authRequest){ this.authService.loginRedirect({...this.msalGuardConfig.authRequest} as RedirectRequest); } else { this.authService.loginRedirect(); } } setLoginDisplay() { this.loginDisplay = this.authService.instance.getAllAccounts().length > 0; } ngOnDestroy(): void { this._destroying$.next(undefined); this._destroying$.complete(); } }
토큰 획득
Angular 인터셉터
MSAL Angular는 알려진 보호된 리소스에 Angular http 클라이언트를 사용하는 발신 요청에 대한 토큰을 자동으로 획득하는 Interceptor 클래스를 제공합니다.
Interceptor클래스를 구성과 함께 src/app/app.module.ts의 애플리케이션에 대한 공급자로 추가합니다. 지금 코드는 다음과 같습니다.import { BrowserModule } from "@angular/platform-browser"; import { BrowserAnimationsModule } from "@angular/platform-browser/animations"; import { NgModule } from "@angular/core"; import { HTTP_INTERCEPTORS, HttpClientModule } from "@angular/common/http"; // Import import { MatButtonModule } from "@angular/material/button"; import { MatToolbarModule } from "@angular/material/toolbar"; import { MatListModule } from "@angular/material/list"; import { AppRoutingModule } from "./app-routing.module"; import { AppComponent } from "./app.component"; import { HomeComponent } from "./home/home.component"; import { ProfileComponent } from "./profile/profile.component"; import { MsalModule, MsalRedirectComponent, MsalGuard, MsalInterceptor, } from "@azure/msal-angular"; // Import MsalInterceptor import { InteractionType, PublicClientApplication, } from "@azure/msal-browser"; const isIE = window.navigator.userAgent.indexOf("MSIE ") > -1 || window.navigator.userAgent.indexOf("Trident/") > -1; @NgModule({ declarations: [AppComponent, HomeComponent, ProfileComponent], imports: [ BrowserModule, BrowserAnimationsModule, AppRoutingModule, MatButtonModule, MatToolbarModule, MatListModule, HttpClientModule, MsalModule.forRoot( new PublicClientApplication({ auth: { clientId: "Enter_the_Application_Id_Here", authority: "Enter_the_Cloud_Instance_Id_Here/Enter_the_Tenant_Info_Here", redirectUri: "Enter_the_Redirect_Uri_Here", }, cache: { cacheLocation: "localStorage", storeAuthStateInCookie: isIE, }, }), { interactionType: InteractionType.Redirect, authRequest: { scopes: ["user.read"], }, }, { interactionType: InteractionType.Redirect, // MSAL Interceptor Configuration protectedResourceMap: new Map([ ["Enter_the_Graph_Endpoint_Here/v1.0/me", ["user.read"]], ]), } ), ], providers: [ { provide: HTTP_INTERCEPTORS, useClass: MsalInterceptor, multi: true, }, MsalGuard, ], bootstrap: [AppComponent, MsalRedirectComponent], }) export class AppModule {}보호된 리소스는
protectedResourceMap으로 제공됩니다.protectedResourceMap컬렉션에서 제공하는 URL은 대/소문자를 구분합니다. 리소스마다 액세스 토큰에서 반환되도록 요청되는 범위를 추가합니다.예시:
- Microsoft Graph의
["user.read"] - 사용자 지정 웹 API의
["<Application ID URL>/scope"](즉,api://<Application ID>/access_as_user)
다음 설명대로
protectedResourceMap에서 값을 수정합니다.Enter_the_Graph_Endpoint_Here는 애플리케이션과 통신해야 하는 Microsoft Graph API의 인스턴스입니다. 전역 Microsoft Graph API 엔드포인트의 경우 이 문자열을https://graph.microsoft.com으로 바꿉니다. 국가별 클라우드 배포의 엔드포인트는 Microsoft Graph 설명서의 국가별 클라우드 배포를 참조하세요.
- Microsoft Graph의
HTTP 요청으로 사용자 프로필을 검색하려면 src/app/profile/profile.comComponent.ts의 코드를 바꾸고,
GRAPH_ENDPOINT를 Microsoft Graph 엔드포인트로 바꿉니다.import { Component, OnInit } from '@angular/core'; import { HttpClient } from '@angular/common/http'; const GRAPH_ENDPOINT = 'Enter_the_Graph_Endpoint_Here/v1.0/me'; type ProfileType = { givenName?: string, surname?: string, userPrincipalName?: string, id?: string }; @Component({ selector: 'app-profile', templateUrl: './profile.component.html', styleUrls: ['./profile.component.css'] }) export class ProfileComponent implements OnInit { profile!: ProfileType; constructor( private http: HttpClient ) { } ngOnInit() { this.getProfile(); } getProfile() { this.http.get(GRAPH_ENDPOINT) .subscribe(profile => { this.profile = profile; }); } }src/app/profile/profile.component.html에서 UI를 바꿔 프로필 정보를 표시합니다.
<div>
    <p><strong>First Name: </strong> {{profile?.givenName}}</p>
    <p><strong>Last Name: </strong> {{profile?.surname}}</p>
    <p><strong>Email: </strong> {{profile?.userPrincipalName}}</p>
    <p><strong>Id: </strong> {{profile?.id}}</p>
</div>
로그아웃
src/app/app.component.html에서 코드를 업데이트하여
Logout단추를 조건부로 표시합니다.<mat-toolbar color="primary"> <a class="title" href="/">{{ title }}</a> <div class="toolbar-spacer"></div> <a mat-button [routerLink]="['profile']">Profile</a> <button mat-raised-button *ngIf="!loginDisplay" (click)="login()">Login</button> <button mat-raised-button *ngIf="loginDisplay" (click)="logout()">Logout</button> </mat-toolbar> <div class="container"> <!--This is to avoid reload during acquireTokenSilent() because of hidden iframe --> <router-outlet *ngIf="!isIframe"></router-outlet> </div>
리디렉션을 사용하여 로그아웃
src/app/app.component.ts에서 코드를 업데이트하여 리디렉션을 사용해 사용자를 로그아웃합니다.
import { Component, OnInit, OnDestroy, Inject } from '@angular/core';
import { MsalService, MsalBroadcastService, MSAL_GUARD_CONFIG, MsalGuardConfiguration } from '@azure/msal-angular';
import { InteractionStatus, RedirectRequest } from '@azure/msal-browser';
import { Subject } from 'rxjs';
import { filter, takeUntil } from 'rxjs/operators';

@Component({
  selector: 'app-root',
  templateUrl: './app.component.html',
  styleUrls: ['./app.component.css']
})
export class AppComponent implements OnInit, OnDestroy {
  title = 'msal-angular-tutorial';
  isIframe = false;
  loginDisplay = false;
  private readonly _destroying$ = new Subject<void>();

  constructor(@Inject(MSAL_GUARD_CONFIG) private msalGuardConfig: MsalGuardConfiguration, private broadcastService: MsalBroadcastService, private authService: MsalService) { }

  ngOnInit() {
    this.isIframe = window !== window.parent && !window.opener;

    this.broadcastService.inProgress$
    .pipe(
      filter((status: InteractionStatus) => status === InteractionStatus.None),
      takeUntil(this._destroying$)
    )
    .subscribe(() => {
      this.setLoginDisplay();
    })
  }

  login() {
    if (this.msalGuardConfig.authRequest){
      this.authService.loginRedirect({...this.msalGuardConfig.authRequest} as RedirectRequest);
    } else {
      this.authService.loginRedirect();
    }
  }

  logout() { // Add log out function here
    this.authService.logoutRedirect({
      postLogoutRedirectUri: 'http://localhost:4200'
    });
  }

  setLoginDisplay() {
    this.loginDisplay = this.authService.instance.getAllAccounts().length > 0;
  }

  ngOnDestroy(): void {
    this._destroying$.next(undefined);
    this._destroying$.complete();
  }
}
팝업을 사용하여 로그아웃
src/app/app.component.ts에서 코드를 업데이트하여 팝업을 사용해 사용자를 로그아웃합니다.
import { Component, OnInit, OnDestroy, Inject } from '@angular/core';
import { MsalService, MsalBroadcastService, MSAL_GUARD_CONFIG, MsalGuardConfiguration } from '@azure/msal-angular';
import { InteractionStatus, PopupRequest } from '@azure/msal-browser';
import { Subject } from 'rxjs';
import { filter, takeUntil } from 'rxjs/operators';

@Component({
  selector: 'app-root',
  templateUrl: './app.component.html',
  styleUrls: ['./app.component.css']
})
export class AppComponent implements OnInit, OnDestroy {
  title = 'msal-angular-tutorial';
  isIframe = false;
  loginDisplay = false;
  private readonly _destroying$ = new Subject<void>();

  constructor(@Inject(MSAL_GUARD_CONFIG) private msalGuardConfig: MsalGuardConfiguration, private broadcastService: MsalBroadcastService, private authService: MsalService) { }

  ngOnInit() {
    this.isIframe = window !== window.parent && !window.opener;

    this.broadcastService.inProgress$
    .pipe(
      filter((status: InteractionStatus) => status === InteractionStatus.None),
      takeUntil(this._destroying$)
    )
    .subscribe(() => {
      this.setLoginDisplay();
    })
  }

  login() {
    if (this.msalGuardConfig.authRequest){
      this.authService.loginPopup({...this.msalGuardConfig.authRequest} as PopupRequest)
        .subscribe({
          next: (result) => {
            console.log(result);
            this.setLoginDisplay();
          },
          error: (error) => console.log(error)
        });
    } else {
      this.authService.loginPopup()
        .subscribe({
          next: (result) => {
            console.log(result);
            this.setLoginDisplay();
          },
          error: (error) => console.log(error)
        });
    }
  }

  logout() { // Add log out function here
    this.authService.logoutPopup({
      mainWindowRedirectUri: "/"
    });
  }

  setLoginDisplay() {
    this.loginDisplay = this.authService.instance.getAllAccounts().length > 0;
  }

  ngOnDestroy(): void {
    this._destroying$.next(undefined);
    this._destroying$.complete();
  }
}
코드 테스트
애플리케이션 폴더의 명령줄 프롬프트에서 다음 명령을 실행하여 포트를 수신 대기하도록 웹 서버를 시작합니다.
npm install
npm start
브라우저에
http://localhost:4200을 입력하면 다음과 같은 페이지가 표시됩니다.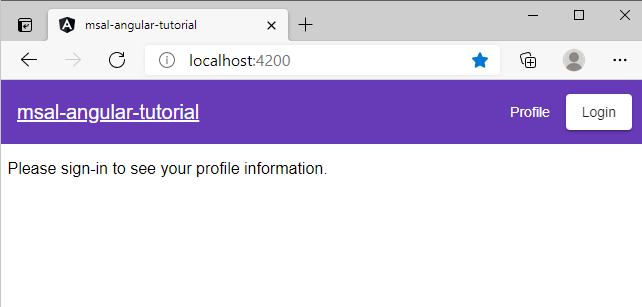
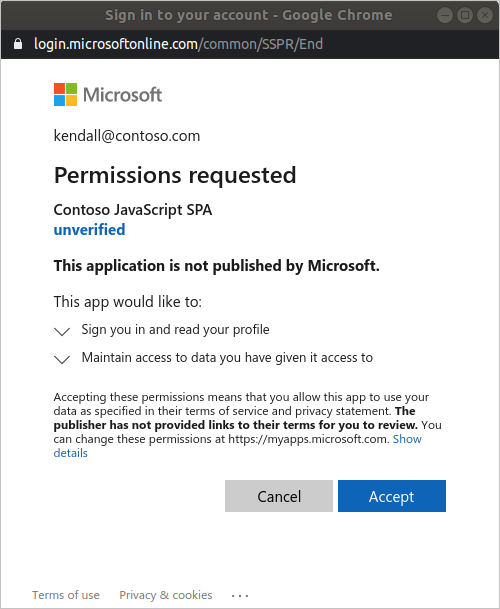
프로필에 앱 권한을 부여하려면 수락을 선택합니다. 이는 처음 로그인을 시작할 때 발생합니다.
동의 후, 요청된 권한에 동의하면 웹 애플리케이션에 로그인 성공 페이지가 표시됩니다.

Microsoft Graph API 호출의 응답으로 반환된 사용자 프로필 정보를 보려면 프로필을 선택합니다.

범위 및 위임된 권한 추가
Microsoft Graph API에서 사용자 프로필을 읽으려면 User.Read 범위가 필요합니다. User.Read 범위는 모든 앱 등록에 자동으로 추가됩니다. Microsoft Graph용 기타 API와 백 엔드 서버용 사용자 지정 API에는 다른 범위가 필요할 수 있습니다. 예를 들어 Microsoft Graph API에는 사용자의 이메일을 나열하기 위해 Mail.Read 범위가 필요합니다.
범위를 추가하면 추가된 범위에 대해 추가 동의를 제공하라는 메시지가 사용자에게 표시될 수 있습니다.
참고 항목
범위 수를 늘리면 사용자에게 추가 동의를 요청하는 메시지가 표시될 수 있습니다.
도움말 및 지원
도움이 필요하거나, 문제를 보고하거나, 지원 옵션에 대해 알아보려면 개발자를 위한 도움말 및 지원을 참조하세요.