Azure Automation에서 인증서 관리
Azure Automation은 Azure Resource Manager 리소스에 Get-AzAutomationCertificate cmdlet을 사용하여 Runbook 및 DSC 구성에 의한 액세스를 위해 인증서를 안전하게 저장합니다. 보안 인증서 스토리지를 사용하여 인증을 위해 인증서를 사용하는 Runbook 및 DSC 구성을 만들거나 Azure 또는 타사 리소스에 추가할 수 있습니다.
참고 항목
Azure Automation의 보안 자산으로는 자격 증명, 인증서, 연결, 암호화된 변수가 있습니다. 이러한 자산은 각 Automation 계정에 대해 생성된 고유 키를 사용하여 암호화되고 Automation에 저장됩니다. Automation은 시스템 관리형 Key Vault 서비스에 키를 저장합니다. 보안 자산을 저장하기 전에 Automation은 Key Vault에서 키를 로드한 다음 이를 사용하여 자산을 암호화합니다.
인증서에 액세스하는 PowerShell cmdlet
다음 표의 cmdlet은 PowerShell을 사용하여 Automation 인증서를 만들고 관리합니다. Az 모듈의 일부로 제공됩니다.
| cmdlet | 설명 |
|---|---|
| Get-AzAutomationCertificate | Runbook 또는 DSC 구성에서 사용할 인증서에 대한 정보를 검색합니다. 내부 Get-AutomationCertificate cmdlet을 사용해야 인증서 자체를 검색할 수 있습니다. |
| New-AzAutomationCertificate | Automation에서 새 인증서를 만듭니다. |
| Remove-AzAutomationCertificate | Automation에서 인증서를 제거합니다. |
| Set-AzAutomationCertificate | 인증서 파일 업로드 및 .pfx 파일의 암호 설정을 포함하여 기존 인증서의 속성을 설정합니다. |
Add-AzureCertificate cmdlet을 사용하여 지정된 클라우드 서비스에 대한 서비스 인증서를 업로드할 수도 있습니다.
인증서에 액세스하는 내부 cmdlet
다음 표의 내부 cmdlet은 Runbook의 인증서에 액세스하는 데 사용됩니다. 이 cmdlet은 전역 모듈 Orchestrator.AssetManagement.Cmdlets과 함께 제공됩니다. 자세한 내용은 내부 cmdlet을 참조하세요.
| 내부 cmdlet | 설명 |
|---|---|
Get-AutomationCertificate |
Runbook 또는 DSC 구성에 사용할 인증서를 가져옵니다. System.Security.Cryptography.X509Certificates.X509Certificate2 개체를 반환합니다. |
참고 항목
Runbook 또는 DSC 구성의 Get-AutomationCertificate 매개 변수에서 변수 Name 를 사용하지 않아야 합니다. 이러한 변수는 디자인 타임에 Runbook 또는 DSC 구성과 Automation 변수 간의 종속성 검색을 복잡하게 만들 수 있습니다.
인증서에 액세스하는 Python 함수
다음 테이블의 함수를 사용하여 Python 2 및 3 Runbook의 인증서에 액세스합니다. Python 3 Runbook은 현재 미리 보기로 제공됩니다.
| 함수 | 설명 |
|---|---|
automationassets.get_automation_certificate |
인증서 자산에 대한 정보를 검색합니다. |
참고 항목
자산 함수에 automationassets 액세스하려면 Python Runbook의 시작 부분에 모듈을 가져와야 합니다.
새 인증서 만들기
새 인증서를 만들 때 .cer 또는 .pfx 파일을 Automation에 업로드합니다. 인증서를 내보내기 가능한 것으로 표시한 경우 Automation 인증서 저장소 외부로 전송할 수 있습니다. 내보낼 수 없는 경우, Runbook 또는 DSC 구성 내에서 사용할 수 있는 것만 서명합니다. Automation을 사용하려면 인증서의 공급자가 Microsoft Enhanced RSA and AES Cryptographic Provider여야 합니다.
Azure Portal을 사용하여 새 인증서 만들기
- Automation 계정의 왼쪽 창에서 공유 리소스 아래의 인증서를 선택합니다.
- 인증서 페이지에서 인증서 추가를 선택합니다.
- 이름 필드에 인증서의 이름을 입력합니다.
- .cer 또는 .pfx 파일을 찾아보려면 인증서 파일 업로드 아래에서 파일 선택을 선택합니다. .pfx 파일을 선택하는 경우 암호를 지정하고 내보낼 수 있는지 여부를 나타냅니다. Azure Automation 포털을 사용하여 인증서를 업로드하는 경우 파트너(CSP) 계정에 대해 실패할 수 있습니다. 이 문제를 해결하려면 PowerShell cmdlet을 해결 방법으로 사용하는 것이 좋습니다.
- 만들기를 선택하여 새 인증서 자산을 저장합니다.
PowerShell을 사용하여 새 인증서 만들기
다음 예제에서는 새 Automation 인증서를 만들고 내보내기 가능한 것으로 표시하는 방법을 보여 줍니다. 이 예제에서는 기존 .pfx 파일을 가져옵니다 .
$certificateName = 'MyCertificate'
$PfxCertPath = '.\MyCert.pfx'
$CertificatePassword = ConvertTo-SecureString -String 'P@$$w0rd' -AsPlainText -Force
$ResourceGroup = "ResourceGroup01"

New-AzAutomationCertificate -AutomationAccountName "MyAutomationAccount" -Name $certificateName -Path $PfxCertPath -Password $CertificatePassword -Exportable -ResourceGroupName $ResourceGroup
Resource Manager 템플릿을 사용하여 새 인증서 만들기
다음 예제에서는 PowerShell을 통해 Resource Manager 템플릿을 사용하여 Automation 계정에 인증서를 배포하는 방법을 보여 줍니다.
$AutomationAccountName = "<automation account name>"
$PfxCertPath = '<PFX cert path and filename>'
$CertificatePassword = '<password>'
$certificateName = '<certificate name>' #A name of your choosing
$ResourceGroupName = '<resource group name>' #The one that holds your automation account
$flags = [System.Security.Cryptography.X509Certificates.X509KeyStorageFlags]::Exportable `
    -bor [System.Security.Cryptography.X509Certificates.X509KeyStorageFlags]::PersistKeySet `
    -bor [System.Security.Cryptography.X509Certificates.X509KeyStorageFlags]::MachineKeySet
# Load the certificate into memory
$PfxCert = New-Object -TypeName System.Security.Cryptography.X509Certificates.X509Certificate2 -ArgumentList @($PfxCertPath, $CertificatePassword, $flags)
# Export the certificate and convert into base 64 string
$Base64Value = [System.Convert]::ToBase64String($PfxCert.Export([System.Security.Cryptography.X509Certificates.X509ContentType]::Pkcs12))
$Thumbprint = $PfxCert.Thumbprint


$json = @"
{
    '`$schema': 'https://schema.management.azure.com/schemas/2015-01-01/deploymentTemplate.json#',
    'contentVersion': '1.0.0.0',
    'resources': [
        {
            'name': '$AutomationAccountName/$certificateName',
            'type': 'Microsoft.Automation/automationAccounts/certificates',
            'apiVersion': '2015-10-31',
            'properties': {
                'base64Value': '$Base64Value',
                'thumbprint': '$Thumbprint',
                'isExportable': true
            }
        }
    ]
}
"@

$json | out-file .\template.json
New-AzResourceGroupDeployment -Name NewCert -ResourceGroupName $ResourceGroupName -TemplateFile .\template.json
인증서 가져오기
인증서를 검색하려면 내부 Get-AutomationCertificate cmdlet을 사용합니다. 인증서 자산에 대한 정보를 반환하지만 인증서 자체는 반환하지 않으므로 Get-AzAutomationCertificate cmdlet을 사용할 수 없습니다.
텍스트 Runbook 예제
다음 예제에서는 Runbook의 클라우드 서비스에 인증서를 추가하는 방법을 보여줍니다. 이 샘플에서는 암호화된 자동화 변수에서 암호를 검색합니다.
$serviceName = 'MyCloudService'
$cert = Get-AutomationCertificate -Name 'MyCertificate'
$certPwd = Get-AzAutomationVariable -ResourceGroupName "ResourceGroup01" `
-AutomationAccountName "MyAutomationAccount" -Name 'MyCertPassword'
Add-AzureCertificate -ServiceName $serviceName -CertToDeploy $cert
그래픽 Runbook 예제
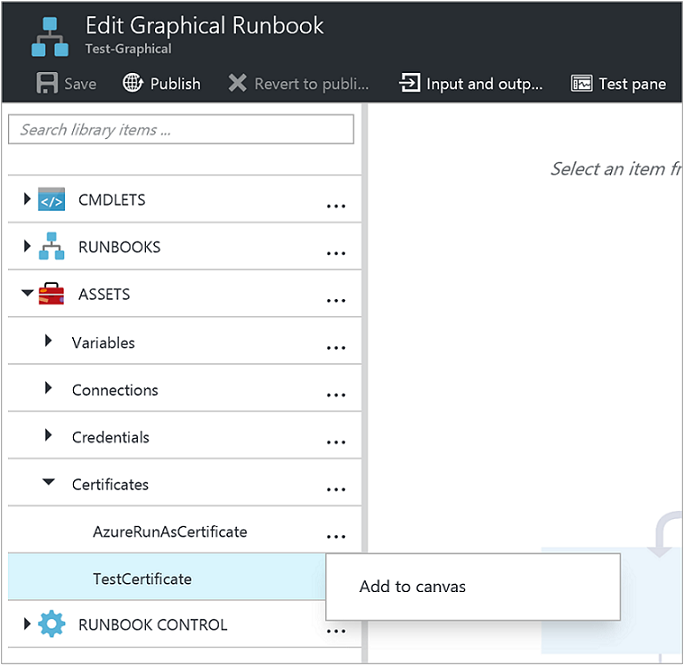
라이브러리 창에서 인증서를 마우스 오른쪽 단추로 클릭하고 캔버스에 추가를 선택하여 그래픽 Runbook에 내부 Get-AutomationCertificate cmdlet에 대한 작업을 추가합니다.
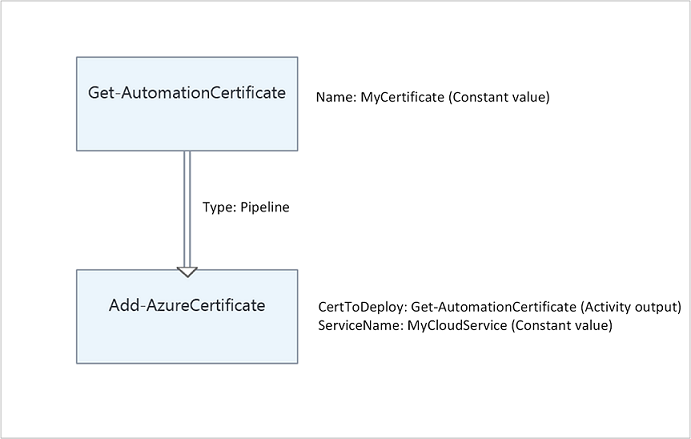
다음 그림에서는 그래픽 Runbook에서 인증서를 사용하는 예제를 보여 줍니다.
다음 단계
- 인증서에 액세스하는 데 사용되는 cmdlet에 대한 자세한 내용은 Azure Automation에서 모듈 관리를 참조하세요.
- Runbook에 대한 일반적인 내용은 Azure Automation에서 Runbook 실행을 참조 하세요.
- DSC 구성에 대한 자세한 내용은 Azure Automation 상태 구성 개요를 참조하세요.