지도에 이미지 계층 추가(Android SDK)
참고 항목
Azure Maps Android SDK 사용 중지
이제 Android용 Azure Maps 네이티브 SDK는 더 이상 사용되지 않으며 2025년 3월 31일에 사용 중지됩니다. 서비스 중단을 방지하려면 2025년 3월 31일까지 Azure Maps 웹 SDK로 마이그레이션하세요. 자세한 내용은 Azure Maps Android SDK 마이그레이션 가이드를 참조하세요.
이 문서에서는 이미지를 좌표의 고정 세트에 오버레이하는 방법을 보여 줍니다. 지도에 오버레이될 수 있는 다양한 이미지 유형의 몇 가지 예제는 다음과 같습니다.
- 드론에서 캡처한 이미지
- 빌딩 평면도
- 역사적 또는 기타 특수한 지도 이미지
- 작업 사이트의 청사진
팁
이미지 계층은 지도에 이미지를 오버레이할 수 있는 쉬운 방법입니다. 큰 이미지는 많은 메모리를 소비하고 잠재적으로 성능 문제를 일으킬 수 있습니다. 이 경우 이미지를 타일로 분할하고 지도에 타일 계층으로 로드하는 것이 좋습니다.
이미지 계층 추가
다음 코드는 1922년 뉴저지, 뉴어크 지도 이미지를 지도에 오버레이합니다. 이 이미지는 프로젝트의 drawable 폴더에 추가됩니다. 이미지 계층은 형식의 네 모서리에 대한 이미지 및 좌표를 [Top Left Corner, Top Right Corner, Bottom Right Corner, Bottom Left Corner] 형식으로 설정하여 만듭니다. label 계층 아래에 이미지 계층을 추가하는 것이 바람직한 경우가 많습니다.
//Create an image layer.
ImageLayer layer = new ImageLayer(
    imageCoordinates(
        new Position[] {
            new Position(-74.22655, 40.773941), //Top Left Corner
            new Position(-74.12544, 40.773941), //Top Right Corner
            new Position(-74.12544, 40.712216), //Bottom Right Corner
            new Position(-74.22655, 40.712216)  //Bottom Left Corner
        }
    ),
    setImage(R.drawable.newark_nj_1922)
);

//Add the image layer to the map, below the label layer.
map.layers.add(layer, "labels");
//Create an image layer.
val layer = ImageLayer(
    imageCoordinates(
        arrayOf<Position>(
            Position(-74.22655, 40.773941),  //Top Left Corner
            Position(-74.12544, 40.773941),  //Top Right Corner
            Position(-74.12544, 40.712216),  //Bottom Right Corner
            Position(-74.22655, 40.712216)   //Bottom Left Corner
        )
    ),
    setImage(R.drawable.newark_nj_1922)
)

//Add the image layer to the map, below the label layer.
map.layers.add(layer, "labels")
또는 온라인에서 호스트되는 이미지에 대한 URL을 지정할 수 있습니다. 그러나 시나리오에서 허용하는 경우 이미지를 로컬에서 사용할 수 있고 다운로드할 필요가 없으므로 프로젝트 drawable 폴더에 이미지를 추가합니다.
//Create an image layer.
ImageLayer layer = new ImageLayer(
    imageCoordinates(
        new Position[] {
            new Position(-74.22655, 40.773941), //Top Left Corner
            new Position(-74.12544, 40.773941), //Top Right Corner
            new Position(-74.12544, 40.712216), //Bottom Right Corner
            new Position(-74.22655, 40.712216)  //Bottom Left Corner
        }
    ),
    setUrl("https://www.lib.utexas.edu/maps/historical/newark_nj_1922.jpg")
);

//Add the image layer to the map, below the label layer.
map.layers.add(layer, "labels");
//Create an image layer.
val layer = ImageLayer(
    imageCoordinates(
        arrayOf<Position>(
            Position(-74.22655, 40.773941),  //Top Left Corner
            Position(-74.12544, 40.773941),  //Top Right Corner
            Position(-74.12544, 40.712216),  //Bottom Right Corner
            Position(-74.22655, 40.712216) //Bottom Left Corner
        )
    ),
    setUrl("https://www.lib.utexas.edu/maps/historical/newark_nj_1922.jpg")
)

//Add the image layer to the map, below the label layer.
map.layers.add(layer, "labels")
다음 스크린샷은 이미지 계층을 사용하여 오버레이된 1922년 뉴저지, 뉴어크의 지도를 보여 줍니다.
KML 파일을 지면 오버레이로 가져오기
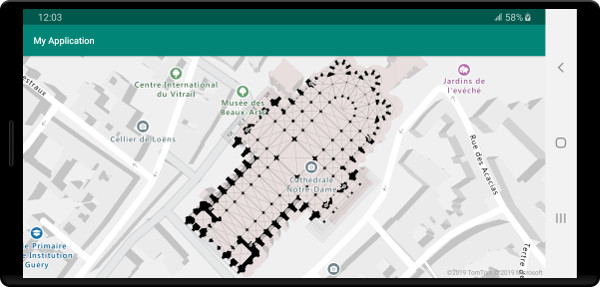
이 샘플은 KML 지면 오버레이 정보를 지도에서 이미지 계층으로 추가하는 방법을 보여 줍니다. KML 지면 오버레이는 북쪽, 남쪽, 동쪽 및 서쪽 좌표와 시계 반대 방향 회전을 제공합니다. 그러나 이미지 계층에는 이미지의 각 구석에 대한 좌표가 필요합니다. 이 샘플의 KML 지면 오버레이는 샤르트르 대성당에 대한 것이며 Wikimedia에서 제공된 것입니다.
<?xml version="1.0" encoding="UTF-8"?>
<kml xmlns="http://www.opengis.net/kml/2.2" xmlns:gx="http://www.google.com/kml/ext/2.2" xmlns:kml="http://www.opengis.net/kml/2.2" xmlns:atom="http://www.w3.org/2005/Atom">
<GroundOverlay>
    <name>Map of Chartres cathedral</name>
    <Icon>
        <href>https://upload.wikimedia.org/wikipedia/commons/thumb/e/e3/Chartres.svg/1600px-Chartres.svg.png</href>
        <viewBoundScale>0.75</viewBoundScale>
    </Icon>
    <LatLonBox>
        <north>48.44820923628113</north>
        <south>48.44737203258976</south>
        <east>1.488833825534365</east>
        <west>1.486788581643038</west>
        <rotation>46.44067597839695</rotation>
    </LatLonBox>
</GroundOverlay>
</kml>
이 코드는 ImageLayer 클래스의 정적 getCoordinatesFromEdges 메서드를 사용합니다. 이 메서드는 KML 지면 오버레이의 북쪽, 남쪽, 동쪽, 서쪽 및 회전 정보를 사용하여 이미지의 네 모서리를 계산합니다.
//Calculate the corner coordinates of the ground overlay.
Position[] corners = ImageLayer.getCoordinatesFromEdges(
    //North, south, east, west
    48.44820923628113, 48.44737203258976, 1.488833825534365, 1.486788581643038,

    //KML rotations are counter-clockwise, subtract from 360 to make them clockwise.
    360 - 46.44067597839695
);

//Create an image layer.
ImageLayer layer = new ImageLayer(
    imageCoordinates(corners),
    setUrl("https://upload.wikimedia.org/wikipedia/commons/thumb/e/e3/Chartres.svg/1600px-Chartres.svg.png")
);

//Add the image layer to the map, below the label layer.
map.layers.add(layer, "labels");
//Calculate the corner coordinates of the ground overlay.
val corners: Array<Position> =
    ImageLayer.getCoordinatesFromEdges( //North, south, east, west
        48.44820923628113,
        48.44737203258976,
        1.488833825534365,
        1.486788581643038,  //KML rotations are counter-clockwise, subtract from 360 to make them clockwise.
        360 - 46.44067597839695
    )

//Create an image layer.
val layer = ImageLayer(
    imageCoordinates(corners),
    setUrl("https://upload.wikimedia.org/wikipedia/commons/thumb/e/e3/Chartres.svg/1600px-Chartres.svg.png")
)

//Add the image layer to the map, below the label layer.
map.layers.add(layer, "labels")
다음 스크린샷은 이미지 계층을 사용하여 KML 지면 오버레이가 오버레이된 지도를 보여 줍니다.
팁
이미지 계층 클래스의 getPixels 및 getPositions 메서드를 사용하여 배치된 이미지 계층의 지리적 좌표와 로컬 이미지 픽셀 좌표 간을 변환합니다.
다음 단계
맵에서 이미지를 오버레이하는 방법에 대해 자세히 알아보려면 다음 문서를 참조하세요.