ARM 템플릿에서 배포 스크립트에 대한 개발 환경 구성
배포 스크립트 이미지를 사용하여 ARM 템플릿 배포 스크립트를 개발하고 테스트하기 위한 개발 환경을 만드는 방법에 대해 알아봅니다. Azure 컨테이너 인스턴스를 만들거나 Docker를 사용할 수 있습니다. 이 문서에서는 두 옵션을 모두 다룹니다.
필수 조건
Azure PowerShell 컨테이너
Azure PowerShell 배포 스크립트가 없는 경우 다음 콘텐츠를 사용하여 hello.ps1 파일을 만들 수 있습니다.
param([string] $name)
$output = 'Hello {0}' -f $name
Write-Output $output
$DeploymentScriptOutputs = @{}
$DeploymentScriptOutputs['text'] = $output
Azure CLI 컨테이너
Azure CLI 컨테이너 이미지의 경우 다음 콘텐츠를 사용하여 hello.sh 파일을 만들 수 있습니다.
FIRSTNAME=$1
LASTNAME=$2
OUTPUT="{\"name\":{\"displayName\":\"$FIRSTNAME $LASTNAME\",\"firstName\":\"$FIRSTNAME\",\"lastName\":\"$LASTNAME\"}}"
echo -n "Hello "
echo $OUTPUT | jq -r '.name.displayName'
참고 항목
Azure CLI 배포 스크립트를 실행하는 경우 AZ_SCRIPTS_OUTPUT_PATH라는 환경 변수는 스크립트 출력 파일의 위치를 저장합니다. 환경 변수는 개발 환경 컨테이너에서 사용할 수 없습니다. Azure CLI 출력을 사용하는 방법에 대한 자세한 내용은 CLI 스크립트에서 출력 작업을 참조하세요.
Azure PowerShell 컨테이너 인스턴스 사용
컴퓨터에서 스크립트를 작성하려면 스토리지 계정을 만들고 컨테이너 인스턴스에 스토리지 계정을 탑재해야 합니다. 스토리지 계정에 스크립트를 업로드하고 컨테이너 인스턴스에서 스크립트를 실행할 수 있습니다.
참고 항목
스크립트를 테스트하기 위해 만드는 스토리지 계정은 배포 스크립트 서비스에서 스크립트를 실행하는 데 사용하는 것과 동일한 스토리지 계정이 아닙니다. 배포 스크립트 서비스는 모든 실행 시 파일 공유로 고유한 이름을 만듭니다.
Azure PowerShell 컨테이너 인스턴스 만들기
다음 Azure Resource Manager 템플릿(ARM 템플릿)은 컨테이너 인스턴스 및 파일 공유를 만든 다음 컨테이너 이미지에 파일 공유를 탑재합니다.
{
  "$schema": "https://schema.management.azure.com/schemas/2019-04-01/deploymentTemplate.json#",
  "contentVersion": "1.0.0.0",
  "parameters": {
    "projectName": {
      "type": "string",
      "metadata": {
        "description": "Specify a project name that is used for generating resource names."
      }
    },
    "location": {
      "type": "string",
      "defaultValue": "[resourceGroup().location]",
      "metadata": {
        "description": "Specify the resource location."
      }
    },
    "containerImage": {
      "type": "string",
      "defaultValue": "mcr.microsoft.com/azuredeploymentscripts-powershell:az9.7",
      "metadata": {
        "description": "Specify the container image."
      }
    },
    "mountPath": {
      "type": "string",
      "defaultValue": "/mnt/azscripts/azscriptinput",
      "metadata": {
        "description": "Specify the mount path."
      }
    }
  },
  "variables": {
    "storageAccountName": "[toLower(format('{0}store', parameters('projectName')))]",
    "fileShareName": "[format('{0}share', parameters('projectName'))]",
    "containerGroupName": "[format('{0}cg', parameters('projectName'))]",
    "containerName": "[format('{0}container', parameters('projectName'))]"
  },
  "resources": [
    {
      "type": "Microsoft.Storage/storageAccounts",
      "apiVersion": "2023-01-01",
      "name": "[variables('storageAccountName')]",
      "location": "[parameters('location')]",
      "sku": {
        "name": "Standard_LRS"
      },
      "kind": "StorageV2",
      "properties": {
        "accessTier": "Hot"
      }
    },
    {
      "type": "Microsoft.Storage/storageAccounts/fileServices/shares",
      "apiVersion": "2023-01-01",
      "name": "[format('{0}/default/{1}', variables('storageAccountName'), variables('fileShareName'))]",
      "dependsOn": [
        "[resourceId('Microsoft.Storage/storageAccounts', variables('storageAccountName'))]"
      ]
    },
    {
      "type": "Microsoft.ContainerInstance/containerGroups",
      "apiVersion": "2023-05-01",
      "name": "[variables('containerGroupName')]",
      "location": "[parameters('location')]",
      "properties": {
        "containers": [
          {
            "name": "[variables('containerName')]",
            "properties": {
              "image": "[parameters('containerImage')]",
              "resources": {
                "requests": {
                  "cpu": 1,
                  "memoryInGB": "[json('1.5')]"
                }
              },
              "ports": [
                {
                  "protocol": "TCP",
                  "port": 80
                }
              ],
              "volumeMounts": [
                {
                  "name": "filesharevolume",
                  "mountPath": "[parameters('mountPath')]"
                }
              ],
              "command": [
                "/bin/sh",
                "-c",
                "pwsh -c 'Start-Sleep -Seconds 1800'"
              ]
            }
          }
        ],
        "osType": "Linux",
        "volumes": [
          {
            "name": "filesharevolume",
            "azureFile": {
              "readOnly": false,
              "shareName": "[variables('fileShareName')]",
              "storageAccountName": "[variables('storageAccountName')]",
              "storageAccountKey": "[listKeys(resourceId('Microsoft.Storage/storageAccounts', variables('storageAccountName')), '2023-01-01').keys[0].value]"
            }
          }
        ]
      },
      "dependsOn": [
        "[resourceId('Microsoft.Storage/storageAccounts', variables('storageAccountName'))]"
      ]
    }
  ]
}
탑재 경로의 기본값은 /mnt/azscripts/azscriptinput입니다. 이 경로는 컨테이너 인스턴스에서 파일 공유에 탑재된 경로입니다.
템플릿에 지정된 기본 컨테이너 이미지는 mcr.microsoft.com/azuredeploymentscripts-powershell:az9.7입니다. 지원되는 모든 Azure PowerShell 버전 목록을 참조하세요.
템플릿은 1800초 후에 컨테이너 인스턴스를 일시 중단합니다. 컨테이너 인스턴스가 종료된 상태로 전환되고 세션이 종료되기까지 30분이 소요됩니다.
템플릿을 배포하는 방법은 다음과 같습니다.
$projectName = Read-Host -Prompt "Enter a project name that is used to generate resource names"
$location = Read-Host -Prompt "Enter the location (i.e. centralus)"
$templateFile = Read-Host -Prompt "Enter the template file path and file name"
$resourceGroupName = "${projectName}rg"

New-AzResourceGroup -Location $location -name $resourceGroupName
New-AzResourceGroupDeployment -resourceGroupName $resourceGroupName -TemplateFile $templatefile -projectName $projectName
배포 스크립트 업로드
스토리지 계정에 배포 스크립트를 업로드합니다. PowerShell 스크립트의 예는 다음과 같습니다.
$projectName = Read-Host -Prompt "Enter the same project name that you used earlier"
$fileName = Read-Host -Prompt "Enter the deployment script file name with the path"

$resourceGroupName = "${projectName}rg"
$storageAccountName = "${projectName}store"
$fileShareName = "${projectName}share"

$context = (Get-AzStorageAccount -ResourceGroupName $resourceGroupName -Name $storageAccountName).Context
Set-AzStorageFileContent -Context $context -ShareName $fileShareName -Source $fileName -Force
Azure Portal 또는 Azure CLI를 사용하여 파일을 업로드할 수도 있습니다.
배포 스크립트 테스트
Azure Portal에서 컨테이너 인스턴스 및 스토리지 계정을 배포한 리소스 그룹을 엽니다.
컨테이너 그룹을 엽니다. 기본 컨테이너 그룹 이름은 cg가 추가된 프로젝트 이름입니다. 컨테이너 인스턴스가 실행 중 상태입니다.
리소스 메뉴에서 컨테이너를 선택합니다. 컨테이너 인스턴스 이름은 컨테이너가 추가된 프로젝트 이름입니다.
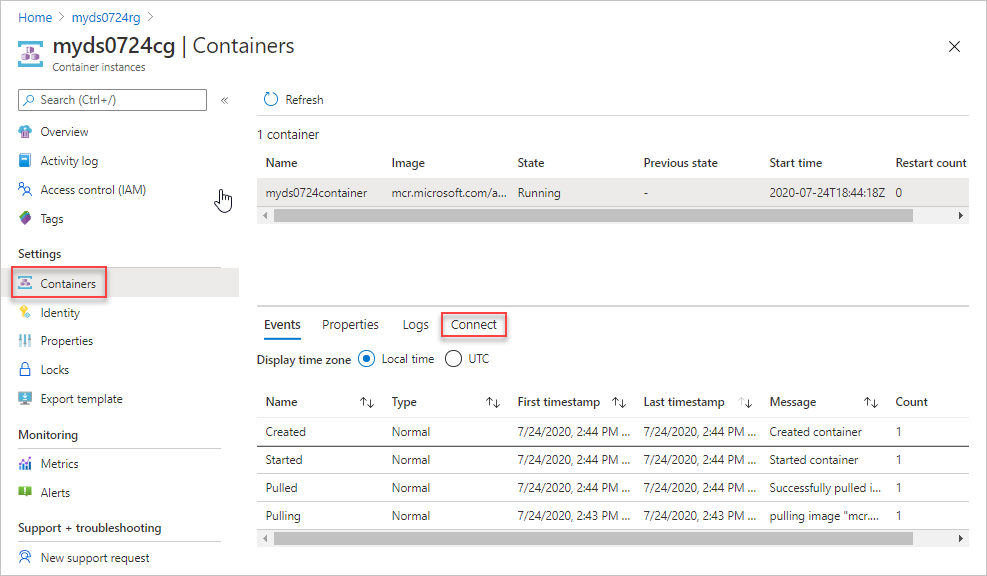
연결을 선택한 다음 연결을 선택합니다. 컨테이너 인스턴스에 연결할 수 없는 경우 컨테이너 그룹을 다시 시작한 후 다시 시도하세요.
콘솔 창에서 다음 명령을 실행합니다.
cd /mnt/azscripts/azscriptinput
ls
pwsh ./hello.ps1 "John Dole"
출력은 Hello John Dole입니다.

Azure CLI 컨테이너 인스턴스 사용
컴퓨터에서 스크립트를 작성하려면 스토리지 계정을 만들고 컨테이너 인스턴스에 스토리지 계정을 탑재합니다. 그런 다음 스토리지 계정에 스크립트를 업로드하고 컨테이너 인스턴스에서 스크립트를 실행할 수 있습니다.
참고 항목
스크립트를 테스트하기 위해 만드는 스토리지 계정은 배포 스크립트 서비스에서 스크립트를 실행하는 데 사용하는 것과 동일한 스토리지 계정이 아닙니다. 배포 스크립트 서비스는 모든 실행 시 파일 공유로 고유한 이름을 만듭니다.
Azure CLI 컨테이너 인스턴스 만들기
다음 ARM 템플릿은 컨테이너 인스턴스 및 파일 공유를 만든 다음 컨테이너 이미지에 파일 공유를 탑재합니다.
{
  "$schema": "https://schema.management.azure.com/schemas/2019-04-01/deploymentTemplate.json#",
  "contentVersion": "1.0.0.0",
  "parameters": {
    "projectName": {
      "type": "string",
      "metadata": {
        "description": "Specify a project name that is used for generating resource names."
      }
    },
    "location": {
      "type": "string",
      "defaultValue": "[resourceGroup().location]",
      "metadata": {
        "description": "Specify the resource location."
      }
    },
    "containerImage": {
      "type": "string",
      "defaultValue": "mcr.microsoft.com/azure-cli:2.9.1",
      "metadata": {
        "description": "Specify the container image."
      }
    },
    "mountPath": {
      "type": "string",
      "defaultValue": "/mnt/azscripts/azscriptinput",
      "metadata": {
        "description": "Specify the mount path."
      }
    }
  },
  "variables": {
    "storageAccountName": "[toLower(format('{0}store', parameters('projectName')))]",
    "fileShareName": "[format('{0}share', parameters('projectName'))]",
    "containerGroupName": "[format('{0}cg', parameters('projectName'))]",
    "containerName": "[format('{0}container', parameters('projectName'))]"
  },
  "resources": [
    {
      "type": "Microsoft.Storage/storageAccounts",
      "apiVersion": "2022-09-01",
      "name": "[variables('storageAccountName')]",
      "location": "[parameters('location')]",
      "sku": {
        "name": "Standard_LRS"
      },
      "kind": "StorageV2",
      "properties": {
        "accessTier": "Hot"
      }
    },
    {
      "type": "Microsoft.Storage/storageAccounts/fileServices/shares",
      "apiVersion": "2022-09-01",
      "name": "[format('{0}/default/{1}', variables('storageAccountName'), variables('fileShareName'))]",
      "dependsOn": [
        "[resourceId('Microsoft.Storage/storageAccounts', variables('storageAccountName'))]"
      ]
    },
    {
      "type": "Microsoft.ContainerInstance/containerGroups",
      "apiVersion": "2023-05-01",
      "name": "[variables('containerGroupName')]",
      "location": "[parameters('location')]",
      "properties": {
        "containers": [
          {
            "name": "[variables('containerName')]",
            "properties": {
              "image": "[parameters('containerImage')]",
              "resources": {
                "requests": {
                  "cpu": 1,
                  "memoryInGB": "[json('1.5')]"
                }
              },
              "ports": [
                {
                  "protocol": "TCP",
                  "port": 80
                }
              ],
              "volumeMounts": [
                {
                  "name": "filesharevolume",
                  "mountPath": "[parameters('mountPath')]"
                }
              ],
              "command": [
                "/bin/bash",
                "-c",
                "echo hello; sleep 1800"
              ]
            }
          }
        ],
        "osType": "Linux",
        "volumes": [
          {
            "name": "filesharevolume",
            "azureFile": {
              "readOnly": false,
              "shareName": "[variables('fileShareName')]",
              "storageAccountName": "[variables('storageAccountName')]",
              "storageAccountKey": "[listKeys(resourceId('Microsoft.Storage/storageAccounts', variables('storageAccountName')), '2022-09-01').keys[0].value]"
            }
          }
        ]
      },
      "dependsOn": [
        "storageAccount"
      ]
    }
  ]
}
탑재 경로의 기본값은 /mnt/azscripts/azscriptinput입니다. 이 경로는 컨테이너 인스턴스에서 파일 공유에 탑재된 경로입니다.
템플릿에 지정된 기본 컨테이너 이미지는 mcr.microsoft.com/azure-cli:2.9.1입니다. 지원되는 Azure CLI 버전 목록을 참조하세요.
Important
배포 스크립트는 MCR(Microsoft Container Registry)에서 사용 가능한 CLI 이미지를 사용합니다. 배포 스크립트의 CLI 이미지를 인증하는 데 약 한 달이 걸립니다. 30일 이내에 릴리스된 CLI 버전은 사용하지 마세요. 이미지의 릴리스 날짜를 확인하려면 Azure CLI 릴리스 정보를 참조하세요. 지원되지 않는 버전을 사용하는 경우 오류 메시지에 지원되는 버전이 나열됩니다.
템플릿은 1800초 후에 컨테이너 인스턴스를 일시 중단합니다. 컨테이너 인스턴스가 터미널 상태가 되고 세션이 종료되기까지 30분이 소요됩니다.
템플릿을 배포하는 방법은 다음과 같습니다.
$projectName = Read-Host -Prompt "Enter a project name that is used to generate resource names"
$location = Read-Host -Prompt "Enter the location (i.e. centralus)"
$templateFile = Read-Host -Prompt "Enter the template file path and file name"
$resourceGroupName = "${projectName}rg"

New-AzResourceGroup -Location $location -name $resourceGroupName
New-AzResourceGroupDeployment -resourceGroupName $resourceGroupName -TemplateFile $templatefile -projectName $projectName
배포 스크립트 업로드
스토리지 계정에 배포 스크립트를 업로드합니다. 다음은 PowerShell 예제입니다.
$projectName = Read-Host -Prompt "Enter the same project name that you used earlier"
$fileName = Read-Host -Prompt "Enter the deployment script file name with the path"

$resourceGroupName = "${projectName}rg"
$storageAccountName = "${projectName}store"
$fileShareName = "${projectName}share"

$context = (Get-AzStorageAccount -ResourceGroupName $resourceGroupName -Name $storageAccountName).Context
Set-AzStorageFileContent -Context $context -ShareName $fileShareName -Source $fileName -Force
Azure Portal 또는 Azure CLI를 사용하여 파일을 업로드할 수도 있습니다.
배포 스크립트 테스트
Azure Portal에서 컨테이너 인스턴스 및 스토리지 계정을 배포한 리소스 그룹을 엽니다.
컨테이너 그룹을 엽니다. 기본 컨테이너 그룹 이름은 cg가 추가된 프로젝트 이름입니다. 컨테이너 인스턴스는 실행 중 상태로 표시됩니다.
리소스 메뉴에서 컨테이너를 선택합니다. 컨테이너 인스턴스 이름은 컨테이너가 추가된 프로젝트 이름입니다.
연결을 선택한 다음 연결을 선택합니다. 컨테이너 인스턴스에 연결할 수 없는 경우 컨테이너 그룹을 다시 시작한 후 다시 시도하세요.
콘솔 창에서 다음 명령을 실행합니다.
cd /mnt/azscripts/azscriptinput
ls
./hello.sh John Dole
출력은 Hello John Dole입니다.

Docker 사용
배포 스크립트 개발 환경으로 미리 구성된 Docker 컨테이너 이미지를 사용할 수 있습니다. Docker를 설치하려면 Docker 가져오기를 참조하세요. 또한 배포 스크립트를 포함하는 디렉터리를 Docker 컨테이너에 탑재하도록 파일 공유를 구성해야 합니다.
배포 스크립트 컨테이너 이미지를 로컬 컴퓨터로 끌어옵니다.
docker pull mcr.microsoft.com/azuredeploymentscripts-powershell:az4.3이 예에서는 PowerShell 4.3.0 버전을 사용합니다.
MCR에서 CLI 이미지를 꺼내려면 다음을 수행합니다.
docker pull mcr.microsoft.com/azure-cli:2.0.80이 예에서는 CLI 2.0.80 버전을 사용합니다. 배포 스크립트는 여기 있는 기본 CLI 컨테이너 이미지를 사용합니다.
Docker 이미지를 로컬로 실행합니다.
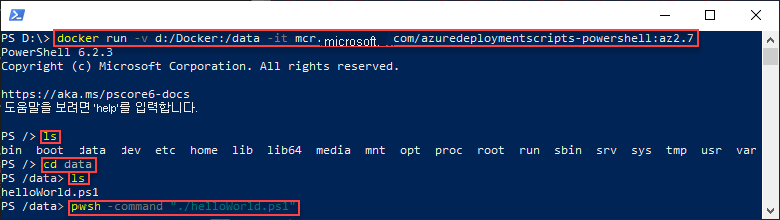
docker run -v <host drive letter>:/<host directory name>:/data -it mcr.microsoft.com/azuredeploymentscripts-powershell:az4.3<host driver letter> 및 <host directory name>을 공유 드라이브의 기존 폴더로 바꿉니다. 폴더가 컨테이너의 /data 폴더에 매핑됩니다. 예를 들어 D:\docker를 매핑하려면 다음을 수행합니다.
docker run -v d:/docker:/data -it mcr.microsoft.com/azuredeploymentscripts-powershell:az4.3-it는 컨테이너 이미지를 활성 상태로 유지하는 것을 의미합니다.
CLI 예:
docker run -v d:/docker:/data -it mcr.microsoft.com/azure-cli:2.0.80다음 스크린샷에서는 공유 드라이브에 helloworld.ps1 파일이 있는 경우 PowerShell 스크립트를 실행하는 방법을 보여 줍니다.
스크립트를 성공적으로 테스트한 후에는 이 스크립트를 템플릿에서 배포 스크립트로 사용할 수 있습니다.
다음 단계
이 문서에서는 배포 스크립트를 사용하는 방법을 알아보았습니다. 배포 스크립트 자습서는 다음을 참조하세요.