웹 채팅 사용자 지정
적용 대상: SDK v4
이 문서에서는 봇에 맞게 웹 채팅 샘플을 사용자 지정하는 방법을 자세히 설명합니다.
웹 사이트에 웹 채팅 통합
웹 채팅 개요에서는 웹 채팅 컨트롤을 웹 사이트에 통합하는 방법을 설명합니다.
스타일 사용자 지정
웹 채팅 컨트롤은 다양한 사용자 지정 옵션을 제공합니다. 색, 크기, 요소 배치를 변경하고, 사용자 지정 요소를 추가하고, 호스팅 웹 페이지와 상호 작용할 수 있습니다. 다음은 웹 채팅 UI를 사용자 지정하는 방법에 대한 몇 가지 예입니다.
파일의 웹 채팅 수정할 수 있는 모든 설정의 StyleOptions.ts 전체 목록을 찾을 수 있습니다. 웹 채팅 기본값은 defaultStyleOptions.ts 파일에서 찾을 수 있습니다.
해당 설정은 glamor로 향상된 CSS 규칙 세트인 스타일 세트를 생성합니다. 파일의 스타일 집합 createStyleSet.ts 에서 생성된 CSS 스타일의 전체 목록을 찾을 수 있습니다.
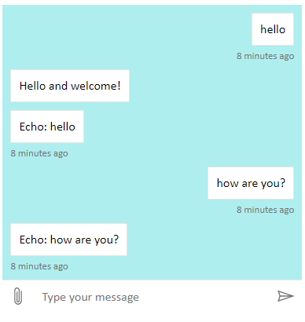
웹 채팅 컨테이너의 크기 설정
웹 채팅 컨테이너의 크기를 조정하려면 스타일 집합의rootHeight 및 rootWidth 속성을 사용합니다. 다음 예제에서는 컨테이너의 배경색을 설정하여 컨트롤러의 크기를 표시합니다.
<!DOCTYPE html>
<head>
    <script src="https://cdn.botframework.com/botframework-webchat/latest/webchat.js"></script>
</head>
<body>
  <div style="height: 60%; width: 40%; margin-top:5%; margin-left:10%" id="webchat" role="main"></div>
  <script>
     // Set  the CSS rules.
     const styleSet = window.WebChat.createStyleSet({
         rootHeight: '100%',
         rootWidth: '50%',
         backgroundColor: 'paleturquoise'
      });

    window.WebChat.renderWebChat({
      directLine: window.WebChat.createDirectLine({
          token: '<Your Direct Line token>'}),
      styleSet
    }, document.getElementById('webchat'));

  </script>
</body>
경고
호스팅 웹 페이지에서 Direct Line 키를 사용하지 마세요. 봇을 웹 채팅 연결하는 방법의 프로덕션 포함 옵션 섹션에 설명된 대로 토큰을 사용합니다.
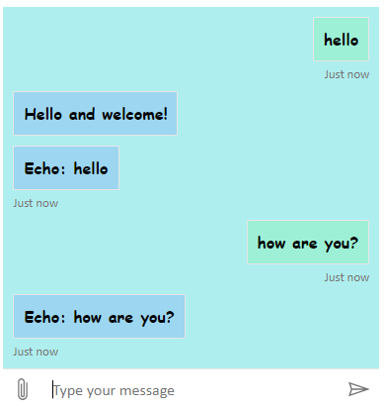
채팅 거품형 글꼴 및 색 변경
웹 채팅 컨트롤을 호스트하는 웹 페이지의 스타일과 일치하도록 채팅 거품에 사용되는 배경색 및 글꼴을 사용자 지정할 수 있습니다. 아래 코드 조각은 수행하는 방법을 보여줍니다.
<!DOCTYPE html>
<head>
    <script src="https://cdn.botframework.com/botframework-webchat/latest/webchat.js"></script>
</head>
<body>
  <div style="height: 60%; width: 40%; margin-top:5%; margin-left:10%" id="webchat" role="main"></div>
  <script>

     // Set  the CSS rules.
     const styleSet = window.WebChat.createStyleSet({
         bubbleBackground: 'rgba(0, 0, 255, .1)',
         bubbleFromUserBackground: 'rgba(0, 255, 0, .1)',
         rootHeight: '100%',
         rootWidth: '50%',
         backgroundColor: 'paleturquoise'
      });

      // After generated, you can modify the CSS rules.
      // Change font family and weight.
      styleSet.textContent = {
         ...styleSet.textContent,
         fontFamily: "'Comic Sans MS', 'Arial', sans-serif",
         fontWeight: 'bold'
      };
    window.WebChat.renderWebChat({
      directLine: window.WebChat.createDirectLine({
          token: '<Your Direct Line token>'}),
      styleSet
    }, document.getElementById('webchat'));

  </script>
</body>
봇 및 사용자 아바타 변경
웹 채팅 및 속성을 설정 botAvatarInitialsuserAvatarInitialsstyleOptions 하여 사용자 지정할 수 있는 아바타를 지원합니다.
![]()
<!DOCTYPE html>
<head>
    <script src="https://cdn.botframework.com/botframework-webchat/latest/webchat.js"></script>
</head>
<body>
  <div style="height: 60%; width: 40%; margin-top:5%; margin-left:10%" id="webchat" role="main"></div>
  <script>

     // Set  the CSS rules.
     const styleSet = window.WebChat.createStyleSet({
         bubbleBackground: 'rgba(0, 0, 255, .1)',
         bubbleFromUserBackground: 'rgba(0, 255, 0, .1)',
         rootHeight: '100%',
         rootWidth: '50%',
         backgroundColor: 'paleturquoise'
      });

      // After generated, you can modify the CSS rules.
      // Change font family and weight.
      styleSet.textContent = {
         ...styleSet.textContent,
         fontFamily: "'Comic Sans MS', 'Arial', sans-serif",
         fontWeight: 'bold'
      };

    // Set the avatar options.
     const avatarOptions = {
         botAvatarInitials: 'BF',
         userAvatarInitials: 'WC'
         };

    window.WebChat.renderWebChat({
      directLine: window.WebChat.createDirectLine({
          token: '<Your Direct Line token>'}),
      styleSet,
      styleOptions: avatarOptions
    }, document.getElementById('webchat'));

  </script>
</body>
사용 된 botAvatarInitials 봇에 대 한 아바타 이니셜을 설정 하는 속성은 컨트롤의 왼쪽에 표시 됩니다.
사용 된 userAvatarInitials 사용자에 대 한 아바타 이니셜을 설정 하는 속성, 오른쪽에 표시 됩니다.
botAvatarImage 및 userAvatarImage 속성을 사용하여 봇 및 사용자 아바타에 대한 이미지 URL을 제공합니다. 컨트롤은 아래와 같이 이니셜 대신 이러한 이니셜을 표시합니다.
const avatarOptions = {
   botAvatarImage: '<URL to your bot avatar image>',
   botAvatarInitials: 'BF',
   userAvatarImage: '<URL to your user avatar image>',
   userAvatarInitials: 'WC'
};
![]()
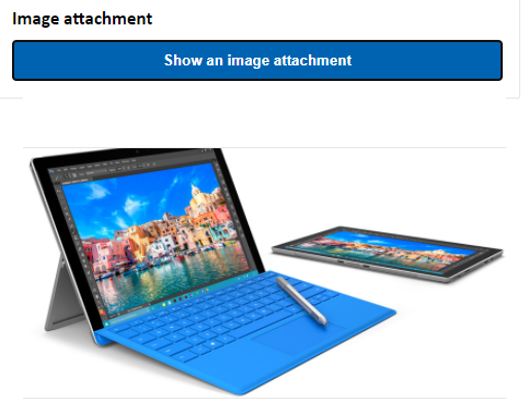
활동 또는 첨부 파일 사용자 지정 렌더링
최신 버전의 웹 채팅 사용하면 웹 채팅 기본 제공을 지원하지 않는 활동 또는 첨부 파일을 렌더링할 수도 있습니다. 활동 및 첨부 파일 렌더링은 Redux 미들웨어를 따라 모델링된 사용자 지정 가능한 파이프라인을 통해 전송됩니다. 이 파이프라인은 다음 작업을 쉽게 수행할 수 있을 만큼 유연성이 있습니다.
- 기존 활동/첨부 파일 데코레이트
- 새 활동/첨부 파일 추가
- 기존 활동/첨부 파일 바꾸기(또는 제거)
- 미들웨어 데이지 체인
GitHub 리포지토리를 첨부 파일로 표시
예를 들어 GitHub 리포지토리 카드의 데크를 표시하려는 경우 GitHub 리포지토리에 대한 새 React 구성 요소를 만들고 미들웨어로 추가할 수 있습니다. 다음 이미지 및 코드 조각은 사용자 지정 카드 구성 요소 샘플 샘플에서 가져옵니다.
기본 메시지를 입력할 때 출력은 sample:github-repository입니다.

도움말을 입력하면 선택할 수 있는 모든 카드를 선택할 수 있습니다. 이는 다음과 같은 많은 예 중 하나입니다.
import ReactWebChat from 'botframework-webchat';
import ReactDOM from 'react-dom';

// Create a new React component that accept render a GitHub repository attachment
const GitHubRepositoryAttachment = props => (
   <div
      style={{
         fontFamily: "'Calibri', 'Helvetica Neue', Arial, sans-serif",
         margin: 20,
         textAlign: 'center'
      }}
   >
      <svg
         height="64"
         viewBox="0 0 16 16"
         version="1.1"
         width="64"
         aria-hidden="true"
      >
         <path
            fillRule="evenodd"
            d="M8 0C3.58 0 0 3.58 0 8c0 3.54 2.29 6.53 5.47 7.59.4.07.55-.17.55-.38 0-.19-.01-.82-.01-1.49-2.01.37-2.53-.49-2.69-.94-.09-.23-.48-.94-.82-1.13-.28-.15-.68-.52-.01-.53.63-.01 1.08.58 1.23.82.72 1.21 1.87.87 2.33.66.07-.52.28-.87.51-1.07-1.78-.2-3.64-.89-3.64-3.95 0-.87.31-1.59.82-2.15-.08-.2-.36-1.02.08-2.12 0 0 .67-.21 2.2.82.64-.18 1.32-.27 2-.27.68 0 1.36.09 2 .27 1.53-1.04 2.2-.82 2.2-.82.44 1.1.16 1.92.08 2.12.51.56.82 1.27.82 2.15 0 3.07-1.87 3.75-3.65 3.95.29.25.54.73.54 1.48 0 1.07-.01 1.93-.01 2.2 0 .21.15.46.55.38A8.013 8.013 0 0 0 16 8c0-4.42-3.58-8-8-8z"
         />
      </svg>
      <p>
         <a
            href={`https://github.com/${encodeURI(props.owner)}/${encodeURI(
               props.repo
            )}`}
            target="_blank"
         >
            {props.owner}/<br />
            {props.repo}
         </a>
      </p>
   </div>
);

// Creating a new middleware pipeline that will render <GitHubRepositoryAttachment> for specific type of attachment
const attachmentMiddleware = () => next => card => {
   switch (card.attachment.contentType) {
      case 'application/vnd.microsoft.botframework.samples.github-repository':
         return (
            <GitHubRepositoryAttachment
               owner={card.attachment.content.owner}
               repo={card.attachment.content.repo}
            />
         );

      default:
         return next(card);
   }
};

ReactDOM.render(
   <ReactWebChat
      // Prepending the new middleware pipeline
      attachmentMiddleware={attachmentMiddleware}
      directLine={window.WebChat.createDirectLine({ token })}
   />,
   document.getElementById('webchat')
);
이 샘플에서 GitHubRepositoryAttachment라는 새 React 구성 요소를 추가합니다.
const GitHubRepositoryAttachment = props => (
   <div
      style={{
         fontFamily: "'Calibri', 'Helvetica Neue', Arial, sans-serif",
         margin: 20,
         textAlign: 'center'
      }}
   >
      <svg
         height="64"
         viewBox="0 0 16 16"
         version="1.1"
         width="64"
         aria-hidden="true"
      >
         <path
            fillRule="evenodd"
            d="M8 0C3.58 0 0 3.58 0 8c0 3.54 2.29 6.53 5.47 7.59.4.07.55-.17.55-.38 0-.19-.01-.82-.01-1.49-2.01.37-2.53-.49-2.69-.94-.09-.23-.48-.94-.82-1.13-.28-.15-.68-.52-.01-.53.63-.01 1.08.58 1.23.82.72 1.21 1.87.87 2.33.66.07-.52.28-.87.51-1.07-1.78-.2-3.64-.89-3.64-3.95 0-.87.31-1.59.82-2.15-.08-.2-.36-1.02.08-2.12 0 0 .67-.21 2.2.82.64-.18 1.32-.27 2-.27.68 0 1.36.09 2 .27 1.53-1.04 2.2-.82 2.2-.82.44 1.1.16 1.92.08 2.12.51.56.82 1.27.82 2.15 0 3.07-1.87 3.75-3.65 3.95.29.25.54.73.54 1.48 0 1.07-.01 1.93-.01 2.2 0 .21.15.46.55.38A8.013 8.013 0 0 0 16 8c0-4.42-3.58-8-8-8z"
         />
      </svg>
      <p>
         <a
            href={`https://github.com/${encodeURI(props.owner)}/${encodeURI(
               props.repo
            )}`}
            target="_blank"
         >
            {props.owner}/<br />
            {props.repo}
         </a>
      </p>
   </div>
);
그런 다음, 봇이 application/vnd.microsoft.botframework.samples.github-repository 콘텐츠 형식의 첨부 파일을 보낼 때 새 React 구성 요소를 렌더링할 미들웨어를 만듭니다. 이 작업을 수행하지 않으면 봇이 next(card)를 호출하여 미들웨어를 계속합니다.
const attachmentMiddleware = () => next => card => {
   switch (card.attachment.contentType) {
      case 'application/vnd.microsoft.botframework.samples.github-repository':
         return (
            <GitHubRepositoryAttachment
               owner={card.attachment.content.owner}
               repo={card.attachment.content.repo}
            />
         );

      default:
         return next(card);
   }
};
봇에서 보내는 활동은 다음과 같습니다.
{
   "type": "message",
   "from": {
      "role": "bot"
   },
   "attachmentLayout": "carousel",
   "attachments": [
      {
         "contentType": "application/vnd.microsoft.botframework.samples.github-repository",
         "content": {
            "owner": "Microsoft",
            "repo": "BotFramework-WebChat"
         }
      },
      {
         "contentType": "application/vnd.microsoft.botframework.samples.github-repository",
         "content": {
            "owner": "Microsoft",
            "repo": "BotFramework-Emulator"
         }
      },
      {
         "contentType": "application/vnd.microsoft.botframework.samples.github-repository",
         "content": {
            "owner": "Microsoft",
            "repo": "BotFramework-DirectLineJS"
         }
      }
   ]
}