자습서: 사진의 콘텐츠를 사용하여 몰입형 리더를 시작하는 iOS 앱 만들기(Swift)
몰입형 판독기는 읽기 이해도를 향상시키기 위해 검증된 기술을 구현하는 포괄적으로 설계된 도구입니다.
Azure AI 비전 Read API는 Microsoft의 최신 인식 모델을 사용하여 이미지의 텍스트 콘텐츠를 감지하고, 식별된 텍스트를 머신에서 읽을 수 있는 문자 스트림으로 변환합니다.
이 자습서에서는 iOS 앱을 처음부터 빌드하고 몰입형 리더 SDK를 사용하여 읽기 API 및 몰입형 리더 통합합니다. 이 자습서의 전체 작업 샘플은 GitHub에서 사용할 수 있습니다.
필수 구성 요소
- Azure 구독 무료로 하나를 만들 수 있습니다.
- MacOS 및 Xcode.
- Microsoft Entra 인증에 대해 구성된 몰입형 판독기 리소스입니다. 다음 지침에 따라 설정하세요.
- Azure AI Vision 서비스에 대한 구독입니다. Azure Portal에서 Azure AI Vision 리소스를 만듭니다.
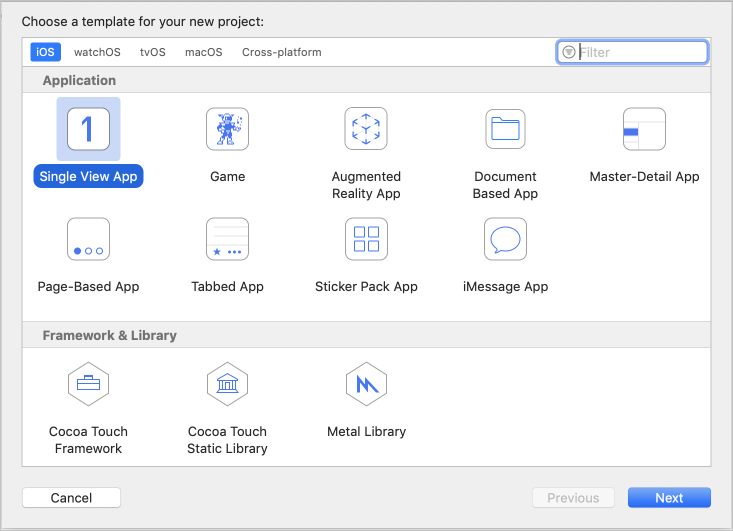
Xcode 프로젝트 만들기
Xcode에서 새 프로젝트를 만듭니다.

단일 보기 앱을 선택합니다.
SDK CocoaPod 가져오기
몰입형 리더 SDK를 사용하는 가장 쉬운 방법은 CocoaPods를 사용하는 것입니다. Cocoapods를 통해 설치하려면 다음을 수행합니다.
가이드에 따라 Cocoapods를 설치합니다.
Xcode 프로젝트의 루트 디렉터리에서
pod init를 실행하여 Podfile을 만듭니다.pod 'immersive-reader-sdk', :path => 'https://github.com/microsoft/immersive-reader-sdk/tree/master/iOS/immersive-reader-sdk'를 추가하여 CocoaPod를 Podfile에 추가합니다. Podfile은 picture-to-immersive-reader-swift를 대상의 이름으로 바꿔 다음과 같습니다.platform :ios, '9.0' target 'picture-to-immersive-reader-swift' do use_frameworks! # Pods for picture-to-immersive-reader-swift pod 'immersive-reader-sdk', :git => 'https://github.com/microsoft/immersive-reader-sdk.git' end터미널의 Xcode 프로젝트 디렉터리에서
pod install명령을 실행하여 몰입형 리더 SDK Pod를 설치합니다.SDK를 참조해야 하는 모든 파일에
import immersive_reader_sdk를 추가합니다..xcodeproj파일이 아니라.xcworkspace파일을 열어 프로젝트를 열어야 합니다.
Microsoft Entra 인증 토큰 획득
필수 구성 요소 섹션의 Microsoft Entra 인증 구성 단계에서 일부 값이 필요합니다. 해당 세션에서 저장한 텍스트 파일을 다시 참조하세요.
TenantId     => Azure subscription TenantId
ClientId     => Microsoft Entra ApplicationId
ClientSecret => Microsoft Entra Application Service Principal password
Subdomain    => Immersive Reader resource subdomain (resource 'Name' if the resource was created in the Azure portal, or 'CustomSubDomain' option if the resource was created with Azure CLI PowerShell. Check the Azure portal for the subdomain on the Endpoint in the resource Overview page, for example, 'https://[SUBDOMAIN].cognitiveservices.azure.com/')
ViewController.swift 파일이 포함된 기본 프로젝트 폴더에서 Swift Constants.swift클래스 파일을 만듭니다. 클래스를 다음 코드로 바꾸고, 해당하는 경우 값을 추가합니다. 이 파일은 컴퓨터에만 존재하는 로컬 파일로 유지하고 공개해서는 안 되는 비밀이 포함되어 있으므로 이 파일을 소스 제어에 커밋하지 않아야 합니다. 앱에 비밀을 보관하지 않는 것이 좋습니다. 대신 백 엔드 서비스를 사용하여 토큰을 가져옵니다. 여기서 비밀은 앱 외부와 디바이스 외부에 보관할 수 있습니다. 권한 없는 사용자가 토큰을 획득하여 몰입형 리더 서비스 및 청구에 사용하지 못하도록 백 엔드 API 엔드포인트를 인증 형식(예: OAuth)으로 보호해야 합니다. 이 작업은 이 자습서의 범위를 벗어납니다.
스토리보드 없이 실행되도록 앱 설정
AppDelegate.swift를 열고 파일을 다음 코드로 바꿉다.
import UIKit

@UIApplicationMain
class AppDelegate: UIResponder, UIApplicationDelegate {

    var window: UIWindow?

    var navigationController: UINavigationController?

    func application(_ application: UIApplication, didFinishLaunchingWithOptions launchOptions: [UIApplication.LaunchOptionsKey: Any]?) -> Bool {
        // Override point for customization after application launch.

        window = UIWindow(frame: UIScreen.main.bounds)

        // Allow the app run without a storyboard
        if let window = window {
            let mainViewController = PictureLaunchViewController()
            navigationController = UINavigationController(rootViewController: mainViewController)
            window.rootViewController = navigationController
            window.makeKeyAndVisible()
        }
        return true
    }

    func applicationWillResignActive(_ application: UIApplication) {
        // Sent when the application is about to move from active to inactive state. This can occur for certain types of temporary interruptions (such as an incoming phone call or SMS message) or when the user quits the application and it begins the transition to the background state.
        // Use this method to pause ongoing tasks, disable timers, and invalidate graphics rendering callbacks. Games should use this method to pause the game.
    }

    func applicationDidEnterBackground(_ application: UIApplication) {
        // Use this method to release shared resources, save user data, invalidate timers, and store enough application state information to restore your application to its current state in case it is terminated later.
        // If your application supports background execution, this method is called instead of applicationWillTerminate: when the user quits.
    }

    func applicationWillEnterForeground(_ application: UIApplication) {
        // Called as part of the transition from the background to the active state; here you can undo many of the changes made on entering the background.
    }

    func applicationDidBecomeActive(_ application: UIApplication) {
        // Restart any tasks that were paused (or not yet started) while the application was inactive. If the application was previously in the background, optionally refresh the user interface.
    }

    func applicationWillTerminate(_ application: UIApplication) {
        // Called when the application is about to terminate. Save data if appropriate. See also applicationDidEnterBackground:.
    }

}
사진을 촬영하고 업로드하는 기능 추가
ViewController.swift의 이름을 PictureLaunchViewController.swift로 바꾸고 파일을 다음 코드로 바꿉니다.
import UIKit
import immersive_reader_sdk
class PictureLaunchViewController: UIViewController, UINavigationControllerDelegate, UIImagePickerControllerDelegate {
private var photoButton: UIButton!
private var cameraButton: UIButton!
private var titleText: UILabel!
private var bodyText: UILabel!
private var sampleContent: Content!
private var sampleChunk: Chunk!
private var sampleOptions: Options!
private var imagePicker: UIImagePickerController!
private var spinner: UIActivityIndicatorView!
private var activityIndicatorBackground: UIView!
private var textURL = "vision/v2.0/read/core/asyncBatchAnalyze";
override func viewDidLoad() {
super.viewDidLoad()
view.backgroundColor = .white
titleText = UILabel()
titleText.text = "Picture to Immersive Reader with OCR"
titleText.font = UIFont.boldSystemFont(ofSize: 32)
titleText.textAlignment = .center
titleText.lineBreakMode = .byWordWrapping
titleText.numberOfLines = 0
view.addSubview(titleText)
bodyText = UILabel()
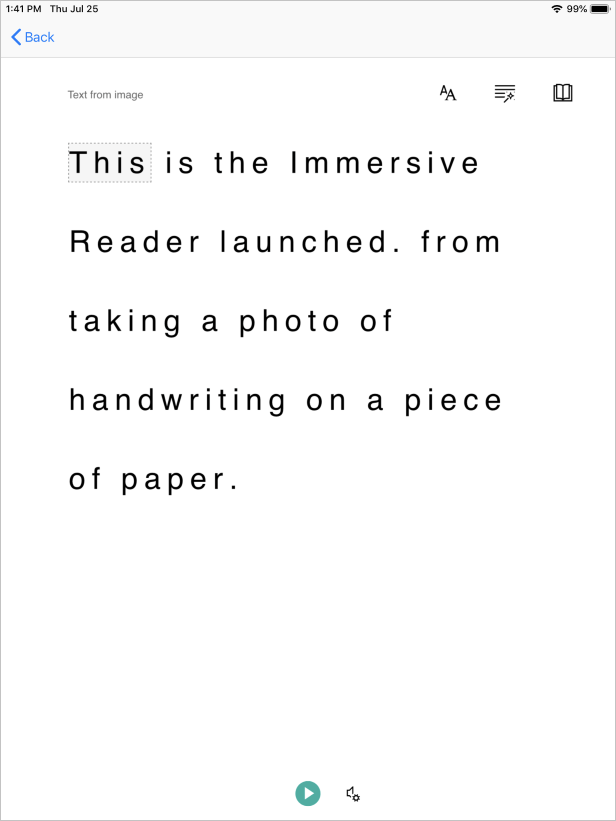
bodyText.text = "Capture or upload a photo of handprinted text on a piece of paper, handwriting, typed text, text on a computer screen, writing on a white board and many more, and watch it be presented to you in the Immersive Reader!"
bodyText.font = UIFont.systemFont(ofSize: 18)
bodyText.lineBreakMode = .byWordWrapping
bodyText.numberOfLines = 0
let screenSize = self.view.frame.height
if screenSize <= 667 {
// Font size for smaller iPhones.
bodyText.font = bodyText.font.withSize(16)
} else if screenSize <= 812.0 {
// Font size for medium iPhones.
bodyText.font = bodyText.font.withSize(18)
} else if screenSize <= 896 {
// Font size for larger iPhones.
bodyText.font = bodyText.font.withSize(20)
} else {
// Font size for iPads.
bodyText.font = bodyText.font.withSize(26)
}
view.addSubview(bodyText)
photoButton = UIButton()
photoButton.backgroundColor = .darkGray
photoButton.contentEdgeInsets = UIEdgeInsets(top: 10, left: 5, bottom: 10, right: 5)
photoButton.layer.cornerRadius = 5
photoButton.setTitleColor(.white, for: .normal)
photoButton.setTitle("Choose Photo from Library", for: .normal)
photoButton.titleLabel?.font = UIFont.systemFont(ofSize: 18, weight: .bold)
photoButton.addTarget(self, action: #selector(selectPhotoButton(sender:)), for: .touchUpInside)
view.addSubview(photoButton)
cameraButton = UIButton()
cameraButton.backgroundColor = .darkGray
cameraButton.contentEdgeInsets = UIEdgeInsets(top: 10, left: 5, bottom: 10, right: 5)
cameraButton.layer.cornerRadius = 5
cameraButton.setTitleColor(.white, for: .normal)
cameraButton.setTitle("Take Photo", for: .normal)
cameraButton.titleLabel?.font = UIFont.systemFont(ofSize: 18, weight: .bold)
cameraButton.addTarget(self, action: #selector(takePhotoButton(sender:)), for: .touchUpInside)
view.addSubview(cameraButton)
activityIndicatorBackground = UIView()
activityIndicatorBackground.backgroundColor = UIColor.black
activityIndicatorBackground.alpha = 0
view.addSubview(activityIndicatorBackground)
view.bringSubviewToFront(_: activityIndicatorBackground)
spinner = UIActivityIndicatorView(style: .whiteLarge)
view.addSubview(spinner)
let layoutGuide = view.safeAreaLayoutGuide
titleText.translatesAutoresizingMaskIntoConstraints = false
titleText.topAnchor.constraint(equalTo: layoutGuide.topAnchor, constant: 25).isActive = true
titleText.leadingAnchor.constraint(equalTo: layoutGuide.leadingAnchor, constant: 20).isActive = true
titleText.trailingAnchor.constraint(equalTo: layoutGuide.trailingAnchor, constant: -20).isActive = true
bodyText.translatesAutoresizingMaskIntoConstraints = false
bodyText.topAnchor.constraint(equalTo: titleText.bottomAnchor, constant: 35).isActive = true
bodyText.leadingAnchor.constraint(equalTo: layoutGuide.leadingAnchor, constant: 20).isActive = true
bodyText.trailingAnchor.constraint(equalTo: layoutGuide.trailingAnchor, constant: -20).isActive = true
cameraButton.translatesAutoresizingMaskIntoConstraints = false
if screenSize > 896 {
// Constraints for iPads.
cameraButton.heightAnchor.constraint(equalToConstant: 150).isActive = true
cameraButton.leadingAnchor.constraint(equalTo: layoutGuide.leadingAnchor, constant: 60).isActive = true
cameraButton.trailingAnchor.constraint(equalTo: layoutGuide.trailingAnchor, constant: -60).isActive = true
cameraButton.topAnchor.constraint(equalTo: bodyText.bottomAnchor, constant: 150).isActive = true
} else {
// Constraints for iPhones.
cameraButton.heightAnchor.constraint(equalToConstant: 100).isActive = true
cameraButton.leadingAnchor.constraint(equalTo: layoutGuide.leadingAnchor, constant: 30).isActive = true
cameraButton.trailingAnchor.constraint(equalTo: layoutGuide.trailingAnchor, constant: -30).isActive = true
cameraButton.topAnchor.constraint(equalTo: bodyText.bottomAnchor, constant: 100).isActive = true
}
cameraButton.bottomAnchor.constraint(equalTo: photoButton.topAnchor, constant: -40).isActive = true
photoButton.translatesAutoresizingMaskIntoConstraints = false
if screenSize > 896 {
// Constraints for iPads.
photoButton.heightAnchor.constraint(equalToConstant: 150).isActive = true
photoButton.leadingAnchor.constraint(equalTo: layoutGuide.leadingAnchor, constant: 60).isActive = true
photoButton.trailingAnchor.constraint(equalTo: layoutGuide.trailingAnchor, constant: -60).isActive = true
} else {
// Constraints for iPhones.
photoButton.heightAnchor.constraint(equalToConstant: 100).isActive = true
photoButton.leadingAnchor.constraint(equalTo: layoutGuide.leadingAnchor, constant: 30).isActive = true
photoButton.trailingAnchor.constraint(equalTo: layoutGuide.trailingAnchor, constant: -30).isActive = true
}
spinner.translatesAutoresizingMaskIntoConstraints = false
spinner.centerXAnchor.constraint(equalTo: view.centerXAnchor).isActive = true
spinner.centerYAnchor.constraint(equalTo: view.centerYAnchor).isActive = true
activityIndicatorBackground.translatesAutoresizingMaskIntoConstraints = false
activityIndicatorBackground.topAnchor.constraint(equalTo: layoutGuide.topAnchor).isActive = true
activityIndicatorBackground.bottomAnchor.constraint(equalTo: layoutGuide.bottomAnchor).isActive = true
activityIndicatorBackground.leadingAnchor.constraint(equalTo: layoutGuide.leadingAnchor).isActive = true
activityIndicatorBackground.trailingAnchor.constraint(equalTo: layoutGuide.trailingAnchor).isActive = true
// Create content and options.
sampleChunk = Chunk(content: bodyText.text!, lang: nil, mimeType: nil)
sampleContent = Content(title: titleText.text!, chunks: [sampleChunk])
sampleOptions = Options(uiLang: nil, timeout: nil, uiZIndex: nil)
}
@IBAction func selectPhotoButton(sender: AnyObject) {
// Launch the photo picker.
imagePicker = UIImagePickerController()
imagePicker.delegate = self
self.imagePicker.sourceType = .photoLibrary
self.imagePicker.allowsEditing = true
self.present(self.imagePicker, animated: true, completion: nil)
self.photoButton.isEnabled = true
}
@IBAction func takePhotoButton(sender: AnyObject) {
if !UIImagePickerController.isSourceTypeAvailable(.camera) {
// If there is no camera on the device, disable the button
self.cameraButton.backgroundColor = .gray
self.cameraButton.isEnabled = true
} else {
// Launch the camera.
imagePicker = UIImagePickerController()
imagePicker.delegate = self
self.imagePicker.sourceType = .camera
self.present(self.imagePicker, animated: true, completion: nil)
self.cameraButton.isEnabled = true
}
}
func imagePickerController(_ picker: UIImagePickerController, didFinishPickingMediaWithInfo info: [UIImagePickerController.InfoKey : Any]) {
imagePicker.dismiss(animated: true, completion: nil)
photoButton.isEnabled = false
cameraButton.isEnabled = false
self.spinner.startAnimating()
activityIndicatorBackground.alpha = 0.6
// Retrieve the image.
let image = (info[.originalImage] as? UIImage)!
// Retrieve the byte array from image.
let imageByteArray = image.jpegData(compressionQuality: 1.0)
// Call the getTextFromImage function passing in the image the user takes or chooses.
getTextFromImage(subscriptionKey: Constants.computerVisionSubscriptionKey, getTextUrl: Constants.computerVisionEndPoint + textURL, pngImage: imageByteArray!, onSuccess: { cognitiveText in
print("cognitive text is: \(cognitiveText)")
DispatchQueue.main.async {
self.photoButton.isEnabled = true
self.cameraButton.isEnabled = true
}
// Create content and options with the text from the image.
let sampleImageChunk = Chunk(content: cognitiveText, lang: nil, mimeType: nil)
let sampleImageContent = Content(title: "Text from image", chunks: [sampleImageChunk])
let sampleImageOptions = Options(uiLang: nil, timeout: nil, uiZIndex: nil)
// Callback to get token for Immersive Reader.
self.getToken(onSuccess: {cognitiveToken in
DispatchQueue.main.async {
launchImmersiveReader(navController: self.navigationController!, token: cognitiveToken, subdomain: Constants.subdomain, content: sampleImageContent, options: sampleImageOptions, onSuccess: {
self.spinner.stopAnimating()
self.activityIndicatorBackground.alpha = 0
self.photoButton.isEnabled = true
self.cameraButton.isEnabled = true
}, onFailure: { error in
print("An error occurred launching the Immersive Reader: \(error)")
self.spinner.stopAnimating()
self.activityIndicatorBackground.alpha = 0
self.photoButton.isEnabled = true
self.cameraButton.isEnabled = true
})
}
}, onFailure: { error in
DispatchQueue.main.async {
self.photoButton.isEnabled = true
self.cameraButton.isEnabled = true
}
print("An error occurred retrieving the token: \(error)")
})
}, onFailure: { error in
DispatchQueue.main.async {
self.photoButton.isEnabled = true
self.cameraButton.isEnabled = true
}
})
}
/// Retrieves the token for the Immersive Reader using Microsoft Entra authentication
///
/// - Parameters:
/// -onSuccess: A closure that gets called when the token is successfully received using Microsoft Entra authentication.
/// -theToken: The token for the Immersive Reader received using Microsoft Entra authentication.
/// -onFailure: A closure that gets called when the token fails to be obtained from the Microsoft Entra authentication.
/// -theError: The error that occurred when the token fails to be obtained from the Microsoft Entra authentication.
func getToken(onSuccess: @escaping (_ theToken: String) -> Void, onFailure: @escaping ( _ theError: String) -> Void) {
let tokenForm = "grant_type=client_credentials&resource=https://cognitiveservices.azure.com/&client_id=" + Constants.clientId + "&client_secret=" + Constants.clientSecret
let tokenUrl = "https://login.windows.net/" + Constants.tenantId + "/oauth2/token"
var responseTokenString: String = "0"
let url = URL(string: tokenUrl)!
var request = URLRequest(url: url)
request.httpBody = tokenForm.data(using: .utf8)
request.httpMethod = "POST"
let task = URLSession.shared.dataTask(with: request) { data, response, error in
guard let data = data,
let response = response as? HTTPURLResponse,
// Check for networking errors.
error == nil else {
print("error", error ?? "Unknown error")
onFailure("Error")
return
}
// Check for http errors.
guard (200 ... 299) ~= response.statusCode else {
print("statusCode should be 2xx, but is \(response.statusCode)")
print("response = \(response)")
onFailure(String(response.statusCode))
return
}
let responseString = String(data: data, encoding: .utf8)
print("responseString = \(String(describing: responseString!))")
let jsonResponse = try? JSONSerialization.jsonObject(with: data, options: [])
guard let jsonDictonary = jsonResponse as? [String: Any] else {
onFailure("Error parsing JSON response.")
return
}
guard let responseToken = jsonDictonary["access_token"] as? String else {
onFailure("Error retrieving token from JSON response.")
return
}
responseTokenString = responseToken
onSuccess(responseTokenString)
}
task.resume()
}
/// Returns the text string after it has been extracted from an Image input.
///
/// - Parameters:
/// -subscriptionKey: The Azure subscription key.
/// -pngImage: Image data in PNG format.
/// - Returns: a string of text representing the
func getTextFromImage(subscriptionKey: String, getTextUrl: String, pngImage: Data, onSuccess: @escaping (_ theToken: String) -> Void, onFailure: @escaping ( _ theError: String) -> Void) {
let url = URL(string: getTextUrl)!
var request = URLRequest(url: url)
request.setValue(subscriptionKey, forHTTPHeaderField: "Ocp-Apim-Subscription-Key")
request.setValue("application/octet-stream", forHTTPHeaderField: "Content-Type")
// Two REST API calls are required to extract text. The first call is to submit the image for processing, and the next call is to retrieve the text found in the image.
// Set the body to the image in byte array format.
request.httpBody = pngImage
request.httpMethod = "POST"
let task = URLSession.shared.dataTask(with: request) { data, response, error in
guard let data = data,
let response = response as? HTTPURLResponse,
// Check for networking errors.
error == nil else {
print("error", error ?? "Unknown error")
onFailure("Error")
return
}
// Check for http errors.
guard (200 ... 299) ~= response.statusCode else {
print("statusCode should be 2xx, but is \(response.statusCode)")
print("response = \(response)")
onFailure(String(response.statusCode))
return
}
let responseString = String(data: data, encoding: .utf8)
print("responseString = \(String(describing: responseString!))")
// Send the second call to the API. The first API call returns operationLocation which stores the URI for the second REST API call.
let operationLocation = response.allHeaderFields["Operation-Location"] as? String
if (operationLocation == nil) {
print("Error retrieving operation location")
return
}
// Wait 10 seconds for text recognition to be available as suggested by the Text API documentation.
print("Text submitted. Waiting 10 seconds to retrieve the recognized text.")
sleep(10)
// HTTP GET request with the operationLocation url to retrieve the text.
let getTextUrl = URL(string: operationLocation!)!
var getTextRequest = URLRequest(url: getTextUrl)
getTextRequest.setValue(subscriptionKey, forHTTPHeaderField: "Ocp-Apim-Subscription-Key")
getTextRequest.httpMethod = "GET"
// Send the GET request to retrieve the text.
let taskGetText = URLSession.shared.dataTask(with: getTextRequest) { data, response, error in
guard let data = data,
let response = response as? HTTPURLResponse,
// Check for networking errors.
error == nil else {
print("error", error ?? "Unknown error")
onFailure("Error")
return
}
// Check for http errors.
guard (200 ... 299) ~= response.statusCode else {
print("statusCode should be 2xx, but is \(response.statusCode)")
print("response = \(response)")
onFailure(String(response.statusCode))
return
}
// Decode the JSON data into an object.
let customDecoding = try! JSONDecoder().decode(TextApiResponse.self, from: data)
// Loop through the lines to get all lines of text and concatenate them together.
var textFromImage = ""
for textLine in customDecoding.recognitionResults[0].lines {
textFromImage = textFromImage + textLine.text + " "
}
onSuccess(textFromImage)
}
taskGetText.resume()
}
task.resume()
}
// Structs used for decoding the Text API JSON response.
struct TextApiResponse: Codable {
let status: String
let recognitionResults: [RecognitionResult]
}
struct RecognitionResult: Codable {
let page: Int
let clockwiseOrientation: Double
let width, height: Int
let unit: String
let lines: [Line]
}
struct Line: Codable {
let boundingBox: [Int]
let text: String
let words: [Word]
}
struct Word: Codable {
let boundingBox: [Int]
let text: String
let confidence: String?
}
}
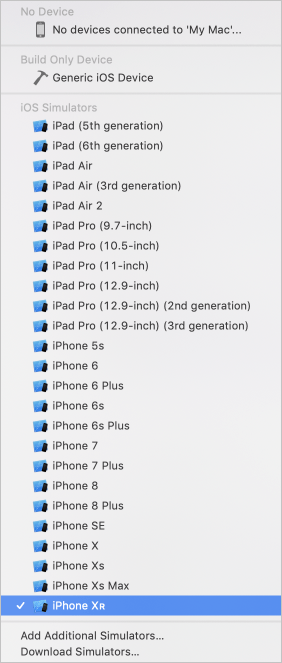
앱 빌드 및 실행
시뮬레이터 또는 디바이스 대상을 선택하여 Xcode에서 보관 체계를 설정합니다.

Xcode에서 Ctrl+R을 누르거나 재생 단추를 선택하여 프로젝트를 실행합니다. 앱은 지정된 시뮬레이터 또는 디바이스에서 시작되어야 합니다.
앱에서 다음과 같이 표시됩니다.

사진 찍기 단추 또는 라이브러리에서 사진 선택 단추를 눌러 텍스트 사진을 찍 거나 업로드합니다 . 그런 다음 몰입형 리더 시작되어 사진의 텍스트를 표시합니다.