빠른 시작: Speech Service 및 LUIS를 사용하여 의도 인식
Important
LUIS는 2025년 10월 1일에 사용 중지됩니다. 2023년 4월 1일부터 새 LUIS 리소스를 만들 수 없습니다. 지속적인 제품 지원 및 다국어 기능을 활용하려면 LUIS 애플리케이션을 대화 언어 이해로 마이그레이션하는 것이 좋습니다.
CLU(Conversational Language Understanding)는 Speech SDK 버전 1.25 이상에서 C# 및 C++에 사용할 수 있습니다. Speech SDK 및 CLU를 사용하여 의도를 인식하려면 빠른 시작을 참조하세요.
참조 설명서 | 패키지(NuGet) | GitHub의 추가 샘플
이 빠른 시작에서는 Speech SDK 및 LUIS(Language Understanding) 서비스를 사용하여 마이크에서 캡처한 오디오 데이터에서 의도를 인식합니다. 특히 Speech SDK를 사용하여 음성을 캡처하고 LUIS에서 미리 빌드된 작업을 기본 조명 켜기 및 해제와 같은 홈 자동화의 의도를 식별합니다.
필수 조건
- Azure 구독 - 체험 구독 만들기
- Azure Portal에서 언어 리소스 를 만듭니다. 평가판 가격 책정 계층(
F0)을 통해 서비스를 사용해보고, 나중에 프로덕션용 유료 계층으로 업그레이드할 수 있습니다. 이번에는 음성 리소스가 필요하지 않습니다. - 언어 리소스 키 및 지역을 가져옵니다. 언어 리소스가 배포된 후, 리소스로 이동을 선택하여 키를 보고 관리합니다. Azure AI 서비스 리소스에 대한 자세한 내용은 리소스 키 가져오기를 참조하세요.
의도 인식을 위한 LUIS 앱 만들기
의도 인식 빠른 시작을 완료하려면 LUIS 미리 보기 포털을 사용하여 LUIS 계정 및 프로젝트를 만들어야 합니다. 이 빠른 시작에서는 의도 인식을 사용할 수 있는 지역에서 LUIS 구독이 필요합니다. Speech Service 구독은 필요하지 않습니다.
가장 먼저 해야 할 일은 LUIS 미리 보기 포털을 사용하여 LUIS 계정 및 앱을 만드는 것입니다. 만든 LUIS 앱은 의도, 엔터티 및 예제 발화를 제공하는 홈 자동화에 대해 미리 빌드된 도메인을 사용합니다. 완료되면 Speech SDK를 사용하여 호출할 수 있는 LUIS 엔드포인트가 클라우드에서 실행됩니다.
다음 지침에 따라 LUIS 앱을 만듭니다.
완료되면 다음 네 가지가 필요합니다.
- 음성 초기화가 전환된 상태에서 다시 게시
- LUIS 기본 키
- LUIS 위치
- LUIS 앱 ID
LUIS 미리 보기 포털에서 이 정보를 찾을 수 있는 위치는 다음과 같습니다.
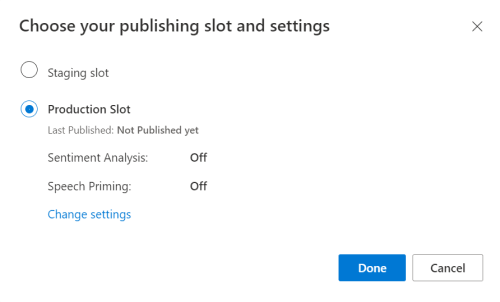
LUIS 미리 보기 포털에서 앱을 선택한 다음 게시 단추를 선택합니다.
프로덕션 슬롯을 선택하고(
en-US를 사용하는 경우 설정 변경 선택) 음성 프라이밍 옵션을 켜기 위치로 설정합니다. 그런 다음 게시 단추를 선택합니다.Important
음성 초기화 는 음성 인식 정확도를 향상시키기 때문에 매우 권장됩니다.
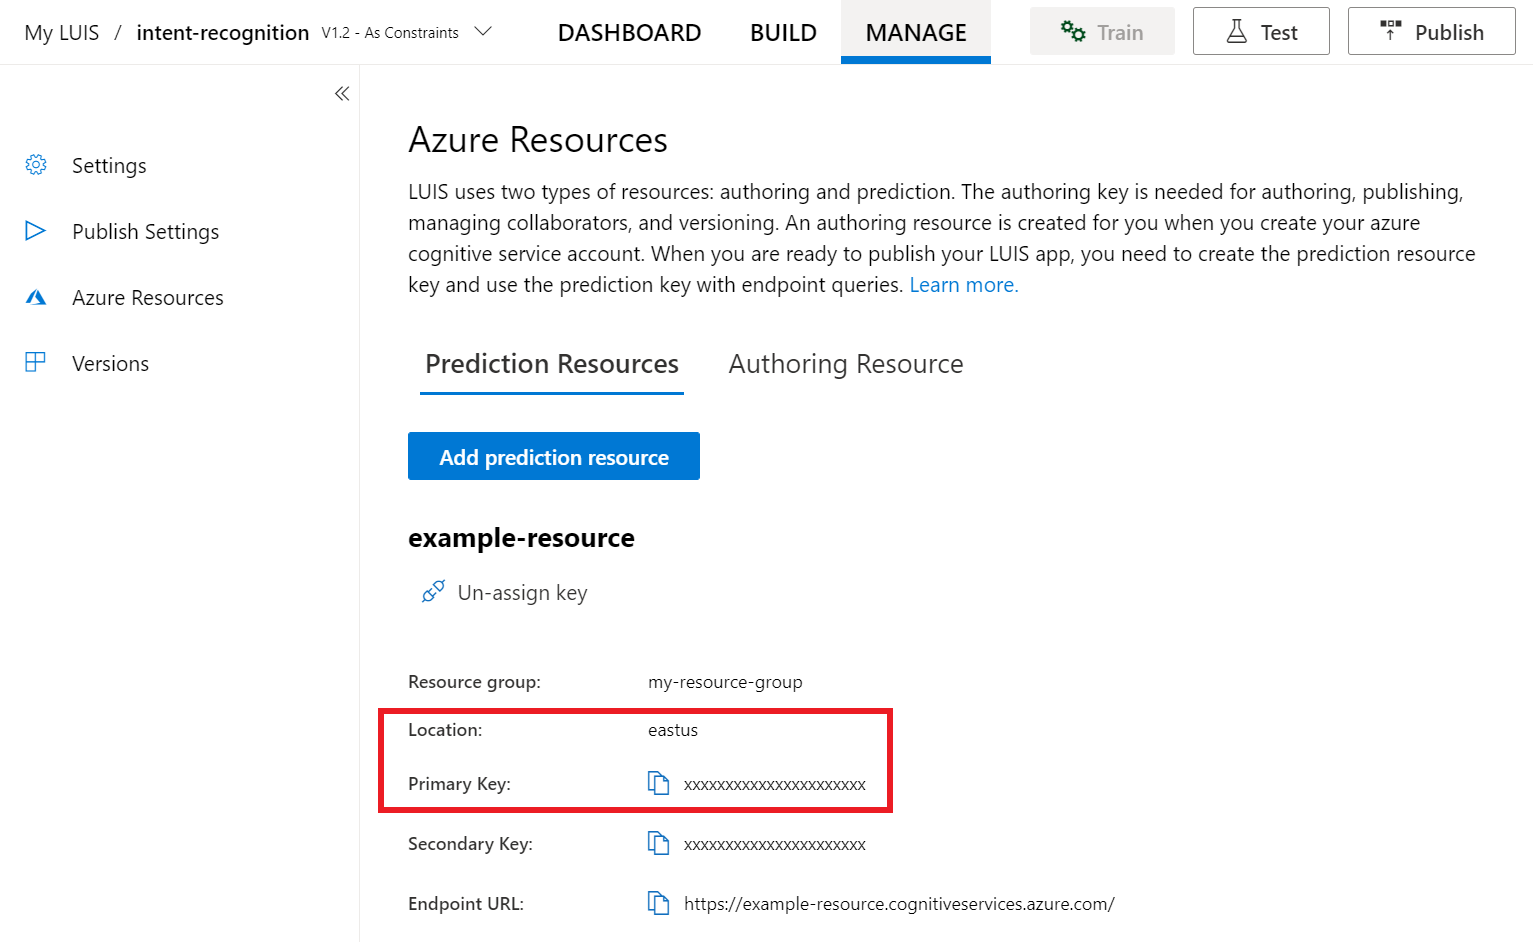
LUIS 미리 보기 포털에서 관리를 선택한 다음, Azure 리소스를 선택합니다. 이 페이지에서 LUIS 예측 리소스에 대한 LUIS 키와 위치(지역이라고도 함)를 찾을 수 있습니다.
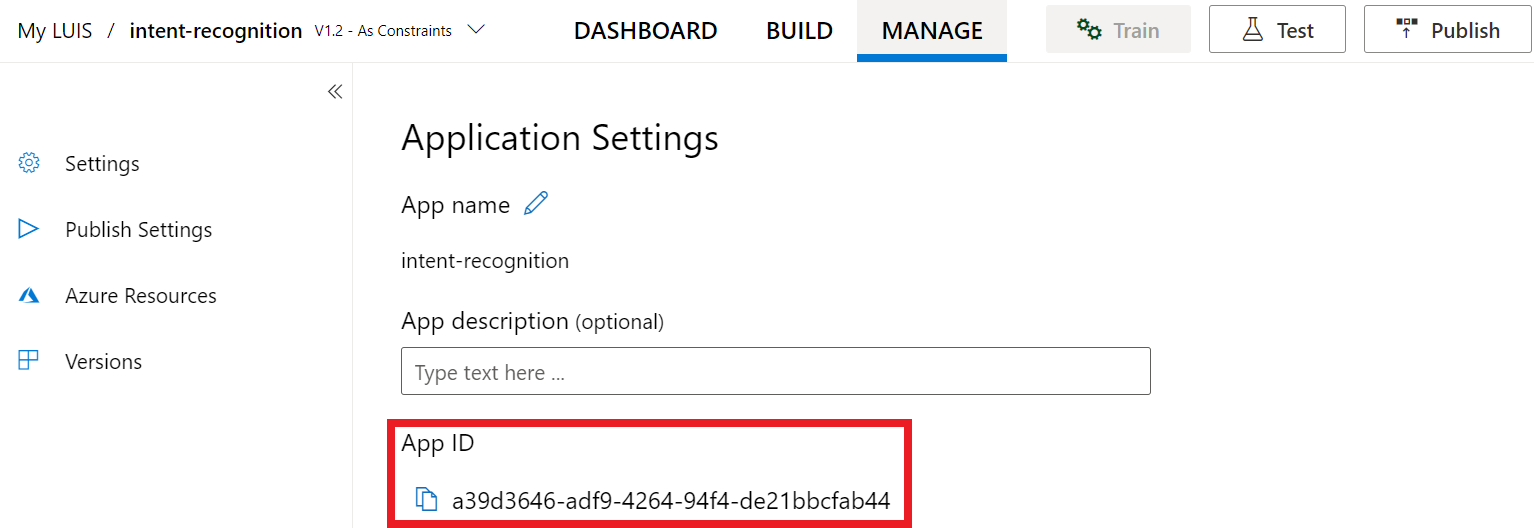
키와 위치를 얻은 후에는 앱 ID가 필요합니다. 설정을 선택합니다. 이 페이지에서 앱 ID를 사용할 수 있습니다.
Visual Studio에서 프로젝트 열기
다음으로 Visual Studio에서 프로젝트를 엽니다.
- Visual Studio 2019를 시작합니다.
- 프로젝트를 로드하고 엽니다
Program.cs.
일부 상용구 코드로 시작
프로젝트에 대한 기본 사항으로 작동하는 몇 가지 코드를 추가해 보겠습니다. 라는 RecognizeIntentAsync()비동기 메서드를 만들었습니다.
using System;
using System.Threading.Tasks;
using Microsoft.CognitiveServices.Speech;
using Microsoft.CognitiveServices.Speech.Intent;

namespace helloworld
{
    class Program
    {
        public static async Task RecognizeIntentAsync()
        {
        }

        static async Task Main()
        {
            await RecognizeIntentAsync();
            Console.WriteLine("Please press <Return> to continue.");
            Console.ReadLine();
        }
    }
}
Speech 구성 만들기
개체를 IntentRecognizer 초기화하려면 먼저 LUIS 예측 리소스에 대한 키와 위치를 사용하는 구성을 만들어야 합니다.
Important
시작 키와 작성 키가 작동하지 않습니다. 이전에 만든 예측 키와 위치를 사용해야 합니다. 자세한 내용은 의도 인식에 대한 LUIS 앱 만들기를 참조하세요.
메서드에 이 코드를 삽입합니다 RecognizeIntentAsync() . 다음 값을 업데이트해야 합니다.
- LUIS 예측 키로 대체
"YourLanguageUnderstandingSubscriptionKey"합니다. - LUIS 위치로 대체
"YourLanguageUnderstandingServiceRegion"합니다. 지역에서 지역 식별자를사용합니다.
팁
이러한 값을 찾는 데 도움이 필요한 경우 의도 인식을 위한 LUIS 앱 만들기를 참조하세요.
Important
완료되면 코드에서 키를 제거하고 공개적으로 게시하지 마세요. 프로덕션의 경우 Azure Key Vault와 같은 자격 증명을 안전하게 저장하고 액세스하는 방법을 사용합니다. 자세한 내용은 Azure AI 서비스 보안 문서를 참조하세요.
var config = SpeechConfig.FromSubscription(
    "YourLanguageUnderstandingSubscriptionKey",
    "YourLanguageUnderstandingServiceRegion");
이 샘플에서는 메서드SpeechConfig를 FromSubscription() 사용하여 . 사용 가능한 메서드의 전체 목록은 SpeechConfig 클래스를 참조하세요.
Speech SDK는 기본적으로 언어에 en-us를 사용하여 인식합니다. 소스 언어 선택에 대한 자세한 내용은 음성 인식 방법을 참조하세요.
IntentRecognizer 초기화
이제 IntentRecognizer를 만들어 보겠습니다. 이 개체는 관리되지 않는 리소스의 적절한 릴리스를 보장하기 위해 using 문 내에 생성됩니다. 이 코드를 RecognizeIntentAsync() Speech 구성 바로 아래의 메서드에 삽입합니다.
// Creates an intent recognizer using microphone as audio input.
using (var recognizer = new IntentRecognizer(config))
{
}
LanguageUnderstandingModel 및 의도 추가
의도 인식기와 연결 LanguageUnderstandingModel 하고 인식하려는 의도를 추가해야 합니다. 홈 자동화를 위해 미리 빌드된 do기본 의도를 사용합니다. 이전 섹션의 using 문에 이 코드를 삽입합니다. "YourLanguageUnderstandingAppId"를 LUIS 앱 ID로 바꾸어야 합니다.
팁
이 값을 찾는 데 도움이 필요한 경우 의도 인식을 위한 LUIS 앱 만들기를 참조하세요.
// Creates a Language Understanding model using the app id, and adds specific intents from your model
var model = LanguageUnderstandingModel.FromAppId("YourLanguageUnderstandingAppId");
recognizer.AddIntent(model, "YourLanguageUnderstandingIntentName1", "id1");
recognizer.AddIntent(model, "YourLanguageUnderstandingIntentName2", "id2");
recognizer.AddIntent(model, "YourLanguageUnderstandingIntentName3", "any-IntentId-here");
이 예제에서는 함수를 AddIntent() 사용하여 의도를 개별적으로 추가합니다. 모델에서 모든 의도를 추가하려면 AddAllIntents(model)를 사용하고 모델을 전달합니다.
의도 인식
IntentRecognizer 개체에서 메서드를 호출 RecognizeOnceAsync() 합니다. 이 메서드를 사용하면 Speech Service에서 인식할 단일 구를 보내고 있으며, 구가 식별되면 음성 인식을 중지한다는 것을 알 수 있습니다.
using 문 내에서 모델 아래에 이 코드를 추가합니다.
// Starts recognizing.
Console.WriteLine("Say something...");

// Starts intent recognition, and returns after a single utterance is recognized. The end of a
// single utterance is determined by listening for silence at the end or until a maximum of 15
// seconds of audio is processed.  The task returns the recognition text as result.
// Note: Since RecognizeOnceAsync() returns only a single utterance, it is suitable only for single
// shot recognition like command or query.
// For long-running multi-utterance recognition, use StartContinuousRecognitionAsync() instead.
var result = await recognizer.RecognizeOnceAsync();
인식 결과 표시(또는 오류)
Speech Service에서 인식 결과를 반환하는 경우 이를 사용하여 작업을 수행할 수 있습니다. 간단하게 유지하고 결과를 콘솔에 인쇄합니다.
using 문 내부에 아래 RecognizeOnceAsync()코드를 추가합니다.
// Checks result.
switch (result.Reason)
{
    case ResultReason.RecognizedIntent:
        Console.WriteLine($"RECOGNIZED: Text={result.Text}");
        Console.WriteLine($"    Intent Id: {result.IntentId}.");
        var json = result.Properties.GetProperty(PropertyId.LanguageUnderstandingServiceResponse_JsonResult);
        Console.WriteLine($"    Language Understanding JSON: {json}.");
        break;
    case ResultReason.RecognizedSpeech:
        Console.WriteLine($"RECOGNIZED: Text={result.Text}");
        Console.WriteLine($"    Intent not recognized.");
        break;
    case ResultReason.NoMatch:
        Console.WriteLine($"NOMATCH: Speech could not be recognized.");
        break;
    case ResultReason.Canceled:
        var cancellation = CancellationDetails.FromResult(result);
        Console.WriteLine($"CANCELED: Reason={cancellation.Reason}");

        if (cancellation.Reason == CancellationReason.Error)
        {
            Console.WriteLine($"CANCELED: ErrorCode={cancellation.ErrorCode}");
            Console.WriteLine($"CANCELED: ErrorDetails={cancellation.ErrorDetails}");
            Console.WriteLine($"CANCELED: Did you update the subscription info?");
        }
        break;
}
코드 확인
이 시점에서 코드는 다음과 같습니다.
참고 항목
이 버전에 몇 가지 주석을 추가했습니다.
//
// Copyright (c) Microsoft. All rights reserved.
// Licensed under the MIT license. See LICENSE.md file in the project root for full license information.
//

// <skeleton_1>
using System;
using System.Threading.Tasks;
using Microsoft.CognitiveServices.Speech;
using Microsoft.CognitiveServices.Speech.Intent;

namespace helloworld
{
    class Program
    {
        public static async Task RecognizeIntentAsync()
        {
            // </skeleton_1>
            // Creates an instance of a speech config with specified subscription key
            // and service region. Note that in contrast to other services supported by
            // the Cognitive Services Speech SDK, the Language Understanding service
            // requires a specific subscription key from https://www.luis.ai/.
            // The Language Understanding service calls the required key 'endpoint key'.
            // Once you've obtained it, replace with below with your own Language Understanding subscription key
            // and service region (e.g., "westus").
            // The default language is "en-us".
            // <create_speech_configuration>
            var config = SpeechConfig.FromSubscription(
                "YourLanguageUnderstandingSubscriptionKey",
                "YourLanguageUnderstandingServiceRegion");
            // </create_speech_configuration>

            // <create_intent_recognizer_1>
            // Creates an intent recognizer using microphone as audio input.
            using (var recognizer = new IntentRecognizer(config))
            {
                // </create_intent_recognizer_1>

                // <add_intents>
                // Creates a Language Understanding model using the app id, and adds specific intents from your model
                var model = LanguageUnderstandingModel.FromAppId("YourLanguageUnderstandingAppId");
                recognizer.AddIntent(model, "YourLanguageUnderstandingIntentName1", "id1");
                recognizer.AddIntent(model, "YourLanguageUnderstandingIntentName2", "id2");
                recognizer.AddIntent(model, "YourLanguageUnderstandingIntentName3", "any-IntentId-here");
                // </add_intents>

                // To add all of the possible intents from a LUIS model to the recognizer, uncomment the line below:
                // recognizer.AddAllIntents(model);

                // <recognize_intent>
                // Starts recognizing.
                Console.WriteLine("Say something...");

                // Starts intent recognition, and returns after a single utterance is recognized. The end of a
                // single utterance is determined by listening for silence at the end or until a maximum of 15
                // seconds of audio is processed.  The task returns the recognition text as result.
                // Note: Since RecognizeOnceAsync() returns only a single utterance, it is suitable only for single
                // shot recognition like command or query.
                // For long-running multi-utterance recognition, use StartContinuousRecognitionAsync() instead.
                var result = await recognizer.RecognizeOnceAsync();
                // </recognize_intent>

                // <print_results>
                // Checks result.
                switch (result.Reason)
                {
                    case ResultReason.RecognizedIntent:
                        Console.WriteLine($"RECOGNIZED: Text={result.Text}");
                        Console.WriteLine($"    Intent Id: {result.IntentId}.");
                        var json = result.Properties.GetProperty(PropertyId.LanguageUnderstandingServiceResponse_JsonResult);
                        Console.WriteLine($"    Language Understanding JSON: {json}.");
                        break;
                    case ResultReason.RecognizedSpeech:
                        Console.WriteLine($"RECOGNIZED: Text={result.Text}");
                        Console.WriteLine($"    Intent not recognized.");
                        break;
                    case ResultReason.NoMatch:
                        Console.WriteLine($"NOMATCH: Speech could not be recognized.");
                        break;
                    case ResultReason.Canceled:
                        var cancellation = CancellationDetails.FromResult(result);
                        Console.WriteLine($"CANCELED: Reason={cancellation.Reason}");

                        if (cancellation.Reason == CancellationReason.Error)
                        {
                            Console.WriteLine($"CANCELED: ErrorCode={cancellation.ErrorCode}");
                            Console.WriteLine($"CANCELED: ErrorDetails={cancellation.ErrorDetails}");
                            Console.WriteLine($"CANCELED: Did you update the subscription info?");
                        }
                        break;
                }
                // </print_results>
            // <create_intent_recognizer_2>
            }
            // </create_intent_recognizer_2>
        // <skeleton_2>
        }

        static async Task Main()
        {
            await RecognizeIntentAsync();
            Console.WriteLine("Please press <Return> to continue.");
            Console.ReadLine();
        }
    }
}
// </skeleton_2>
앱 빌드 및 실행
이제 앱을 빌드하고 음성 서비스를 사용하여 음성 인식을 테스트할 준비가 되었습니다.
- 코드를 컴파일합니다. Visual Studio의 메뉴 모음에서 빌드 솔루션 빌드>를 선택합니다.
- 앱 시작 - 메뉴 모음에서 디버그>시작 디버깅을 선택하거나 F5 키를 누릅니다.
- 인식 시작 - 영어로 문구를 말하라는 메시지가 표시됩니다. 음성이 Speech Service로 전송되고, 텍스트로 전사되고, 콘솔에서 렌더링됩니다.
참조 설명서 | 패키지(NuGet) | GitHub의 추가 샘플
이 빠른 시작에서는 Speech SDK 및 LUIS(Language Understanding) 서비스를 사용하여 마이크에서 캡처한 오디오 데이터에서 의도를 인식합니다. 특히 Speech SDK를 사용하여 음성을 캡처하고 LUIS에서 미리 빌드된 작업을 기본 조명 켜기 및 해제와 같은 홈 자동화의 의도를 식별합니다.
필수 조건
- Azure 구독 - 체험 구독 만들기
- Azure Portal에서 언어 리소스 를 만듭니다. 평가판 가격 책정 계층(
F0)을 통해 서비스를 사용해보고, 나중에 프로덕션용 유료 계층으로 업그레이드할 수 있습니다. 이번에는 음성 리소스가 필요하지 않습니다. - 언어 리소스 키 및 지역을 가져옵니다. 언어 리소스가 배포된 후, 리소스로 이동을 선택하여 키를 보고 관리합니다. Azure AI 서비스 리소스에 대한 자세한 내용은 리소스 키 가져오기를 참조하세요.
의도 인식을 위한 LUIS 앱 만들기
의도 인식 빠른 시작을 완료하려면 LUIS 미리 보기 포털을 사용하여 LUIS 계정 및 프로젝트를 만들어야 합니다. 이 빠른 시작에서는 의도 인식을 사용할 수 있는 지역에서 LUIS 구독이 필요합니다. Speech Service 구독은 필요하지 않습니다.
가장 먼저 해야 할 일은 LUIS 미리 보기 포털을 사용하여 LUIS 계정 및 앱을 만드는 것입니다. 만든 LUIS 앱은 의도, 엔터티 및 예제 발화를 제공하는 홈 자동화에 대해 미리 빌드된 도메인을 사용합니다. 완료되면 Speech SDK를 사용하여 호출할 수 있는 LUIS 엔드포인트가 클라우드에서 실행됩니다.
다음 지침에 따라 LUIS 앱을 만듭니다.
완료되면 다음 네 가지가 필요합니다.
- 음성 초기화가 전환된 상태에서 다시 게시
- LUIS 기본 키
- LUIS 위치
- LUIS 앱 ID
LUIS 미리 보기 포털에서 이 정보를 찾을 수 있는 위치는 다음과 같습니다.
LUIS 미리 보기 포털에서 앱을 선택한 다음 게시 단추를 선택합니다.
프로덕션 슬롯을 선택하고(
en-US를 사용하는 경우 설정 변경 선택) 음성 프라이밍 옵션을 켜기 위치로 설정합니다. 그런 다음 게시 단추를 선택합니다.Important
음성 초기화 는 음성 인식 정확도를 향상시키기 때문에 매우 권장됩니다.
LUIS 미리 보기 포털에서 관리를 선택한 다음, Azure 리소스를 선택합니다. 이 페이지에서 LUIS 예측 리소스에 대한 LUIS 키와 위치(지역이라고도 함)를 찾을 수 있습니다.
키와 위치를 얻은 후에는 앱 ID가 필요합니다. 설정을 선택합니다. 이 페이지에서 앱 ID를 사용할 수 있습니다.
Visual Studio에서 프로젝트 열기
다음으로 Visual Studio에서 프로젝트를 엽니다.
- Visual Studio 2019를 시작합니다.
- 프로젝트를 로드하고 엽니다
helloworld.cpp.
일부 상용구 코드로 시작
프로젝트에 대한 기본 사항으로 작동하는 몇 가지 코드를 추가해 보겠습니다. 라는 recognizeIntent()비동기 메서드를 만들었습니다.
#include "stdafx.h"
#include <iostream>
#include <speechapi_cxx.h>

using namespace std;
using namespace Microsoft::CognitiveServices::Speech;
using namespace Microsoft::CognitiveServices::Speech::Intent;

void recognizeIntent()
{
}

int wmain()
{
    try
    {
        recognizeIntent();
    }
    catch (exception e)
    {
        cout << e.what();
    }
    cout << "Please press a key to continue.\n";
    cin.get();
    return 0;
}
Speech 구성 만들기
개체를 IntentRecognizer 초기화하려면 먼저 LUIS 예측 리소스에 대한 키와 위치를 사용하는 구성을 만들어야 합니다.
Important
시작 키와 작성 키가 작동하지 않습니다. 이전에 만든 예측 키와 위치를 사용해야 합니다. 자세한 내용은 의도 인식에 대한 LUIS 앱 만들기를 참조하세요.
메서드에 이 코드를 삽입합니다 recognizeIntent() . 다음 값을 업데이트해야 합니다.
- LUIS 예측 키로 대체
"YourLanguageUnderstandingSubscriptionKey"합니다. - LUIS 위치로 대체
"YourLanguageUnderstandingServiceRegion"합니다. 지역에서 지역 식별자를사용합니다.
팁
이러한 값을 찾는 데 도움이 필요한 경우 의도 인식을 위한 LUIS 앱 만들기를 참조하세요.
Important
완료되면 코드에서 키를 제거하고 공개적으로 게시하지 마세요. 프로덕션의 경우 Azure Key Vault와 같은 자격 증명을 안전하게 저장하고 액세스하는 방법을 사용합니다. 자세한 내용은 Azure AI 서비스 보안 문서를 참조하세요.
auto config = SpeechConfig::FromSubscription(
    "YourLanguageUnderstandingSubscriptionKey",
    "YourLanguageUnderstandingServiceRegion");
이 샘플에서는 메서드SpeechConfig를 FromSubscription() 사용하여 . 사용 가능한 메서드의 전체 목록은 SpeechConfig 클래스를 참조하세요.
Speech SDK는 기본적으로 언어에 en-us를 사용하여 인식합니다. 소스 언어 선택에 대한 자세한 내용은 음성 인식 방법을 참조하세요.
IntentRecognizer 초기화
이제 IntentRecognizer를 만들어 보겠습니다. 이 코드를 recognizeIntent() Speech 구성 바로 아래의 메서드에 삽입합니다.
// Creates an intent recognizer using microphone as audio input.
auto recognizer = IntentRecognizer::FromConfig(config);
LanguageUnderstandingModel 및 의도 추가
의도 인식기와 연결 LanguageUnderstandingModel 하고 인식하려는 의도를 추가해야 합니다. 홈 자동화를 위해 미리 빌드된 do기본 의도를 사용합니다.
아래에 이 코드를 삽입합니다 IntentRecognizer. "YourLanguageUnderstandingAppId"를 LUIS 앱 ID로 바꾸어야 합니다.
팁
이 값을 찾는 데 도움이 필요한 경우 의도 인식을 위한 LUIS 앱 만들기를 참조하세요.
// Creates a Language Understanding model using the app id, and adds specific intents from your model
auto model = LanguageUnderstandingModel::FromAppId("YourLanguageUnderstandingAppId");
recognizer->AddIntent(model, "YourLanguageUnderstandingIntentName1", "id1");
recognizer->AddIntent(model, "YourLanguageUnderstandingIntentName2", "id2");
recognizer->AddIntent(model, "YourLanguageUnderstandingIntentName3", "any-IntentId-here");
이 예제에서는 함수를 AddIntent() 사용하여 의도를 개별적으로 추가합니다. 모델에서 모든 의도를 추가하려면 AddAllIntents(model)를 사용하고 모델을 전달합니다.
의도 인식
IntentRecognizer 개체에서 메서드를 호출 RecognizeOnceAsync() 합니다. 이 메서드를 사용하면 Speech Service에서 인식할 단일 구를 보내고 있으며, 구가 식별되면 음성 인식을 중지한다는 것을 알 수 있습니다. 간단히 하기 위해 우리는 완료하기 위해 반환 된 미래를 기다릴 것입니다.
이 코드를 모델 아래에 삽입합니다.
cout << "Say something...\n";

// Starts intent recognition, and returns after a single utterance is recognized. The end of a
// single utterance is determined by listening for silence at the end or until a maximum of 15
// seconds of audio is processed.  The task returns the recognition text as result.
// Note: Since RecognizeOnceAsync() returns only a single utterance, it is suitable only for single
// shot recognition like command or query.
// For long-running multi-utterance recognition, use StartContinuousRecognitionAsync() instead.
auto result = recognizer->RecognizeOnceAsync().get();
인식 결과(또는 오류) 표시
Speech Service에서 인식 결과를 반환하는 경우 이를 사용하여 작업을 수행할 수 있습니다. 작업을 간단하게 유지하고 결과를 콘솔에 출력합니다.
아래에 다음 코드를 삽입합니다.auto result = recognizer->RecognizeOnceAsync().get();
// Checks result.
if (result->Reason == ResultReason::RecognizedIntent)
{
    cout << "RECOGNIZED: Text=" << result->Text << std::endl;
    cout << "  Intent Id: " << result->IntentId << std::endl;
    cout << "  Intent Service JSON: " << result->Properties.GetProperty(PropertyId::LanguageUnderstandingServiceResponse_JsonResult) << std::endl;
}
else if (result->Reason == ResultReason::RecognizedSpeech)
{
    cout << "RECOGNIZED: Text=" << result->Text << " (intent could not be recognized)" << std::endl;
}
else if (result->Reason == ResultReason::NoMatch)
{
    cout << "NOMATCH: Speech could not be recognized." << std::endl;
}
else if (result->Reason == ResultReason::Canceled)
{
    auto cancellation = CancellationDetails::FromResult(result);
    cout << "CANCELED: Reason=" << (int)cancellation->Reason << std::endl;

    if (cancellation->Reason == CancellationReason::Error)
    {
        cout << "CANCELED: ErrorCode=" << (int)cancellation->ErrorCode << std::endl;
        cout << "CANCELED: ErrorDetails=" << cancellation->ErrorDetails << std::endl;
        cout << "CANCELED: Did you update the subscription info?" << std::endl;
    }
}
코드 확인
이 시점에서 코드는 다음과 같습니다.
참고 항목
이 버전에 몇 가지 주석을 추가했습니다.
//
// Copyright (c) Microsoft. All rights reserved.
// Licensed under the MIT license. See LICENSE.md file in the project root for full license information.
//

// <skeleton_1>
#include "stdafx.h"
#include <iostream>
#include <speechapi_cxx.h>

using namespace std;
using namespace Microsoft::CognitiveServices::Speech;
using namespace Microsoft::CognitiveServices::Speech::Intent;

void recognizeIntent()
{
    // </skeleton_1>
    // Creates an instance of a speech config with specified subscription key
    // and service region. Note that in contrast to other services supported by
    // the Cognitive Services Speech SDK, the Language Understanding service
    // requires a specific subscription key from https://www.luis.ai/.
    // The Language Understanding service calls the required key 'endpoint key'.
    // Once you've obtained it, replace with below with your own Language Understanding subscription key
    // and service region (e.g., "westus").
    // The default recognition language is "en-us".
    // <create_speech_configuration>
    auto config = SpeechConfig::FromSubscription(
        "YourLanguageUnderstandingSubscriptionKey",
        "YourLanguageUnderstandingServiceRegion");
    // </create_speech_configuration>

    // <create_intent_recognizer>
    // Creates an intent recognizer using microphone as audio input.
    auto recognizer = IntentRecognizer::FromConfig(config);
    // </create_intent_recognizer>

    // <add_intents>
    // Creates a Language Understanding model using the app id, and adds specific intents from your model
    auto model = LanguageUnderstandingModel::FromAppId("YourLanguageUnderstandingAppId");
    recognizer->AddIntent(model, "YourLanguageUnderstandingIntentName1", "id1");
    recognizer->AddIntent(model, "YourLanguageUnderstandingIntentName2", "id2");
    recognizer->AddIntent(model, "YourLanguageUnderstandingIntentName3", "any-IntentId-here");
    // </add_intents>

    // To add all of the possible intents from a LUIS model to the recognizer, uncomment the line below:
    // recognizer->AddAllIntents(model);

    // <recognize_intent>
    cout << "Say something...\n";

    // Starts intent recognition, and returns after a single utterance is recognized. The end of a
    // single utterance is determined by listening for silence at the end or until a maximum of 15
    // seconds of audio is processed.  The task returns the recognition text as result.
    // Note: Since RecognizeOnceAsync() returns only a single utterance, it is suitable only for single
    // shot recognition like command or query.
    // For long-running multi-utterance recognition, use StartContinuousRecognitionAsync() instead.
    auto result = recognizer->RecognizeOnceAsync().get();
    // </recognize_intent>

    // <print_results>
    // Checks result.
    if (result->Reason == ResultReason::RecognizedIntent)
    {
        cout << "RECOGNIZED: Text=" << result->Text << std::endl;
        cout << "  Intent Id: " << result->IntentId << std::endl;
        cout << "  Intent Service JSON: " << result->Properties.GetProperty(PropertyId::LanguageUnderstandingServiceResponse_JsonResult) << std::endl;
    }
    else if (result->Reason == ResultReason::RecognizedSpeech)
    {
        cout << "RECOGNIZED: Text=" << result->Text << " (intent could not be recognized)" << std::endl;
    }
    else if (result->Reason == ResultReason::NoMatch)
    {
        cout << "NOMATCH: Speech could not be recognized." << std::endl;
    }
    else if (result->Reason == ResultReason::Canceled)
    {
        auto cancellation = CancellationDetails::FromResult(result);
        cout << "CANCELED: Reason=" << (int)cancellation->Reason << std::endl;

        if (cancellation->Reason == CancellationReason::Error)
        {
            cout << "CANCELED: ErrorCode=" << (int)cancellation->ErrorCode << std::endl;
            cout << "CANCELED: ErrorDetails=" << cancellation->ErrorDetails << std::endl;
            cout << "CANCELED: Did you update the subscription info?" << std::endl;
        }
    }
    // </print_results>
    // <skeleton_2>
}

int wmain()
{
    try
    {
        recognizeIntent();
    }
    catch (exception e)
    {
        cout << e.what();
    }
    cout << "Please press a key to continue.\n";
    cin.get();
    return 0;
}
// </skeleton_2>
앱 빌드 및 실행
이제 앱을 빌드하고 음성 서비스를 사용하여 음성 인식을 테스트할 준비가 되었습니다.
- 코드를 컴파일합니다. Visual Studio의 메뉴 모음에서 빌드 솔루션 빌드>를 선택합니다.
- 앱 시작 - 메뉴 모음에서 디버그>시작 디버깅을 선택하거나 F5 키를 누릅니다.
- 인식 시작 - 영어로 문구를 말하라는 메시지가 표시됩니다. 음성이 Speech Service로 전송되고, 텍스트로 전사되고, 콘솔에서 렌더링됩니다.
이 빠른 시작에서는 Speech SDK 및 LUIS(Language Understanding) 서비스를 사용하여 마이크에서 캡처한 오디오 데이터에서 의도를 인식합니다. 특히 Speech SDK를 사용하여 음성을 캡처하고 LUIS에서 미리 빌드된 작업을 기본 조명 켜기 및 해제와 같은 홈 자동화의 의도를 식별합니다.
필수 조건
- Azure 구독 - 체험 구독 만들기
- Azure Portal에서 언어 리소스 를 만듭니다. 평가판 가격 책정 계층(
F0)을 통해 서비스를 사용해보고, 나중에 프로덕션용 유료 계층으로 업그레이드할 수 있습니다. 이번에는 음성 리소스가 필요하지 않습니다. - 언어 리소스 키 및 지역을 가져옵니다. 언어 리소스가 배포된 후, 리소스로 이동을 선택하여 키를 보고 관리합니다. Azure AI 서비스 리소스에 대한 자세한 내용은 리소스 키 가져오기를 참조하세요.
또한 개발 환경용 Speech SDK를 설치하고 빈 샘플 프로젝트를 만들어야 합니다.
의도 인식을 위한 LUIS 앱 만들기
의도 인식 빠른 시작을 완료하려면 LUIS 미리 보기 포털을 사용하여 LUIS 계정 및 프로젝트를 만들어야 합니다. 이 빠른 시작에서는 의도 인식을 사용할 수 있는 지역에서 LUIS 구독이 필요합니다. Speech Service 구독은 필요하지 않습니다.
가장 먼저 해야 할 일은 LUIS 미리 보기 포털을 사용하여 LUIS 계정 및 앱을 만드는 것입니다. 만든 LUIS 앱은 의도, 엔터티 및 예제 발화를 제공하는 홈 자동화에 대해 미리 빌드된 도메인을 사용합니다. 완료되면 Speech SDK를 사용하여 호출할 수 있는 LUIS 엔드포인트가 클라우드에서 실행됩니다.
다음 지침에 따라 LUIS 앱을 만듭니다.
완료되면 다음 네 가지가 필요합니다.
- 음성 초기화가 전환된 상태에서 다시 게시
- LUIS 기본 키
- LUIS 위치
- LUIS 앱 ID
LUIS 미리 보기 포털에서 이 정보를 찾을 수 있는 위치는 다음과 같습니다.
LUIS 미리 보기 포털에서 앱을 선택한 다음 게시 단추를 선택합니다.
프로덕션 슬롯을 선택하고(
en-US를 사용하는 경우 설정 변경 선택) 음성 프라이밍 옵션을 켜기 위치로 설정합니다. 그런 다음 게시 단추를 선택합니다.Important
음성 초기화 는 음성 인식 정확도를 향상시키기 때문에 매우 권장됩니다.
LUIS 미리 보기 포털에서 관리를 선택한 다음, Azure 리소스를 선택합니다. 이 페이지에서 LUIS 예측 리소스에 대한 LUIS 키와 위치(지역이라고도 함)를 찾을 수 있습니다.
키와 위치를 얻은 후에는 앱 ID가 필요합니다. 설정을 선택합니다. 이 페이지에서 앱 ID를 사용할 수 있습니다.
프로젝트 열기
- 원하는 IDE를 엽니다.
- 프로젝트를 로드하고 엽니다
Main.java.
일부 상용구 코드로 시작
프로젝트에 대한 기본 사항으로 작동하는 몇 가지 코드를 추가해 보겠습니다.
package speechsdk.quickstart;

import com.microsoft.cognitiveservices.speech.*;
import com.microsoft.cognitiveservices.speech.intent.*;

/**
 * Quickstart: recognize speech using the Speech SDK for Java.
 */
public class Main {

    /**
     * @param args Arguments are ignored in this sample.
     */
    public static void main(String[] args) {
        } catch (Exception ex) {
            System.out.println("Unexpected exception: " + ex.getMessage());

            assert(false);
            System.exit(1);
        }
    }
}
Speech 구성 만들기
개체를 IntentRecognizer 초기화하려면 먼저 LUIS 예측 리소스에 대한 키와 위치를 사용하는 구성을 만들어야 합니다.
의 try/catch 블록에 이 코드를 삽입합니다 main(). 다음 값을 업데이트해야 합니다.
- LUIS 예측 키로 대체
"YourLanguageUnderstandingSubscriptionKey"합니다. - LUIS 위치로 대체
"YourLanguageUnderstandingServiceRegion"합니다. 지역에서 지역 식별자사용
팁
이러한 값을 찾는 데 도움이 필요한 경우 의도 인식을 위한 LUIS 앱 만들기를 참조하세요.
Important
완료되면 코드에서 키를 제거하고 공개적으로 게시하지 마세요. 프로덕션의 경우 Azure Key Vault와 같은 자격 증명을 안전하게 저장하고 액세스하는 방법을 사용합니다. 자세한 내용은 Azure AI 서비스 보안 문서를 참조하세요.
// Replace below with with specified subscription key (called 'endpoint key' by the Language Understanding service)
String languageUnderstandingSubscriptionKey = "YourLanguageUnderstandingSubscriptionKey";
// Replace below with your own service region (e.g., "westus").
String languageUnderstandingServiceRegion = "YourLanguageUnderstandingServiceRegion";

// Creates an instance of intent recognizer with a given speech configuration.
// Recognizer is created with the default microphone audio input and default language "en-us".
try (SpeechConfig config = SpeechConfig.fromSubscription(languageUnderstandingSubscriptionKey, languageUnderstandingServiceRegion);
이 샘플에서는 메서드SpeechConfig를 FromSubscription() 사용하여 . 사용 가능한 메서드의 전체 목록은 SpeechConfig 클래스를 참조하세요.
Speech SDK는 기본적으로 언어에 en-us를 사용하여 인식합니다. 소스 언어 선택에 대한 자세한 내용은 음성 인식 방법을 참조하세요.
IntentRecognizer 초기화
이제 IntentRecognizer를 만들어 보겠습니다. Speech 구성 바로 아래에 이 코드를 삽입합니다.
IntentRecognizer recognizer = new IntentRecognizer(config)) {
LanguageUnderstandingModel 및 의도 추가
의도 인식기와 연결 LanguageUnderstandingModel 하고 인식하려는 의도를 추가해야 합니다. 홈 자동화를 위해 미리 빌드된 do기본 의도를 사용합니다.
아래에 이 코드를 삽입합니다 IntentRecognizer. "YourLanguageUnderstandingAppId"를 LUIS 앱 ID로 바꾸어야 합니다.
팁
이 값을 찾는 데 도움이 필요한 경우 의도 인식을 위한 LUIS 앱 만들기를 참조하세요.
// Creates a language understanding model using the app id, and adds specific intents from your model
LanguageUnderstandingModel model = LanguageUnderstandingModel.fromAppId("YourLanguageUnderstandingAppId");
recognizer.addIntent(model, "YourLanguageUnderstandingIntentName1", "id1");
recognizer.addIntent(model, "YourLanguageUnderstandingIntentName2", "id2");
recognizer.addIntent(model, "YourLanguageUnderstandingIntentName3", "any-IntentId-here");
이 예제에서는 함수를 addIntent() 사용하여 의도를 개별적으로 추가합니다. 모델에서 모든 의도를 추가하려면 addAllIntents(model)를 사용하고 모델을 전달합니다.
의도 인식
IntentRecognizer 개체에서 메서드를 호출 recognizeOnceAsync() 합니다. 이 메서드를 사용하면 Speech Service에서 인식할 단일 구를 보내고 있으며, 구가 식별되면 음성 인식을 중지한다는 것을 알 수 있습니다.
이 코드를 모델 아래에 삽입합니다.
System.out.println("Say something...");

// Starts recognition. It returns when the first utterance has been recognized.
IntentRecognitionResult result = recognizer.recognizeOnceAsync().get();
인식 결과(또는 오류) 표시
Speech Service에서 인식 결과를 반환하는 경우 이를 사용하여 작업을 수행할 수 있습니다. 작업을 간단하게 유지하고 결과를 콘솔에 출력합니다.
recognizeOnceAsync()에 대한 호출 아래에 이 코드를 삽입합니다.
// Checks result.
if (result.getReason() == ResultReason.RecognizedIntent) {
    System.out.println("RECOGNIZED: Text=" + result.getText());
    System.out.println("    Intent Id: " + result.getIntentId());
    System.out.println("    Intent Service JSON: " + result.getProperties().getProperty(PropertyId.LanguageUnderstandingServiceResponse_JsonResult));
}
else if (result.getReason() == ResultReason.RecognizedSpeech) {
    System.out.println("RECOGNIZED: Text=" + result.getText());
    System.out.println("    Intent not recognized.");
}
else if (result.getReason() == ResultReason.NoMatch) {
    System.out.println("NOMATCH: Speech could not be recognized.");
}
else if (result.getReason() == ResultReason.Canceled) {
    CancellationDetails cancellation = CancellationDetails.fromResult(result);
    System.out.println("CANCELED: Reason=" + cancellation.getReason());

    if (cancellation.getReason() == CancellationReason.Error) {
        System.out.println("CANCELED: ErrorCode=" + cancellation.getErrorCode());
        System.out.println("CANCELED: ErrorDetails=" + cancellation.getErrorDetails());
        System.out.println("CANCELED: Did you update the subscription info?");
    }
}
코드 확인
이 시점에서 코드는 다음과 같습니다.
참고 항목
이 버전에 몇 가지 주석을 추가했습니다.
//
// Copyright (c) Microsoft. All rights reserved.
// Licensed under the MIT license. See LICENSE.md file in the project root for full license information.
//

// <skeleton_1>
package speechsdk.quickstart;

import com.microsoft.cognitiveservices.speech.*;
import com.microsoft.cognitiveservices.speech.intent.*;

/**
 * Quickstart: recognize speech using the Speech SDK for Java.
 */
public class Main {

    /**
     * @param args Arguments are ignored in this sample.
     */
    public static void main(String[] args) {
    // </skeleton_1>
        // <create_speech_configuration>
        // Replace below with with specified subscription key (called 'endpoint key' by the Language Understanding service)
        String languageUnderstandingSubscriptionKey = "YourLanguageUnderstandingSubscriptionKey";
        // Replace below with your own service region (e.g., "westus").
        String languageUnderstandingServiceRegion = "YourLanguageUnderstandingServiceRegion";

        // Creates an instance of intent recognizer with a given speech configuration.
        // Recognizer is created with the default microphone audio input and default language "en-us".
        try (SpeechConfig config = SpeechConfig.fromSubscription(languageUnderstandingSubscriptionKey, languageUnderstandingServiceRegion);
        // </create_speech_configuration>
            // <create_intent_recognizer>
            IntentRecognizer recognizer = new IntentRecognizer(config)) {
            // </create_intent_recognizer>

            // <add_intents>
            // Creates a language understanding model using the app id, and adds specific intents from your model
            LanguageUnderstandingModel model = LanguageUnderstandingModel.fromAppId("YourLanguageUnderstandingAppId");
            recognizer.addIntent(model, "YourLanguageUnderstandingIntentName1", "id1");
            recognizer.addIntent(model, "YourLanguageUnderstandingIntentName2", "id2");
            recognizer.addIntent(model, "YourLanguageUnderstandingIntentName3", "any-IntentId-here");
            // </add_intents>

            // To add all of the possible intents from a LUIS model to the recognizer, uncomment the line below:
            // recognizer.addAllIntents(model);

            // <recognize_intent>
            System.out.println("Say something...");

            // Starts recognition. It returns when the first utterance has been recognized.
            IntentRecognitionResult result = recognizer.recognizeOnceAsync().get();
            // </recognize_intent>

            // <print_result>
            // Checks result.
            if (result.getReason() == ResultReason.RecognizedIntent) {
                System.out.println("RECOGNIZED: Text=" + result.getText());
                System.out.println("    Intent Id: " + result.getIntentId());
                System.out.println("    Intent Service JSON: " + result.getProperties().getProperty(PropertyId.LanguageUnderstandingServiceResponse_JsonResult));
            }
            else if (result.getReason() == ResultReason.RecognizedSpeech) {
                System.out.println("RECOGNIZED: Text=" + result.getText());
                System.out.println("    Intent not recognized.");
            }
            else if (result.getReason() == ResultReason.NoMatch) {
                System.out.println("NOMATCH: Speech could not be recognized.");
            }
            else if (result.getReason() == ResultReason.Canceled) {
                CancellationDetails cancellation = CancellationDetails.fromResult(result);
                System.out.println("CANCELED: Reason=" + cancellation.getReason());

                if (cancellation.getReason() == CancellationReason.Error) {
                    System.out.println("CANCELED: ErrorCode=" + cancellation.getErrorCode());
                    System.out.println("CANCELED: ErrorDetails=" + cancellation.getErrorDetails());
                    System.out.println("CANCELED: Did you update the subscription info?");
                }
            }
            // </print_result>
        // <skeleton_2>
        } catch (Exception ex) {
            System.out.println("Unexpected exception: " + ex.getMessage());

            assert(false);
            System.exit(1);
        }
    }
}
// </skeleton_2>
앱 빌드 및 실행
F11 키를 누르거나 디버그 실행을>선택합니다. 마이크의 다음 15초 음성 입력이 인식되고 콘솔 창에 기록됩니다.
참조 설명서 | 패키지(npm) | GitHub의 추가 샘플 | 라이브러리 소스 코드
이 빠른 시작에서는 Speech SDK 및 LUIS(Language Understanding) 서비스를 사용하여 마이크에서 캡처한 오디오 데이터에서 의도를 인식합니다. 특히 Speech SDK를 사용하여 음성을 캡처하고 LUIS에서 미리 빌드된 작업을 기본 조명 켜기 및 해제와 같은 홈 자동화의 의도를 식별합니다.
필수 조건
- Azure 구독 - 체험 구독 만들기
- Azure Portal에서 언어 리소스 를 만듭니다. 평가판 가격 책정 계층(
F0)을 통해 서비스를 사용해보고, 나중에 프로덕션용 유료 계층으로 업그레이드할 수 있습니다. 이번에는 음성 리소스가 필요하지 않습니다. - 언어 리소스 키 및 지역을 가져옵니다. 언어 리소스가 배포된 후, 리소스로 이동을 선택하여 키를 보고 관리합니다. Azure AI 서비스 리소스에 대한 자세한 내용은 리소스 키 가져오기를 참조하세요.
또한 개발 환경용 Speech SDK를 설치하고 빈 샘플 프로젝트를 만들어야 합니다.
의도 인식을 위한 LUIS 앱 만들기
의도 인식 빠른 시작을 완료하려면 LUIS 미리 보기 포털을 사용하여 LUIS 계정 및 프로젝트를 만들어야 합니다. 이 빠른 시작에서는 의도 인식을 사용할 수 있는 지역에서 LUIS 구독이 필요합니다. Speech Service 구독은 필요하지 않습니다.
가장 먼저 해야 할 일은 LUIS 미리 보기 포털을 사용하여 LUIS 계정 및 앱을 만드는 것입니다. 만든 LUIS 앱은 의도, 엔터티 및 예제 발화를 제공하는 홈 자동화에 대해 미리 빌드된 도메인을 사용합니다. 완료되면 Speech SDK를 사용하여 호출할 수 있는 LUIS 엔드포인트가 클라우드에서 실행됩니다.
다음 지침에 따라 LUIS 앱을 만듭니다.
완료되면 다음 네 가지가 필요합니다.
- 음성 초기화가 전환된 상태에서 다시 게시
- LUIS 기본 키
- LUIS 위치
- LUIS 앱 ID
LUIS 미리 보기 포털에서 이 정보를 찾을 수 있는 위치는 다음과 같습니다.
LUIS 미리 보기 포털에서 앱을 선택한 다음 게시 단추를 선택합니다.
프로덕션 슬롯을 선택하고(
en-US를 사용하는 경우 설정 변경 선택) 음성 프라이밍 옵션을 켜기 위치로 설정합니다. 그런 다음 게시 단추를 선택합니다.Important
음성 초기화 는 음성 인식 정확도를 향상시키기 때문에 매우 권장됩니다.
LUIS 미리 보기 포털에서 관리를 선택한 다음, Azure 리소스를 선택합니다. 이 페이지에서 LUIS 예측 리소스에 대한 LUIS 키와 위치(지역이라고도 함)를 찾을 수 있습니다.
키와 위치를 얻은 후에는 앱 ID가 필요합니다. 설정을 선택합니다. 이 페이지에서 앱 ID를 사용할 수 있습니다.
일부 상용구 코드로 시작
프로젝트에 대한 기본 사항으로 작동하는 몇 가지 코드를 추가해 보겠습니다.
    <!DOCTYPE html>
    <html>
    <head>
    <title>Microsoft Azure AI Speech SDK JavaScript Quickstart</title>
    <meta charset="utf-8" />
    </head>
    <body style="font-family:'Helvetica Neue',Helvetica,Arial,sans-serif; font-size:13px;">
    </body>
    </html>
UI 요소 추가
이제 입력 상자에 대한 몇 가지 기본 UI를 추가하고, Speech SDK의 JavaScript를 참조하고, 사용 가능한 경우 권한 부여 토큰을 가져옵니다.
Important
완료되면 코드에서 키를 제거하고 공개적으로 게시하지 마세요. 프로덕션의 경우 Azure Key Vault와 같은 자격 증명을 안전하게 저장하고 액세스하는 방법을 사용합니다. 자세한 내용은 Azure AI 서비스 보안 문서를 참조하세요.
<body style="font-family:'Helvetica Neue',Helvetica,Arial,sans-serif; font-size:13px;">
  <div id="content" style="display:none">
    <table width="100%">
      <tr>
        <td></td>
        <td><h1 style="font-weight:500;">Microsoft Azure AI Speech SDK JavaScript Quickstart</h1></td>
      </tr>
      <tr>
        <td align="right"><a href="https://learn.microsoft.com/azure/ai-services/speech-service/overview" target="_blank">Subscription</a>:</td>
        <td><input id="subscriptionKey" type="text" size="40" value="subscription"></td>
      </tr>
      <tr>
        <td align="right">Region</td>
        <td><input id="serviceRegion" type="text" size="40" value="YourServiceRegion"></td>
      </tr>
      <tr>
        <td align="right">Application ID:</td>
        <td><input id="appId" type="text" size="60" value="YOUR_LANGUAGE_UNDERSTANDING_APP_ID"></td>
      </tr>
      <tr>
        <td></td>
        <td><button id="startIntentRecognizeAsyncButton">Start Intent Recognition</button></td>
      </tr>
      <tr>
        <td align="right" valign="top">Input Text</td>
        <td><textarea id="phraseDiv" style="display: inline-block;width:500px;height:200px"></textarea></td>
      </tr>
      <tr>
        <td align="right" valign="top">Result</td>
        <td><textarea id="statusDiv" style="display: inline-block;width:500px;height:100px"></textarea></td>
      </tr>
    </table>
  </div>

  <script src="microsoft.cognitiveservices.speech.sdk.bundle.js"></script>

  <script>
  // Note: Replace the URL with a valid endpoint to retrieve
  //       authorization tokens for your subscription.
  var authorizationEndpoint = "token.php";

  function RequestAuthorizationToken() {
    if (authorizationEndpoint) {
      var a = new XMLHttpRequest();
      a.open("GET", authorizationEndpoint);
      a.setRequestHeader("Content-Type", "application/x-www-form-urlencoded");
      a.send("");
      a.onload = function() {
				var token = JSON.parse(atob(this.responseText.split(".")[1]));
				serviceRegion.value = token.region;
				authorizationToken = this.responseText;
				subscriptionKey.disabled = true;
				subscriptionKey.value = "using authorization token (hit F5 to refresh)";
				console.log("Got an authorization token: " + token);
      }
    }
  }
  </script>

  <script>
    // status fields and start button in UI
    var phraseDiv;
    var statusDiv;
    var startIntentRecognizeAsyncButton;

    // subscription key, region, and appId for LUIS services.
    var subscriptionKey, serviceRegion, appId;
    var authorizationToken;
    var SpeechSDK;
    var recognizer;

    document.addEventListener("DOMContentLoaded", function () {
      startIntentRecognizeAsyncButton = document.getElementById("startIntentRecognizeAsyncButton");
      subscriptionKey = document.getElementById("subscriptionKey");
      serviceRegion = document.getElementById("serviceRegion");
      appId = document.getElementById("appId");
      phraseDiv = document.getElementById("phraseDiv");
      statusDiv = document.getElementById("statusDiv");

      startIntentRecognizeAsyncButton.addEventListener("click", function () {
        startIntentRecognizeAsyncButton.disabled = true;
        phraseDiv.innerHTML = "";
        statusDiv.innerHTML = "";
      });

      if (!!window.SpeechSDK) {
        SpeechSDK = window.SpeechSDK;
        startIntentRecognizeAsyncButton.disabled = false;

        document.getElementById('content').style.display = 'block';
        document.getElementById('warning').style.display = 'none';

        // in case we have a function for getting an authorization token, call it.
        if (typeof RequestAuthorizationToken === "function") {
          RequestAuthorizationToken();
        }
      }
    });
  </script>
Speech 구성 만들기
개체를 SpeechRecognizer 초기화하려면 먼저 구독 키 및 구독 지역을 사용하는 구성을 만들어야 합니다. 메서드에 이 코드를 삽입합니다 startRecognizeOnceAsyncButton.addEventListener() .
참고 항목
Speech SDK는 기본적으로 언어에 en-us를 사용하여 인식합니다. 소스 언어 선택에 대한 자세한 내용은 음성 인식 방법을 참조하세요.
        // if we got an authorization token, use the token. Otherwise use the provided subscription key
        var speechConfig;
        if (authorizationToken) {
          speechConfig = SpeechSDK.SpeechConfig.fromAuthorizationToken(authorizationToken, serviceRegion.value);
        } else {
          if (subscriptionKey.value === "" || subscriptionKey.value === "subscription") {
            alert("Please enter your Microsoft Azure AI Speech subscription key!");
            return;
          }
          startIntentRecognizeAsyncButton.disabled = false;
          speechConfig = SpeechSDK.SpeechConfig.fromSubscription(subscriptionKey.value, serviceRegion.value);
        }

        speechConfig.speechRecognitionLanguage = "en-US";
오디오 구성 만들기
이제 입력 디바이스를 가리키는 개체를 AudioConfig 만들어야 합니다. 이 코드를 startIntentRecognizeAsyncButton.addEventListener() Speech 구성 바로 아래의 메서드에 삽입합니다.
var audioConfig = SpeechSDK.AudioConfig.fromDefaultMicrophoneInput();
IntentRecognizer 초기화
이제 앞에서 만든 개체와 개체를 IntentRecognizer 사용하여 개체를 SpeechConfig 만들어 AudioConfig 보겠습니다. 메서드에 이 코드를 삽입합니다 startIntentRecognizeAsyncButton.addEventListener() .
recognizer = new SpeechSDK.IntentRecognizer(speechConfig, audioConfig);
LanguageUnderstandingModel 및 의도 추가
의도 인식기와 연결 LanguageUnderstandingModel 하고 인식하려는 의도를 추가해야 합니다. 홈 자동화를 위해 미리 빌드된 do기본 의도를 사용합니다.
아래에 이 코드를 삽입합니다 IntentRecognizer. "YourLanguageUnderstandingAppId"를 LUIS 앱 ID로 바꾸어야 합니다.
        if (appId.value !== "" && appId.value !== "YOUR_LANGUAGE_UNDERSTANDING_APP_ID") {
          var lm = SpeechSDK.LanguageUnderstandingModel.fromAppId(appId.value);

          recognizer.addAllIntents(lm);
        }
참고 항목
Speech SDK는 LUIS v2.0 엔드포인트만 지원합니다. v2.0 URL 패턴을 사용하려면 예제 쿼리 필드에 있는 v3.0 엔드포인트 URL을 수동으로 수정해야 합니다. LUIS v2.0 엔드포인트는 항상 다음 두 패턴 중 하나를 따릅니다.
https://{AzureResourceName}.cognitiveservices.azure.com/luis/v2.0/apps/{app-id}?subscription-key={subkey}&verbose=true&q=https://{Region}.api.cognitive.microsoft.com/luis/v2.0/apps/{app-id}?subscription-key={subkey}&verbose=true&q=
의도 인식
IntentRecognizer 개체에서 메서드를 호출 recognizeOnceAsync() 합니다. 이 메서드를 사용하면 Speech Service에서 인식할 단일 구를 보내고 있으며, 구가 식별되면 음성 인식을 중지한다는 것을 알 수 있습니다.
모델 추가 아래에 다음 코드를 삽입합니다.
        recognizer.recognizeOnceAsync(
          function (result) {
            window.console.log(result);

            phraseDiv.innerHTML = result.text + "\r\n";

            statusDiv.innerHTML += "(continuation) Reason: " + SpeechSDK.ResultReason[result.reason];
            switch (result.reason) {
              case SpeechSDK.ResultReason.RecognizedSpeech:
                statusDiv.innerHTML += " Text: " + result.text;
                break;
              case SpeechSDK.ResultReason.RecognizedIntent:
                statusDiv.innerHTML += " Text: " + result.text + " IntentId: " + result.intentId;

                // The actual JSON returned from Language Understanding is a bit more complex to get to, but it is available for things like
                // the entity name and type if part of the intent.
                statusDiv.innerHTML += " Intent JSON: " + result.properties.getProperty(SpeechSDK.PropertyId.LanguageUnderstandingServiceResponse_JsonResult);
                phraseDiv.innerHTML += result.properties.getProperty(SpeechSDK.PropertyId.LanguageUnderstandingServiceResponse_JsonResult) + "\r\n";
                break;
              case SpeechSDK.ResultReason.NoMatch:
                var noMatchDetail = SpeechSDK.NoMatchDetails.fromResult(result);
                statusDiv.innerHTML += " NoMatchReason: " + SpeechSDK.NoMatchReason[noMatchDetail.reason];
                break;
              case SpeechSDK.ResultReason.Canceled:
                var cancelDetails = SpeechSDK.CancellationDetails.fromResult(result);
                statusDiv.innerHTML += " CancellationReason: " + SpeechSDK.CancellationReason[cancelDetails.reason];

              if (cancelDetails.reason === SpeechSDK.CancellationReason.Error) {
                statusDiv.innerHTML += ": " + cancelDetails.errorDetails;
              }
            break;
            }
            statusDiv.innerHTML += "\r\n";
            startIntentRecognizeAsyncButton.disabled = false;
          },
          function (err) {
            window.console.log(err);

            phraseDiv.innerHTML += "ERROR: " + err;
            startIntentRecognizeAsyncButton.disabled = false;
          });
코드 확인
<!DOCTYPE html>
<html>
<head>
  <title>Microsoft Cognitive Services Speech SDK JavaScript Quickstart</title>
  <meta charset="utf-8" />
</head>
<body style="font-family:'Helvetica Neue',Helvetica,Arial,sans-serif; font-size:13px;">
  <div id="warning">
    <h1 style="font-weight:500;">Speech Recognition Speech SDK not found (microsoft.cognitiveservices.speech.sdk.bundle.js missing).</h1>
  </div>

  <div id="content" style="display:none">
    <table width="100%">
      <tr>
        <td></td>
        <td><h1 style="font-weight:500;">Microsoft Cognitive Services Speech SDK JavaScript Quickstart</h1></td>
      </tr>
      <tr>
        <td align="right"><a href="https://docs.microsoft.com/azure/cognitive-services/speech-service/quickstarts/intent-recognition?pivots=programming-language-csharp#create-a-luis-app-for-intent-recognition" target="_blank">LUIS Primary Key</a>:</td>
        <td><input id="subscriptionKey" type="text" size="40" value="subscription"></td>
      </tr>
      <tr>
        <td align="right">LUIS Location</td>
        <td><input id="serviceRegion" type="text" size="40" value="YourServiceRegion"></td>
      </tr>
      <tr>
        <td align="right">LUIS App ID:</td>
        <td><input id="appId" type="text" size="60" value="YOUR_LANGUAGE_UNDERSTANDING_APP_ID"></td>
      </tr>
      <tr>
        <td></td>
        <td><button id="startIntentRecognizeAsyncButton">Start Intent Recognition</button></td>
      </tr>
      <tr>
        <td align="right" valign="top">Input Text</td>
        <td><textarea id="phraseDiv" style="display: inline-block;width:500px;height:200px"></textarea></td>
      </tr>
      <tr>
        <td align="right" valign="top">Result</td>
        <td><textarea id="statusDiv" style="display: inline-block;width:500px;height:100px"></textarea></td>
      </tr>
    </table>
  </div>

  <!-- Speech SDK reference sdk. -->
  <script src="https://aka.ms/csspeech/jsbrowserpackageraw"></script>

  <!-- Speech SDK USAGE -->
  <script>
    // status fields and start button in UI
    var phraseDiv;
    var statusDiv;
    var startIntentRecognizeAsyncButton;

    // subscription key and region for speech services.
    var subscriptionKey, serviceRegion, appId;
    var SpeechSDK;
    var recognizer;

    document.addEventListener("DOMContentLoaded", function () {

      startIntentRecognizeAsyncButton = document.getElementById("startIntentRecognizeAsyncButton");
      subscriptionKey = document.getElementById("subscriptionKey");
      serviceRegion = document.getElementById("serviceRegion");
      appId = document.getElementById("appId");
      phraseDiv = document.getElementById("phraseDiv");
      statusDiv = document.getElementById("statusDiv");

      startIntentRecognizeAsyncButton.addEventListener("click", function () {
        startIntentRecognizeAsyncButton.disabled = true;
        phraseDiv.innerHTML = "";
        statusDiv.innerHTML = "";

        let audioConfig = SpeechSDK.AudioConfig.fromDefaultMicrophoneInput();
        if (subscriptionKey.value === "" || subscriptionKey.value === "subscription") {
          alert("Please enter your Microsoft Cognitive Services Speech subscription key!");
          startIntentRecognizeAsyncButton.disabled = false;
          return;
        }
        var speechConfig = SpeechSDK.SpeechConfig.fromSubscription(subscriptionKey.value, serviceRegion.value);

        speechConfig.speechRecognitionLanguage = "en-US";
        recognizer = new SpeechSDK.IntentRecognizer(speechConfig, audioConfig);

        // Set up a Language Understanding Model from Language Understanding Intelligent Service (LUIS).
        // See https://www.luis.ai/home for more information on LUIS.
        if (appId.value !== "" && appId.value !== "YOUR_LANGUAGE_UNDERSTANDING_APP_ID") {
          var lm = SpeechSDK.LanguageUnderstandingModel.fromAppId(appId.value);

          recognizer.addAllIntents(lm);
        }

        recognizer.recognizeOnceAsync(
          function (result) {
            window.console.log(result);
            phraseDiv.innerHTML = result.text + "\r\n";

            statusDiv.innerHTML += "(continuation) Reason: " + SpeechSDK.ResultReason[result.reason];
            switch (result.reason) {

              case SpeechSDK.ResultReason.RecognizedSpeech:
                statusDiv.innerHTML += " Text: " + result.text;
                break;

              case SpeechSDK.ResultReason.RecognizedIntent:
                statusDiv.innerHTML += " Text: " + result.text + " IntentId: " + result.intentId;

                // The actual JSON returned from Language Understanding is a bit more complex to get to, but it is available for things like
                // the entity name and type if part of the intent.
                statusDiv.innerHTML += " Intent JSON: " + result.properties.getProperty(SpeechSDK.PropertyId.LanguageUnderstandingServiceResponse_JsonResult);
                phraseDiv.innerHTML += result.properties.getProperty(SpeechSDK.PropertyId.LanguageUnderstandingServiceResponse_JsonResult) + "\r\n";
                break;

              case SpeechSDK.ResultReason.NoMatch:
                var noMatchDetail = SpeechSDK.NoMatchDetails.fromResult(result);
                statusDiv.innerHTML += " NoMatchReason: " + SpeechSDK.NoMatchReason[noMatchDetail.reason];
                break;

              case SpeechSDK.ResultReason.Canceled:
                var cancelDetails = SpeechSDK.CancellationDetails.fromResult(result);
                statusDiv.innerHTML += " CancellationReason: " + SpeechSDK.CancellationReason[cancelDetails.reason];

                if (cancelDetails.reason === SpeechSDK.CancellationReason.Error) {
                  statusDiv.innerHTML += ": " + cancelDetails.errorDetails;
                }
                break;
            }
            statusDiv.innerHTML += "\r\n";
            startIntentRecognizeAsyncButton.disabled = false;
          },
          function (err) {
            window.console.log(err);

            phraseDiv.innerHTML += "ERROR: " + err;
            startIntentRecognizeAsyncButton.disabled = false;
        });
      });

      if (!!window.SpeechSDK) {
        SpeechSDK = window.SpeechSDK;
        startIntentRecognizeAsyncButton.disabled = false;

        document.getElementById('content').style.display = 'block';
        document.getElementById('warning').style.display = 'none';
      }
    });

  </script>
</body>
</html>
토큰 원본 만들기(선택 사항)
웹 서버에 웹 페이지를 호스트하려는 경우 필요에 따라 데모 애플리케이션의 토큰 소스를 제공하면 됩니다. 이렇게 하면 사용자가 권한 부여 코드를 직접 입력하지 않고 음성 기능을 사용할 수 있도록 허용하면서 구독 키가 서버를 떠나지 않습니다.
이름이 token.php인 새 파일을 만듭니다. 이 예제에서는 웹 서버가 curl을 사용하도록 설정된 PHP 스크립팅 언어를 지원합니다. 다음 코드를 입력합니다.
<?php
header('Access-Control-Allow-Origin: ' . $_SERVER['SERVER_NAME']);

// Replace with your own subscription key and service region (e.g., "westus").
$subscriptionKey = 'YourSubscriptionKey';
$region = 'YourServiceRegion';

$ch = curl_init();
curl_setopt($ch, CURLOPT_URL, 'https://' . $region . '.api.cognitive.microsoft.com/sts/v1.0/issueToken');
curl_setopt($ch, CURLOPT_POST, 1);
curl_setopt($ch, CURLOPT_POSTFIELDS, '{}');
curl_setopt($ch, CURLOPT_HTTPHEADER, array('Content-Type: application/json', 'Ocp-Apim-Subscription-Key: ' . $subscriptionKey));
curl_setopt($ch, CURLOPT_RETURNTRANSFER, 1);
echo curl_exec($ch);
?>
참고 항목
권한 부여 토큰의 수명은 제한됩니다. 이 간단한 예제에서는 권한 부여 토큰을 자동으로 새로 고치는 방법을 보여주지 않습니다. 사용자는 페이지를 수동으로 다시 로드하거나 F5 키를 눌러 새로 고칠 수 있습니다.
로컬에서 샘플 빌드 및 실행
앱을 시작하려면 index.html 파일을 두 번 클릭하거나 즐겨 찾는 웹 브라우저를 사용하여 index.html 엽니다. LUIS 키, LUIS 지역 및 LUIS 애플리케이션 ID를 입력할 수 있는 간단한 GUI가 표시됩니다. 해당 필드를 입력한 후에는 적절한 단추를 클릭하여 마이크를 사용하여 인식을 트리거할 수 있습니다.
참고 항목
이 메서드는 Safari 브라우저에서 작동하지 않습니다. Safari에서 샘플 웹 페이지는 웹 서버에서 호스트되어야 합니다. Safari는 로컬 파일에서 로드된 웹 사이트에서 마이크를 사용할 수 없습니다.
웹 서버를 통해 샘플 빌드 및 실행
앱을 시작하려면 즐겨 사용하는 웹 브라우저를 열고 폴더를 호스트하는 공용 URL을 가리키고 LUIS 지역과 LUIS 애플리케이션 ID를 입력하고 마이크를 사용하여 인식을 트리거합니다. 구성되면 토큰 소스에서 토큰을 획득하고 음성 명령을 인식하기 시작합니다.
참조 설명서 | 패키지(PyPi) | GitHub의 추가 샘플
이 빠른 시작에서는 Speech SDK 및 LUIS(Language Understanding) 서비스를 사용하여 마이크에서 캡처한 오디오 데이터에서 의도를 인식합니다. 특히 Speech SDK를 사용하여 음성을 캡처하고 LUIS에서 미리 빌드된 작업을 기본 조명 켜기 및 해제와 같은 홈 자동화의 의도를 식별합니다.
필수 조건
- Azure 구독 - 체험 구독 만들기
- Azure Portal에서 언어 리소스 를 만듭니다. 평가판 가격 책정 계층(
F0)을 통해 서비스를 사용해보고, 나중에 프로덕션용 유료 계층으로 업그레이드할 수 있습니다. 이번에는 음성 리소스가 필요하지 않습니다. - 언어 리소스 키 및 지역을 가져옵니다. 언어 리소스가 배포된 후, 리소스로 이동을 선택하여 키를 보고 관리합니다. Azure AI 서비스 리소스에 대한 자세한 내용은 리소스 키 가져오기를 참조하세요.
또한 개발 환경용 Speech SDK를 설치하고 빈 샘플 프로젝트를 만들어야 합니다.
의도 인식을 위한 LUIS 앱 만들기
의도 인식 빠른 시작을 완료하려면 LUIS 미리 보기 포털을 사용하여 LUIS 계정 및 프로젝트를 만들어야 합니다. 이 빠른 시작에서는 의도 인식을 사용할 수 있는 지역에서 LUIS 구독이 필요합니다. Speech Service 구독은 필요하지 않습니다.
가장 먼저 해야 할 일은 LUIS 미리 보기 포털을 사용하여 LUIS 계정 및 앱을 만드는 것입니다. 만든 LUIS 앱은 의도, 엔터티 및 예제 발화를 제공하는 홈 자동화에 대해 미리 빌드된 도메인을 사용합니다. 완료되면 Speech SDK를 사용하여 호출할 수 있는 LUIS 엔드포인트가 클라우드에서 실행됩니다.
다음 지침에 따라 LUIS 앱을 만듭니다.
완료되면 다음 네 가지가 필요합니다.
- 음성 초기화가 전환된 상태에서 다시 게시
- LUIS 기본 키
- LUIS 위치
- LUIS 앱 ID
LUIS 미리 보기 포털에서 이 정보를 찾을 수 있는 위치는 다음과 같습니다.
LUIS 미리 보기 포털에서 앱을 선택한 다음 게시 단추를 선택합니다.
프로덕션 슬롯을 선택하고(
en-US를 사용하는 경우 설정 변경 선택) 음성 프라이밍 옵션을 켜기 위치로 설정합니다. 그런 다음 게시 단추를 선택합니다.Important
음성 초기화 는 음성 인식 정확도를 향상시키기 때문에 매우 권장됩니다.
LUIS 미리 보기 포털에서 관리를 선택한 다음, Azure 리소스를 선택합니다. 이 페이지에서 LUIS 예측 리소스에 대한 LUIS 키와 위치(지역이라고도 함)를 찾을 수 있습니다.
키와 위치를 얻은 후에는 앱 ID가 필요합니다. 설정을 선택합니다. 이 페이지에서 앱 ID를 사용할 수 있습니다.
프로젝트 열기
- 원하는 IDE를 엽니다.
- 새 프로젝트를 만들고 호출된
quickstart.py파일을 만든 다음 엽니다.
일부 상용구 코드로 시작
프로젝트에 대한 기본 사항으로 작동하는 몇 가지 코드를 추가해 보겠습니다.
import azure.cognitiveservices.speech as speechsdk

print("Say something...")
Speech 구성 만들기
개체를 IntentRecognizer 초기화하려면 먼저 LUIS 예측 리소스에 대한 키와 위치를 사용하는 구성을 만들어야 합니다.
에 이 코드를 삽입합니다 quickstart.py. 다음 값을 업데이트해야 합니다.
- LUIS 예측 키로 대체
"YourLanguageUnderstandingSubscriptionKey"합니다. - LUIS 위치로 대체
"YourLanguageUnderstandingServiceRegion"합니다. 지역에서 지역 식별자사용
팁
이러한 값을 찾는 데 도움이 필요한 경우 의도 인식을 위한 LUIS 앱 만들기를 참조하세요.
Important
완료되면 코드에서 키를 제거하고 공개적으로 게시하지 마세요. 프로덕션의 경우 Azure Key Vault와 같은 자격 증명을 안전하게 저장하고 액세스하는 방법을 사용합니다. 자세한 내용은 Azure AI 서비스 보안 문서를 참조하세요.
# Set up the config for the intent recognizer (remember that this uses the Language Understanding key, not the Speech Services key)!
intent_config = speechsdk.SpeechConfig(
    subscription="YourLanguageUnderstandingSubscriptionKey",
    region="YourLanguageUnderstandingServiceRegion")
이 샘플에서는 SpeechConfig LUIS 키 및 지역을 사용하여 개체를 생성합니다. 사용 가능한 메서드의 전체 목록은 SpeechConfig 클래스를 참조하세요.
Speech SDK는 기본적으로 언어에 en-us를 사용하여 인식합니다. 소스 언어 선택에 대한 자세한 내용은 음성 인식 방법을 참조하세요.
IntentRecognizer 초기화
이제 IntentRecognizer를 만들어 보겠습니다. Speech 구성 바로 아래에 이 코드를 삽입합니다.
# Set up the intent recognizer
intent_recognizer = speechsdk.intent.IntentRecognizer(speech_config=intent_config)
LanguageUnderstandingModel 및 의도 추가
의도 인식기와 연결 LanguageUnderstandingModel 하고 인식하려는 의도를 추가해야 합니다. 홈 자동화를 위해 미리 빌드된 do기본 의도를 사용합니다.
아래에 이 코드를 삽입합니다 IntentRecognizer. "YourLanguageUnderstandingAppId"를 LUIS 앱 ID로 바꾸어야 합니다.
팁
이 값을 찾는 데 도움이 필요한 경우 의도 인식을 위한 LUIS 앱 만들기를 참조하세요.
# set up the intents that are to be recognized. These can be a mix of simple phrases and
# intents specified through a LanguageUnderstanding Model.
model = speechsdk.intent.LanguageUnderstandingModel(app_id="YourLanguageUnderstandingAppId")
intents = [
    (model, "HomeAutomation.TurnOn"),
    (model, "HomeAutomation.TurnOff"),
    ("This is a test.", "test"),
    ("Switch to channel 34.", "34"),
    ("what's the weather like", "weather"),
]
intent_recognizer.add_intents(intents)
이 예제에서는 함수를 add_intents() 사용하여 명시적으로 정의된 의도 목록을 추가합니다. 모델에서 모든 의도를 추가하려면 add_all_intents(model)를 사용하고 모델을 전달합니다.
의도 인식
IntentRecognizer 개체에서 메서드를 호출 recognize_once() 합니다. 이 메서드를 사용하면 Speech Service에서 인식할 단일 구를 보내고 있으며, 구가 식별되면 음성 인식을 중지한다는 것을 알 수 있습니다.
이 코드를 모델 아래에 삽입합니다.
intent_result = intent_recognizer.recognize_once()
인식 결과(또는 오류) 표시
Speech Service에서 인식 결과를 반환하는 경우 이를 사용하여 작업을 수행할 수 있습니다. 작업을 간단하게 유지하고 결과를 콘솔에 출력합니다.
호출 recognize_once()아래에 이 코드를 추가합니다.
# Check the results
if intent_result.reason == speechsdk.ResultReason.RecognizedIntent:
    print("Recognized: \"{}\" with intent id `{}`".format(intent_result.text, intent_result.intent_id))
elif intent_result.reason == speechsdk.ResultReason.RecognizedSpeech:
    print("Recognized: {}".format(intent_result.text))
elif intent_result.reason == speechsdk.ResultReason.NoMatch:
    print("No speech could be recognized: {}".format(intent_result.no_match_details))
elif intent_result.reason == speechsdk.ResultReason.Canceled:
    print("Intent recognition canceled: {}".format(intent_result.cancellation_details.reason))
    if intent_result.cancellation_details.reason == speechsdk.CancellationReason.Error:
        print("Error details: {}".format(intent_result.cancellation_details.error_details))
코드 확인
이 시점에서 코드는 다음과 같습니다.
참고 항목
이 버전에 몇 가지 주석을 추가했습니다.
# Copyright (c) Microsoft. All rights reserved.
# Licensed under the MIT license. See LICENSE.md file in the project root for full license information.

# <skeleton>
import azure.cognitiveservices.speech as speechsdk

print("Say something...")
# </skeleton>

"""performs one-shot intent recognition from input from the default microphone"""

# <create_speech_configuration>
# Set up the config for the intent recognizer (remember that this uses the Language Understanding key, not the Speech Services key)!
intent_config = speechsdk.SpeechConfig(
    subscription="YourLanguageUnderstandingSubscriptionKey",
    region="YourLanguageUnderstandingServiceRegion")
# </create_speech_configuration>

# <create_intent_recognizer>
# Set up the intent recognizer
intent_recognizer = speechsdk.intent.IntentRecognizer(speech_config=intent_config)
# </create_intent_recognizer>

# <add_intents>
# set up the intents that are to be recognized. These can be a mix of simple phrases and
# intents specified through a LanguageUnderstanding Model.
model = speechsdk.intent.LanguageUnderstandingModel(app_id="YourLanguageUnderstandingAppId")
intents = [
    (model, "HomeAutomation.TurnOn"),
    (model, "HomeAutomation.TurnOff"),
    ("This is a test.", "test"),
    ("Switch to channel 34.", "34"),
    ("what's the weather like", "weather"),
]
intent_recognizer.add_intents(intents)
# </add_intents>

# To add all of the possible intents from a LUIS model to the recognizer, uncomment the line below:
# intent_recognizer.add_all_intents(model)

# Starts intent recognition, and returns after a single utterance is recognized. The end of a
# single utterance is determined by listening for silence at the end or until a maximum of 15
# seconds of audio is processed. It returns the recognition text as result.
# Note: Since recognize_once() returns only a single utterance, it is suitable only for single
# shot recognition like command or query.
# For long-running multi-utterance recognition, use start_continuous_recognition() instead.
# <recognize_intent>
intent_result = intent_recognizer.recognize_once()
# </recognize_intent>

# <print_results>
# Check the results
if intent_result.reason == speechsdk.ResultReason.RecognizedIntent:
    print("Recognized: \"{}\" with intent id `{}`".format(intent_result.text, intent_result.intent_id))
elif intent_result.reason == speechsdk.ResultReason.RecognizedSpeech:
    print("Recognized: {}".format(intent_result.text))
elif intent_result.reason == speechsdk.ResultReason.NoMatch:
    print("No speech could be recognized: {}".format(intent_result.no_match_details))
elif intent_result.reason == speechsdk.ResultReason.Canceled:
    print("Intent recognition canceled: {}".format(intent_result.cancellation_details.reason))
    if intent_result.cancellation_details.reason == speechsdk.CancellationReason.Error:
        print("Error details: {}".format(intent_result.cancellation_details.error_details))
# </print_results>
앱 빌드 및 실행
콘솔 또는 IDE에서 샘플을 실행합니다.
python quickstart.py
마이크의 다음 15초 음성 입력이 인식되고 콘솔 창에 기록됩니다.
참조 설명서 | 패키지(Go) | GitHub의 추가 샘플
Go용 Speech SDK는 의도 인식을 지원하지 않습니다. 다른 프로그래밍 언어를 선택하거나 이 문서의 앞 부분에서 링크된 Go 참조 및 샘플을 참조하세요.
참조 설명서 | 패키지(다운로드) | GitHub의 추가 샘플
Objective-C용 Speech SDK는 의도 인식을 지원하지만 아직 가이드가 여기에 포함되지 않았습니다. 다른 프로그래밍 언어를 선택해서 작업을 시작하고 개념을 알아보거나 이 문서의 앞 부분에 링크된 Objective-C 참조 및 샘플을 참조하세요.
참조 설명서 | 패키지(다운로드) | GitHub의 추가 샘플
Swift용 Speech SDK는 의도 인식을 지원하지만 아직 가이드가 여기에 포함되지 않았습니다. 다른 프로그래밍 언어를 선택해서 작업을 시작하고 개념을 알아보거나 이 문서의 앞 부분에 링크된 Swift 참조 및 샘플을 참조하세요.
음성을 텍스트로 변환하는 REST API 참조 | 짧은 오디오 참조를 위한 음성을 텍스트로 변환하는 REST API | GitHub의 추가 샘플
의도 인식에 REST API를 사용할 수 있지만 아직 가이드가 여기에 포함되지 않았습니다. 다른 프로그래밍 언어를 선택하여 작업을 시작하고 개념에 대해 알아보세요.
Speech CLI(명령줄 인터페이스)가 의도 인식을 지원하지만 아직 가이드가 여기에 포함되지 않았습니다. 다른 프로그래밍 언어를 선택해서 작업을 시작하고 개념에 대해 알아보거나 Speech CLI 개요에서 CLI에 대해 자세히 알아보세요.