Speech SDK를 사용하여 클라이언트 애플리케이션과 통합
Important
사용자 지정 명령은 2026년 4월 30일에 사용 중지됩니다. 2023년 10월 30일부터 Speech Studio에서 새 사용자 지정 명령 애플리케이션을 만들 수 없습니다. 이 변경 과 관련하여 LUIS 는 2025년 10월 1일에 사용 중지됩니다. 2023년 4월 1일부터 새 LUIS 리소스를 만들 수 없습니다.
이 문서에서는 UWP 애플리케이션에서 실행되는 Speech SDK에서 게시된 사용자 지정 명령 애플리케이션에 대한 요청을 만드는 방법을 알아봅니다. 사용자 지정 명령 애플리케이션에 대한 연결을 설정하려면 다음이 필요합니다.
- 사용자 지정 명령 애플리케이션을 게시하고 애플리케이션 식별자(앱 ID) 가져오기
- Speech SDK를 사용하여 사용자 지정 명령 애플리케이션과 통신할 수 있도록 UWP(유니버설 Windows 플랫폼) 클라이언트 앱 만들기
필수 조건
이 문서를 완료하려면 사용자 지정 명령 애플리케이션이 필요합니다. 빠른 시작을 시도하여 사용자 지정 명령 애플리케이션을 만듭니다.
또한 다음이 필요합니다.
- Visual Studio 2019 이상. 이 가이드는 Visual Studio 2019를 기반으로 합니다.
- Azure AI 음성 리소스 키 및 지역: Azure Portal에서 음성 리소스를 만듭니다. 자세한 내용은 다중 서비스 리소스 만들기를 참조하세요.
- 디바이스를 개발에 사용하도록 설정
1단계: 사용자 지정 명령 애플리케이션 게시
이전에 만든 사용자 지정 명령 애플리케이션을 엽니다.
설정 이동하여 LUIS 리소스를 선택합니다.
예측 리소스가 할당되지 않은 경우 쿼리 예측 키를 선택하거나 새로 만듭니다.
애플리케이션을 게시하기 전에 항상 쿼리 예측 키가 필요합니다. LUIS 리소스에 대한 자세한 내용은 LUIS 리소스 만들기를 참조하세요.
편집 명령으로 돌아가서 게시를 선택합니다.
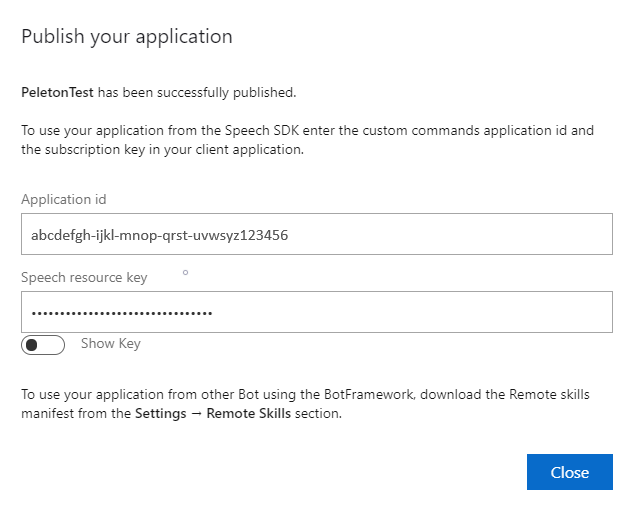
나중에 사용할 수 있도록 "게시" 알림에서 앱 ID를 복사합니다.
나중에 사용할 수 있는 Speech Resource Key를 복사합니다.
2단계: Visual Studio 프로젝트 만들기
UWP 개발을 위한 Visual Studio 프로젝트를 만들고 Speech SDK를 설치합니다.
3단계: 샘플 코드 추가
이 단계에서 애플리케이션의 사용자 인터페이스를 정의하는 XAML 코드를 추가하고, C# 코드 숨김 구현을 추가합니다.
XAML 코드
XAML 코드를 추가하여 애플리케이션의 사용자 인터페이스를 만듭니다.
솔루션 탐색기에서
MainPage.xaml을 엽니다.디자이너의 XAML 보기에서 전체 콘텐츠를 다음 코드 조각으로 바꿉니다.
<Page
    x:Class="helloworld.MainPage"
    xmlns="http://schemas.microsoft.com/winfx/2006/xaml/presentation"
    xmlns:x="http://schemas.microsoft.com/winfx/2006/xaml"
    xmlns:local="using:helloworld"
    xmlns:d="http://schemas.microsoft.com/expression/blend/2008"
    xmlns:mc="http://schemas.openxmlformats.org/markup-compatibility/2006"
    mc:Ignorable="d"
    Background="{ThemeResource ApplicationPageBackgroundThemeBrush}">

    <Grid>
        <StackPanel Orientation="Vertical" HorizontalAlignment="Center"
                    Margin="20,50,0,0" VerticalAlignment="Center" Width="800">
            <Button x:Name="EnableMicrophoneButton" Content="Enable Microphone"
                    Margin="0,10,10,0" Click="EnableMicrophone_ButtonClicked"
                    Height="35"/>
            <Button x:Name="ListenButton" Content="Talk"
                    Margin="0,10,10,0" Click="ListenButton_ButtonClicked"
                    Height="35"/>
            <StackPanel x:Name="StatusPanel" Orientation="Vertical"
                        RelativePanel.AlignBottomWithPanel="True"
                        RelativePanel.AlignRightWithPanel="True"
                        RelativePanel.AlignLeftWithPanel="True">
                <TextBlock x:Name="StatusLabel" Margin="0,10,10,0"
                           TextWrapping="Wrap" Text="Status:" FontSize="20"/>
                <Border x:Name="StatusBorder" Margin="0,0,0,0">
                    <ScrollViewer VerticalScrollMode="Auto"
                                  VerticalScrollBarVisibility="Auto" MaxHeight="200">
                        <!-- Use LiveSetting to enable screen readers to announce
                             the status update. -->
                        <TextBlock
                            x:Name="StatusBlock" FontWeight="Bold"
                            AutomationProperties.LiveSetting="Assertive"
                            MaxWidth="{Binding ElementName=Splitter, Path=ActualWidth}"
                            Margin="10,10,10,20" TextWrapping="Wrap"  />
                    </ScrollViewer>
                </Border>
            </StackPanel>
        </StackPanel>
        <MediaElement x:Name="mediaElement"/>
    </Grid>
</Page>
애플리케이션의 사용자 인터페이스를 표시하도록 디자인 보기가 업데이트됩니다.
C# 코드 숨김 원본
애플리케이션이 예상대로 작동하도록 코드 숨김 원본을 추가합니다. 코드 숨김 원본은 다음을 포함합니다.
- 및
Speech.Dialog네임스페이Speech스에 대한 필수using문입니다. - 단추 처리기에 연결된 마이크 액세스를 보장하는 간단한 구현입니다.
- 애플리케이션에서 메시지 및 오류를 표시하는 기본 UI 도우미입니다.
- 초기화 코드 경로에 대한 방문 지점입니다.
- 스트리밍 지원 없이 텍스트를 음성으로 재생하기 위한 도우미입니다.
- 수신 대기를 시작할 빈 단추 처리기입니다.
다음과 같이 코드 숨김 원본을 추가합니다.
솔루션 탐색기에서 코드 숨김 원본 파일
MainPage.xaml.cs(MainPage.xaml에 그룹화됨)를 엽니다.파일의 내용을 다음 코드로 바꿉니다.
using Microsoft.CognitiveServices.Speech;
using Microsoft.CognitiveServices.Speech.Audio;
using Microsoft.CognitiveServices.Speech.Dialog;
using System;
using System.IO;
using System.Text;
using Windows.UI.Xaml;
using Windows.UI.Xaml.Controls;
using Windows.UI.Xaml.Media;

namespace helloworld
{
    public sealed partial class MainPage : Page
    {
        private DialogServiceConnector connector;

        private enum NotifyType
        {
            StatusMessage,
            ErrorMessage
        };

        public MainPage()
        {
            this.InitializeComponent();
        }

        private async void EnableMicrophone_ButtonClicked(
            object sender, RoutedEventArgs e)
        {
            bool isMicAvailable = true;
            try
            {
                var mediaCapture = new Windows.Media.Capture.MediaCapture();
                var settings =
                    new Windows.Media.Capture.MediaCaptureInitializationSettings();
                settings.StreamingCaptureMode =
                    Windows.Media.Capture.StreamingCaptureMode.Audio;
                await mediaCapture.InitializeAsync(settings);
            }
            catch (Exception)
            {
                isMicAvailable = false;
            }
            if (!isMicAvailable)
            {
                await Windows.System.Launcher.LaunchUriAsync(
                    new Uri("ms-settings:privacy-microphone"));
            }
            else
            {
                NotifyUser("Microphone was enabled", NotifyType.StatusMessage);
            }
        }

        private void NotifyUser(
            string strMessage, NotifyType type = NotifyType.StatusMessage)
        {
            // If called from the UI thread, then update immediately.
            // Otherwise, schedule a task on the UI thread to perform the update.
            if (Dispatcher.HasThreadAccess)
            {
                UpdateStatus(strMessage, type);
            }
            else
            {
                var task = Dispatcher.RunAsync(
                    Windows.UI.Core.CoreDispatcherPriority.Normal,
                    () => UpdateStatus(strMessage, type));
            }
        }

        private void UpdateStatus(string strMessage, NotifyType type)
        {
            switch (type)
            {
                case NotifyType.StatusMessage:
                    StatusBorder.Background = new SolidColorBrush(
                        Windows.UI.Colors.Green);
                    break;
                case NotifyType.ErrorMessage:
                    StatusBorder.Background = new SolidColorBrush(
                        Windows.UI.Colors.Red);
                    break;
            }
            StatusBlock.Text += string.IsNullOrEmpty(StatusBlock.Text)
                ? strMessage : "\n" + strMessage;

            if (!string.IsNullOrEmpty(StatusBlock.Text))
            {
                StatusBorder.Visibility = Visibility.Visible;
                StatusPanel.Visibility = Visibility.Visible;
            }
            else
            {
                StatusBorder.Visibility = Visibility.Collapsed;
                StatusPanel.Visibility = Visibility.Collapsed;
            }
            // Raise an event if necessary to enable a screen reader
            // to announce the status update.
            var peer = Windows.UI.Xaml.Automation.Peers.FrameworkElementAutomationPeer.FromElement(StatusBlock);
            if (peer != null)
            {
                peer.RaiseAutomationEvent(
                    Windows.UI.Xaml.Automation.Peers.AutomationEvents.LiveRegionChanged);
            }
        }

        // Waits for and accumulates all audio associated with a given
        // PullAudioOutputStream and then plays it to the MediaElement. Long spoken
        // audio will create extra latency and a streaming playback solution
        // (that plays audio while it continues to be received) should be used --
        // see the samples for examples of this.
        private void SynchronouslyPlayActivityAudio(
            PullAudioOutputStream activityAudio)
        {
            var playbackStreamWithHeader = new MemoryStream();
            playbackStreamWithHeader.Write(Encoding.ASCII.GetBytes("RIFF"), 0, 4); // ChunkID
            playbackStreamWithHeader.Write(BitConverter.GetBytes(UInt32.MaxValue), 0, 4); // ChunkSize: max
            playbackStreamWithHeader.Write(Encoding.ASCII.GetBytes("WAVE"), 0, 4); // Format
            playbackStreamWithHeader.Write(Encoding.ASCII.GetBytes("fmt "), 0, 4); // Subchunk1ID
            playbackStreamWithHeader.Write(BitConverter.GetBytes(16), 0, 4); // Subchunk1Size: PCM
            playbackStreamWithHeader.Write(BitConverter.GetBytes(1), 0, 2); // AudioFormat: PCM
            playbackStreamWithHeader.Write(BitConverter.GetBytes(1), 0, 2); // NumChannels: mono
            playbackStreamWithHeader.Write(BitConverter.GetBytes(16000), 0, 4); // SampleRate: 16kHz
            playbackStreamWithHeader.Write(BitConverter.GetBytes(32000), 0, 4); // ByteRate
            playbackStreamWithHeader.Write(BitConverter.GetBytes(2), 0, 2); // BlockAlign
            playbackStreamWithHeader.Write(BitConverter.GetBytes(16), 0, 2); // BitsPerSample: 16-bit
            playbackStreamWithHeader.Write(Encoding.ASCII.GetBytes("data"), 0, 4); // Subchunk2ID
            playbackStreamWithHeader.Write(BitConverter.GetBytes(UInt32.MaxValue), 0, 4); // Subchunk2Size

            byte[] pullBuffer = new byte[2056];

            uint lastRead = 0;
            do
            {
                lastRead = activityAudio.Read(pullBuffer);
                playbackStreamWithHeader.Write(pullBuffer, 0, (int)lastRead);
            }
            while (lastRead == pullBuffer.Length);

            var task = Dispatcher.RunAsync(
                Windows.UI.Core.CoreDispatcherPriority.Normal, () =>
            {
                mediaElement.SetSource(
                    playbackStreamWithHeader.AsRandomAccessStream(), "audio/wav");
                mediaElement.Play();
            });
        }

        private void InitializeDialogServiceConnector()
        {
            // New code will go here
        }

        private async void ListenButton_ButtonClicked(
            object sender, RoutedEventArgs e)
        {
            // New code will go here
        }
    }
}
참고 항목
"'개체' 형식이 참조되지 않는 어셈블리에 정의되어 있습니다."라는 오류가 표시되는 경우 다음을 수행합니다.
- 솔루션을 마우스 오른쪽 단추로 클릭합니다.
- 솔루션용 NuGet 패키지 관리를 선택하고 업데이트를 선택합니다.
- 업데이트 목록에 Microsoft.NETCore.UniversalWindowsPlatform이 표시되면 Microsoft.NETCore.UniversalWindowsPlatform을 새 버전으로 업데이트합니다.
InitializeDialogServiceConnector메서드 본문에 다음 코드를 추가합니다.// This code creates the `DialogServiceConnector` with your resource information. // create a DialogServiceConfig by providing a Custom Commands application id and Speech resource key // The RecoLanguage property is optional (default en-US); note that only en-US is supported in Preview const string speechCommandsApplicationId = "YourApplicationId"; // Your application id const string speechSubscriptionKey = "YourSpeechSubscriptionKey"; // Your Speech resource key const string region = "YourServiceRegion"; // The Speech resource region. var speechCommandsConfig = CustomCommandsConfig.FromSubscription(speechCommandsApplicationId, speechSubscriptionKey, region); speechCommandsConfig.SetProperty(PropertyId.SpeechServiceConnection_RecoLanguage, "en-us"); connector = new DialogServiceConnector(speechCommandsConfig);YourApplicationId,YourSpeechSubscriptionKey및YourServiceRegion문자열을 사용자 고유의 앱, 음성 키 및 지역 값으로 바꿉니다.InitializeDialogServiceConnector의 메서드 본문 끝에 다음 코드 조각을 추가합니다.// // This code sets up handlers for events relied on by `DialogServiceConnector` to communicate its activities, // speech recognition results, and other information. // // ActivityReceived is the main way your client will receive messages, audio, and events connector.ActivityReceived += (sender, activityReceivedEventArgs) => { NotifyUser( $"Activity received, hasAudio={activityReceivedEventArgs.HasAudio} activity={activityReceivedEventArgs.Activity}"); if (activityReceivedEventArgs.HasAudio) { SynchronouslyPlayActivityAudio(activityReceivedEventArgs.Audio); } }; // Canceled will be signaled when a turn is aborted or experiences an error condition connector.Canceled += (sender, canceledEventArgs) => { NotifyUser($"Canceled, reason={canceledEventArgs.Reason}"); if (canceledEventArgs.Reason == CancellationReason.Error) { NotifyUser( $"Error: code={canceledEventArgs.ErrorCode}, details={canceledEventArgs.ErrorDetails}"); } }; // Recognizing (not 'Recognized') will provide the intermediate recognized text // while an audio stream is being processed connector.Recognizing += (sender, recognitionEventArgs) => { NotifyUser($"Recognizing! in-progress text={recognitionEventArgs.Result.Text}"); }; // Recognized (not 'Recognizing') will provide the final recognized text // once audio capture is completed connector.Recognized += (sender, recognitionEventArgs) => { NotifyUser($"Final speech to text result: '{recognitionEventArgs.Result.Text}'"); }; // SessionStarted will notify when audio begins flowing to the service for a turn connector.SessionStarted += (sender, sessionEventArgs) => { NotifyUser($"Now Listening! Session started, id={sessionEventArgs.SessionId}"); }; // SessionStopped will notify when a turn is complete and // it's safe to begin listening again connector.SessionStopped += (sender, sessionEventArgs) => { NotifyUser($"Listening complete. Session ended, id={sessionEventArgs.SessionId}"); };MainPage클래스의ListenButton_ButtonClicked메서드 본문에 다음 코드 조각을 추가합니다.// This code sets up `DialogServiceConnector` to listen, since you already established the configuration and // registered the event handlers. if (connector == null) { InitializeDialogServiceConnector(); // Optional step to speed up first interaction: if not called, // connection happens automatically on first use var connectTask = connector.ConnectAsync(); } try { // Start sending audio await connector.ListenOnceAsync(); } catch (Exception ex) { NotifyUser($"Exception: {ex.ToString()}", NotifyType.ErrorMessage); }메뉴 모음에서 파일>모두 저장을 선택하여 변경 내용을 저장합니다.
체험
메뉴 모음에서 빌드>솔루션 빌드를 선택하여 애플리케이션을 빌드합니다. 코드는 오류 없이 컴파일됩니다.
디버그>디버깅 시작을 선택하거나, F5 키를 눌러 애플리케이션을 시작합니다. helloworld 창이 나타납니다.
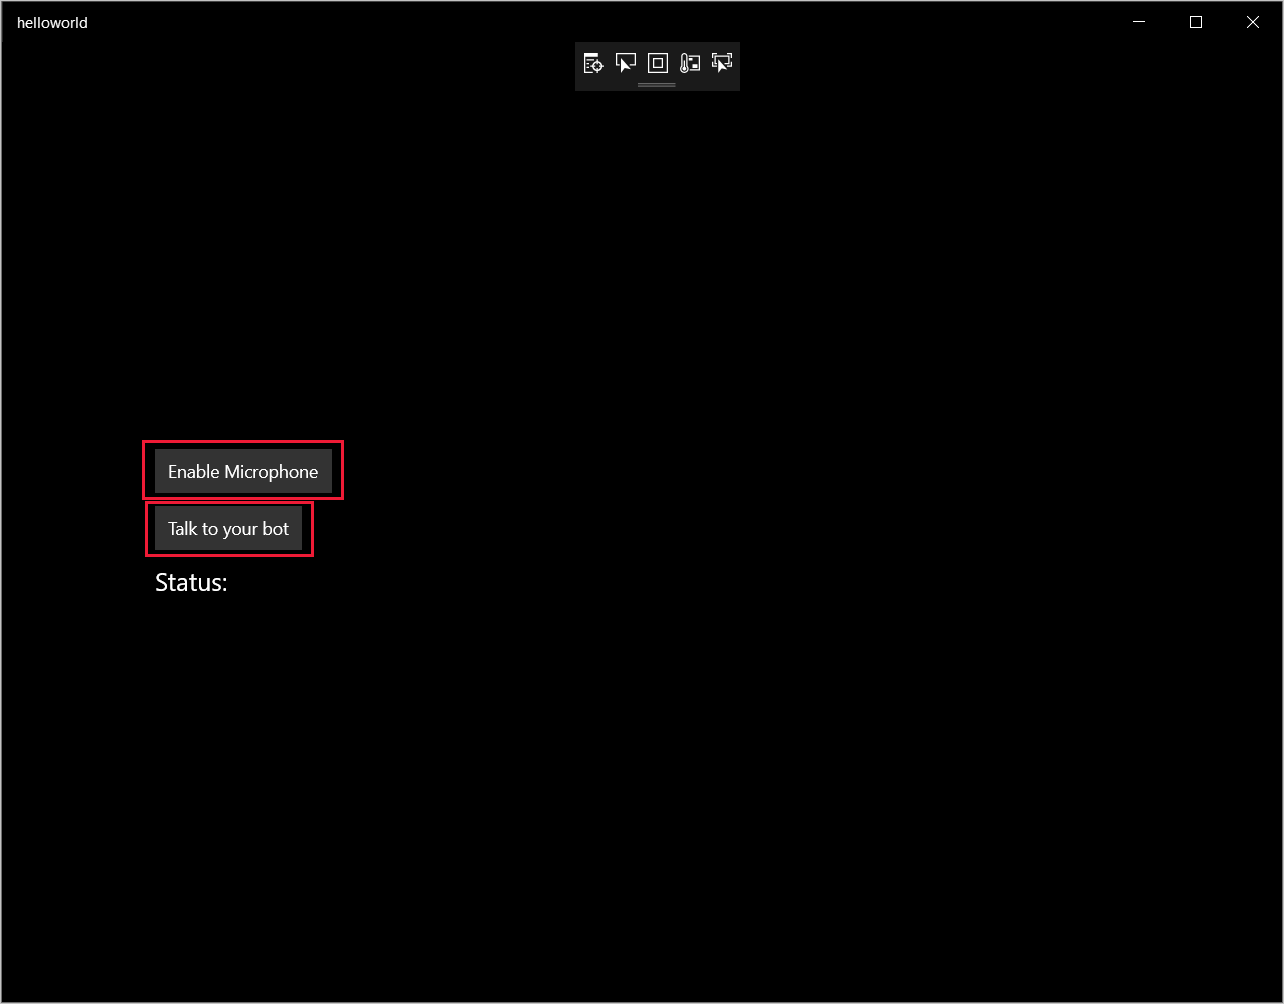
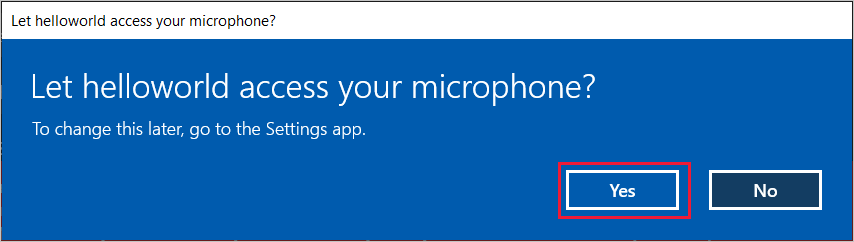
마이크 사용을 선택합니다. 액세스 권한 요청이 나타나면 예를 선택합니다.
말하기를 선택하고, 디바이스의 마이크에 영어로 짧은 구나 문장을 말합니다. 음성은 Direct Line Speech 채널로 전송되어 텍스트로 전사되고 창에 표시됩니다.