연결된 GitHub 리포지토리 또는 Azure DevOps 프로젝트 검사
연결된 GitHub 리포지토리 또는 Azure DevOps 프로젝트를 검사하도록 Microsoft Security DevOps를 설정할 수 있습니다. GitHub 작업 또는 Azure DevOps 확장을 사용하여 IaC(Infrastructure as Code) 소스 코드에서만 Microsoft Security DevOps를 실행하고 파이프라인 런타임을 줄일 수 있습니다.
이 문서에서는 템플릿 YAML 구성 파일을 적용하여 Microsoft Security DevOps 규칙을 사용하여 연결된 리포지토리 또는 프로젝트 특히 IaC 보안 문제를 검사하는 방법을 보여 줍니다.
필수 조건
- Microsoft Security DevOps의 경우 소스 코드 관리 시스템을 기반으로 GitHub 작업 또는 Azure DevOps 확장을 설정합니다.
- 리포지토리가 GitHub에 있는 경우 Microsoft Security DevOps GitHub 작업을 설정합니다.
- Azure DevOps에서 소스 코드를 관리하는 경우 Microsoft Security DevOps Azure DevOps 확장을 설정합니다.
- 리포지토리에 IaC 템플릿이 있는지 확인합니다.
연결된 IaC 소스 코드를 검사하는 GitHub 작업 설정 및 실행
GitHub에서 작업을 설정하고 검사 결과를 보려면:
GitHub에 로그인합니다.
리포지토리의 기본 페이지로 이동합니다.
파일 디렉터리에서 .github>워크플로>msdevopssec.yml을 선택합니다.
GitHub의 작업 작업에 대한 자세한 내용은 필수 구성 요소를 참조하세요.
이 파일 편집(연필) 아이콘을 선택합니다.

YAML 파일의 분석기 실행 섹션에서 다음 코드를 추가합니다.
with:
    categories: 'IaC'
참고 항목
값은 대/소문자를 구분합니다.
예를 들면 다음과 같습니다.

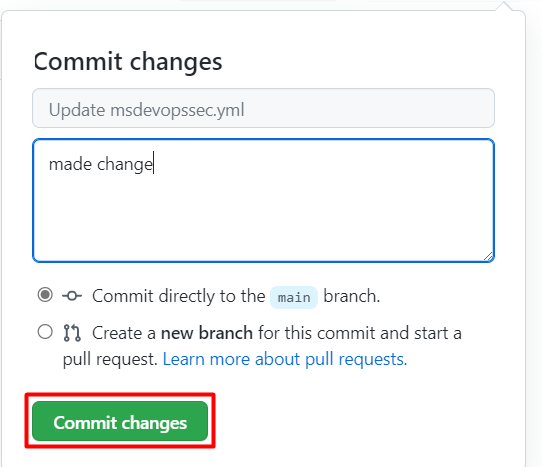
변경 내용 커밋...을 선택합니다.
변경 내용 커밋을 선택합니다.
(선택 사항) 리포지토리에 IaC 템플릿을 추가합니다. 리포지토리에 IaC 템플릿이 이미 있는 경우 이 단계를 건너뜁니다.
예를 들어 기본 Linux 웹 애플리케이션을 배포하는 데 사용할 수 있는 IaC 템플릿을 커밋합니다.
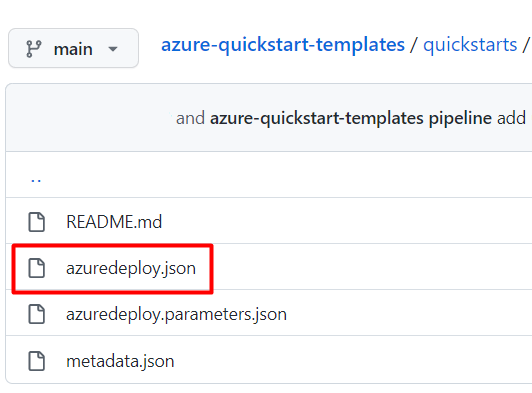
azuredeploy.json 파일을 선택합니다.
원시를 선택합니다.
다음 예제와 같이 파일의 모든 정보를 복사합니다.
{
  "$schema": "https://schema.management.azure.com/schemas/2019-04-01/deploymentTemplate.json#",
  "contentVersion": "1.0.0.0",
  "parameters": {
    "webAppName": {
      "type": "string",
      "defaultValue": "AzureLinuxApp",
      "metadata": {
        "description": "The base name of the resource, such as the web app name or the App Service plan."
      },
      "minLength": 2
    },
    "sku": {
      "type": "string",
      "defaultValue": "S1",
      "metadata": {
        "description": "The SKU of the App Service plan."
      }
    },
    "linuxFxVersion": {
      "type": "string",
      "defaultValue": "php|7.4",
      "metadata": {
        "description": "The runtime stack of the current web app."
      }
    },
    "location": {
      "type": "string",
      "defaultValue": "[resourceGroup().location]",
      "metadata": {
        "description": "The location for all resources."
      }
    }
  },
  "variables": {
    "webAppPortalName": "[concat(parameters('webAppName'), '-webapp')]",
    "appServicePlanName": "[concat('AppServicePlan-', parameters('webAppName'))]"
  },
  "resources": [
    {
      "type": "Microsoft.Web/serverfarms",
      "apiVersion": "2020-06-01",
      "name": "[variables('appServicePlanName')]",
      "location": "[parameters('location')]",
      "sku": {
        "name": "[parameters('sku')]"
      },
      "kind": "linux",
      "properties": {
        "reserved": true
      }
    },
    {
      "type": "Microsoft.Web/sites",
      "apiVersion": "2020-06-01",
      "name": "[variables('webAppPortalName')]",
      "location": "[parameters('location')]",
      "kind": "app",
      "dependsOn": [
        "[resourceId('Microsoft.Web/serverfarms', variables('appServicePlanName'))]"
      ],
      "properties": {
        "serverFarmId": "[resourceId('Microsoft.Web/serverfarms', variables('appServicePlanName'))]",
        "siteConfig": {
          "linuxFxVersion": "[parameters('linuxFxVersion')]"
        }
      }
    }
  ]
}
GitHub 리포지토리에서 .github/workflows 폴더로 이동합니다.
파일 추가>새 파일 만들기를 선택합니다.

파일의 이름을 입력합니다.
복사한 정보를 파일에 붙여넣습니다.
새 파일 커밋을 선택합니다.
템플릿 파일이 리포지토리에 추가됩니다.

Microsoft Security DevOps 검사가 완료되었는지 확인합니다.
리포지토리의 경우 작업을 선택합니다.
워크플로를 선택하여 작업 상태를 확인합니다.
검사 결과를 보려면 보안>코드 검색 경고로 이동합니다.
도구별로 필터링하여 IaC 결과만 볼 수 있습니다.


Azure DevOps 확장을 설정하고 실행하여 연결된 IaC 소스 코드 검사
Azure DevOps에서 확장을 설정하고 검사 결과를 보려면:
Azure DevOps에 로그인합니다.
프로젝트를 선택합니다.
파이프라인을 선택합니다.
Microsoft Security DevOps용 Azure DevOps 확장이 구성된 파이프라인을 선택합니다.
파이프라인 편집을 선택합니다.
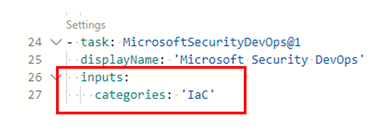
파이프라인 YAML 구성 파일의 MicrosoftSecurityDevOps@1 작업에 대한
displayName줄 아래에 다음 코드를 추가합니다.inputs: categories: 'IaC'예를 들면 다음과 같습니다.
저장을 선택합니다.
(선택 사항) Azure DevOps 프로젝트에 IaC 템플릿을 추가합니다. 프로젝트에 IaC 템플릿이 이미 있는 경우 이 단계를 건너뜁니다.
기본 분기에 직접 커밋할지 또는 커밋에 대한 새 분기를 만들 것인지를 선택한 다음 저장을 선택합니다.
IaC 검사 결과를 보려면 Pipelines를 선택한 다음 수정한 파이프라인을 선택합니다.
자세한 내용을 확인하고 특정 파이프라인 실행을 선택합니다.
적용된 IaC 규칙에 대한 세부 정보 및 수정 정보 보기
Microsoft Security DevOps에 포함된 IaC 검사 도구는 템플릿 분석기(PSRule은 템플릿 분석기에 포함됨) 및 Terrascan입니다.
템플릿 분석기는 ARM 템플릿(Azure Resource Manager 템플릿) 및 Bicep 템플릿에서 규칙을 실행합니다. 자세한 내용은 템플릿 분석기 규칙 및 수정 세부 정보를 참조하세요.
Terrascan은 CloudFormation, Docker, Helm, Kubernetes, Kustomize 및 Terraform에 대한 ARM 템플릿 및 템플릿에 대한 규칙을 실행합니다. 자세한 내용은 Terrascan 규칙을 참조하세요.
Microsoft Security DevOps에 포함된 IaC 검사 도구에 대한 자세한 내용은 다음을 참조하세요.
관련 콘텐츠
이 문서에서는 IaC 보안 잘못된 구성을 검사하기 위해 GitHub 작업 및 Microsoft Security DevOps용 Azure DevOps 확장을 설정하는 방법과 결과를 보는 방법을 알아보았습니다.
자세한 정보를 얻으려면:
- DevOps 보안에 대해 자세히 알아봅니다.
- 클라우드용 Defender에 GitHub 리포지토리를 연결하는 방법을 알아봅니다.
- Azure DevOps 프로젝트를 클라우드용 Defender에 연결하는 방법을 알아봅니다.