예: Python용 Azure 라이브러리를 사용하여 Azure Storage 만들기
이 문서에서는 Python 스크립트에서 Azure 관리 라이브러리를 사용하여 Azure Storage 계정 및 Blob Storage 컨테이너를 포함하는 리소스 그룹을 만드는 방법을 알아봅니다.
리소스 를 만든 후 예제: Azure Storage 를 사용하여 Python 애플리케이션 코드의 Azure 클라이언트 라이브러리를 사용하여 Blob Storage 컨테이너에 파일을 업로드합니다.
이 문서의 모든 명령은 언급되지 않는 한 Linux/macOS bash 및 Windows 명령 셸에서 동일하게 작동합니다.
해당하는 Azure CLI 명령은 이 문서의 뒷부분에 나와 있습니다. Azure Portal을 사용하려면 Azure Storage 계정 만들기 및 Blob 컨테이너 만들기를 참조하세요.
1: 로컬 개발 환경 설정
아직 실행하지 않은 경우 코드를 실행할 수 있는 환경을 설정합니다. 다음은 몇 가지 옵션입니다.
Python 가상 환경을 구성합니다. 로컬 또는 Azure Cloud Shell에서 가상 환경을 만들고 해당 환경에서 코드를 실행할 수 있습니다. 가상 환경을 활성화하여 사용을 시작해야 합니다.
conda 환경을 사용합니다.
Visual Studio Code 또는 GitHub Codespaces에서 개발 컨테이너를 사용합니다.
2: 필요한 Azure 라이브러리 패키지 설치
이 예제에서 사용된 관리 라이브러리를 나열하는 requirements.txt 파일을 만듭니다.
azure-mgmt-resource
azure-mgmt-storage
azure-identity
가상 환경이 활성화된 터미널에서 요구 사항을 설치합니다.
pip install -r requirements.txt
3: 스토리지 리소스를 만드는 코드 작성
다음 코드를 사용하여 provision_blob.py라는 Python 파일을 만듭니다. 주석은 세부 정보를 설명합니다. 스크립트는 환경 변수 AZURE_SUBSCRIPTION_ID에서 구독 ID를 읽습니다. 이후 단계에서 이 변수를 설정합니다. 리소스 그룹 이름, 위치, 스토리지 계정 이름 및 컨테이너 이름은 모두 코드에서 상수로 정의됩니다.
import os, random

# Import the needed management objects from the libraries. The azure.common library
# is installed automatically with the other libraries.
from azure.identity import DefaultAzureCredential
from azure.mgmt.resource import ResourceManagementClient
from azure.mgmt.storage import StorageManagementClient

# Acquire a credential object.
credential = DefaultAzureCredential()

# Retrieve subscription ID from environment variable.
subscription_id = os.environ["AZURE_SUBSCRIPTION_ID"]

# Obtain the management object for resources.
resource_client = ResourceManagementClient(credential, subscription_id)

# Constants we need in multiple places: the resource group name and the region
# in which we provision resources. You can change these values however you want.
RESOURCE_GROUP_NAME = "PythonAzureExample-Storage-rg"
LOCATION = "centralus"

# Step 1: Provision the resource group.

rg_result = resource_client.resource_groups.create_or_update(RESOURCE_GROUP_NAME,
    { "location": LOCATION })

print(f"Provisioned resource group {rg_result.name}")

# For details on the previous code, see Example: Provision a resource group
# at https://docs.microsoft.com/azure/developer/python/azure-sdk-example-resource-group


# Step 2: Provision the storage account, starting with a management object.

storage_client = StorageManagementClient(credential, subscription_id)

STORAGE_ACCOUNT_NAME = f"pythonazurestorage{random.randint(1,100000):05}"

# You can replace the storage account here with any unique name. A random number is used
# by default, but note that the name changes every time you run this script.
# The name must be 3-24 lower case letters and numbers only.


# Check if the account name is available. Storage account names must be unique across
# Azure because they're used in URLs.
availability_result = storage_client.storage_accounts.check_name_availability(
    { "name": STORAGE_ACCOUNT_NAME }
)

if not availability_result.name_available:
    print(f"Storage name {STORAGE_ACCOUNT_NAME} is already in use. Try another name.")
    exit()

# The name is available, so provision the account
poller = storage_client.storage_accounts.begin_create(RESOURCE_GROUP_NAME, STORAGE_ACCOUNT_NAME,
    {
        "location" : LOCATION,
        "kind": "StorageV2",
        "sku": {"name": "Standard_LRS"}
    }
)

# Long-running operations return a poller object; calling poller.result()
# waits for completion.
account_result = poller.result()
print(f"Provisioned storage account {account_result.name}")


# Step 3: Retrieve the account's primary access key and generate a connection string.
keys = storage_client.storage_accounts.list_keys(RESOURCE_GROUP_NAME, STORAGE_ACCOUNT_NAME)

print(f"Primary key for storage account: {keys.keys[0].value}")

conn_string = f"DefaultEndpointsProtocol=https;EndpointSuffix=core.windows.net;AccountName={STORAGE_ACCOUNT_NAME};AccountKey={keys.keys[0].value}"

print(f"Connection string: {conn_string}")

# Step 4: Provision the blob container in the account (this call is synchronous)
CONTAINER_NAME = "blob-container-01"
container = storage_client.blob_containers.create(RESOURCE_GROUP_NAME, STORAGE_ACCOUNT_NAME, CONTAINER_NAME, {})

# The fourth argument is a required BlobContainer object, but because we don't need any
# special values there, so we just pass empty JSON.

print(f"Provisioned blob container {container.name}")
코드의 인증
이 문서의 뒷부분에서 Azure CLI를 사용하여 Azure에 로그인하여 샘플 코드를 실행합니다. 계정에 Azure 구독에서 리소스 그룹 및 스토리지 리소스를 만들 수 있는 권한이 있는 경우 코드가 성공적으로 실행됩니다.
프로덕션 스크립트에서 이러한 코드를 사용하려면 인증에 서비스 주체 기반 방법을 사용하도록 환경 변수를 설정할 수 있습니다. 자세한 내용은 Azure 서비스를 사용하여 Python 앱을 인증하는 방법을 참조 하세요. 서비스 주체가 Azure에서 적절한 역할(예: 구독의 기여자 역할)을 할당하여 구독에 리소스 그룹 및 스토리지 리소스를 만들 수 있는 충분한 권한이 있는지 확인해야 합니다.
코드에 사용된 클래스에 대한 참조 링크
- DefaultAzureCredential(azure.identity)
- ResourceManagementClient(azure.mgmt.resource)
- StorageManagementClient(azure.mgmt.storage)
4. 스크립트 실행
아직 로그인하지 않은 경우 Azure CLI를 사용하여 Azure에 로그인합니다.
az login환경 변수를
AZURE_SUBSCRIPTION_ID구독 ID로 설정합니다. (az account show 명령을 실행하고 출력의 속성에서 구독 ID를id가져올 수 있습니다.)스크립트를 실행합니다.
python provision_blob.py
스크립트를 완료하는 데 1~2분 정도 걸립니다.
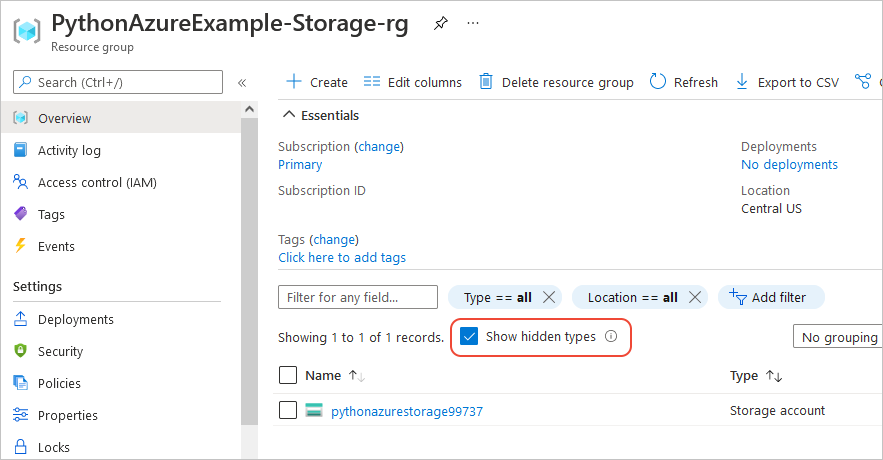
5: 리소스 확인
Azure Portal을 열어 리소스 그룹 및 스토리지 계정이 예상대로 생성되었는지 확인합니다. 잠시 기다렸다가 리소스 그룹에 숨겨진 형식 표시를 선택해야 할 수도 있습니다.
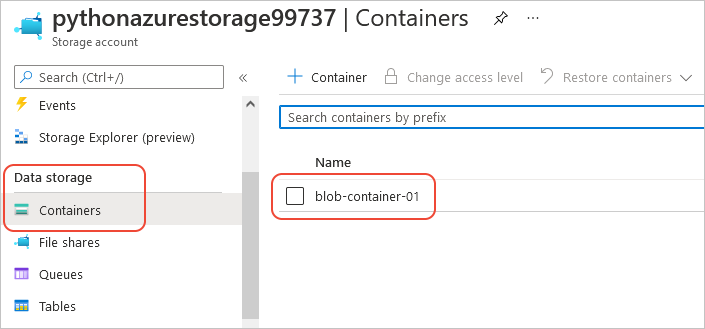
스토리지 계정을 선택한 다음 왼쪽 메뉴에서 데이터 스토리지>컨테이너를 선택하여 "Blob-container-01"이 표시되는지 확인합니다.
애플리케이션 코드 에서 이러한 리소스를 사용하려는 경우 예제: Azure Storage를 계속 사용합니다.
Azure Storage 관리 라이브러리를 사용하는 다른 예는 Python 스토리지 샘플 관리를 참조하세요.
참조용: 해당 Azure CLI 명령
다음 Azure CLI 명령은 Python 스크립트와 동일한 만들기 단계를 완료합니다.
rem Provision the resource group

az group create ^
-n PythonAzureExample-Storage-rg ^
-l centralus

rem Provision the storage account

set account=pythonazurestorage%random%
echo Storage account name is %account%

az storage account create ^
-g PythonAzureExample-Storage-rg ^
-l centralus ^
-n %account% ^
--kind StorageV2 ^
--sku Standard_LRS

rem Retrieve the connection string

FOR /F %i IN ('az storage account show-connection-string -g PythonAzureExample-Storage-rg -n %account% --query connectionString') do (SET connstr=%i)

rem Provision the blob container

az storage container create ^
--name blob-container-01 ^
--account-name %account% ^
--connection-string %connstr%
6: 리소스 정리
예제: Azure Storage를 사용하여 앱 코드에서 이러한 리소스를 사용하려면 리소스를 그대로 둡니다. 그렇지 않으면 이 예제에서 만든 리소스 그룹 및 스토리지 리소스를 유지할 필요가 없는 경우 az group delete 명령을 실행합니다.
리소스 그룹은 구독에서 진행 중인 요금이 발생하지 않지만 리소스 그룹의 스토리지 계정과 같은 리소스에는 요금이 부과될 수 있습니다. 적극적으로 사용하지 않는 그룹을 클린 것이 좋습니다. 인수 --no-wait 를 사용하면 작업이 완료되는 것을 기다리는 대신 명령이 즉시 반환됩니다.
az group delete -n PythonAzureExample-Storage-rg --no-wait
ResourceManagementClient.resource_groups.begin_delete 메서드를 사용하여 코드에서 리소스 그룹을 삭제할 수도 있습니다. 예제: 리소스 그룹 만들기의 코드는 사용량을 보여 줍니다.
참고 항목
피드백
출시 예정: 2024년 내내 콘텐츠에 대한 피드백 메커니즘으로 GitHub 문제를 단계적으로 폐지하고 이를 새로운 피드백 시스템으로 바꿀 예정입니다. 자세한 내용은 다음을 참조하세요. https://aka.ms/ContentUserFeedback
다음에 대한 사용자 의견 제출 및 보기