자습서: 백 엔드 서비스에서 디바이스 구성
디바이스 수명 주기의 일부로 백 엔드 서비스에서 IoT 디바이스를 구성해야 할 수 있습니다. 원하는 구성을 디바이스로 보내면 해당 디바이스에서 상태 및 준수 업데이트를 받을 수도 있습니다. 예를 들어 디바이스의 대상 작동 온도 범위를 설정하거나 디바이스의 펌웨어 버전 정보를 수집할 수 있습니다.
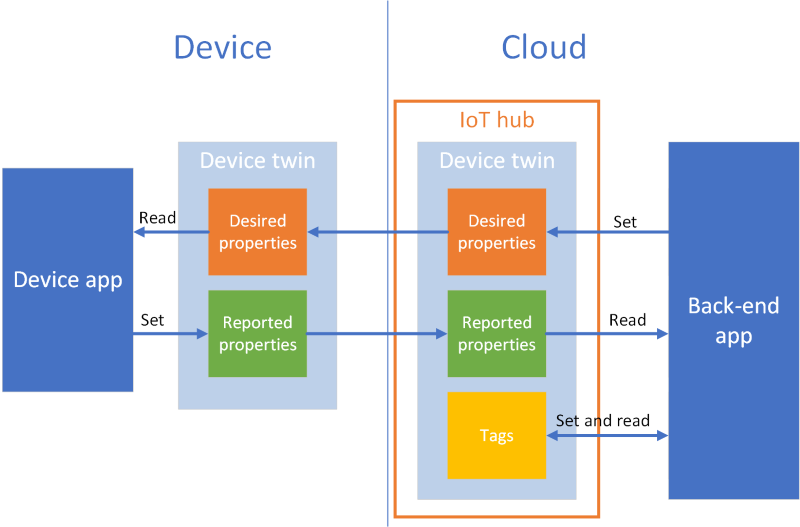
디바이스와 IoT 허브 간에 상태 정보를 동기화하려면 디바이스 쌍을 사용합니다. 디바이스 쌍은 특정 디바이스와 관련된 JSON 문서이며, IoT Hub를 통해 쿼리할 수 있는 클라우드에 저장됩니다. 디바이스 쌍에는 desired 속성, reported 속성 및 태그가 있습니다.
- desired 속성은 백 엔드 애플리케이션에서 설정하고 디바이스에서 읽습니다.
- reported 속성은 디바이스에서 설정하고 백 엔드 애플리케이션에서 읽습니다.
- 태그는 백 엔드 애플리케이션에서 설정하고 디바이스로 보내지 않습니다. 태그를 사용하여 디바이스를 구성합니다.
이 자습서에서는 desired 속성과 reported 속성을 사용하여 상태 정보를 동기화하는 방법을 보여 줍니다.
이 자습서에서는 다음 작업을 수행합니다.
- IoT 허브를 만들고 ID 레지스트리에 테스트 디바이스를 추가합니다.
- desired 속성을 사용하여 시뮬레이션된 디바이스에 상태 정보를 보냅니다.
- reported 속성을 사용하여 시뮬레이션된 디바이스에서 상태 정보를 받습니다.
Azure 구독이 아직 없는 경우 시작하기 전에 체험 계정을 만듭니다.
필수 조건
이 자습서에서는 Azure CLI를 사용하여 클라우드 리소스를 만듭니다. 디바이스가 등록된 IoT Hub가 이미 있는 경우 해당 단계를 건너뛸 수 있습니다. CLI 명령을 실행하는 방법에는 두 가지가 있습니다.
Azure Cloud Shell에서 Bash 환경을 사용합니다. 자세한 내용은 Azure Cloud Shell 빠른 시작 - Bash를 참조하세요.

CLI 참조 명령을 로컬에서 실행하려면 Azure CLI를 설치합니다. Windows 또는 macOS에서 실행 중인 경우 Docker 컨테이너에서 Azure CLI를 실행하는 것이 좋습니다. 자세한 내용은 Docker 컨테이너에서 Azure CLI를 실행하는 방법을 참조하세요.
- az login 명령을 사용하여 Azure CLI에 로그인합니다.
- 메시지가 표시되면 처음 사용할 때 Azure CLI 확장을 설치합니다. 확장에 대한 자세한 내용은 Azure CLI에서 확장 사용을 참조하세요.
- az version을 실행하여 설치된 버전과 종속 라이브러리를 찾습니다. 최신 버전으로 업그레이드하려면 az upgrade를 실행합니다.
이 자습서에서 실행하는 두 개의 샘플 애플리케이션은 Node.js를 사용하여 작성되었습니다. 개발 머신에 Node.js v10.x.x 이상이 필요합니다.
nodejs.org에서 여러 플랫폼에 대한 Node.js를 다운로드할 수 있습니다.
다음 명령을 사용하여 개발 컴퓨터에서 Node.js의 현재 버전을 확인할 수 있습니다.
node --version
Node.js용 Azure IoT 샘플에서 샘플 Node.js 프로젝트를 복제하거나 다운로드합니다.
방화벽에서 포트 8883이 열려 있는지 확인합니다. 이 자습서의 디바이스 샘플은 포트 8883을 통해 통신하는 MQTT 프로토콜을 사용합니다. 이 포트는 일부 회사 및 교육용 네트워크 환경에서 차단될 수 있습니다. 이 문제를 해결하는 자세한 내용과 방법은 IoT Hub에 연결(MQTT)을 참조하세요.
Azure 리소스 설정
이 자습서를 완료하려면 Azure 구독에 디바이스 ID 레지스트리에 디바이스가 추가된 IoT 허브가 있어야 합니다. 디바이스 ID 레지스트리의 항목을 사용하면 이 자습서에서 실행하는 시뮬레이션된 디바이스를 허브에 연결할 수 있습니다.
구독에 아직 IoT 허브를 설정하지 않은 경우 다음 CLI 스크립트를 사용하여 하나의 IoT 허브를 설정할 수 있습니다. 이 스크립트는 IoT Hub 이름에 난수가 추가된 tutorial-iot-hub 이름을 사용합니다. 이 이름을 실행할 때 전역적으로 고유한 이름으로 바꿀 수 있습니다. 이 스크립트의 경우 미국 중부 지역에 리소스 그룹과 허브를 만들지만, 가장 가까운 지역으로 변경할 수 있습니다. 그리고 백 엔드 샘플에서 IoT 허브에 연결하는 데 사용하는 IoT 허브 서비스 연결 문자열을 검색합니다.
let "randomIdentifier=$RANDOM*$RANDOM"
hubname="tutorial-iot-hub-$randomIdentifier"
location=centralus

# Install the IoT extension if it's not already installed:
az extension add --name azure-iot

# Create a resource group:
az group create --name tutorial-iot-hub-rg --location $location

# Create your free-tier IoT hub. You can only have one free IoT hub per subscription.
# Change the sku to S1 to create a standard-tier hub if necessary.
az iot hub create --name $hubname --location $location --resource-group tutorial-iot-hub-rg --partition-count 2 --sku F1

# Make a note of the service connection string, you need it later:
az iot hub connection-string show --hub-name $hubname --policy-name service -o table
이 자습서에서는 MyTwinDevice라는 시뮬레이션된 디바이스를 사용합니다. 다음 스크립트는 이 디바이스를 ID 레지스트리에 추가하고 해당 연결 문자열을 검색합니다.
# Create the device in the identity registry:
az iot hub device-identity create --device-id MyTwinDevice --hub-name $hubname --resource-group tutorial-iot-hub-rg

# Retrieve the device connection string, you need this later:
az iot hub device-identity connection-string show --device-id MyTwinDevice --hub-name $hubname --resource-group tutorial-iot-hub-rg -o table
디바이스에 상태 정보 보내기
desired 속성을 사용하여 백 엔드 애플리케이션에서 디바이스로 상태 정보를 보냅니다. 이 섹션에서 수행하는 방법은 다음과 같습니다.
- 원하는 속성을 수신하고 처리하도록 디바이스를 구성합니다.
- 백 엔드 애플리케이션에서 desired 속성을 디바이스로 보냅니다.
desired 속성 샘플
애플리케이션에 편리한 방식으로 desired 속성을 구조화할 수 있습니다. 다음 예제에서는 fanOn이라는 최상위 속성 하나를 사용하고, 나머지 속성은 별도의 components에 그룹화합니다. 다음 JSON 코드 조각에서는 이 자습서에서 사용하는 desired 속성의 구조를 보여줍니다. JSON은 desired.json 파일에 있습니다.
{
  "fanOn": "true",
  "components": {
    "system": {
      "id": "17",
      "units": "farenheit",
      "firmwareVersion": "9.75"
    },
    "wifi" : {
      "channel" : "6",
      "ssid": "my_network"
    },
    "climate" : {
      "minTemperature": "68",
      "maxTemperature": "76"
    }
  }
}
디바이스 애플리케이션에서 원하는 속성 받기
desired 속성을 받는 시뮬레이션된 디바이스 샘플 코드를 보려면, 다운로드한 Node.js 프로젝트 샘플의 iot-hub/Tutorials/DeviceTwins 폴더로 이동합니다. 그런 다음, 텍스트 편집기에서 SimulatedDevice.js 파일을 엽니다.
다음 섹션에서는 백 엔드 애플리케이션에서 보낸 desired 속성 변경 내용에 응답하는 시뮬레이션된 디바이스에서 실행되는 코드에 대해 설명합니다.
디바이스 쌍 개체 가져오기
IoT Hub에 디바이스를 등록하면 디바이스 연결 문자열이 출력으로 표시됩니다. 디바이스 연결 문자열은 디바이스에서 클라우드에서 등록된 ID로 인증하는 데 사용됩니다. 다음 코드에서는 디바이스 연결 문자열을 사용하여 IoT 허브에 연결합니다.
// Get the device connection string from a command line argument
var connectionString = process.argv[2];
다음 코드에서는 클라이언트 개체에서 쌍을 가져옵니다.
// Get the device twin
client.getTwin(function(err, twin) {
  if (err) {
    console.error(chalk.red('Could not get device twin'));
  } else {
    console.log(chalk.green('Device twin created'));
처리기 만들기
JSON 계층 구조의 여러 수준에서 업데이트에 응답하는 desired 속성 업데이트를 위한 처리기를 만들 수 있습니다. 예를 들어 다음 처리기는 백 엔드 애플리케이션에서 디바이스로 보낸 모든 desired 속성 변경 내용을 표시합니다. delta 변수에는 솔루션 백 엔드에서 보낸 desired 속성이 포함됩니다.
// Handle all desired property updates
twin.on('properties.desired', function(delta) {
    console.log(chalk.yellow('\nNew desired properties received in patch:'));
다음 처리기는 fanOn desired 속성에 대한 변경 내용에만 대응합니다.
// Handle changes to the fanOn desired property
twin.on('properties.desired.fanOn', function(fanOn) {
    console.log(chalk.green('\nSetting fan state to ' + fanOn));

    // Update the reported property after processing the desired property
    reportedPropertiesPatch.fanOn = fanOn ? fanOn : '{unknown}';
});
여러 속성에 대한 처리기
이 자습서의 샘플 desired 속성 JSON 예제에서 components 아래의 climate 노드에는 minTemperature 및 maxTemperature의 두 속성이 있습니다.
디바이스의 로컬 쌍 개체는 desired 속성과 reported 속성의 전체 집합을 저장합니다. 백 엔드에서 보낸 delta는 desired 속성의 일부만 업데이트할 수 있습니다. 다음 코드 조각에서는 시뮬레이션된 디바이스에서 minTemperature 및 maxTemperature 중 하나에 대한 업데이트를 받으면 다른 값에 대한 로컬 쌍의 값을 사용하여 디바이스를 구성합니다.
// Handle desired properties updates to the climate component
twin.on('properties.desired.components.climate', function(delta) {
    if (delta.minTemperature || delta.maxTemperature) {
      console.log(chalk.green('\nUpdating desired tempertures in climate component:'));
      console.log('Configuring minimum temperature: ' + twin.properties.desired.components.climate.minTemperature);
      console.log('Configuring maximum temperture: ' + twin.properties.desired.components.climate.maxTemperature);

      // Update the reported properties and send them to the hub
      reportedPropertiesPatch.minTemperature = twin.properties.desired.components.climate.minTemperature;
      reportedPropertiesPatch.maxTemperature = twin.properties.desired.components.climate.maxTemperature;
      sendReportedProperties();
    }
});
삽입, 업데이트 및 삭제 작업 처리
백 엔드에서 보낸 desired 속성은 특정 desired 속성에 대해 수행되는 작업을 나타내지 않습니다. 코드에서는 로컬에 저장된 현재 desired 속성 집합과 허브에서 보낸 변경 내용에서 작업을 유추해야 합니다.
다음 코드 조각에서는 시뮬레이션된 디바이스에서 desired 속성의 components 목록에 대한 삽입, 업데이트 및 삭제 작업을 처리하는 방법을 보여줍니다. null 값을 사용하여 구성 요소를 삭제해야 함을 나타내는 방법을 볼 수 있습니다.
// Keep track of all the components the device knows about
var componentList = {};

// Use this componentList list and compare it to the delta to infer
// if anything was added, deleted, or updated.
twin.on('properties.desired.components', function(delta) {
  if (delta === null) {
    componentList = {};
  }
  else {
    Object.keys(delta).forEach(function(key) {

      if (delta[key] === null && componentList[key]) {
        // The delta contains a null value, and the
        // device has a record of this component.
        // Must be a delete operation.
        console.log(chalk.green('\nDeleting component ' + key));
        delete componentList[key];

      } else if (delta[key]) {
        if (componentList[key]) {
          // The delta contains a component, and the
          // device has a record of it.
          // Must be an update operation.
          console.log(chalk.green('\nUpdating component ' + key + ':'));
          console.log(JSON.stringify(delta[key]));
          // Store the complete object instead of just the delta
          componentList[key] = twin.properties.desired.components[key];

        } else {
          // The delta contains a component, and the
          // device has no record of it.
          // Must be an add operation.
          console.log(chalk.green('\nAdding component ' + key + ':'));
          console.log(JSON.stringify(delta[key]));
          // Store the complete object instead of just the delta
          componentList[key] = twin.properties.desired.components[key];
        }
      }
    });
  }
});
백 엔드 애플리케이션에서 desired 속성을 보냅니다.
디바이스에서 desired 속성 업데이트를 받기 위한 처리기를 구현하는 방법을 살펴보았습니다. 이 섹션에서는 desired 속성 변경 내용을 백 엔드 애플리케이션에서 디바이스로 보내는 방법을 보여 줍니다.
desired 속성을 받는 시뮬레이션된 디바이스 샘플 코드를 보려면, 다운로드한 Node.js 프로젝트 샘플의 iot-hub/Tutorials/DeviceTwins 폴더로 이동합니다. 그런 다음, 텍스트 편집기에서 ServiceClient.js 파일을 엽니다.
다음 코드 조각에서는 디바이스 ID 레지스트리에 연결하고 특정 디바이스에 대한 쌍에 액세스하는 방법을 보여줍니다.
// Create a device identity registry object
var registry = Registry.fromConnectionString(connectionString);

// Get the device twin and send desired property update patches at intervals.
// Print the reported properties after some of the desired property updates.
registry.getTwin(deviceId, async (err, twin) => {
  if (err) {
    console.error(err.message);
  } else {
    console.log('Got device twin');
다음 코드 조각에서는 백 엔드 애플리케이션에서 디바이스로 보내는 여러 가지 desired 속성 패치를 보여 줍니다.
// Turn the fan on
var twinPatchFanOn = {
  properties: {
    desired: {
      patchId: "Switch fan on",
      fanOn: "false",
    }
  }
};

// Set the maximum temperature for the climate component
var twinPatchSetMaxTemperature = {
  properties: {
    desired: {
      patchId: "Set maximum temperature",
      components: {
        climate: {
          maxTemperature: "92"
        }
      }
    }
  }
};

// Add a new component
var twinPatchAddWifiComponent = {
  properties: {
    desired: {
      patchId: "Add WiFi component",
      components: {
        wifi: {
          channel: "6",
          ssid: "my_network"
        }
      }
    }
  }
};

// Update the WiFi component
var twinPatchUpdateWifiComponent = {
  properties: {
    desired: {
      patchId: "Update WiFi component",
      components: {
        wifi: {
          channel: "13",
          ssid: "my_other_network"
        }
      }
    }
  }
};

// Delete the WiFi component
var twinPatchDeleteWifiComponent = {
  properties: {
    desired: {
      patchId: "Delete WiFi component",
      components: {
        wifi: null
      }
    }
  }
};
다음 코드 조각에서는 백 엔드 애플리케이션이 desired 속성 업데이트를 디바이스로 보내는 방법을 보여 줍니다.
// Send a desired property update patch
async function sendDesiredProperties(twin, patch) {
  twin.update(patch, (err, twin) => {
    if (err) {
      console.error(err.message);
    } else {
      console.log(chalk.green(`\nSent ${twin.properties.desired.patchId} patch:`));
      console.log(JSON.stringify(patch, null, 2));
    }
  });
}
디바이스에서 상태 정보 받기
백 엔드 애플리케이션은 디바이스의 상태 정보를 reported 속성으로 받습니다. 디바이스에서 reported 속성을 설정하고 이 속성을 허브로 보냅니다. 백 엔드 애플리케이션은 reported 속성의 현재 값을 허브에 저장된 디바이스 쌍에서 읽을 수 있습니다.
디바이스에서 reported 속성 보내기
reported 속성 값에 대한 업데이트를 패치로 보낼 수 있습니다. 다음 코드 조각에서는 시뮬레이션된 디바이스에서 보내는 패치에 대한 템플릿을 보여줍니다. 시뮬레이션된 디바이스에서 패치의 필드를 업데이트한 후에 해당 패치를 허브로 보냅니다.
// Create a patch to send to the hub
var reportedPropertiesPatch = {
  firmwareVersion:'1.2.1',
  lastPatchReceivedId: '',
  fanOn:'',
  minTemperature:'',
  maxTemperature:''
};
시뮬레이션된 디바이스에서 다음 함수를 사용하여 reported 속성이 포함된 패치를 허브로 보냅니다.
// Send the reported properties patch to the hub
function sendReportedProperties() {
  twin.properties.reported.update(reportedPropertiesPatch, function(err) {
    if (err) throw err;
    console.log(chalk.blue('\nTwin state reported'));
    console.log(JSON.stringify(reportedPropertiesPatch, null, 2));
  });
}
reported 속성 처리
백 엔드 애플리케이션에서 디바이스 쌍을 통해 디바이스에 대한 현재 reported 속성 값에 액세스합니다. 다음 코드 조각에서는 백 엔드 애플리케이션에서 시뮬레이션된 디바이스에 대한 reported 속성 값을 읽는 방법을 보여 줍니다.
// Display the reported properties from the device
function printReportedProperties(twin) {
  console.log("Last received patch: " + twin.properties.reported.lastPatchReceivedId);
  console.log("Firmware version: " + twin.properties.reported.firmwareVersion);
  console.log("Fan status: " + twin.properties.reported.fanOn);
  console.log("Min temperature set: " + twin.properties.reported.minTemperature);
  console.log("Max temperature set: " + twin.properties.reported.maxTemperature);
}
애플리케이션 실행
이 섹션에서는 두 개의 샘플 애플리케이션을 실행하여 백 엔드 애플리케이션에서 desired 속성 업데이트를 시뮬레이션된 디바이스 애플리케이션으로 보내는 것을 관찰합니다.
시뮬레이션된 디바이스 및 백 엔드 애플리케이션을 실행하려면 디바이스 및 서비스 연결 문자열이 필요합니다. 이 자습서의 시작에서 리소스를 만들 때 연결 문자열을 적어두었습니다.
시뮬레이션된 장치 애플리케이션을 실행하려면 셸 또는 명령 프롬프트 창을 열고 다운로드한 Node.js 프로젝트의 iot-hub/Tutorials/DeviceTwins 폴더로 이동합니다. 그런 다음, 다음 명령을 실행합니다.
npm install
node SimulatedDevice.js "{your device connection string}"
백 엔드 애플리케이션을 실행하려면 다른 셸 또는 명령 프롬프트 창을 엽니다. 그런 다음, 다운로드한 Node.js 프로젝트의 iot-hub/Tutorials/DeviceTwins 폴더로 이동합니다. 그런 다음, 다음 명령을 실행합니다.
npm install
node ServiceClient.js "{your service connection string}"
desired 속성 업데이트 관찰
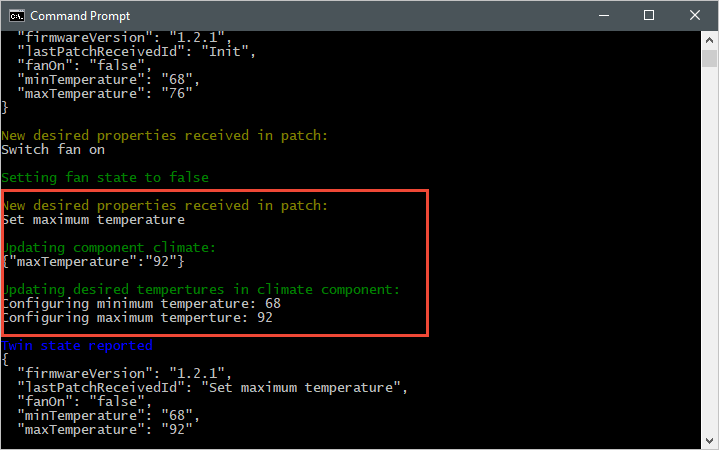
다음 스크린샷에서는 시뮬레이션된 디바이스 애플리케이션의 출력을 보여 주고, maxTemperature desired 속성에 대한 업데이트를 처리하는 방법을 강조 표시하고 있습니다. 최상위 처리기와 climate component(기후 구성 요소) 처리기가 모두 실행되는 방식을 확인할 수 있습니다.
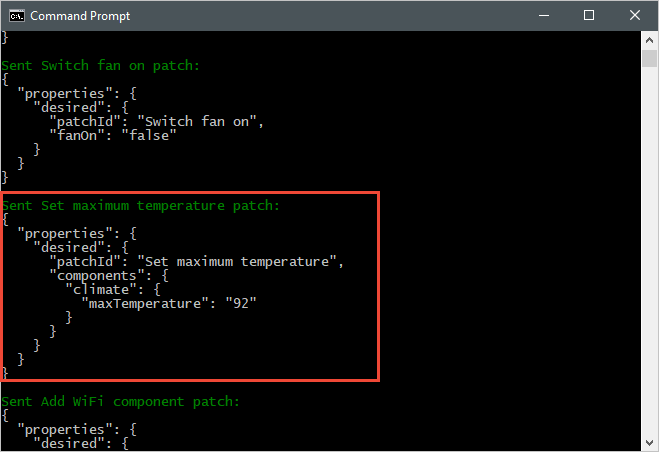
다음 스크린샷에서는 백 엔드 애플리케이션의 출력을 보여 주고, maxTemperature desired 속성에 대한 업데이트를 보내는 방법을 강조 표시하고 있습니다.
reported 속성 업데이트 관찰
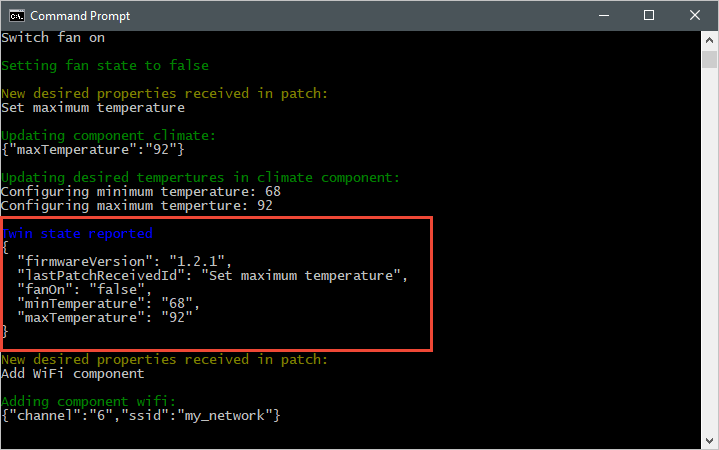
다음 스크린샷에서는 시뮬레이션된 디바이스 애플리케이션의 출력을 보여 주고, reported 속성 업데이트를 허브로 보내는 방법을 강조 표시하고 있습니다.
다음 스크린샷에서는 백 엔드 애플리케이션의 출력을 보여 주고, 디바이스에서 reported 속성 업데이트를 받고 처리하는 방법을 강조 표시하고 있습니다.

리소스 정리
다음 자습서를 완료하려면 리소스 그룹과 IoT 허브를 그대로 두고 나중에 다시 사용합니다.
더 이상 IoT Hub가 필요하지 않으면 포털에서 IoT Hub와 리소스 그룹을 삭제합니다. 이렇게 하려면 IoT 허브가 포함된 tutorial-iot-hub-rg 리소스 그룹을 선택하고 삭제를 선택합니다.
또는 CLI를 사용합니다.
# Delete your resource group and its contents
az group delete --name tutorial-iot-hub-rg
다음 단계
이 자습서에서는 디바이스와 IoT 허브 간에 상태 정보를 동기화하는 방법을 알아보았습니다. 디바이스 쌍을 사용하여 디바이스 업데이트 프로세스를 구현하는 방법을 알아보려면 다음 자습서로 계속 진행하세요.