Fairlearn 오픈 소스 패키지와 함께 Azure Machine Learning을 사용하여 ML 모델의 공정성 평가(미리 보기)
적용 대상: Python SDK azureml v1
이 방법 가이드에서는 Azure Machine Learning과 함께 Fairlearn 오픈 소스 Python 패키지를 사용하여 다음 작업을 수행하는 방법을 알아봅니다.
- 모델 예측의 공정성을 평가합니다. 기계 학습의 공정성에 관한 자세한 내용은 기계 학습의 공정성 문서를 참조하세요.
- Azure Machine Learning 스튜디오에서 공정성 평가 인사이트를 업로드하고 나열하며 다운로드합니다.
- 모델의 공정성 인사이트와 상호 작용하려면 Azure Machine Learning 스튜디오의 공정성 평가 대시보드를 참조하세요.
참고 항목
공정성 평가는 완전히 기술적인 연습이 아닙니다. 이 패키지는 기계 학습 모델의 공정성을 평가하는 데 도움이 될 수 있지만, 모델의 성능을 구성하고 결정할 수 있는 것은 사용자뿐입니다. 이 패키지는 공정성을 평가하기 위한 양적 메트릭을 식별하는 데 도움이 되지만, 기계 학습 모델 개발자는 고유 모델의 공정성을 평가하기 위해 정성적 분석을 수행해야 합니다.
Important
이 기능은 현재 공개 미리 보기로 제공됩니다. 이 미리 보기 버전은 서비스 수준 계약 없이 제공되며, 프로덕션 워크로드에는 권장되지 않습니다. 특정 기능이 지원되지 않거나 기능이 제한될 수 있습니다.
자세한 내용은 Microsoft Azure Preview에 대한 추가 사용 약관을 참조하세요.
Azure Machine Learning Fairness SDK
Azure Machine Learning Fairness SDK, azureml-contrib-fairness는 Azure Machine Learning 내에 오픈 소스 Python 패키지인 Fairlearn을 통합합니다. Azure Machine Learning에서 Fairlearn의 통합에 관해 자세히 알아보려면 해당 샘플 Notebook을 확인하세요. Fairlearn에 관한 자세한 내용은 예제 가이드와 샘플 Notebook을 참조하세요.
다음 명령을 사용하여 azureml-contrib-fairness와 fairlearn 패키지를 설치합니다.
pip install azureml-contrib-fairness
pip install fairlearn==0.4.6
이후 버전의 Fairlearn은 다음 예제 코드에서도 작동해야 합니다.
단일 모델의 공정성 인사이트 업로드
다음 예제에서는 공정성 패키지를 사용하는 방법을 보여 줍니다. Azure Machine Learning에 모델 공정성 인사이트를 업로드하고 Azure Machine Learning 스튜디오의 공정성 평가 대시보드를 확인합니다.
Jupyter Notebook에서 샘플 모델을 학습시킵니다.
데이터 세트의 경우 OpenML에서 가져온 잘 알려진 성인 인구 조사 데이터 세트를 사용합니다. 개인이 이전 대출을 상환했는지를 표시하는 레이블에 대출 결정 문제가 있는 것으로 가정합니다. 이전에 표시되지 않은 개인이 대출을 상환할지 예측하도록 모델을 학습시킵니다. 해당 모델은 대출 결정을 내리는 데 사용할 수 있습니다.
import copy
import numpy as np
import pandas as pd

from sklearn.compose import ColumnTransformer
from sklearn.datasets import fetch_openml
from sklearn.impute import SimpleImputer
from sklearn.linear_model import LogisticRegression
from sklearn.model_selection import train_test_split
from sklearn.preprocessing import StandardScaler, OneHotEncoder
from sklearn.compose import make_column_selector as selector
from sklearn.pipeline import Pipeline

from raiwidgets import FairnessDashboard

# Load the census dataset
data = fetch_openml(data_id=1590, as_frame=True)
X_raw = data.data
y = (data.target == ">50K") * 1

# (Optional) Separate the "sex" and "race" sensitive features out and drop them from the main data prior to training your model
X_raw = data.data
y = (data.target == ">50K") * 1
A = X_raw[["race", "sex"]]
X = X_raw.drop(labels=['sex', 'race'],axis = 1)

# Split the data in "train" and "test" sets
(X_train, X_test, y_train, y_test, A_train, A_test) = train_test_split(
    X_raw, y, A, test_size=0.3, random_state=12345, stratify=y
)

# Ensure indices are aligned between X, y and A,
# after all the slicing and splitting of DataFrames
# and Series
X_train = X_train.reset_index(drop=True)
X_test = X_test.reset_index(drop=True)
y_train = y_train.reset_index(drop=True)
y_test = y_test.reset_index(drop=True)
A_train = A_train.reset_index(drop=True)
A_test = A_test.reset_index(drop=True)

# Define a processing pipeline. This happens after the split to avoid data leakage
numeric_transformer = Pipeline(
    steps=[
        ("impute", SimpleImputer()),
        ("scaler", StandardScaler()),
    ]
)
categorical_transformer = Pipeline(
    [
        ("impute", SimpleImputer(strategy="most_frequent")),
        ("ohe", OneHotEncoder(handle_unknown="ignore")),
    ]
)
preprocessor = ColumnTransformer(
    transformers=[
        ("num", numeric_transformer, selector(dtype_exclude="category")),
        ("cat", categorical_transformer, selector(dtype_include="category")),
    ]
)

# Put an estimator onto the end of the pipeline
lr_predictor = Pipeline(
    steps=[
        ("preprocessor", copy.deepcopy(preprocessor)),
        (
            "classifier",
            LogisticRegression(solver="liblinear", fit_intercept=True),
        ),
    ]
)

# Train the model on the test data
lr_predictor.fit(X_train, y_train)

# (Optional) View this model in the fairness dashboard, and see the disparities which appear:
from raiwidgets import FairnessDashboard
FairnessDashboard(sensitive_features=A_test,
                  y_true=y_test,
                  y_pred={"lr_model": lr_predictor.predict(X_test)})
Azure Machine Learning에 로그인하여 모델을 등록합니다.
공정성 대시보드는 등록된 모델 또는 등록되지 않은 모델과 통합할 수 있습니다. 다음 단계를 사용하여 Azure Machine Learning에 모델을 등록합니다.
from azureml.core import Workspace, Experiment, Model
import joblib
import os

ws = Workspace.from_config()
ws.get_details()

os.makedirs('models', exist_ok=True)

# Function to register models into Azure Machine Learning
def register_model(name, model):
    print("Registering ", name)
    model_path = "models/{0}.pkl".format(name)
    joblib.dump(value=model, filename=model_path)
    registered_model = Model.register(model_path=model_path,
                                    model_name=name,
                                    workspace=ws)
    print("Registered ", registered_model.id)
    return registered_model.id

# Call the register_model function
lr_reg_id = register_model("fairness_logistic_regression", lr_predictor)
공정성 메트릭을 미리 계산합니다.
Fairlearn의
metrics패키지를 사용하여 대시보드 사전을 만듭니다._create_group_metric_set메서드에는 이름을 사용할 수 있도록 민감 정보가 사전으로 전달된다는 점을 제외하고 대시보드 생성자와 유사한 인수가 있습니다. 이 메서드를 호출할 때 예측 형식(이 경우 이진 분류)도 지정해야 합니다.# Create a dictionary of model(s) you want to assess for fairness sf = { 'Race': A_test.race, 'Sex': A_test.sex} ys_pred = { lr_reg_id:lr_predictor.predict(X_test) } from fairlearn.metrics._group_metric_set import _create_group_metric_set dash_dict = _create_group_metric_set(y_true=y_test, predictions=ys_pred, sensitive_features=sf, prediction_type='binary_classification')미리 계산된 공정성 메트릭을 업로드합니다.
이제
azureml.contrib.fairness패키지를 가져와 다음과 같은 업로드를 수행합니다.from azureml.contrib.fairness import upload_dashboard_dictionary, download_dashboard_by_upload_id실험을 만들고 실행한 다음, 대시보드를 업로드합니다.
exp = Experiment(ws, "Test_Fairness_Census_Demo")
print(exp)

run = exp.start_logging()

# Upload the dashboard to Azure Machine Learning
try:
    dashboard_title = "Fairness insights of Logistic Regression Classifier"
    # Set validate_model_ids parameter of upload_dashboard_dictionary to False if you have not registered your model(s)
    upload_id = upload_dashboard_dictionary(run,
                                            dash_dict,
                                            dashboard_name=dashboard_title)
    print("\nUploaded to id: {0}\n".format(upload_id))

    # To test the dashboard, you can download it back and ensure it contains the right information
    downloaded_dict = download_dashboard_by_upload_id(run, upload_id)
finally:
    run.complete()
Azure Machine Learning 스튜디오에서 공정성 대시보드 확인
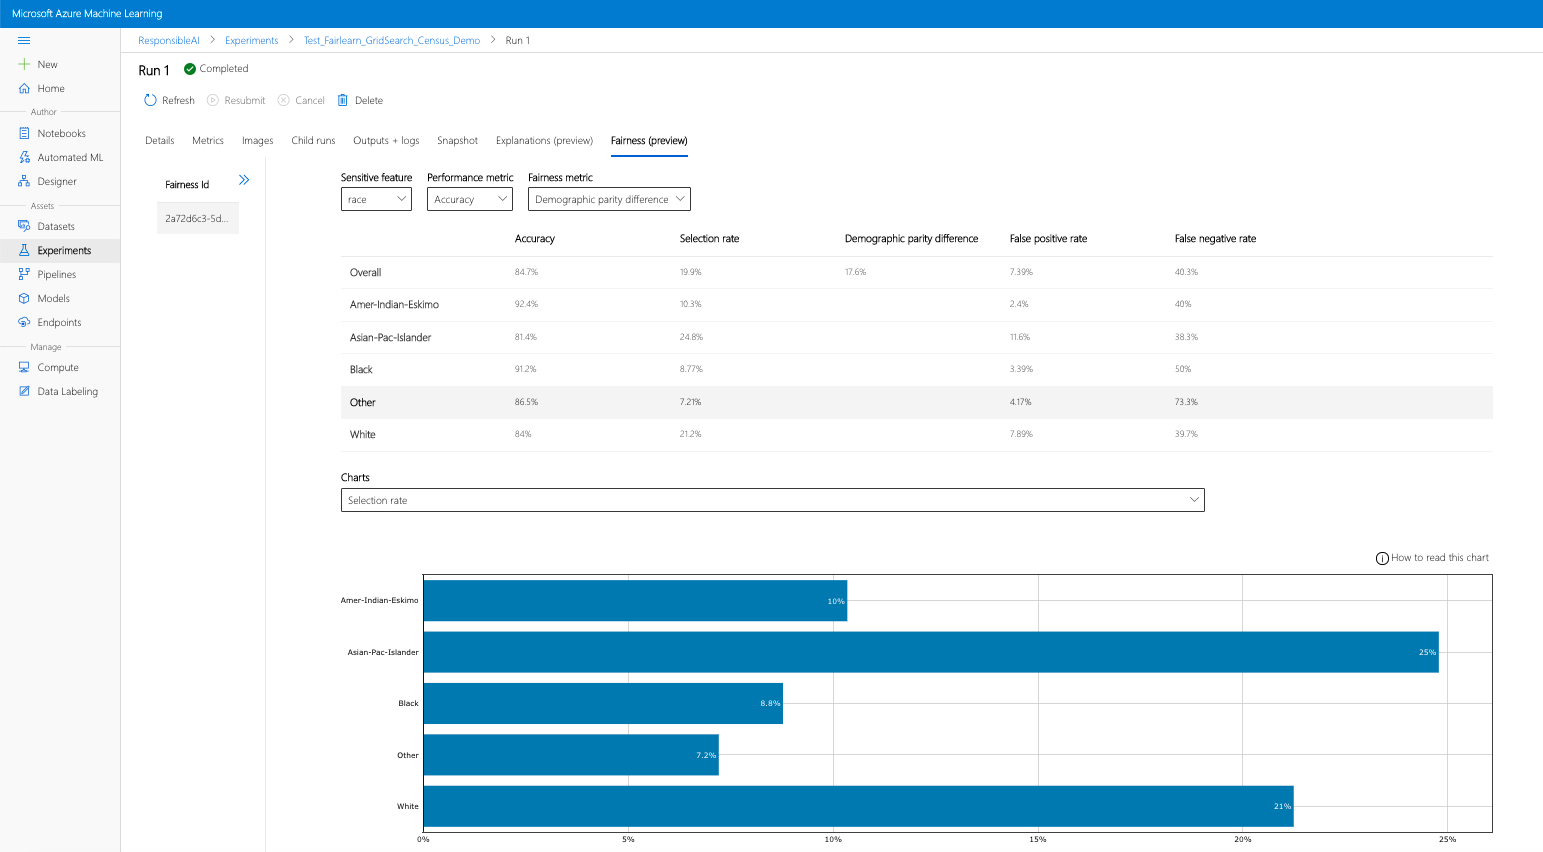
이전 단계(생성된 공정성 인사이트를 Azure Machine Learning에 업로드)를 완료하면 Azure Machine Learning 스튜디오에서 공정성 대시보드를 볼 수 있습니다. 이 대시보드는 Fairlearn에서 제공하는 것과 같은 시각화 대시보드로서, 민감 정보의 하위 그룹(예: 남성 대 여성) 간의 차이를 분석할 수 있습니다. 다음 경로 중 하나를 따라 Azure Machine Learning 스튜디오의 시각화 대시보드에 액세스합니다.
- 작업 창(미리 보기)
- 왼쪽 창에서 작업을 선택하여 Azure Machine Learning에서 실행한 실험 목록을 확인합니다.
- 특정 실험을 선택하여 해당 실험의 모든 실행을 봅니다.
- 실행을 선택한 다음 설명 시각화 대시보드에 대한 공정성 탭을 선택합니다.
- 공정성 탭으로 이동하면 오른쪽 메뉴에서 공정성 ID를 클릭합니다.
- 공정성 평가 페이지에서 관심 있는 민감한 특성, 성능 메트릭 및 공정성 메트릭을 선택하여 대시보드를 구성합니다.
- 한 차트 형식에서 다른 형식으로 전환하여 할당 피해와 서비스 품질 피해를 모두 관찰합니다.

- 모델 창
- 이전 단계에 따라 원본 모델을 등록한 경우 왼쪽 창에서 모델을 선택하여 볼 수 있습니다.
- 모델을 선택한 다음 공정성 탭을 선택하여 설명 시각화 대시보드를 봅니다.
시각화 대시보드 및 포함 내용에 관해 자세히 알아보려면 Fairlearn의 사용자 가이드를 확인하세요.


여러 모델의 공정성 인사이트 업로드
여러 모델을 비교하고 각 모델의 공정성 평가가 어떻게 다른지 확인하려면 둘 이상의 모델을 시각화 대시보드에 전달하고 성능-공정성 장단점을 비교할 수 있습니다.
모델 학습:
이제 지원 벡터 머신 예측 도구를 기반으로 두 번째 분류자를 만들고 Fairlearn의
metrics패키지를 사용하여 공정성 대시보드 사전을 업로드합니다. 이전에 학습된 모델을 계속 사용할 수 있다고 가정합니다.# Put an SVM predictor onto the preprocessing pipeline from sklearn import svm svm_predictor = Pipeline( steps=[ ("preprocessor", copy.deepcopy(preprocessor)), ( "classifier", svm.SVC(), ), ] ) # Train your second classification model svm_predictor.fit(X_train, y_train)모델 등록
그런 다음 Azure Machine Learning에 두 모델을 모두 등록합니다. 편의를 위해 결과를 사전에 저장하면 등록된 모델의
id(name:version형식의 문자열)를 예측자 자체에 매핑합니다.model_dict = {} lr_reg_id = register_model("fairness_logistic_regression", lr_predictor) model_dict[lr_reg_id] = lr_predictor svm_reg_id = register_model("fairness_svm", svm_predictor) model_dict[svm_reg_id] = svm_predictor로컬에서 공정성 대시보드 로드
공정성 인사이트를 Azure Machine Learning에 업로드하기 전에 로컬에서 호출된 공정성 대시보드에서 해당 예측을 검사할 수 있습니다.
#  Generate models' predictions and load the fairness dashboard locally
ys_pred = {}
for n, p in model_dict.items():
    ys_pred[n] = p.predict(X_test)

from raiwidgets import FairnessDashboard

FairnessDashboard(sensitive_features=A_test,
                  y_true=y_test.tolist(),
                  y_pred=ys_pred)
공정성 메트릭을 미리 계산합니다.
Fairlearn의
metrics패키지를 사용하여 대시보드 사전을 만듭니다.sf = { 'Race': A_test.race, 'Sex': A_test.sex } from fairlearn.metrics._group_metric_set import _create_group_metric_set dash_dict = _create_group_metric_set(y_true=Y_test, predictions=ys_pred, sensitive_features=sf, prediction_type='binary_classification')미리 계산된 공정성 메트릭을 업로드합니다.
이제
azureml.contrib.fairness패키지를 가져와 다음과 같은 업로드를 수행합니다.from azureml.contrib.fairness import upload_dashboard_dictionary, download_dashboard_by_upload_id실험을 만들고 실행한 다음, 대시보드를 업로드합니다.
exp = Experiment(ws, "Compare_Two_Models_Fairness_Census_Demo")
print(exp)

run = exp.start_logging()

# Upload the dashboard to Azure Machine Learning
try:
    dashboard_title = "Fairness Assessment of Logistic Regression and SVM Classifiers"
    # Set validate_model_ids parameter of upload_dashboard_dictionary to False if you have not registered your model(s)
    upload_id = upload_dashboard_dictionary(run,
                                            dash_dict,
                                            dashboard_name=dashboard_title)
    print("\nUploaded to id: {0}\n".format(upload_id))

    # To test the dashboard, you can download it back and ensure it contains the right information
    downloaded_dict = download_dashboard_by_upload_id(run, upload_id)
finally:
    run.complete()
이전 섹션과 마찬가지로 Azure Machine Learning 스튜디오에서 실험 또는 모델을 통해 위에서 설명한 경로 중 하나를 따라 시각화 대시보드에 액세스하고 두 모델을 공정성 및 성능 측면에서 비교할 수 있습니다.
완화되지 않은 공정성 인사이트와 완화된 공정성 인사이트 업로드
Fairlearn의 완화 알고리즘을 사용하고, 생성된 완화 모델을 원래의 완화되지 않은 모델과 비교하며, 비교된 모델 간의 성능/공정성 장단점을 검색할 수 있습니다.
그리드 검색 완화 알고리즘(다양한 공정성 및 성능의 장단점을 유지하면서 완화된 모델 컬렉션을 생성)의 사용을 보여 주는 예를 보려면 이 샘플 Notebook을 확인하세요.
단일 실행에서 여러 모델의 공정성 인사이트를 업로드하면 공정성과 성능 측면에서 모델을 비교할 수 있습니다. 모델 비교 차트에 표시된 모델 중 하나를 클릭하면 특정 모델에 관한 자세한 공정성 인사이트를 볼 수 있습니다.
