자습서: Azure Notification Hubs를 사용하여 특정 사용자에게 알림 보내기
개요
이 자습서에서는 Azure Notification Hubs를 사용하여 특정 디바이스의 특정 앱 사용자에게 푸시 알림을 보내는 방법을 설명합니다. ASP.NET WebAPI 백 엔드는 클라이언트를 인증하는 데 사용 됩니다. 백 엔드가 클라이언트 애플리케이션 사용자를 인증하는 경우 알림 등록에 자동으로 태그를 추가합니다. 백 엔드는 이 태그를 사용하여 특정 사용자에게 알림을 보냅니다.
참고 항목
이 자습서에 대해 완료된 코드는 GitHub에서 찾을 수 있습니다.
이 자습서에서 수행하는 단계는 다음과 같습니다.
- WebAPI 프로젝트 만들기
- WebAPI 백 엔드에 클라이언트 인증
- WebAPI 백 엔드를 사용하여 알림 등록
- WebAPI 백 엔드에서 알림 보내기
- 새 WebAPI 백 엔드 게시
- 클라이언트 프로젝트에 대한 코드 업데이트
- 애플리케이션 테스트
필수 조건
이 자습서는 알림 허브와 자습서: Azure Notification Hubs를 사용하여 유니버설 Windows 플랫폼 앱에 알림 보내기 자습서에서 만든 Visual Studio 프로젝트를 기반으로 합니다. 따라서 이 자습서를 시작하기 전에 완료합니다.
참고 항목
Azure App Service의 Mobile Apps를 백 엔드 서비스로 사용 중인 경우 이 자습서의 Mobile Apps 버전을 참조하세요.
WebAPI 프로젝트 만들기
다음 섹션에서는 새 ASP.NET WebAPI 백 엔드 만들기를 설명합니다. 이 프로세스에는 세 가지 주요 목적이 있습니다.
- 클라이언트 인증: 클라이언트 요청을 인증하고 사용자를 요청과 연결하는 메시지 처리기를 추가합니다.
- WebAPI 백 엔드를 사용하여 알림 등록: 클라이언트 디바이스에서 알림을 받을 수 있도록 새 등록을 처리하는 컨트롤러를 추가합니다. 인증된 사용자 이름은 태그로 등록에 자동으로 추가됩니다.
- 클라이언트로 알림 보내기: 사용자가 태그와 연결된 디바이스 및 클라이언트로 보안 푸시를 트리거할 수 있는 방법을 제공하는 컨트롤러를 추가합니다.
다음 작업을 수행하여 새 ASP.NET Core 6.0 웹 API 백 엔드를 만듭니다.
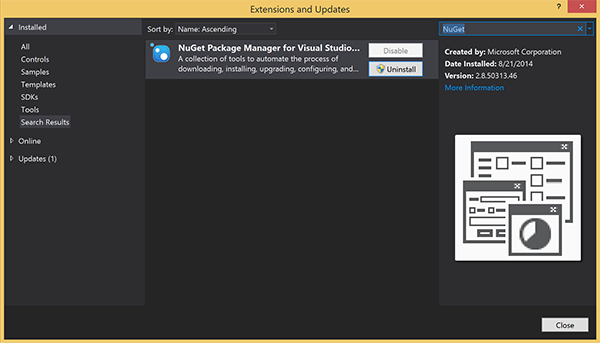
확인하려면 Visual Studio를 시작합니다. 도구 메뉴에서 확장 및 업데이트를 선택합니다. 사용하는 Visual Studio 버전에서 NuGet 패키지 관리자를 검색하고, 현재 버전이 최신 버전인지 확인합니다. 사용하는 버전이 최신 버전이 아닌 경우 해당 버전을 제거한 다음 NuGet 패키지 관리자를 다시 설치합니다.
참고 항목
웹 사이트 배포를 위해 Visual Studio Azure SDK를 설치했는지 확인합니다.
Visual Studio 또는 Visual Studio Express를 시작합니다.
서버 탐색기를 선택하고 Azure 계정에 로그인합니다. 계정에 웹 사이트 리소스를 만들려면 로그인해야 합니다.
Visual Studio의 파일 메뉴에서 새로 만들기>프로젝트를 선택합니다.
검색 상자에 Web API를 입력합니다.
ASP.NET Core 웹 API 프로젝트 템플릿을 선택하고 다음을 선택합니다.
새 프로젝트 구성 대화 상자에서 AppBackend 프로젝트 이름을 지정하고 다음을 선택합니다.
추가 정보 대화 상자에서 다음을 수행합니다.
- 프레임워크가 .Net 6.0(장기 지원)인지 확인합니다.
- 컨트롤러 사용(최소 API를 사용하려면 선택 취소) 확인란을 선택합니다.
- OpenAPI 지원 사용을 선택 취소합니다.
- 만들기를 실행합니다.
WeatherForecast 템플릿 파일 제거
- 새 AppBackend 프로젝트에서 WeatherForecast.cs 및 Controllers/WeatherForecastController.cs 예제 파일을 제거합니다.
- Properties\launchSettings.json을 엽니다.
- launchUrl 속성을 weatherforcast에서 appbackend로 변경합니다.
Microsoft Azure 웹앱 구성 창에서 구독을 선택한 다음, App Service 계획 목록에서 다음 작업 중 하나를 수행합니다.
- 이미 작성한 Azure App Service 요금제를 선택합니다.
- 새 앱 서비스 계획 만들기를 선택한 다음 새로 만듭니다.
이 자습서를 위해 데이터베이스는 필요하지 않습니다. 앱 서비스 계획을 선택한 후 확인을 선택하여 프로젝트를 만듭니다.
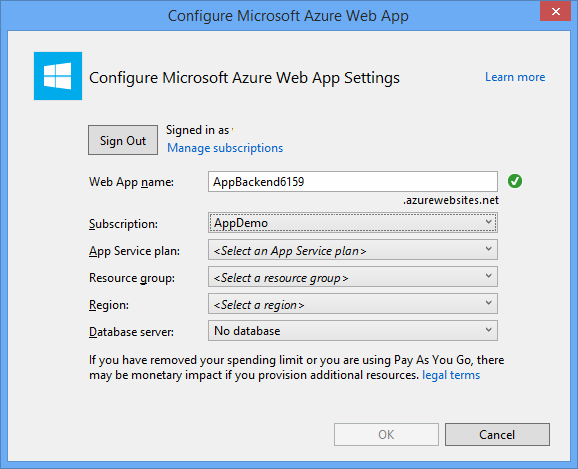
App Service 계획 구성에 사용되는 이 페이지가 보이지 않을 경우 자습서를 진행하세요. 나중에 앱을 게시할 때 구성할 수 있습니다.
WebAPI 백 엔드에 클라이언트 인증
이 섹션에서는 새 백 엔드에 대해 AuthenticationTestHandler라는 새 메시지 처리기 클래스를 만듭니다. 이 클래스는 DelegatingHandler에서 파생되며 백 엔드로 들어오는 모든 요청을 처리할 수 있도록 메시지 처리기로 추가됩니다.
솔루션 탐색기에서 AppBackend 프로젝트를 마우스 오른쪽 단추로 클릭하고 추가, 클래스를 차례로 선택합니다.
새 클래스의 이름을 AuthenticationTestHandler.cs로 지정한 다음 추가를 선택하여 클래스를 생성합니다. 이 클래스는 간단히 하기 위해 기본 인증을 사용하여 사용자를 인증합니다. 앱은 모든 인증 체계를 사용할 수 있습니다.
AuthenticationTestHandler.cs에 다음
using문을 추가합니다.using System.Net.Http; using System.Threading; using System.Security.Principal; using System.Net; using System.Text; using System.Threading.Tasks;AuthenticationTestHandler.cs에서
AuthenticationTestHandler클래스 정의를 다음 코드로 바꿉니다.처리기는 다음 세 가지 조건이 충족될 때 요청을 인증합니다.
- 요청에 Authorization 헤더가 포함되어 있습니다.
- 요청이 기본 인증을 사용합니다.
- 사용자 이름 문자열과 암호 문자열은 동일한 문자열입니다.
그렇지 않으면 요청이 거부됩니다. 이 인증은 실제 인증 및 권한 부여 방법이 아닙니다. 이 자습서를 위한 간단한 예제일 뿐입니다.
요청 메시지가
AuthenticationTestHandler에 의해 인증되고 권한이 부여되면 HttpContext의 현재 요청에 기본 인증 사용자가 연결됩니다. HttpContext의 사용자 정보는 나중에 다른 컨트롤러(RegisterController)에서 알림 등록 요청에 태그를 추가하는 데 사용됩니다.public class AuthenticationTestHandler : DelegatingHandler { protected override Task<HttpResponseMessage> SendAsync( HttpRequestMessage request, CancellationToken cancellationToken) { var authorizationHeader = request.Headers.GetValues("Authorization").First(); if (authorizationHeader != null && authorizationHeader .StartsWith("Basic ", StringComparison.InvariantCultureIgnoreCase)) { string authorizationUserAndPwdBase64 = authorizationHeader.Substring("Basic ".Length); string authorizationUserAndPwd = Encoding.Default .GetString(Convert.FromBase64String(authorizationUserAndPwdBase64)); string user = authorizationUserAndPwd.Split(':')[0]; string password = authorizationUserAndPwd.Split(':')[1]; if (VerifyUserAndPwd(user, password)) { // Attach the new principal object to the current HttpContext object HttpContext.Current.User = new GenericPrincipal(new GenericIdentity(user), new string[0]); System.Threading.Thread.CurrentPrincipal = System.Web.HttpContext.Current.User; } else return Unauthorized(); } else return Unauthorized(); return base.SendAsync(request, cancellationToken); } private bool VerifyUserAndPwd(string user, string password) { // This is not a real authentication scheme. return user == password; } private Task<HttpResponseMessage> Unauthorized() { var response = new HttpResponseMessage(HttpStatusCode.Forbidden); var tsc = new TaskCompletionSource<HttpResponseMessage>(); tsc.SetResult(response); return tsc.Task; } }참고 항목
보안 정보:
AuthenticationTestHandler클래스는 진정한 의미의 인증을 제공하지 않습니다. 이 클래스는 기본 인증과 비슷한 동작을 하고 보안이 안전하지 않습니다. 프로덕션 애플리케이션 및 서비스에 보안 인증 메커니즘을 구현해야 합니다.메시지 처리기를 등록하려면 Program.cs 파일의
Register메서드 끝에 다음 코드를 추가합니다.config.MessageHandlers.Add(new AuthenticationTestHandler());변경 내용을 저장합니다.
WebAPI 백 엔드를 사용하여 알림 등록
이 섹션에서는 알림 허브에 클라이언트 라이브러리를 사용하여 알림을 위한 사용자 및 디바이스 등록 요청을 처리하는 새 컨트롤러를 WebAPI 백 엔드에 추가합니다. 이 컨트롤러는 AuthenticationTestHandler에 의해 인증되고 HttpContext에 연결된 사용자에 대한 사용자 태그를 추가합니다. 태그의 문자열 형식은 "username:<actual username>"입니다.
솔루션 탐색기에서 AppBackend 프로젝트를 마우스 오른쪽 단추로 클릭한 다음 NuGet 패키지 관리를 선택합니다.
왼쪽 창에서 온라인을 선택한 다음 검색 상자에 Microsoft.Azure.NotificationHubs를 입력합니다.
결과 목록에서 Microsoft Azure Notification Hubs를 선택한 다음 설치를 선택합니다. 설치를 완료한 다음, NuGet 패키지 관리자 창을 닫습니다.
이 작업은 Microsoft.Azure.Notification Hubs NuGet 패키지를 사용하는 Azure Notification Hubs SDK에 대한 참조를 추가합니다.
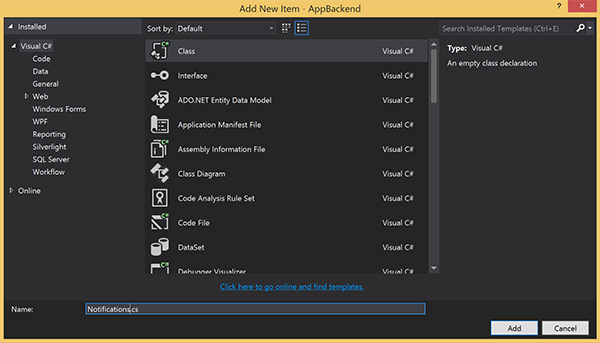
알림을 보내는 데 사용되는 알림 허브와의 연결을 나타내는 새 클래스 파일을 만듭니다. 솔루션 탐색기에서 Models 폴더를 마우스 오른쪽 단추로 클릭한 후 추가, 클래스를 차례로 선택합니다. 새 클래스 이름을 Notifications.cs로 지정한 후 추가를 선택하여 클래스를 생성합니다.
Notifications.cs에서 파일의 맨 위에
using문을 추가합니다.using Microsoft.Azure.NotificationHubs;Notifications클래스 정의를 다음 코드로 바꾸고 두 개의 자리 표시자를 알림 허브에 대한 연결 문자열(모든 권한 사용) 및 허브 이름(Azure Portal에서 제공)으로 바꿉니다.public class Notifications { public static Notifications Instance = new Notifications(); public NotificationHubClient Hub { get; set; } private Notifications() { Hub = NotificationHubClient.CreateClientFromConnectionString("<your hub's DefaultFullSharedAccessSignature>", "<hub name>"); } }Important
허브의 이름과 DefaultFullSharedAccessSignature를 입력하고 계속 진행합니다.
다음으로 RegisterController라는 새 컨트롤러를 만듭니다. 솔루션 탐색기에서 Controllers 폴더를 마우스 오른쪽 단추로 클릭한 후 추가, 컨트롤러를 차례로 선택합니다.
API 컨트롤러 - 비어 있음을 선택한 다음 추가를 선택합니다.
컨트롤러 이름 상자에서 RegisterController를 입력하여 새 클래스의 이름을 지정한 다음 추가를 선택합니다.

RegiterController.cs에 다음
using문을 추가합니다.using Microsoft.Azure.NotificationHubs; using Microsoft.Azure.NotificationHubs.Messaging; using AppBackend.Models; using System.Threading.Tasks; using System.Web;다음 코드를
RegisterController클래스 정의 내에 추가합니다. 이 코드에서 HttpContext에 연결된 사용자에 대한 사용자 태그를 추가합니다. 사용자는 추가한 메시지 필터AuthenticationTestHandler에 의해 인증되고 HttpContext에 연결되었습니다. 또한 선택적인 검사를 추가하여 사용자에게 요청된 태그에 등록할 수 있는 권한이 있는지 확인합니다.private NotificationHubClient hub; public RegisterController() { hub = Notifications.Instance.Hub; } public class DeviceRegistration { public string Platform { get; set; } public string Handle { get; set; } public string[] Tags { get; set; } } // POST api/register // This creates a registration id public async Task<string> Post(string handle = null) { string newRegistrationId = null; // make sure there are no existing registrations for this push handle (used for iOS and Android) if (handle != null) { var registrations = await hub.GetRegistrationsByChannelAsync(handle, 100); foreach (RegistrationDescription registration in registrations) { if (newRegistrationId == null) { newRegistrationId = registration.RegistrationId; } else { await hub.DeleteRegistrationAsync(registration); } } } if (newRegistrationId == null) newRegistrationId = await hub.CreateRegistrationIdAsync(); return newRegistrationId; } // PUT api/register/5 // This creates or updates a registration (with provided channelURI) at the specified id public async Task<HttpResponseMessage> Put(string id, DeviceRegistration deviceUpdate) { RegistrationDescription registration = null; switch (deviceUpdate.Platform) { case "mpns": registration = new MpnsRegistrationDescription(deviceUpdate.Handle); break; case "wns": registration = new WindowsRegistrationDescription(deviceUpdate.Handle); break; case "apns": registration = new AppleRegistrationDescription(deviceUpdate.Handle); break; case "fcm": registration = new FcmRegistrationDescription(deviceUpdate.Handle); break; default: throw new HttpResponseException(HttpStatusCode.BadRequest); } registration.RegistrationId = id; var username = HttpContext.Current.User.Identity.Name; // add check if user is allowed to add these tags registration.Tags = new HashSet<string>(deviceUpdate.Tags); registration.Tags.Add("username:" + username); try { await hub.CreateOrUpdateRegistrationAsync(registration); } catch (MessagingException e) { ReturnGoneIfHubResponseIsGone(e); } return Request.CreateResponse(HttpStatusCode.OK); } // DELETE api/register/5 public async Task<HttpResponseMessage> Delete(string id) { await hub.DeleteRegistrationAsync(id); return Request.CreateResponse(HttpStatusCode.OK); } private static void ReturnGoneIfHubResponseIsGone(MessagingException e) { var webex = e.InnerException as WebException; if (webex.Status == WebExceptionStatus.ProtocolError) { var response = (HttpWebResponse)webex.Response; if (response.StatusCode == HttpStatusCode.Gone) throw new HttpRequestException(HttpStatusCode.Gone.ToString()); } }변경 내용을 저장합니다.

WebAPI 백 엔드에서 알림 보내기
이 섹션에서는 클라이언트 디바이스에서 알림을 보내기 위한 방법을 노출하는 새 컨트롤러를 추가합니다. 알림은 ASP.NET WebAPI 백 엔드에서 Azure Notification Hubs .NET 라이브러리를 사용하는 사용자 이름 태그를 기반으로 합니다.
이전 섹션에서 RegisterController를 만들었던 동일한 방식으로 NotificationsController라는 다른 새 컨트롤러를 만듭니다.
NotificationsController.cs에 다음
using문을 추가합니다.using AppBackend.Models; using System.Threading.Tasks; using System.Web;NotificationsController 클래스에 다음 메서드를 추가합니다.
이 코드는 PNS(Platform Notification Service)
pns매개 변수를 기반으로 알림 유형을 보냅니다.to_tag값은 메시지에서 사용자 이름 태그를 지정하는 데 사용됩니다. 이 태그는 활성 알림 허브 등록의 사용자 이름 태그와 일치해야 합니다. 알림 메시지는 POST 요청의 본문에서 가져오고 대상 PNS에 맞게 형식이 지정됩니다.알림을 수신하기 위해 지원되는 디바이스가 사용하는 PNS에 따라 다양한 형식으로 알림을 지원합니다. 예를 들어 Windows 디바이스에서 다른 PNS에서 직접 지원되지 않는 WNS로 알림을 사용할 수 있습니다. 이러한 상황에서 백 엔드는 알림을 지원하려는 디바이스의 PNS에 지원되는 알림으로 포맷해야 합니다. 그런 다음 NotificationHubClient 클래스에서 적절한 보내기 API를 사용합니다.
public async Task<HttpResponseMessage> Post(string pns, [FromBody]string message, string to_tag)
{
    var user = HttpContext.Current.User.Identity.Name;
    string[] userTag = new string[2];
    userTag[0] = "username:" + to_tag;
    userTag[1] = "from:" + user;

    Microsoft.Azure.NotificationHubs.NotificationOutcome outcome = null;
    HttpStatusCode ret = HttpStatusCode.InternalServerError;

    switch (pns.ToLower())
    {
        case "wns":
            // Windows 8.1 / Windows Phone 8.1
            var toast = @"<toast><visual><binding template=""ToastText01""><text id=""1"">" +
                        "From " + user + ": " + message + "</text></binding></visual></toast>";
            outcome = await Notifications.Instance.Hub.SendWindowsNativeNotificationAsync(toast, userTag);
            break;
        case "apns":
            // iOS
            var alert = "{\"aps\":{\"alert\":\"" + "From " + user + ": " + message + "\"}}";
            outcome = await Notifications.Instance.Hub.SendAppleNativeNotificationAsync(alert, userTag);
            break;
        case "fcm":
            // Android
            var notif = "{ \"data\" : {\"message\":\"" + "From " + user + ": " + message + "\"}}";
            outcome = await Notifications.Instance.Hub.SendFcmNativeNotificationAsync(notif, userTag);
            break;
    }

    if (outcome != null)
    {
        if (!((outcome.State == Microsoft.Azure.NotificationHubs.NotificationOutcomeState.Abandoned) ||
            (outcome.State == Microsoft.Azure.NotificationHubs.NotificationOutcomeState.Unknown)))
        {
            ret = HttpStatusCode.OK;
        }
    }

    return Request.CreateResponse(ret);
}
애플리케이션을 실행하고 지금까지 작업의 정확성을 확인하려면 F5 키를 선택합니다. 앱은 웹 브라우저를 열고 ASP.NET 홈페이지에 표시됩니다.
새 WebAPI 백 엔드 게시
다음으로 모든 디바이스에서 액세스할 수 있도록 앱을 Azure 웹 사이트에 배포합니다.
AppBackend 프로젝트를 마우스 오른쪽 단추로 클릭한 다음 게시를 선택합니다.
Microsoft Azure App Service를 게시 대상으로 선택한 다음, \*\*[게시]를 선택합니다. App Service 만들기 창이 열립니다. 여기에서 Azure에서 ASP.NET 웹앱을 실행하는 데 필요한 모든 Azure 리소스를 만들 수 있습니다.

App Service 만들기 창에서 Azure 계정을 선택합니다. 유형 변경>웹앱을 선택합니다. 기본 웹앱 이름을 유지한 다음 구독, 리소스 그룹, App Service 계획을 차례로 선택합니다.
만들기를 실행합니다.
요약 섹션의 사이트 URL 속성을 메모해 둡니다. 이 URL은 자습서의 뒷부분에서 백 엔드 엔드포인트입니다.
게시를 선택합니다.
마법사를 완료한 후 Azure에 ASP.NET 웹앱을 게시한 다음 기본 브라우저에서 앱을 엽니다. 애플리케이션을 Azure App Services에서 볼 수 있습니다.
URL은 http://<app_name>.azurewebsites.net 형식으로 이전에 지정한 웹앱 이름을 사용합니다.
UWP 클라이언트의 코드 업데이트
이 섹션에서는 자습서: Azure Notification Hubs를 사용하여 유니버설 Windows 플랫폼 앱에 알림 보내기 자습서를 완료한 프로젝트에서 코드를 업데이트합니다. 프로젝트는 Windows 스토어와 이미 연결되어 있어야 합니다. 또한 알림 허브를 사용하도록 구성되어야 합니다. 이 섹션에서는 새 WebAPI 백 엔드를 호출할 코드를 추가하고, 알림을 등록하고 보내는 데 이 코드를 사용합니다.
Visual Studio에서 자습서: Azure Notification Hubs를 사용하여 유니버설 Windows 플랫폼 앱에 알림 보내기에 대해 만든 솔루션을 엽니다.
솔루션 탐색기에서 UWP(유니버설 Windows 플랫폼) 프로젝트를 마우스 오른쪽 단추로 클릭한 다음, NuGet 패키지 관리를 클릭합니다.
왼쪽에서 찾아보기를 선택합니다.
검색 상자에 Http 클라이언트를 입력합니다.
결과 목록에서 System.Net.Http를 클릭하고, 설치를 클릭합니다. 설치를 완료합니다.
다시 NuGet 검색 상자에 Json.net을 입력합니다. Newtonsoft.json 패키지를 설치한 다음, NuGet 패키지 관리자 창을 닫습니다.
솔루션 탐색기의 WindowsApp 프로젝트에서 MainPage.xaml을 두 번 클릭하여 Visual Studio 편집기에서 엽니다.
MainPage.xaml파일에서<Grid>섹션을 다음 코드로 바꿉니다. 이 코드는 사용자가 인증하는 데 사용하는 사용자 이름 및 암호 텍스트 상자를 추가합니다. 또한 알림 메시지 및 알림을 받을 사용자 이름 태그용 텍스트 상자도 추가합니다.<Grid> <Grid.RowDefinitions> <RowDefinition Height="Auto"/> <RowDefinition Height="*"/> </Grid.RowDefinitions> <TextBlock Grid.Row="0" Text="Notify Users" HorizontalAlignment="Center" FontSize="48"/> <StackPanel Grid.Row="1" VerticalAlignment="Center"> <Grid> <Grid.RowDefinitions> <RowDefinition Height="Auto"/> <RowDefinition Height="Auto"/> <RowDefinition Height="Auto"/> <RowDefinition Height="Auto"/> <RowDefinition Height="Auto"/> <RowDefinition Height="Auto"/> <RowDefinition Height="Auto"/> <RowDefinition Height="Auto"/> <RowDefinition Height="Auto"/> <RowDefinition Height="Auto"/> <RowDefinition Height="Auto"/> </Grid.RowDefinitions> <Grid.ColumnDefinitions> <ColumnDefinition></ColumnDefinition> <ColumnDefinition></ColumnDefinition> <ColumnDefinition></ColumnDefinition> </Grid.ColumnDefinitions> <TextBlock Grid.Row="0" Grid.ColumnSpan="3" Text="Username" FontSize="24" Margin="20,0,20,0"/> <TextBox Name="UsernameTextBox" Grid.Row="1" Grid.ColumnSpan="3" Margin="20,0,20,0"/> <TextBlock Grid.Row="2" Grid.ColumnSpan="3" Text="Password" FontSize="24" Margin="20,0,20,0" /> <PasswordBox Name="PasswordTextBox" Grid.Row="3" Grid.ColumnSpan="3" Margin="20,0,20,0"/> <Button Grid.Row="4" Grid.ColumnSpan="3" HorizontalAlignment="Center" VerticalAlignment="Center" Content="1. Login and register" Click="LoginAndRegisterClick" Margin="0,0,0,20"/> <ToggleButton Name="toggleWNS" Grid.Row="5" Grid.Column="0" HorizontalAlignment="Right" Content="WNS" IsChecked="True" /> <ToggleButton Name="toggleFCM" Grid.Row="5" Grid.Column="1" HorizontalAlignment="Center" Content="FCM" /> <ToggleButton Name="toggleAPNS" Grid.Row="5" Grid.Column="2" HorizontalAlignment="Left" Content="APNS" /> <TextBlock Grid.Row="6" Grid.ColumnSpan="3" Text="Username Tag To Send To" FontSize="24" Margin="20,0,20,0"/> <TextBox Name="ToUserTagTextBox" Grid.Row="7" Grid.ColumnSpan="3" Margin="20,0,20,0" TextWrapping="Wrap" /> <TextBlock Grid.Row="8" Grid.ColumnSpan="3" Text="Enter Notification Message" FontSize="24" Margin="20,0,20,0"/> <TextBox Name="NotificationMessageTextBox" Grid.Row="9" Grid.ColumnSpan="3" Margin="20,0,20,0" TextWrapping="Wrap" /> <Button Grid.Row="10" Grid.ColumnSpan="3" HorizontalAlignment="Center" Content="2. Send push" Click="PushClick" Name="SendPushButton" /> </Grid> </StackPanel> </Grid>솔루션 탐색기에서 (Windows 8.1) 및 (Windows Phone 8.1) 프로젝트의
MainPage.xaml.cs파일을 엽니다. 두 파일의 맨 위에 다음using문을 추가합니다.using System.Net.Http; using Windows.Storage; using System.Net.Http.Headers; using Windows.Networking.PushNotifications; using Windows.UI.Popups; using System.Threading.Tasks;WindowsApp 프로젝트의
MainPage.xaml.cs에서 다음 멤버를MainPage클래스에 추가합니다.<Enter Your Backend Endpoint>를 이전에 얻은 실제 백 엔드 엔드포인트으로 바꿔야 합니다. 예:http://mybackend.azurewebsites.net.private static string BACKEND_ENDPOINT = "<Enter Your Backend Endpoint>";(Windows 8.1) 및 (Windows Phone 8.1) 프로젝트의
MainPage.xaml.cs에서 아래 코드를 MainPage 클래스에 추가합니다.PushClick메서드는 Send Push(푸시 전송) 단추의 클릭 처리기입니다.to_tag매개 변수와 일치하는 사용자 이름 태그가 있는 모든 디바이스로 알림을 트리거하도록 백 엔드를 호출합니다. 알림 메시지는 요청 본문의 JSON 콘텐츠로 전송됩니다.LoginAndRegisterClick메서드는 로그인 및 등록 단추의 클릭 처리기입니다. 기본 인증 토큰(이는 인증 체계에서 사용하는 모든 토큰을 나타냄)을 로컬 스토리지에 저장한 다음,RegisterClient를 사용하여 백 엔드가 사용되는 알림에 등록합니다.private async void PushClick(object sender, RoutedEventArgs e) { if (toggleWNS.IsChecked.Value) { await sendPush("wns", ToUserTagTextBox.Text, this.NotificationMessageTextBox.Text); } if (toggleFCM.IsChecked.Value) { await sendPush("fcm", ToUserTagTextBox.Text, this.NotificationMessageTextBox.Text); } if (toggleAPNS.IsChecked.Value) { await sendPush("apns", ToUserTagTextBox.Text, this.NotificationMessageTextBox.Text); } } private async Task sendPush(string pns, string userTag, string message) { var POST_URL = BACKEND_ENDPOINT + "/api/notifications?pns=" + pns + "&to_tag=" + userTag; using (var httpClient = new HttpClient()) { var settings = ApplicationData.Current.LocalSettings.Values; httpClient.DefaultRequestHeaders.Authorization = new AuthenticationHeaderValue("Basic", (string)settings["AuthenticationToken"]); try { await httpClient.PostAsync(POST_URL, new StringContent("\"" + message + "\"", System.Text.Encoding.UTF8, "application/json")); } catch (Exception ex) { MessageDialog alert = new MessageDialog(ex.Message, "Failed to send " + pns + " message"); alert.ShowAsync(); } } } private async void LoginAndRegisterClick(object sender, RoutedEventArgs e) { SetAuthenticationTokenInLocalStorage(); var channel = await PushNotificationChannelManager.CreatePushNotificationChannelForApplicationAsync(); // The "username:<user name>" tag gets automatically added by the message handler in the backend. // The tag passed here can be whatever other tags you may want to use. try { // The device handle used is different depending on the device and PNS. // Windows devices use the channel uri as the PNS handle. await new RegisterClient(BACKEND_ENDPOINT).RegisterAsync(channel.Uri, new string[] { "myTag" }); var dialog = new MessageDialog("Registered as: " + UsernameTextBox.Text); dialog.Commands.Add(new UICommand("OK")); await dialog.ShowAsync(); SendPushButton.IsEnabled = true; } catch (Exception ex) { MessageDialog alert = new MessageDialog(ex.Message, "Failed to register with RegisterClient"); alert.ShowAsync(); } } private void SetAuthenticationTokenInLocalStorage() { string username = UsernameTextBox.Text; string password = PasswordTextBox.Password; var token = Convert.ToBase64String(System.Text.Encoding.UTF8.GetBytes(username + ":" + password)); ApplicationData.Current.LocalSettings.Values["AuthenticationToken"] = token; }App.xaml.cs를 열고OnLaunched()이벤트 처리기의InitNotificationsAsync()에 대한 호출을 찾습니다.InitNotificationsAsync()에 대한 호출을 주석으로 처리하거나 삭제합니다. 단추 처리기는 알림 등록을 초기화합니다.protected override void OnLaunched(LaunchActivatedEventArgs e) { //InitNotificationsAsync();WindowsApp 프로젝트를 마우스 오른쪽 단추로 클릭하고, 추가를 클릭한 다음, 클래스를 클릭합니다. 클래스 이름을
RegisterClient.cs로 지정한 다음, 확인을 클릭하여 클래스를 생성합니다.이 클래스는 푸시 알림에 등록하기 위해 앱 백 엔드에 접속하는 데 필요한 REST 호출을 래핑합니다. 또한 앱 백 엔드에서 등록 에 설명된 대로 알림 허브에서 생성된 registrationId를 로컬로 저장합니다. 이 구성 요소는 로그인 및 등록 단추를 클릭할 때 로컬 스토리지에 저장된 인증 토큰을 사용합니다.
RegisterClient.cs 파일의 맨 위에 다음
using문을 추가합니다.using Windows.Storage; using System.Net; using System.Net.Http; using System.Net.Http.Headers; using Newtonsoft.Json; using System.Threading.Tasks; using System.Linq;다음 코드를
RegisterClient클래스 정의 내에 추가합니다.private string POST_URL; private class DeviceRegistration { public string Platform { get; set; } public string Handle { get; set; } public string[] Tags { get; set; } } public RegisterClient(string backendEndpoint) { POST_URL = backendEndpoint + "/api/register"; } public async Task RegisterAsync(string handle, IEnumerable<string> tags) { var regId = await RetrieveRegistrationIdOrRequestNewOneAsync(); var deviceRegistration = new DeviceRegistration { Platform = "wns", Handle = handle, Tags = tags.ToArray<string>() }; var statusCode = await UpdateRegistrationAsync(regId, deviceRegistration); if (statusCode == HttpStatusCode.Gone) { // regId is expired, deleting from local storage & recreating var settings = ApplicationData.Current.LocalSettings.Values; settings.Remove("__NHRegistrationId"); regId = await RetrieveRegistrationIdOrRequestNewOneAsync(); statusCode = await UpdateRegistrationAsync(regId, deviceRegistration); } if (statusCode != HttpStatusCode.Accepted && statusCode != HttpStatusCode.OK) { // log or throw throw new System.Net.WebException(statusCode.ToString()); } } private async Task<HttpStatusCode> UpdateRegistrationAsync(string regId, DeviceRegistration deviceRegistration) { using (var httpClient = new HttpClient()) { var settings = ApplicationData.Current.LocalSettings.Values; httpClient.DefaultRequestHeaders.Authorization = new AuthenticationHeaderValue("Basic", (string) settings["AuthenticationToken"]); var putUri = POST_URL + "/" + regId; string json = JsonConvert.SerializeObject(deviceRegistration); var response = await httpClient.PutAsync(putUri, new StringContent(json, Encoding.UTF8, "application/json")); return response.StatusCode; } } private async Task<string> RetrieveRegistrationIdOrRequestNewOneAsync() { var settings = ApplicationData.Current.LocalSettings.Values; if (!settings.ContainsKey("__NHRegistrationId")) { using (var httpClient = new HttpClient()) { httpClient.DefaultRequestHeaders.Authorization = new AuthenticationHeaderValue("Basic", (string)settings["AuthenticationToken"]); var response = await httpClient.PostAsync(POST_URL, new StringContent("")); if (response.IsSuccessStatusCode) { string regId = await response.Content.ReadAsStringAsync(); regId = regId.Substring(1, regId.Length - 2); settings.Add("__NHRegistrationId", regId); } else { throw new System.Net.WebException(response.StatusCode.ToString()); } } } return (string)settings["__NHRegistrationId"]; }변경 내용을 모두 저장합니다.
애플리케이션 테스트
두 Windows에서 애플리케이션을 시작합니다.
아래 화면에 표시된 것처럼 사용자 이름 및 암호를 입력합니다. Windows Phone에서 입력하는 사용자 이름 및 암호와 달라야 합니다.
Log in and register(로그인 및 등록) 를 클릭하고 대화 상자에 로그인되었다고 표시되는지 확인합니다. 이 코드는 푸시 전송 단추도 활성화합니다.

그런 다음, 받는 사람 사용자 이름 태그 필드에 등록한 사용자 이름을 입력합니다. 알림 메시지를 입력하고 Send Push(푸시 전송)를 클릭합니다.
일치하는 사용자 이름 태그로 등록된 디바이스만 이 알림 메시지를 받습니다.

다음 단계
이 자습서에서는 등록에 태그가 연결된 특정 사용자에게 알림을 푸시하는 방법을 배웠습니다. 위치 기반 알림을 푸시하는 방법을 알아보려면 다음 자습서를 계속 진행합니다.