자습서: Azure SQL Database C# 및 ADO.NET에서 관계형 데이터베이스 디자인
적용 대상:![]() Azure SQL Database
Azure SQL Database
Azure SQL 데이터베이스는 Microsoft Cloud(Azure)의 관계형 DBaaS(Database-As-A-Service)입니다. 이 자습서에서는 Visual Studio에서 Azure Portal 및 ADO.NET을 사용하여 다음과 같은 작업을 수행하는 방법에 대해 알아봅니다.
- Azure Portal을 사용하여 데이터베이스 만들기
- Azure Portal을 사용하여 서버 수준 IP 방화벽 규칙 설정
- ADO.NET 및 Visual Studio를 사용하여 데이터베이스에 연결
- ADO.NET을 사용하여 테이블 만들기
- ADO.NET을 사용하여 데이터 삽입, 업데이트 및 삭제
- ADO.NET 데이터 쿼리
팁
다음 무료 Learn 모듈을 사용하면 간단한 데이터베이스 생성을 포함하여 Azure SQL Database를 쿼리하는 ASP.NET 애플리케이션을 개발하고 구성하는 방법을 배울 수 있습니다.
필수 구성 요소
- Visual Studio 2019 이상 설치
- Azure 구독이 없는 경우 시작하기 전에 체험 계정을 만듭니다.
- Azure SQL Database를 아직 만들지 않은 경우 빠른 시작: 단일 데이터베이스 만들기를 방문하세요. 제품을 사용하여 Azure SQL Database를 무료로 사용해 보기(미리 보기) 옵션을 찾습니다.
Azure Portal에 로그인
Azure Portal에 로그인합니다.
서버 수준 IP 방화벽 규칙 만들기
SQL Database는 서버 수준에서 IP 방화벽을 만듭니다. 방화벽 규칙에서 특정 IP가 방화벽을 통과하도록 허용하지 않는 한 이 방화벽은 외부 애플리케이션과 도구가 서버 및 서버의 데이터베이스에 연결하지 못하게 차단합니다. 데이터베이스에 대한 외부 연결을 사용하려면 먼저 IP 주소(또는 IP 주소 범위)에 대한 IP 방화벽 규칙을 추가해야 합니다. 다음 단계에 따라 서버 수준 IP 방화벽 규칙을 만듭니다.
중요
SQL Database는 포트 1433을 통해 통신합니다. 회사 네트워크 내에서 이 서비스에 연결을 시도하면 포트 1433을 통한 아웃바운드 트래픽을 네트워크 방화벽에서 허용하지 않을 수 있습니다. 이 경우 관리자가 1433 포트를 열지 않으면 데이터베이스에 연결할 수 없습니다.
배포가 완료되면 왼쪽 메뉴에서 SQL 데이터베이스를 선택한 다음, SQL 데이터베이스 페이지에서 yourDatabase를 선택합니다. 정규화된 서버 이름(예: yourserver.database.windows.net)을 표시하고 추가 구성 옵션을 제공하는 데이터베이스 개요 페이지가 열립니다.
SQL Server Management Studio에서 서버 및 데이터베이스에 연결하는 데 사용할 수 있도록 이 정규화된 서버 이름을 복사합니다.

설정에서 네트워킹을 선택합니다. 퍼블릭 액세스 탭을 선택한 다음, 공용 네트워크 액세스에서 선택한 네트워크를 선택하여 방화벽 규칙 섹션을 표시합니다.

도구 모음에서 클라이언트 IP 추가를 선택하여 현재 IP 주소를 새 IP 방화벽 규칙에 추가합니다. IP 방화벽 규칙은 단일 IP 주소 또는 IP 주소의 범위에 1433 포트를 열 수 있습니다.
저장을 선택합니다. 서버의 1433 포트를 여는 현재 IP 주소에 서버 수준 IP 방화벽 규칙이 생성됩니다.
확인을 선택한 다음, 방화벽 설정 페이지를 닫습니다.


이제 IP 주소가 IP 방화벽을 통과할 수 있습니다. 이제 SQL Server Management Studio 또는 원하는 다른 도구를 사용하여 데이터베이스에 연결할 수 있습니다. 이전에 만든 서버 관리자 계정을 사용해야 합니다.
중요
기본적으로 모든 Azure 서비스에는 SQL Database IP 방화벽을 통한 액세스가 사용됩니다. 이 페이지에서 끄기를 선택하여 모든 Azure 서비스에 대한 액세스를 사용하지 않도록 설정합니다.
C# 프로그램 예
이 문서의 다음 섹션에는 ADO.NET을 사용하여 T-SQL(Transact-SQL) 문을 SQL Database로 보내는 C# 프로그램이 나와 있습니다. C# 프로그램은 다음 작업을 보여줍니다.
- ADO.NET을 사용하여 SQL Database에 연결
- T-SQL 명령문을 반환하는 메서드
- 테이블 만들기
- 데이터로 테이블 채우기
- 데이터 업데이트, 삭제 및 선택
- T-SQL을 데이터베이스에 제출
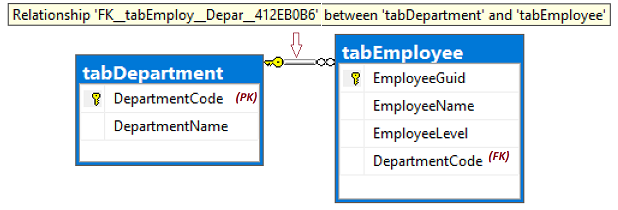
엔터티 관계 다이어그램(ERD)
CREATE TABLE 명령문에는 두 테이블 간의 외래 키(FK) 관계를 만들기 위해 REFERENCES 키워드가 있습니다. tempdb를 사용하는 경우 선행 대시의 쌍을 사용하여 --REFERENCES 키워드를 주석으로 처리합니다.
ERD는 두 테이블 간의 관계를 표시합니다. tabEmployee.DepartmentCode자식 열의 값은 tabDepartment.DepartmentCode부모 열의 값으로 제한됩니다.
참고 항목
tempdb에서 #를 테이블 이름 앞에 추가하여 임시 테이블로 만드는 T-SQL 편집 옵션이 있습니다. 이는 사용할 수 있는 테스트 데이터베이스가 없는 경우 데모용으로 유용합니다. 외래 키에 대한 참조는 사용하는 동안 적용되지 않으며 프로그램 실행이 완료된 후 연결을 닫으면 임시 테이블은 자동으로 삭제됩니다.
컴파일 및 실행
C# 프로그램은 논리적으로 하나의 .cs 파일이며, 물리적으로 여러 코드 블록으로 분할되어 각 블록을 보다 쉽게 이해할 수 있습니다. 프로그램을 컴파일하고 실행하려면 다음 단계를 수행합니다.
Visual Studio에서 C# 프로젝트를 만듭니다. 프로젝트 형식은 템플릿>Visual C#>Windows데스크톱>콘솔 앱(.NET Framework) 에 있는 콘솔이어야 합니다.
파일 Program.cs에서 다음 단계를 사용하여 코드의 시작 줄을 바꿉니다.
표시되는 동일한 순서로 다음 코드 블록을 복사 및 붙여넣기합니다. 데이터베이스에 연결, T-SQL 생성 및 데이터베이스에 전송을 참조하세요.
Main메서드에서 다음 값을 변경합니다.- cb.DataSource
- cb.UserID
- cb.Password
- cb.InitialCatalog
System.Data.dll 어셈블리가 참조되는지 확인합니다. 확인하려면 솔루션 탐색기 창에서 참조 노드를 확장합니다.
Visual Studio의 프로그램을 빌드 및 실행하려면 시작 단추를 선택합니다. 보고서 출력이 프로그램 창에 표시됩니다. GUID 값은 테스트 실행 간에 달라질 수 있습니다.
=================================
T-SQL to 2 - Create-Tables...
-1 = rows affected.

=================================
T-SQL to 3 - Inserts...
8 = rows affected.

=================================
T-SQL to 4 - Update-Join...
2 = rows affected.

=================================
T-SQL to 5 - Delete-Join...
2 = rows affected.

=================================
Now, SelectEmployees (6)...
8ddeb8f5-9584-4afe-b7ef-d6bdca02bd35 , Alison , 20 , acct , Accounting
9ce11981-e674-42f7-928b-6cc004079b03 , Barbara , 17 , hres , Human Resources
315f5230-ec94-4edd-9b1c-dd45fbb61ee7 , Carol , 22 , acct , Accounting
fcf4840a-8be3-43f7-a319-52304bf0f48d , Elle , 15 , NULL , NULL
View the report output here, then press any key to end the program...
ADO.NET을 사용하여 SQL Database에 연결
using System;
using System.Data.SqlClient;   // System.Data.dll
//using System.Data;           // For:  SqlDbType , ParameterDirection

namespace csharp_db_test
{
    class Program
    {
        static void Main(string[] args)
        {
            try
            {
                var cb = new SqlConnectionStringBuilder();
                cb.DataSource = "your_server.database.windows.net";
                cb.UserID = "your_user";
                cb.Password = "your_password";
                cb.InitialCatalog = "your_database";

                using (var connection = new SqlConnection(cb.ConnectionString))
                {
                    connection.Open();

                    Submit_Tsql_NonQuery(connection, "2 - Create-Tables", Build_2_Tsql_CreateTables());

                    Submit_Tsql_NonQuery(connection, "3 - Inserts", Build_3_Tsql_Inserts());

                    Submit_Tsql_NonQuery(connection, "4 - Update-Join", Build_4_Tsql_UpdateJoin(),
                        "@csharpParmDepartmentName", "Accounting");

                    Submit_Tsql_NonQuery(connection, "5 - Delete-Join", Build_5_Tsql_DeleteJoin(),
                        "@csharpParmDepartmentName", "Legal");

                    Submit_6_Tsql_SelectEmployees(connection);
                }
            }
            catch (SqlException e)
            {
                Console.WriteLine(e.ToString());
            }

            Console.WriteLine("View the report output here, then press any key to end the program...");
            Console.ReadKey();
        }
T-SQL 명령문을 반환하는 메서드
static string Build_2_Tsql_CreateTables()
{
    return @"
        DROP TABLE IF EXISTS tabEmployee;
        DROP TABLE IF EXISTS tabDepartment;  -- Drop parent table last.

        CREATE TABLE tabDepartment
        (
            DepartmentCode  nchar(4)          not null    PRIMARY KEY,
            DepartmentName  nvarchar(128)     not null
        );

        CREATE TABLE tabEmployee
        (
            EmployeeGuid    uniqueIdentifier  not null  default NewId()    PRIMARY KEY,
            EmployeeName    nvarchar(128)     not null,
            EmployeeLevel   int               not null,
            DepartmentCode  nchar(4)              null
            REFERENCES tabDepartment (DepartmentCode)  -- (REFERENCES would be disallowed on temporary tables.)
        );
    ";
}

static string Build_3_Tsql_Inserts()
{
    return @"
        -- The company has these departments.
        INSERT INTO tabDepartment (DepartmentCode, DepartmentName)
        VALUES
            ('acct', 'Accounting'),
            ('hres', 'Human Resources'),
            ('legl', 'Legal');

        -- The company has these employees, each in one department.
        INSERT INTO tabEmployee (EmployeeName, EmployeeLevel, DepartmentCode)
        VALUES
            ('Alison'  , 19, 'acct'),
            ('Barbara' , 17, 'hres'),
            ('Carol'   , 21, 'acct'),
            ('Deborah' , 24, 'legl'),
            ('Elle'    , 15, null);
    ";
}

static string Build_4_Tsql_UpdateJoin()
{
    return @"
        DECLARE @DName1  nvarchar(128) = @csharpParmDepartmentName;  --'Accounting';

        -- Promote everyone in one department (see @parm...).
        UPDATE empl
        SET
            empl.EmployeeLevel += 1
        FROM
            tabEmployee   as empl
        INNER JOIN
            tabDepartment as dept ON dept.DepartmentCode = empl.DepartmentCode
        WHERE
            dept.DepartmentName = @DName1;
    ";
}

static string Build_5_Tsql_DeleteJoin()
{
    return @"
        DECLARE @DName2  nvarchar(128);
        SET @DName2 = @csharpParmDepartmentName;  --'Legal';

        -- Right size the Legal department.
        DELETE empl
        FROM
            tabEmployee   as empl
        INNER JOIN
            tabDepartment as dept ON dept.DepartmentCode = empl.DepartmentCode
        WHERE
            dept.DepartmentName = @DName2

        -- Disband the Legal department.
        DELETE tabDepartment
            WHERE DepartmentName = @DName2;
    ";
}

static string Build_6_Tsql_SelectEmployees()
{
    return @"
        -- Look at all the final Employees.
        SELECT
            empl.EmployeeGuid,
            empl.EmployeeName,
            empl.EmployeeLevel,
            empl.DepartmentCode,
            dept.DepartmentName
        FROM
            tabEmployee   as empl
        LEFT OUTER JOIN
            tabDepartment as dept ON dept.DepartmentCode = empl.DepartmentCode
        ORDER BY
            EmployeeName;
    ";
}
T-SQL을 데이터베이스에 제출
static void Submit_6_Tsql_SelectEmployees(SqlConnection connection)
{
    Console.WriteLine();
    Console.WriteLine("=================================");
    Console.WriteLine("Now, SelectEmployees (6)...");

    string tsql = Build_6_Tsql_SelectEmployees();

    using (var command = new SqlCommand(tsql, connection))
    {
        using (SqlDataReader reader = command.ExecuteReader())
        {
            while (reader.Read())
            {
                Console.WriteLine("{0} , {1} , {2} , {3} , {4}",
                    reader.GetGuid(0),
                    reader.GetString(1),
                    reader.GetInt32(2),
                    (reader.IsDBNull(3)) ? "NULL" : reader.GetString(3),
                    (reader.IsDBNull(4)) ? "NULL" : reader.GetString(4));
            }
        }
    }
}

static void Submit_Tsql_NonQuery(
    SqlConnection connection,
    string tsqlPurpose,
    string tsqlSourceCode,
    string parameterName = null,
    string parameterValue = null
    )
{
    Console.WriteLine();
    Console.WriteLine("=================================");
    Console.WriteLine("T-SQL to {0}...", tsqlPurpose);

    using (var command = new SqlCommand(tsqlSourceCode, connection))
    {
        if (parameterName != null)
        {
            command.Parameters.AddWithValue(  // Or, use SqlParameter class.
                parameterName,
                parameterValue);
        }
        int rowsAffected = command.ExecuteNonQuery();
        Console.WriteLine(rowsAffected + " = rows affected.");
    }
}
} // EndOfClass
}
팁
SQL 쿼리 작성에 대해 자세한 내용을 위해 자습서: Transact-SQL 문 작성을 방문하세요.
관련 콘텐츠
- Azure Database 무료 체험하기(미리 보기)
- Azure SQL 데이터베이스의 새로운 기능
- 콘텐츠 참조 구성 및 관리 - Azure SQL 데이터베이스
- Azure SQL Database 비용 계획 및 관리
다음 단계
데이터 마이그레이션에 대해 자세히 알아보려면 다음 자습서로 이동합니다.
피드백
출시 예정: 2024년 내내 콘텐츠에 대한 피드백 메커니즘으로 GitHub 문제를 단계적으로 폐지하고 이를 새로운 피드백 시스템으로 바꿀 예정입니다. 자세한 내용은 다음을 참조하세요. https://aka.ms/ContentUserFeedback
다음에 대한 사용자 의견 제출 및 보기