적용 대상: ✔️ Linux VM ✔️ 유연한 확장 집합
이 문서에서는 Azure 포털을 통해 신규 및 기존 디스크를 Linux 가상 머신에 연결하는 방법을 보여줍니다. 또한 Azure Portal에서 Windows VM에 데이터 디스크를 연결할 수도 있습니다.
적용 대상: ✔️ Linux VM ✔️ 유연한 확장 집합
이 문서에서는 Azure 포털을 통해 신규 및 기존 디스크를 Linux 가상 머신에 연결하는 방법을 보여줍니다. 또한 Azure Portal에서 Windows VM에 데이터 디스크를 연결할 수도 있습니다.
VM에 디스크를 연결하기 전에 다음 팁을 검토합니다.
가상 머신의 크기로 연결할 수 있는 디스크 개수가 제어됩니다. 자세한 내용은 가상 머신의 크기를 참조하세요.
다음 단계를 수행합니다.
Azure Portal로 이동하여 VM을 찾습니다. 가상 머신을 검색하여 선택합니다.
목록에서 디스크를 연결하려는 VM을 선택합니다.
가상 머신 페이지의 설정에서 디스크를 선택합니다.
다음 단계를 수행합니다.
디스크 창의 데이터 디스크에서 새 디스크 만들기 및 연결을 선택합니다.
관리되는 디스크에 대한 이름을 입력합니다. 기본 설정을 검토하고 필요에 따라 스토리지 유형, 크기(GiB), 암호화 및 호스트 캐싱을 업데이트합니다.

완료되면 페이지 맨 위에 있는 저장을 선택하여 관리 디스크를 만들고 VM 구성을 업데이트합니다.
다음 단계를 수행합니다.
디스크 창의 데이터 디스크에서 기존 디스크 연결을 선택합니다.
디스크 이름 드롭다운 메뉴를 선택하고 사용 가능한 관리 디스크 목록에서 디스크를 선택합니다.
저장을 선택하여 기존 관리 디스크를 연결하고 VM 구성을 업데이트합니다.
Linux VM에서 사용할 수 있도록 새 디스크를 분할, 포맷 및 탑재하려면 VM에 SSH합니다. 자세한 내용은 Azure에서 Linux와 함께 SSH를 사용하는 방법을 참조하세요. 다음 예제에서는 azureuser를 사용자 이름으로 하는 공용 IP 주소 10.123.123.25를 사용하여 VM에 연결합니다.
ssh azureuser@10.123.123.25
VM에 연결되면 디스크를 찾아야 합니다. 이 예제에서는 lsblk을 사용하여 디스크를 나열합니다.
lsblk -o NAME,HCTL,SIZE,MOUNTPOINT | grep -i "sd"
The output is similar to the following example:
sda     0:0:0:0      30G
├─sda1             29.9G /
├─sda14               4M
└─sda15             106M /boot/efi
sdb     1:0:1:0      14G
└─sdb1               14G /mnt
sdc     3:0:0:0       4G
In this example, the disk that was added was sdc. It's a LUN 0 and is 4GB.
For a more complex example, here's what multiple data disks look like in the portal:
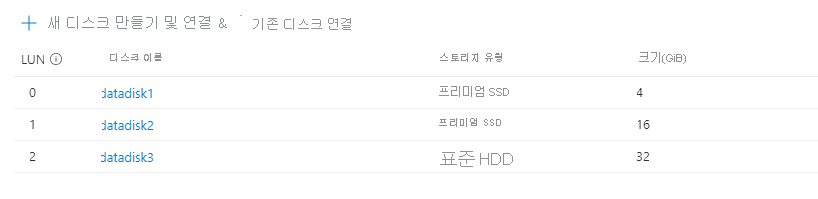
In the image, you can see that there are 3 data disks: 4 GB on LUN 0, 16GB at LUN 1, and 32G at LUN 2.
Here's what that might look like using lsblk:
sda     0:0:0:0      30G
├─sda1             29.9G /
├─sda14               4M
└─sda15             106M /boot/efi
sdb     1:0:1:0      14G
└─sdb1               14G /mnt
sdc     3:0:0:0       4G
sdd     3:0:0:1      16G
sde     3:0:0:2      32G
From the output of lsblk you can see that the 4GB disk at LUN 0 is sdc, the 16GB disk at LUN 1 is sdd, and the 32G disk at LUN 2 is sde.
Important
If you are using an existing disk that contains data, skip to mounting the disk. The following instructions will delete data on the disk.
If you're attaching a new disk, you need to partition the disk.
The parted utility can be used to partition and to format a data disk.
parted that is available for your distro.The following example uses parted on /dev/sdc, which is where the first data disk will typically be on most VMs. Replace sdc with the correct option for your disk. We're also formatting it using the XFS filesystem.
sudo parted /dev/sdc --script mklabel gpt mkpart xfspart xfs 0% 100%
sudo mkfs.xfs /dev/sdc1
sudo partprobe /dev/sdc1
Use the partprobe utility to make sure the kernel is aware of the new partition and filesystem. Failure to use partprobe can cause the blkid or lslbk commands to not return the UUID for the new filesystem immediately.
Create a directory to mount the file system using mkdir. The following example creates a directory at /datadrive:
sudo mkdir /datadrive
Use mount to then mount the filesystem. The following example mounts the /dev/sdc1 partition to the /datadrive mount point:
sudo mount /dev/sdc1 /datadrive
To ensure that the drive is remounted automatically after a reboot, it must be added to the /etc/fstab file. It's also highly recommended that the UUID (Universally Unique Identifier) is used in /etc/fstab to refer to the drive rather than just the device name (such as, /dev/sdc1). If the OS detects a disk error during boot, using the UUID avoids the incorrect disk being mounted to a given location. Remaining data disks would then be assigned those same device IDs. To find the UUID of the new drive, use the blkid utility:
sudo blkid
The output looks similar to the following example:
/dev/sda1: LABEL="cloudimg-rootfs" UUID="11111111-1b1b-1c1c-1d1d-1e1e1e1e1e1e" TYPE="ext4" PARTUUID="1a1b1c1d-11aa-1234-1a1a1a1a1a1a"
/dev/sda15: LABEL="UEFI" UUID="BCD7-96A6" TYPE="vfat" PARTUUID="1e1g1cg1h-11aa-1234-1u1u1a1a1u1u"
/dev/sdb1: UUID="22222222-2b2b-2c2c-2d2d-2e2e2e2e2e2e" TYPE="ext4" TYPE="ext4" PARTUUID="1a2b3c4d-01"
/dev/sda14: PARTUUID="2e2g2cg2h-11aa-1234-1u1u1a1a1u1u"
/dev/sdc1: UUID="33333333-3b3b-3c3c-3d3d-3e3e3e3e3e3e" TYPE="xfs" PARTLABEL="xfspart" PARTUUID="c1c2c3c4-1234-cdef-asdf3456ghjk"
Note
Improperly editing the /etc/fstab file could result in an unbootable system. If unsure, refer to the distribution's documentation for information on how to properly edit this file. You should create a backup of the /etc/fstab file is created before editing.
Next, open the /etc/fstab file in a text editor. Add a line to the end of the file, using the UUID value for the /dev/sdc1 device that was created in the previous steps, and the mountpoint of /datadrive. Using the example from this article, the new line would look like the following:
UUID=33333333-3b3b-3c3c-3d3d-3e3e3e3e3e3e /datadrive xfs defaults,nofail 1 2
When you're done editing the file, save and close the editor.
Note
Later removing a data disk without editing fstab could cause the VM to fail to boot. Most distributions provide either the nofail and/or nobootwait fstab options. These options allow a system to boot even if the disk fails to mount at boot time. Consult your distribution's documentation for more information on these parameters.
The nofail option ensures that the VM starts even if the filesystem is corrupt or the disk does not exist at boot time. Without this option, you may encounter behavior as described in Cannot SSH to Linux VM due to FSTAB errors
이제 lsblk를 다시 사용하여 디스크 및 탑재 지점을 확인할 수 있습니다.
lsblk -o NAME,HCTL,SIZE,MOUNTPOINT | grep -i "sd"
출력은 다음과 비슷할 것입니다.
sda     0:0:0:0      30G
├─sda1             29.9G /
├─sda14               4M
└─sda15             106M /boot/efi
sdb     1:0:1:0      14G
└─sdb1               14G /mnt
sdc     3:0:0:0       4G
└─sdc1                4G /datadrive
이제 sdc가 /datadrive에 탑재되었음을 확인할 수 있습니다.
일부 Linux 커널은 디스크에서 사용되지 않은 블록을 버릴 수 있도록 TRIM/UNMAP 작업을 지원합니다. 이 기능은 Azure에 삭제된 페이지가 더 이상 유효하지 않으며 폐기될 수 있음을 알리는 데 주로 유용합니다. 이 기능은 관리되지 않는 표준 디스크 및 디스크 스냅샷과 같이 사용된 스토리지의 양에 따라 청구되는 디스크의 비용을 절감할 수 있습니다.
Linux VM에서 TRIM 지원을 사용하는 두 가지 방법이 있습니다. 평소와 같이 권장되는 방법에 대해 배포에 확인하세요.
/etc/fstab에 discard 탑재 옵션을 사용합니다. 예:
```config
UUID=33333333-3b3b-3c3c-3d3d-3e3e3e3e3e3e   /datadrive   xfs   defaults,discard   1   2
```
경우에 따라 discard 옵션을 사용하면 성능이 저하될 수 있습니다. 또는 fstrim 명령을 명령줄에서 수동으로 실행하거나, 또는 정기적으로 실행하기 위해 crontab에 추가할 수 있습니다.
Ubuntu
sudo apt-get install util-linux
sudo fstrim /datadrive
RHEL
sudo yum install util-linux
sudo fstrim /datadrive
SUSE
sudo zypper install util-linux
sudo fstrim /datadrive
출시 예정: 2024년 내내 콘텐츠에 대한 피드백 메커니즘으로 GitHub 문제를 단계적으로 폐지하고 이를 새로운 피드백 시스템으로 바꿀 예정입니다. 자세한 내용은 다음을 참조하세요. https://aka.ms/ContentUserFeedback
다음에 대한 사용자 의견 제출 및 보기